This information will help you easily learn how to measure your figure. In special tables you can find your size of outerwear, trousers, skirts and jeans in all generally accepted classifications.
Every woman simply must know the parameters of her figure. When ordering clothes from the Internet or visiting a store, this knowledge will become a real lifesaver. Moreover, taking measurements will not take much time, and while shopping it will help you focus not on the waist circumference or sleeve length, but on the color of the new thing and its design.
Measuring your body parameters is easy
Four simple rules will help you take measurements correctly
- Take measurements in thin clothing that does not distort your figure.
- The centimeter should fit well to the body, but not be too tight or loose.
- To make the measurement easier, you can ask another person for help.
- You need to stand straight and relax as much as possible.
Basic measurements can be as follows:
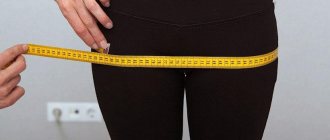
The waist circumference should be measured at the narrowest part (located between the ilia and lower ribs), the arms should be relaxed and lowered. Measurements are taken horizontally, parallel to the floor. Do not pull in your stomach.
The chest circumference is also measured horizontally and parallel to the floor, the centimeter crosses the most protruding points of the chest, the armpits and then the shoulder blades. The measurement is taken while exhaling.
The circumference of the hips is determined by the most protruding place; if the stomach is at the same level, you need to measure along with it. It is better to take several measurements in a row - the largest value is the correct result.
Sleeve length is measured from the intended shoulder seam to the desired length or wrist along the upper edge of the arm.
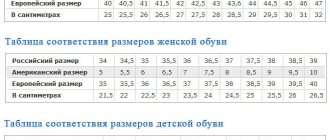
Table of measurements for women's clothing
The table, which gives the average parameters of a typical figure, is actively used by seamstresses to control the measured values, since if there are large deviations from the standard, there is a possibility of incorrect individual measurements being taken. Of course, you cannot rely only on the table below, since each lady’s figure, for example, size 58, 60, is individual. Therefore, it is necessary to take measurements of horizontal, vertical, control and additional parameters of the figure according to GOST and height.
Taking measurements
The horizontal parameter includes neck, chest, hip and shoulder girth. It also includes the girth under and above the chest and waist circumference. It is worth pointing out that the chest is measured to determine the size of the tuck solution and provide an adjacent layer.
Note! The vertical parameter includes measuring the length of the front and back of the product to the waist, the location of the hip line, chest height and the entire length of the product.
The control parameter includes measuring the distance between the waist and hips, and the additional parameter includes shoulder height, front and back width, shoulder girth and total sleeve length of women's outerwear.
Table of female figure measurements for constructing patterns for women's outerwear
Table 1. Dresses, skirts, sweaters, etc.
| Waist circumference | Hip girth | Bust | Sleeve length | Russian size | International size | USA | Europe | Italy | England | Japan |
| 58 | 82 | 76 | 58 – 60 | 38 | XXS | 0 | 32 | 36/0 | 4/30 | 3 |
| 62 | 86 | 80 | 59 – 61 | 40 | XS | 2 | 34 | 38/I | 6/32 | 5 |
| 66 | 92 | 84 | 59 – 61 | 42 | S | 4 | 36 | 40/II | 8/34 | 7 |
| 70 | 96 | 88 | 60 – 62 | 44 | M | 6 | 38 | 42/III | 10/36 | 9 |
| 74 | 100 | 92 | 60 – 62 | 46 | M | 8 | 40 | 44/IV | 12/38 | 11 |
| 78 | 104 | 96 | 60 – 62 | 48 | L | 10 | 42 | 46/V | 14/40 | 13 |
| 82 | 108 | 100 | 61 – 63 | 50 | L | 12 | 44 | 48/VI | 16/42 | 15 |
| 86 | 112 | 104 | 61 – 63 | 52 | XL | 14 | 46 | 50/VII | 18/44 | 17 |
| 90 | 116 | 108 | 61 – 63 | 54 | XXL | 16 | 48 | 52/VIII | 20/46 | 19 |
| 94 | 120 | 112 | 61 – 63 | 56 | XXL | 18 | 50 | 54/IX | 22/48 | 21 |
| 98 | 124 | 116 | 62 – 64 | 58 | XXXL | 20 | 52 | 56/X | 24/50 | 23 |
| 100 | 128 | 120 | 62 – 64 | 60 | 4XL | 22 | 54 | 58/XI | 26/52 | 25 |
| 104 | 132 | 124 | 62,5 – 65 | 62 | 4XL | 24 | 56 | 60/XII | 28/54 | 27 |
| 108 | 136 | 128 | 62,5 – 65 | 64 | 4XL | 26 | 58 | 62/XIII | 30/56 | 29 |
| 112 | 140 | 132 | 62,5 – 65 | 66 | 5XL | 28 | 60 | 64/XIV | 32/58 | 31 |
| 116 | 144 | 136 | 62,5 – 65 | 68 | 5XL | 30 | 62 | 66/XV | 34/60 | 33 |
| 120 | 148 | 140 | 62,5 – 65 | 70 | 5XL | 32 | 64 | 68/XVI | 36/62 | 35 |
Basic Rules
First of all, we would like to draw your attention to the fact that not all measurements can be taken alone. An assistant is needed to measure the back and sleeves. Here are a few more rules that must be followed to take accurate measurements:
- Wear the exact underwear (or the same type of underwear) that you will wear with the finished product. Adding volume to a bra or tights will make a big difference to your figure!
- Tie a ribbon or braid around your waist.
- Take a natural pose. Lower your arms down, don't bend your legs.
- For greater accuracy, take each measurement several times and compare the results.
- The measuring tape should fit snugly, but not tightly. Try to place it horizontally.
- To find the seventh cervical vertebra, tilt your head very down and feel the first tubercle where the neck meets the torso. Place a mark on your clothing or body.
- Also mark the shoulder point - the place where the arm joins the torso, on clothing or on the body.
Now let's find out how to correctly take each measurement in order to create a pattern for women's clothing. Most magazines or books use the following abbreviations to indicate measurements taken: the first capital letter for the type of measurement, small letters for the place where the measurement was taken. So, the letter “B” stands for height, “D” for length, “O” for girth, and “W” for width.
Let's start with the length and height measurements, and the very first of them is the Total length of the product or “Di”
. In order to measure it correctly, you first need to decide how long your model should be. Then apply the edge of the centimeter to a point on the back at the base of the neck (7th cervical vertebra, hereinafter in the text “point 7”) and lower it along the spine to the waist, and then down to the intended length of the model.
If you are sewing a skirt, start measuring from the waist level to the length of the model, also along the back.
If you are sewing trousers, you will need to take several measurements:
Front length (chipboard)
– start measuring from a point at the waist, then lower the centimeter along the protruding part of the abdomen and continue to the floor.
Side Length (DSB)
– start measuring from a point at the waist, then lower the centimeter along the protruding part of the thigh and continue to the floor.
Back length (Dsz)
– start measuring from a point at the waist, then lower the centimeter along the protruding part of the buttocks and continue to the floor.
Knee Length (Dtk)
– start measuring from the point at the waist, then lower the centimeter to the middle of the knee; to save time, this measurement is recorded in parallel with the DSB measurement.
Step Length (Lw)
– start measuring along the inside of the leg, from the groin and continue to the floor level.
The following measurements will be required for shoulder patterns.
Back length to waist (Dst or Ds)
- start measuring from point 7 and end at the waist line. Make sure that the centimeter lies exactly along the line of the spine and touches the back.
Front length to waist (Dpt or Dp)
- start measuring from a point located at the base of the neck on the shoulder line (then point 1), then lower the centimeter to the protruding point of the chest and continue to the waist line.
Shoulder Length (Dp)
— start measuring from point 1 and end at the starting point of the hand (then point 2).
Sleeve length (Dr)
- start measuring from point 2, move the centimeter along the outside of the hand (towards the little finger) and end at the line of the wrist.
The arm should be slightly bent at the elbow. For ¾ sleeves, end the measurement at elbow level (DRL)
. If the arm is extended and lowered, end the measurement at the level of the beginning of the thumb.
Chest Height (Vg)
- start measuring from point 1 and end at the most protruding point of the chest.
Front shoulder height (Vp or Vpp)
- start measuring from point 2 and end at the most protruding point of the chest.
Back shoulder height oblique (Vpk)
– start measuring from point 2 and end in the middle of the back along the waist line (the junction of the lines of the spine and waist).
Height (depth) of the armhole (Gp or Gpr)
– You will need a long piece of paper about 3cm wide. Hold it under your hands. Start measuring from point 7 and end at the level of the top edge of the tape.
Hips Height (Wb)
– take measurements from the side, starting from the waist line and ending at the hip line.
Seat height (Sun)
– Sit on a hard and level surface. Take measurements from the back, starting from the waistline, and ending at seat level.
Now let's look at the Width measurements.
Back Width (Shs)
– take measurements at the level of the shoulder blades (in the center). Hold the tape measure horizontally and do not place it under your armpits!
Shoulder width (W)
– take measurements between the extreme shoulder points (points 2 on each side). Keep the tape measure horizontal!
Chest Width(W)
or
Center of the chest (CH)
- take measurements between the protruding points of the chest. Keep the tape measure horizontal!
Let's move on to the Circumference or Girth measurements. They are often written and used in half size: Half-Girth and Half-Circle. In abbreviated entries, the combination “By” is then used.
Chest circumference (Og or Og2)
– take the measurement along the protruding points of the chest, the centimeter should fit tightly around the body.
Circumference above the chest and below the chest (Og1 and Og3)
– take the measurement above and below the chest, the centimeter should fit tightly around the body.
Waist Circumference (From)
– take the measurement along the intended waist line, the centimeter should fit tightly around the body.
Hip Circumference (About)
– take measurements at the most protruding points of the buttocks. If you need to take into account the protruding belly, attach a ruler to it vertically and take measurements taking into account this protrusion.
Thigh Circumference (Lunch)
– take the measurement at the widest point of the leg, just below the subgluteal fold.
Leg circumference (HE)
– take the measurement 10-15 cm above the knee.
Knee circumference (approx)
– measure around the knee. For medium-width trousers, the leg should be bent, and for narrow trousers, the leg should be straightened.
Calf circumference (Oi)
– take the measurement in the widest part of the calf muscle
Neck circumference (Osh)
– take the measurement around the base of the neck, in front – above the jugular cavity.
Wrist circumference (Oz)
— measure around the base of the brush.
Shoulder circumference (Op)
- take the measurement around the widest part of the arm (at the top, lowering the arm down).
Table 2. Outerwear: coats, jackets and raincoats
| Waist circumference | Hip girth | Bust | Sleeve length | Russian size | International size | USA | Europe | Italy | England | Japan |
| 58 | 82 | 76 | 58/60 | 38 | XXS | 0 | 32 | 36 | 30 | 3 |
| 62 | 86 | 80 | 59/61 | 40 | XS | 2 | 34 | 38 | 32 | 5 |
| 66 | 92 | 84 | 59/61 | 42 | S | 4 | 36 | 40 | 34 | 7 |
| 70 | 96 | 88 | 60/62 | 44 | M | 6 | 38 | 42 | 36 | 36 |
| 74 | 100 | 92 | 60/62 | 46 | M | 8 | 40 | 44 | 38 | 38 |
| 78 | 104 | 96 | 60/62 | 48 | L | 10 | 42 | 46 | 40 | 40 |
| 82 | 108 | 100 | 61/63 | 50 | L | 12 | 44 | 48 | 42 | 42 |
| 86 | 112 | 104 | 61/63 | 52 | XL | 14 | 46 | 50 | 44 | 44 |
Measurements for underwear
At the moment, as is the case with outerwear, shoulder and waist garments, women's underwear has its own measuring grid or table. It helps determine the standardized fullness of the bra cups.
Underwear Measurement Chart
Naturally, due to a distorted perception of your own figure, you need to know the exact parameters when creating underwear. Therefore, you need to take standard measurements for women using the appropriate recommendations:
- You need to apply the centimeter as close as possible.
- It is better to take an old model of bra and panties as the basis for the product and measurements.
- For measurements to be accurate, they must be taken in a relaxed state. The measuring tape should follow the silhouette. It should not crash or dangle.
- The centimeter should be positioned parallel to the floor.
- It is not recommended to remove indicators from yourself.
Note! To embroider underwear, you need to know the chest and hip girth, waist circumference. You may also need to know the length of the product. As for the fullness of the cup, this is the difference between the chest girth and the volume under it. It is clearly defined in the table.
Taking measurements from finished laundry
Table 3. Pants, trousers and skirts
| Waist circumference | Hip girth | Russian size | International size | USA | Europe | Italy | England | Japan |
| 58 | 82 | 38 | XXS | 0 | 32 | 36/0 | 4/30 | 3 |
| 62 | 86 | 40 | XS | 2 | 34 | 38/I | 6/32 | 5 |
| 66 | 92 | 42 | S | 4 | 36 | 40/II | 8/34 | 7 |
| 70 | 96 | 44 | M | 6 | 38 | 42/III | 10/36 | 9 |
| 74 | 100 | 46 | M | 8 | 40 | 44/IV | 12/38 | 11 |
| 78 | 104 | 48 | L | 10 | 42 | 46/V | 14/40 | 13 |
| 82 | 108 | 50 | L | 12 | 44 | 48/VI | 16/42 | 15 |
| 86 | 112 | 52 | XL | 14 | 46 | 50/VII | 18/44 | 17 |
| 90 | 116 | 54 | XXL | 16 | 48 | 52/VIII | 20/46 | 19 |
| 94 | 120 | 56 | XXL | 18 | 50 | 54/IX | 22/48 | 21 |
| 98 | 124 | 58 | XXXL | 20 | 52 | 56/X | 24/50 | 23 |
| 100 | 128 | 60 | 4XL | 22 | 54 | 58/XI | 26/52 | 25 |
| 104 | 132 | 62 | 4XL | 24 | 56 | 60/XII | 28/54 | 27 |
| 108 | 136 | 64 | 4XL | 26 | 58 | 62/XIII | 30/56 | 29 |
| 112 | 140 | 66 | 5XL | 28 | 60 | 64/XIV | 32/58 | 31 |
| 116 | 144 | 68 | 5XL | 30 | 62 | 66/XV | 34/60 | 33 |
| 120 | 148 | 70 | 5XL | 32 | 64 | 68/XVI | 36/62 | 35 |
How to measure sleeve length on a finished product
However, there is one caveat in taking measurements along the sleeve length. You must independently find exactly the extreme protruding point on the descent of the shoulder, otherwise the variation in parameters and fit can reach several centimeters. This does not look very professional and high quality, especially on shirts and knitwear. If you are in doubt about the chosen point to start measuring, then use a ready-made item and measure the sleeve using it.
Progress of measurements
- Place the product in front of you on a large table or on the floor. Straighten the sleeves and smooth the fabric on them with an iron or simply by running your hands if they are not very wrinkled.
- The length is also measured along the outer edge. Attach the measuring tape to the beginning of the collar (from the neck) and lower it to the end of the cuff (taking that into account as well). This option is usually called shoulder length with sleeves. This method is very convenient for sewing items for yourself, especially for styles with raglan sleeves.
- Write down the result in a notepad.
If you want to find out only the length of the sleeve, then draw a straight line from the armhole line up to the shoulder hem. Start measuring from this point. This measurement will be called sleeve length and is more suitable for set-in options.
Table 4. Jeans
| Waist circumference | Hip circumference (cm) | Waist (inches) | Russian size | International size | USA |
| 58 | 82 | 24 | 38 | XXS | 0 |
| 62 | 86 | 25 | 40 | XS | 0-2 |
| 66 | 92 | 26 | 42 | S | 2 |
| 66 – 70 | 92 – 96 | 27 | 42 – 44 | S/M | 2 – 4 |
| 70 | 96 | 28 | 44 | M | 4 |
| 68 – 74 | 96 – 100 | 29 | 44 – 46 | M | 4 – 6 |
| 74 | 100 | 30 | 46 | M | 6 |
| 74 – 78 | 100 – 104 | 31 | 46 – 48 | M/L | 6 – 8 |
| 78 | 104 | 32 | 48 | L | 8 |
| 78 – 82 | 104 – 108 | 33 | 48 – 50 | L | 8 – 10 |
| 82 | 108 | 34 | 50 | L | 10 |
| 82 – 86 | 108 – 112 | 35 | 50 – 52 | L/XL | 10 – 12 |
| 86 | 112 | 36 | 52 | XL | 12 |
| 90 | 116 | 38 | 54 | XXL | 14 |
| 94 | 120 | 39 | 56 | XXL | 16 |
| 98 | 124 | 40 | 58 | XXXL | 18 |
| 100 | 128 | 41 | 60 | 4XL | 20 |
| 104 | 132 | 42 | 62 | 4XL | 22 |
| 108 | 136 | 43 | 64 | 4XL | 24 |
| 112 | 140 | 44 | 66 | 5XL | 24 |
Tips for taking measurements
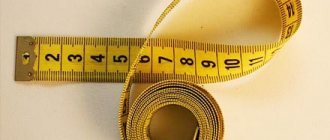
To make the correct measurement, you need to take into account the principles of pattern modeling and purchase available tools for taking measurements. Unlike tailoring, where sewing machines, overlockers, and carpet lockers are used, no special or professional equipment is required to design a drawing and measure body parts. You can get by with the set of tools that every home has: scissors, a ruler, pencil and paper. Yet accurate measurements can only be achieved using a measuring tape. Experienced seamstresses recommend purchasing this small but very useful tool, especially for working with circles.
Before taking measurements for the length of the sleeve, think carefully about whether you will wear something tight under the bottom of the future product with a sleeve. If so, then the underwear can reduce the digital parameters of the sleeve by several centimeters. When creating a jacket, jacket or other outerwear options, what you wear underneath can add volume. These nuances must be taken into account at the stage of taking measurements and when cutting.
When you take measurements, stand straight and do not bend your elbows too much. If you are modeling a product for your own wear, then for convenience and accurate numbers, ask someone to help with the measurements.
In addition to general recommendations on how a sleeve should fit correctly, there are nuances for different items of clothing.
- With clenched fists, the sleeve of outerwear for the winter season (fur coat, coat, sheepskin coat, parka, down jacket) should reach the bones on the hand.
- For lighter, demi-season items, the sleeve length should reach the second protruding phalanx of the thumb.
- Men's and women's items worn under a suit or under a sweater (shirts, blouses, long sleeves) are best purchased and sewn with a sleeve length such that the cuffs or bottom hem seams slightly (1-2 cm) peek out from under the jacket or sweater.
Have you decided to sew yourself? Check out GOST!
Dressing with taste, carefully selecting every element of the wardrobe, being a role model, shocking, attracting admiring glances - all fashionistas dream . But among a large number of things, sometimes even exclusive ones, it is very, very difficult to find “yours.” Especially if you have a non-standard figure. In this case, the ability to sew yourself will be very useful.
And in other cases it won’t hurt - it’s convenient, and it can also become a good hobby, inspire and delight.
If you feel the strength and desire to start sewing at an amateur level, then your reference books should certainly be not only various tutorials on cutting and sewing, but also state standards.
What is it for? GOST, as a technical passport for a washing machine. To wash this or that item, you can run any program, relying only on advice on the Internet, but you need to be prepared for the fact that the result may be disappointing: the item will not wash or the equipment will fail.
To prevent this from happening, it is better to use proven instructions prepared by experts in their field.
And even though after 2011, compliance with GOSTs in the Russian Federation became optional (now they are in the nature of recommendations), there is still a lot of useful information there.
Table of measurements for shoulder and waist products
If the figure is close to standard, then even without taking measurements, you can understand the size using a standard size chart and table. But today it is difficult to find a model whose figure does not have some deviations. Also, the parameters shown in the table below are approximate.
There is a simpler measurement method that is based on studying chest girth and simple mathematics. The resulting girth value is divided in half. This indicator will be the size of future shoulder or waist clothing according to domestic standards. For example, if the chest volume is 80, then the size will be 40. The same applies to other measurements with girth. What values are divisible by two are indicated below.
You might be interested in: Pattern construction and sewing bomber jackets for men and women
Sewing measurements table for women for shoulder and waist items
Formulas for checking the accuracy of measurements taken
It is very difficult for non-professionals to immediately make accurate measurements. However, if mistakes are made, problems may arise when constructing a product drawing. Therefore, there are formulas for checking measurements:
- Sg1=Shg1+Shs+0.36Op ±0.5cm
- Cr2=Shg2+Shs+0.36Op ±0.5cm
- Сг2-Сг1=Шг2-Шг1 ±0.5cm
- Шг2=Шг1+(Сг2-Сг1) ±0.5 cm
Listed above are the basic measurements that are necessary to build basic structures. When modeling the product, additional ones will be needed, for example, the height of the collar stand, the width of the lapel, the height of the yoke, the size of the pocket, etc. They may vary depending on the model.
Measurements for sewing hats
To design a headdress pattern, 3 main measurements are used, which include:
- OG (full head coverage). This measurement is also called the finished product size. To remove it, it is necessary to place the tape around the head so that it runs horizontally, crossing the forehead and touching the edge of the brow ridges in front, and at the back it crosses the most convex part of the back of the head and closes with the beginning of the tape on the side.
Also, when taking this measurement, you should take into account what type of headdress is being designed, since measurements must be taken along the circumference of the head on which the product will be worn. For example, to pattern a hat, the ribbon should be raised in front and lowered at the back, and for a skullcap, raise the horizontal line to the desired level.
- Transverse measurement of the head. When taking this measurement, the tape should run along the highest part of the head, connecting the points above the ears.
- Longitudinal measurement of the head. When taking this measurement, the tape should also pass through the most convex part of the head from front to back. In this case, the extreme measurement points are the points of intersection of the measuring tape with the line along which the full circumference of the head was taken.
The listed parameters are basic, and they will be enough to make standard hats. However, to create special models, additional measurements may be required, which the tailor must determine independently. For example, to sew a beret you also need to know its widest part.
Thus, tables containing the basic parameters for constructing patterns for standard clothing are very valuable because with their help you can sew clothes without even taking the person’s measurements.
Article design: Vladimir the Great
Taking measurements
Regardless of the type of product, measurements for women's size 46 and other sizes must be taken correctly. You can learn how to do this accurately using the following recommendations:
- Volumes must be removed in underwear. Clothes add extra centimeters. This is especially important for putting together a set of bra and panties or dresses with a fitted cut.
- The waist should be tied with a lace or elastic band. This will make it more convenient to take measurements and get the most accurate result.
- Depending on the characteristics of thinking, measurements should be made on the right or left side of the body. For example, it is better for left-handed people to measure their body on the right side and vice versa.
- When taking readings, you must stand straight and not slouch. Any unnecessary movements lead to changes in the final volumes and the addition of new troubles associated with correcting the final product.
It is worth understanding that some measurements are taken and then divided by 2. These are hip, chest, neck, and back girth. This is also your waist size.
You might be interested in: Creating patterns and sewing tops in lingerie style
If volumes have to be calculated for the first time, many craftsmen recommend that novice needlewomen study detailed information from step-by-step tutorials or watch instructional videos on how to take measurements for a woman’s trousers. Try signing up for a master class on how to take measurements for a skirt from famous needlewomen. The easiest way to do this is with ready-made products.
Figure measurement rules
For trousers
To create practical summer or winter trousers, you need to take appropriate measurements of their length, girth of the thinnest part of the torso and buttocks. To make the task of sewing easier, you can cut out old jeans or trousers and create a new product from them.
Measuring your waist to create trousers
Or you can use standard indicators for a standard and full figure. They are presented below.
Typical readings for a standard figure
It is not worth relying entirely on the given tabular measurement data, since each representative of the fair sex is unique and does not have ideal standardized forms. Therefore, it is important to take measurements.
In addition to the indicators presented above, women's measurements of seat height, knee height and knee width are needed. You will also need information about the trouser hem and the overall length of the product.
Typical measurement indicators for representatives of full forms
The first measurement is taken in a sitting position. To do this, the centimeter is brought to the waist and extended to the chair. The second is formed in a standing position. To do this, the centimeter is stretched from the waist to the side seam of the knee.
Note! To take and record the next measurement, you need to wrap the centimeter in a ring at the knee, and the second to last one - at the very bottom.
The length of trousers should be measured in a standing position, starting from the waist and ending at the ankle or below the knees, depending on the product. If you plan to create a narrow trouser product, then the measurement is taken to the bone above the foot. When creating bloomers, the indicator up to the heel is taken.
For a skirt
To sew a skirt, regardless of its structure, material, length and texture, you need to measure the length of the product, waist and hip circumference. To make the task of sewing easier, you can take a finished product, cut it and make the appropriate patterns. If this cannot be done, then measurements must be taken with maximum attention to detail.
Removing indicators for the skirt
You can also simplify the task and use ready-made dimensional grids. Below are two tables with typical volumes for creating a skirt for a representative of sizes sm and xl-xxl.
You may be interested in this Instructions for sewing a pareo with your own hands, as well as creating without sewing
Typical indicators for a girl with size sm
Of course, you cannot completely rely on the readings of tables, for example, on a table of measurements for a dress. Therefore, to correct the data in connection with individual characteristics, it is necessary to write down the distance from the waist to the end of the future product, the volume of the thinnest part of the body without retracting and protruding the abdomen, and the girth of the buttocks. If the product requires it, you can also measure the circumference just above the knees. For example, such a measurement is done if you need to design patterns for a leather skirt or suit.
Typical indicators for a girl with sizes xl-xxl
Note! It is not uncommon to use additional tables of sewing measurements. For example, when creating a two- or three-tier standing skirt or decorating a product with voluminous details.
Taking measurements for size 44 for women or another size to create women's clothing is not difficult if you follow the above recommendations and look at the measurement table for a typical figure. The main thing is to take all measurements as accurately as possible so that you get women's outerwear, shoulder and waist garments, underwear, trousers and a skirt that fit your figure.
Dress
Each dress model has its own construction features, and therefore it is worth focusing on tips for a specific style.
Hats
To make or knit a headdress, you need several measurements:
- head circumference, a line running along the forehead and back of the head parallel to the floor;
- head circumference 2, centimeter should lie perpendicular to the floor and cover the face from the bottom of the jaw to the top;
- height of the head, the tape is “placed” on the head, runs through the crown and connects the marks of the base of the neck on the sides.
Taking measurements from the head
In conclusion, it should be noted that it is necessary to take measurements from the model before choosing fabric. It is not always possible to do this yourself. For beginners, you can watch several master classes on correct measurement.
Determination of posture type
To create a pattern, in addition to body measurements, it is necessary to determine the customer’s posture.
Posture is a person’s usual body position in a standing position without tension in any muscle groups. It can be normal, kinked and stooped (Fig. 2)
How to determine the type of posture? There are 3 ways to do this: