There has been a case in every person's life when his hat irrevocably lost its shape after washing or under the influence of high temperatures. The question arises as to whether it is possible to return your favorite item to its original appearance or whether it will have to be thrown away.
Before performing any actions with a stretched item, you need to determine what material it is made of:
- wool;
- synthetics;
- knitwear
A label inside the headdress will tell you what material the hat is made of. It also contains information about all the washing features that must be observed so as not to lose the item.
How to return to original form
If your hat stretches during washing, you need to soberly assess its condition. In order to revive a headdress, you need several components that are available in every home:
- three-liter iron basin;
- water heated to 60 degrees;
- washing powder;
- washing gel;
- laundry soap;
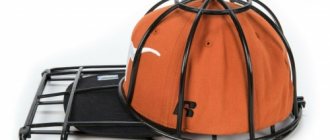
- mold retainer.
If there is no water thermometer in the house, you need to remember that at 50-60 degrees it is impossible to put your hand in the water for a long time.
First, put the stretched wool hat in a basin and fill it with hot water for half an hour. You can add a little gel for washing woolen items. After 30 minutes, the hat should be washed gently by hand; it is strictly forbidden to twist, wrinkle or squeeze it.
If the cap is not stretched very critically, then you should fill it with cold, almost ice-cold water and leave it to lie for about twenty minutes. The whole secret is that hot water compresses the fibers, and cold water fixes the result.
Drying of the product is carried out only on a fixing form, for example, on a balloon, ball or bottle. If such items are not at hand, then you need to lay a rubberized oilcloth with a towel on the table and lay the hat evenly on it. This needs to be done after the item has flowed around a little.
You should never dry a hat by hanging it on a clothesline, as the shape will be lost forever.
The hat stretched after washing - what to do?
There has been a case in every person's life when his hat irrevocably lost its shape after washing or under the influence of high temperatures. The question arises as to whether it is possible to return your favorite item to its original appearance or whether it will have to be thrown away.
Before performing any actions with a stretched item, you need to determine what material it is made of:
- wool;
- synthetics;
- knitwear
A label inside the headdress will tell you what material the hat is made of. It also contains information about all the washing features that must be observed so as not to lose the item.
Important Details
If a hat has stretched after washing, then in the process of resuscitating it it is necessary to observe certain conditions:
- the above method, which returns things to their previous appearance, is suitable only for products made from natural fibers;
- things made of acrylic cannot be immersed in hot water, because they will turn into a matted lump;
- It is strictly prohibited to use a washing machine with a 60-degree wash cycle.
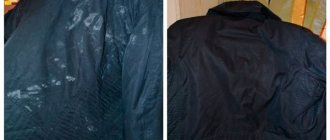
There is a possibility that the hat may not only stretch, but also fade from hot water. To check the product for shedding, you need to turn it inside out, dip one side in hot water, and run a white napkin over it. If the item is subject to shedding, then stains will remain on the napkin. This doesn't mean that a stretched shedding cap can't be saved, you just need to add a tablespoon of vinegar to the water.
What to do if you can’t return your headdress to its original appearance? You can either get rid of the item or take it to the dry cleaner. By the way, not only a wool hat can lose its shape, but also a headdress made of knitwear with a low wool content.
Some models of wool hats can be made smaller by sewing a wide elastic band on them or simply by sewing in the item itself.
Cap material
Before the procedure for returning the shape and volume of the headdress, it is necessary to determine what material was used for its manufacture and what additions or combinations of materials are present in it.
This will help not make the problem worse. Products made mainly from knitwear, wool and some synthetic materials are stretched.
A label sewn on the inside of the hat containing information about the composition of the product, acceptable washing methods, temperature, drying, etc. will help you find out this information.
Often, violation of these recommendations entails loss of the shape of the headdress and unpresentable appearance.
Restoring a cotton hat
If a natural cotton hat has stretched or become deformed, the question arises of how to reduce it to its original size. It is worth clarifying that the shape will return only to a properly sewn item.
Unlike woolen items, cotton ones need to be washed in a washing machine at 60 degrees with a high spin level.
If there is no washing machine in the house, then you will need to immerse the hat in boiling water for five minutes. At the same time, you need to be sure that the product is not subject to shedding. An item can shrink by one size in a short period of time, and if you leave it in boiling water for half an hour, it will become two sizes smaller.
It is worth noting that if it was not possible to return the hat to its original appearance the first time, then you should not make a second attempt. In this case, the headdress will be completely damaged.
Some useful tips
To reduce the size of a woolen hat after it has stretched, not only the implementation of certain actions aimed at this will help, but also the following nuances:
- shrinkage using hot water is effective provided that the composition of the cap contains fibers from natural fabrics;
- acrylic hats may become matted due to temperature exposure;
- A washing machine should not be used to create smaller sizes. This will most likely simply ruin the product;
- It is always worth checking the headdress for color fastness; if there is a possibility of shedding, you need to take action.
The methods listed above for reducing the size of a headdress are the most effective and relatively safe.
Share the article with your friends and don't forget to join us on social networks!
How to properly close (reduce) the loops on a hat, depending on the model
There are two fundamentally different ways to knit these items of clothing:
- On circular knitting needles (the product is seamless).
- On straight knitting needles (it is necessary to sew a seam along the height).
Also, the model of the headdress may imply the need to decrease the loops towards the crown, knitting the fabric using the method of shortened rows, as well as the direction of knitting from top to bottom and bottom to top.
Let's take a closer look at the most popular models and the completion features for each of them.
Easy way
The simplest way can rightly be called the option using a needle and thread. This method is especially relevant for completing work on items knitted in one piece, without decreasing or with minimal decreasing loops towards the crown. The main advantages of such hats are the ease of knitting, the ability to knit on straight knitting needles with subsequent stitching of the fabric in height, as well as a sufficient variety of patterns used.
In order to finish such a thing, you just need to thread a large “gypsy” type thread, which is used to knit a hat, and thread it through the last open loops on the knitting needle. The needle is then pulled out of the knitting and the top is tightened with thread. Its ends are brought out to the wrong side and tied with a knot. The hat can be left as is, or you can attach a pompom to the junction of the loops.
Wedges
For a round hat
When knitting a product with a round crown, the main feature is the decrease of loops: they are decreased at a relatively short distance from the crown by knitting every two loops out of four in the first row of decreases.
Afterwards, several rows are knitted according to the pattern without decreasing, then two loops are decreased per row until 8–10 loops remain on the knitting needles. To complete work on such a thing, you should thread it through the loops using a hook or needle.
On a stocking cap
These models are also called beanie hats. The easiest way to knit them is to knit the fabric using shortened rows on straight knitting needles. With this type of knitting, wedges are formed on the hat. After knitting the required number of these elements, the product is sewn together using a hook along the height, and then the top of the hat is connected with the same hook.
With English rubber band
English rib is a very beautiful pattern, voluminous and suitable for knitting almost all models of knitted hats. You can connect it using the description given in Diagram 1.
Pattern 1 – Knitting an English rib
The main feature of working with fabric from this pattern is the method of closing the loops. In order to do this, you need to switch from English elastic to regular elastic, 1*1 format. This transition is made in the row in which the knit stitch ends up with a double crochet. After this, the loops are reduced and closed in the manner suggested by the model you have chosen.
How to stretch out pants
If shrinkage occurs along the length, then it is not difficult to correct the situation.
- To stretch the trousers, you need to hang a weight on them. The easiest way to do this is to use two trouser hangers with clips.
- Squeeze it lightly so that it does not drip and hang it on the rope by the upper part (where the belt is).
- Soak the item for 15 minutes in cold water.
To increase the length of shrunken trousers, securely fasten the upper part of the product to a rope, and hang a weight from the bottom
If the fabric of woolen trousers becomes shiny during wear, steam the area with an iron through gauze, and then clean with a stiff brush and salt.
Removing various stains
- Wipe sweat stains with a soft cloth soaked in a special solution.
- To prepare it, dissolve a teaspoon of salt and ammonia in two glasses of water.
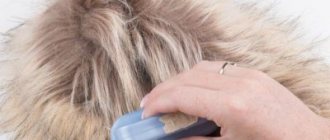
- Wipe grease stains with a cloth soaked in gasoline. Do this in a certain direction: wipe a short-haired product against the lint, and a long-haired product - vice versa. If the stain is old, add a teaspoon of washing powder per liter of water and wipe off the stain. After this, clean with gasoline. Let the headdress dry, and finally comb it with a sparse comb.
- Spray yellow spots on white fur with hydrogen peroxide from a spray bottle, you can add a little ammonia. Place in the sun to dry for a couple of hours.
How to reduce the bulk of a felt hat
Finding the best hat for yourself is not so easy.
Sometimes everything fits perfectly: color, cut, style - and it’s impossible to resist buying. But the size is a little too big - and the entire expected effect from the model comes to nothing.
Unfortunately, it will not be possible to reduce more than a few sizes even in a special workshop, but you can reduce a felt hat the way professionals do it by half a size or a size even at home.
How to make a felt hat smaller at home
First, let's remember the properties of the material - this is dense, high-quality wool that has undergone special processing under production conditions. Take a look at the label: it is clearly not recommended to heat treat it, much less wash it. Even more, in such models it is not recommended to be exposed to any precipitation - snow or rain.
So you won’t be able to shrink a felt hat the way you would with a regular woolen item. By soaking it in warm water and drying it even in the most delicate way, you risk losing the shape of the model forever. You should also forget about the possibility of ironing the model with steam - as a result, you can only spoil the texture of the material.
The material is quite capricious, and instead of a silky and plastic texture after such an operation, you risk getting a texture that is rough to the touch and hard.
You should also forget about the method that works great with knitted hats: hold it over steam and let it dry, giving it the desired shape. The felt from such a procedure stretches perfectly, and you risk getting a completely unexpected and unwanted result.
First of all, the size itself reflects the literal circumference of the head. In different measurement systems it is calculated in inches or centimeters.
But the system is quite simple, for example, the Russian “56” corresponds to the international S. it exactly corresponds to a head circumference of 56 centimeters or 22 inches.
In English or American standards, this is size 7, but the difference or step is easiest to calculate in centimeters.
So, we will need: matching threads, a needle and a tailor's seam ripper - you can buy it at any craft store.
You will also need a foam rubber strip, no more than 0.5-0.7 centimeters wide, and no more than 60 centimeters long.
Instead of foam rubber, you can take any light and plastic material, for example, roll a piece of wool into a rope, giving it the desired shape. But as practice shows, foam rubber is more convenient.
Then carefully manually restore the ripped seam - this is what you will need for thread and a needle. A blind or “back needle” stitch with a minimal stitch pitch will not leave a mark on the outer surface of the model.
Do not use an iron under any circumstances. This is the way to reduce a hat by size, suitable for both models with narrow and wide brims.
Quite often the question arises: “how to reduce the volume of a hat?” Not only the size, but also the crown, and sometimes the brim. It is their dimensions that influence not only the correct “fit” but also the overall impression. As you know, the width of the brim and the height of the crown are a matter of personal choice.
Thoroughly moisten the towel with a spray bottle, fold the towel so that it takes on any soft and round shape. Place a hat on it and smooth it out with your hands. Leave to dry at room temperature. At this stage, you can make an elegant longitudinal “dent” (as in men’s models) - just form it with the edge of your palm.
Too wide brims don't suit many people. But there is an opportunity to correct this shortcoming. Moreover, a material such as felt does not require additional processing of the edge - it does not crumble and clearly holds its given shape. Using chalk and a piece of soap with a sharp edge, trace the circle of the margins to the desired size. Sharp tailor's scissors and even a good knife (or a utility knife) will cut the edge just fine.
Reducing the size of a wool hat
After the garment has stretched, hot water and washing powder will help return it to its previous condition.
The procedure will be as follows:
- Hot water (60-70 degrees) is poured into the container and the hat is placed in it for half an hour. If you have a special product for woolen fabrics, you can add a small amount of it;
- After half an hour, the water in the container will cool down and at this stage the product should be washed. There is no need to rub or squeeze too hard, twisting the product (you can read about proper washing of wool products);
- after washing, you need to change the water in the container and, unlike the first time, it should be cold;
- the item placed in cold water is left there for 15-20 minutes;
- This is followed by thorough rinsing and proper drying.
The effectiveness of this process is explained by the fact that hot water provokes compression of the fibers, which gives a certain shrinkage to the product, while cold water fixes and consolidates this result.
To achieve shrinkage, it is not advisable to wash a stretched hat. A reduction in size, of course, will be achieved, however, this may not happen uniformly, which will change both the shape of the hat and the quality of the wool, not for the better.
How to wash a hat so that it shrinks
Hats that have lost their original appearance can be restored by washing and drying them, following the manufacturer's recommendations. You need to clarify the composition, and then familiarize yourself with the rules of care. When washing, you should use only those products that are used for delicate fabrics and woolen items. The temperature regime must be observed, and the water after rinsing must drain on its own; twisting must be completely avoided.
Attention! If the label indicates that machine washing is allowed, you need to put the hat in a special bag and set it to a delicate cycle. It should be dried on a terry towel.
Will dry cleaning help correct the situation?
A shrunk item can be dry-cleaned. Professionals are armed with specialized compounds that they use to treat wool to make it softer.
Drying is carried out on steam mannequins, which evenly expand the clothes to the desired size.
The cost of the work depends on its complexity. They can stretch a hat for 150-200 rubles, and a dress for 400-800 rubles. You need to check the price on the spot.
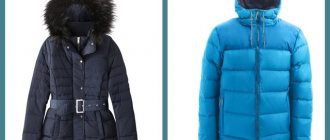
How to make a woman's jacket smaller?
Today I will tell you how to reduce the size of a women's jacket.
Many of you probably have a couple of jackets hanging in your wardrobe, slightly out of fashion, but still very decent. I understand that you may be sorry to part with them, so I will tell you about one way to adjust the jacket to your figure and fashion :).
So, if the jacket is too big, how to alter it?
First, we rip off the shoulder pads. If the jacket is lined, you can get under it by opening the side seam of the sleeve of the lining by 20 centimeters. Then we will carefully sew this seam and nothing will be noticeable.
It is advisable to do the following operation together. Ask your mother, sister or friend to help you. It is necessary to install the shoulder pad on the shoulder so that its thick part protrudes approximately 1 cm beyond the shoulder bone. Now your assistant should raise the sleeve cap (that is, the very seam where the sleeve is sewn to the armhole) so that it matches your shoulders. You need to pin the sleeve cap to the shoulder seam and make sure it sits in place. If not, try again and install the shoulder pad again.
Once the new high point of the sleeve cap is found, pin the cap to the front and back of the jacket in several more places, creating a new armhole line. This applies only to the top of the cover; there is no need to pin the sleeve under the arm.
When a new sleeve sewing line has been found, check whether the new shoulder fits you. At the same time, check whether the sleeve is too wide and whether there is excess fabric that can be tucked into the side seam. If desired, you can mark the undercuts along the front and back. On plain fabrics, try to mark the darts with maximum symmetry and accuracy. On colorful or variegated fabrics, small inaccuracies will not be noticeable, but on plain fabrics they will be.
At the same time, decide on the length of the jacket.
Now take off the jacket and mark with chalk on the front side the “sewing” line for the sleeve where it is marked with pins. Take out the pins. Reach inside the jacket and mark with chalk where the sides and sleeves will be sewn under the arms and in the darts.
Open the sleeve from the jacket, noting the highest point of the cap that was sewn to the shoulder seam and the lowest point that was sewn to the side seam. If the sleeve consists of two parts, mark out the guidelines by which you will install it in place.
Trim off excess fabric on the front and back of the jacket along the marked line, leaving a seam allowance. Line up the armhole line, all the way to the armpit. Measure the lengths of the shoulder seams and make sure they are the same. If you were planning to remove the width of the jacket from the side seams, now is the time to do it. Next, the sleeve is sutured, if planned.
Now we insert the sleeve back into the armhole, pin it and make sure that the sleeve cap is slightly larger than the armhole (the excess is placed at the top of the collar). If not, then you need to sew the jacket along the side seam or take it a little into the shoulder seam. We sew in the sleeve. We install the shoulder pad in a new place so that its thick part protrudes slightly beyond the line of sewing the sleeve. If necessary, the shoulder pad should be reduced. This can be done on both the thick and thin sides. We fasten the shoulder pad by hand, basting it to the protruding part of the seam of the sleeve cap.
Now it’s time to stitch the grooves along the marked lines, and also reduce the length.
To be honest, I hate shortening jackets, but I have to :).
Cut the bottom of the jacket along the marked line (leaving a hem allowance of 5-6 cm), pulling the lining up. Turn the jacket inside out through the open sleeve of the lining. Glue the bottom of the jacket with non-woven fabric. Check with the cut piece. Try to completely repeat what was done there. Sew the lining and main fabric with one seam. Secure the seams of the collar and the bottom of the jacket together so that the collar does not straighten out or come out from under the main fabric.
Turn the jacket onto your face, make sure you did everything correctly. Steam the new seams with an iron.
Try on your jacket. If everything is in order, you can sew up the torn sleeve of the lining. We sew either an overlay on a machine, or a blind seam by hand.
- How to decorate a white jacket Today in the article: the idea of decorating a simple white jacket. A white jacket (or any other color too) is of a simple cut or rather boring.
- How to make a blouse smaller? It happens that you have a favorite shirt or blouse in your wardrobe, which, unfortunately, has already gone out of fashion, or has lost its relevance due to more.
A wool jacket that has shrunk - let's stretch it on the carpet
To reliably and safely stretch the jacket without losing its shape, we will use the “grandmother’s” method. It will require a solution of the following ingredients:
- 5 liters of cold water;
- 5 tablespoons of ammonia;
- 1 tablespoon of turpentine;
- 1 tablespoon cologne.
- Soak the affected product for an hour and a half in the solution.
- Rinse in clean water at the same temperature and squeeze a little.
- Baste the jacket to a piece of thick fabric. To do this, spread a cloth on the table - a tablecloth, a sheet folded in 4 layers, a terry towel. Lay the jacket on top of the fabric, stretch it with your hands and begin sewing it along the contour to the fabric below. Make stitches in 2 cm increments. While sewing, constantly adjust the position of the jacket.
- Stretch the fabric to which the jacket is sewn onto the frame (as indicated in the original recipe). In modern realities, you can do it simpler: lay out the fabric with the jacket on a cleaned rug and attach it to it with pins, pulling it tightly. To do this, you will need a helper to hold the fabric taut while you pin it to the carpet.
- Dry your jacket this way.
- this method is absolutely not suitable if there are small children or playful animals in the house;
- count and write down the number of pins used: you should collect the same number later.
Video material
We hope that these methods and recommendations will help you in solving the problem of returning a stretched item to its previous shape. From the video above you can learn how to fix a stretched elastic band on a jacket. You can use our tips for knitted items as well. As you can see, everything is extremely simple and clear. You don’t have to throw away your favorite sweater if it’s stretched out—just follow our advice, and you’ll find a solution to the problem!
If the elastic band on a sweater is stretched, what should you do?