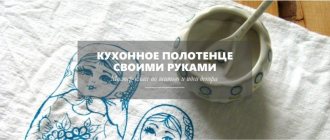
If you want to learn how to quickly and easily sew a turban on your head from a towel, welcome to my master class! It will be a great thing for going to the sauna and bathhouse; you can wrap your head after applying the mask, and just conveniently dry your hair after washing. It is easy to sew, consists of one seam and I don’t need a pattern.
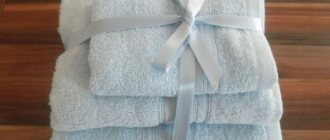
Ready-made head turbans, which are sold in stores, are made from synthetics - microfiber, which does not absorb water, and the hair does not dry afterward. You can make a turban with your own hands from natural cotton fabric, which will be comfortable for your hair and head.
How to sew a turban on your head from a towel step by step
1. Take a towel. It’s good if you have it double-sided - terry on both sides, without the front and back sides
2. I rip out the seams of the hem
3. I cut the towel on the bias
4. I place the resulting two turban parts on top of each other, cut off the upper corner
5. I sew a straight stitch along the edge using a sewing machine. Then I overlock the edges using an overlocker, maybe with a zigzag stitch.
6. I cut off the bottom edge at the seam, making it straight
7. I overlock the lower edges of the turban using an overlocker, using a zigzag stitch. Then I bend it inward by 0.5 cm and sew it on with a sewing machine.
8. I take a piece of cord 9 cm. I burn the edges with matches.
9. Sew a loop on the upper tip of the turban
10. I take a button, it’s better to take a larger one, it will be more convenient to fasten it. I sew it on the bottom of the turban, where it is shown by the arrow in the photo.
You can see how to sew a button correctly here.
A head turban made from a towel for baths and saunas is ready! I am sure that these 10 steps did not seem difficult to you and you can easily repeat my master class.
Friends, all the information presented on my blog is completely free - and I will be very pleased if you share a link to my article (the share buttons are located below ↓).
A terry turban or turban for drying hair is a very convenient thing after water procedures. How do we usually go? With a huge towel wrapped around your head, very heavy, which also constantly tries to unwind? And our view, well, frankly speaking, is not very good. Let's try to sew a turban for drying hair with our own hands from an ordinary terry towel?
A hand-sewn turban for drying hair from a towel is lightweight, dries hair well and does not fall off, as it is securely fixed with a button or elastic band. Yes, and it looks neat and pretty on the head.
The idea of sewing a terry hair turban with your own hands from an ordinary terry towel came to mind when mine, which was once given to me along with a bath set, became worn out, for which I am very grateful to my friends. I really liked the turban for drying my hair; I couldn’t do without it after a shower.
A chapma for drying hair is very convenient not only after a shower or bath, it is for all occasions: when applying masks to the head, instead of an insulating cap, also when applying face masks, so that the hair does not interfere, it is good to tuck it under a turban. But over time, my favorite turban for drying hair became worn out, and at that time I couldn’t find it on sale.
I decided to try to sew a turban for drying my hair with my own hands from terry towels, which are usually plentiful in the household. I figured it out - there doesn’t seem to be anything complicated about it, all you need to do is make one seam.
The hair turban pattern is very simple to make, I did it according to my old one. Although you could search on the Internet, there is now a lot of information on this topic. I have medium-length hair, and my turban for drying my hair fits my size, so I made the pattern based on it. For those who have long hair, it will be enough to simply increase the size of the pattern in length, and if necessary, in width.
I left 1.5 cm for seam allowances. Maybe for some it is not difficult to sew a turban for the head from terry cloth. But for me, sewing a turban from a towel for drying hair is less troublesome, since the border of the towel has already been processed and the entire sewing process will take less time. And old terry towels, which you wouldn’t mind sewing into a turban for drying your hair, will always be available to any housewife.
I overlocked the edges of the product with an overlocker and stitched it on a sewing machine. If you don’t have a machine, it’s easy to sew a turban for drying your hair by hand. You need to overcast the edges of the terry cloth with small stitches, it will take a little longer than using a machine, but it’s worth it. Now you can iron the seams.
All that remains is to sew on the loop and button. A loop can be made from an elastic band and sewn on the narrow end, and a button on the other end of the turban, as shown in the photo. I sewed everything by hand. A turban is put on to dry the hair so that the button is on the back of the head, then the wet hair is wrapped in the turban, twisted on the forehead, and the end is fastened to the button on the back of the head.
Instead of a button with a loop, you can also sew a loop with a hook. You can also sew a rubber loop, stepping back 15-20 cm from the end, then the curled edge of the turban can simply be inserted into the elastic band and the turban will stay well on your head. Well, whoever likes it. My old turban had no loop or button at all, I just wrapped my hair and tied the curled end into a knot.
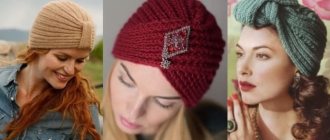
Is there a difference between a turban and a turban?
A turban is often called a turban.
A turban is also a headdress made from a sheet of fabric that is wrapped around the head several times. Such accessories are worn by the peoples of India, North Africa, and Asia.
To make a turban, they take 6-8 meters of fabric, sometimes even 20 meters of brocade, velvet, and cashmere. Mandatory decoration are brooches and strings of pearls.
In India, the cloth was soaked in water and then wrapped around the head to keep it cool all day. This is how they escaped the scorching sun.
Today you can see girls wearing a turban, hiding their heads from the sun or walking around the city in it.
Some fashionistas wrap pieces of fabric in different colors to create a fashionable look.
Indian men still decorate their heads with this intricate design.
A turban is much smaller than a turban.
Initially, only the stronger half wore it, then they adapted it to suit themselves.
There are several ways to create this accessory. Each eastern people has its own way of tying this hat.
How to wrap a turban:
- Take a long strip of material.
- Take one end in your teeth (so that your hands are free), stretch the other diagonally.
- Wrap it around your head at an angle, gradually covering open areas.
- Continue this process until a small tip remains of the fabric.
- Tuck it under the fabric and secure with a brooch.
The next method is from a scarf.
- Take a long one and cover your head.
- Throw one end over the other at the back of your head.
- At the front, tie them on the forehead with a strong knot.
- Next, wrap one end into a loop and pass through a loose knot.
- Thread the other end through the loop, then do not pull too hard on the ends of the scarf.
- Tuck the ends under the structure itself.
- Instead of a knot, you can cross the ends of the scarf on your forehead, make a loop, and pass the other end of the scarf through it to form a second loop.
- Tighten the loops tightly again to prevent the structure from falling apart.
- Hide the ends.
Required materials and tools
The main thing in sewing a children's hat is the choice of high-quality material with spectacular colors.
For one headdress you will need only 25 cm of knitwear and the following accessories:
- sewing threads matching the color;
- tailor's needles with a round eye;
- chalk or pencil for cutting;
- scissors;
- needle;
- sewing machine.
When choosing knitwear, you can pay attention to the following recommendations:
- If you use a simple sewing machine, you should choose denser fabrics. For example, fleece, ribana, footer with lycra or fleece.
- For sewing on a cover machine, you can use thin fabrics (kulirka or interlock).
- For the manufacture of children's products, fabric from unnecessary knitted T-shirts and jumpers is suitable;
History of appearance
A turban is a traditional men's headdress of eastern Muslim peoples and residents of India. In these countries it is customary to wear a turban over a skullcap.
Muslim laws prohibit men from removing their turbans in the presence of strangers. Since ancient times, one could determine one’s position in society and place of residence by the color and material of a headdress.
Over time, the turban entered the women's wardrobe. The beauty of oriental women is perfectly emphasized by a headdress made of expensive fabric and precious stones.
The turban also has practical significance among the peoples of the East and Asia.
It protects your head from the scorching sun and can be tied in such a way as to protect your face from wind and sand.
The turban has appeared in the wardrobe of European fashionistas since the time of the Egyptian campaign.
Fashion is cyclical, so the headdress either appeared or completely disappeared from the scene. Over the past few years, the turban has been actively used by designers and fashionistas around the world, and there is reason to believe that the hat will not lose its relevance for several more seasons.
Rules for taking measurements
A knitted hat for a child is sewn according to 2 main measurements. This is the circumference of the head and the depth (or height) of the product. For a hat with ties that covers the ears, you also need to know the measurements for the side depth of the hat.
The main measurements and measurement technology are given in the following table:
| Measurement name | How to measure |
| Head volume | Place the measuring tape above the ears at the level of the eyebrows, at the back - along the most convex part of the back of the head. |
| Cap depth | Measure the distance up to the forehead from the crown to the point between the eyebrows, back to the base of the skull and along the sides to the edge of the earlobe. |
| Rear Width | Measure the distance from your earlobe to the posterior center line at the base of the skull. |
To create a hat pattern, take any pattern from a sewing magazine as a basis or print out a ready-made pattern. You can also trace the outline of another baby hat and add seam allowances.
The most fashionable styles
The turban itself amazes with its variety of models. A scarf or piece of fabric can be wrapped around your head in many different ways. Every season, fashion trends dictate new rules in choosing a turban. In the new season, the following will be in fashion:
- Strictness of forms. Choose less voluminous, laconic dresses with fewer lines. The favorites of the season are hats and headbands, scarves fade into the background;
- The predominance of European style over Eastern. Simplicity of lines, a minimum of decor, soft noble fabrics - all these are features of a European rather than an oriental style;
Simple version of the product
It is recommended to iron the fabric before cutting. If the knitwear has a pattern, it is necessary to position the pattern so that the objects are placed centrally or symmetrically around the center line.
A knitted hat for a child, the pattern of which can be created in just 10 minutes, can be single-layered or with a lining.
First you need to decide on the size of the hat: measure the volume of your head and choose the desired height of the product.
Next, to create a pattern you need:
- Divide the head circumference measurement by 4 and make a deduction for the stretch of the product (for dense fabrics, subtract 0.5 cm, for thinner and more elastic ones - 1 cm).
- On a sheet of paper, construct a rectangle with the following parameters: the width is equal to a quarter of the circumference of the head, taking into account the necessary deductions, the length is the height of the hat with an increase of 5 cm for the lapel (optional).
- On the left side, move 2.5 cm from the corner to the left, and down ¼ of the height of the cap. Connect the dots to get a dart.
- Round the upper left corner of the rectangle.
- The resulting part is ¼ of the cap.
Knitted hat for a child, a simple pattern.
Preparing fabric for cutting
The length of the fabric cut for the hat depends on how it will be cut:
Sequencing
The main characteristic of knitted fabric is its elasticity. It can stretch in one direction or in two. When cutting products, you should pay attention to the main direction of stretching and place the pattern strictly perpendicular to the direction of the stretching line.
Fashionable decor
When creating an accessory for an evening look, designers come up with a variety of decor for it.
A massive brooch on the forehead can be considered a classic decoration for a turban hat. It can be smooth or strewn with stones.
The decor can also be a scattering of sequins sewn to the fabric, or beads decorating the entire surface of the headdress.
A turban hat decorated with a mesh veil will add piquancy and mystery to its owner. A truly unusual evening accessory.
If you choose a decorated turban for your look, try to use a minimum of other decorations. Moderation is important in the image, and such a hat in itself is already a bright accent that attracts everyone's attention.
Sewing
A knitted hat for a child has a simple pattern that even an inexperienced craftswoman can handle. Sewing a hat takes no more than 30 minutes.
To complete the work you need:
- Place the cut pieces right sides facing each other and pin the edges together with sewing pins.
- Sew the edges on a machine and overcast them with an overlocker or a special machine stitch.
- To ensure even seams, iron the product with an iron.
- Sew the darts in one line. Carefully align the previously stitched seams to create a beautiful intersection of lines on the front side.
- Finish the edges of the dart with an overlocker.
- Sew the bottom of the hat with an overlock stitch and fold it inward by 2-2.5 cm. Pin the hem and sew the edge on a machine, departing 1.5 cm from the fold.
Budenovka pattern
Budenovka is primarily associated with the clothing of the men of the Red Army. This hat can be given as a gift or souvenir with a focus on history for the elderly. Young people use these elements in military style. The pattern can also be used when sewing carnival costumes. There is a hero with whom many children are introduced - Malchish-Kibalchish. As a result, many people are looking for where they can buy such a hat, but they don’t always find it, so there is only one option left - to sew a budenovka with your own hands.
What is it like?
A turban is essentially a piece of fabric wrapped around the head in a special way.
A variety of fabrics are used for it, depending on preferences.
This option is more suitable as an accessory in warm summer weather.
For the convenience of modern Western fashionistas, a hat was invented that visually replicates the shape of a turban. This product is more convenient to put on and take off if necessary. Different fabrics are used to make a turban hat, depending on the seasonality of the model.
There is another lightweight type of such a hat - a bandage that resembles a turban. A simpler option for fashionistas, covering your ears from the wind.
Beanie
To make a hat with a flip at the top of the head, you only need to sew 3 seams. Job completion time: 10 minutes. To cut a hat, you need to place the fabric in front of you and set aside along the stretch line a size equal to the circumference of your head and subtract 4 cm for tension. Measure 55 cm in height and cut out the part.
The nuances of making a beanie hat:
- First you need to fold the rectangle in half, perpendicular to the stretch line, align the side cuts and pin them together with pins.
- Next, lay a straight machine stitch along the edge, leaving a hole (5 cm long) in the seam for subsequent turning of the product.
- The next step allows you to create a curl at the top of the head. To do this, you need to place the stitched part in front of you vertically, take the upper right corner and align it with the lower left corner of the rectangle. Then take the top left corner and align it with the bottom right corner.
- The bottom cut produces 4 layers of fabric. The middle 2 layers need to be moved slightly inward and the 2 outer layers need to be pinned together.
- Next you need to start sewing the chipped sections together using a machine. Having reached the opposite edge, you need to do the following: gradually begin to straighten the folded edges and continue sewing in a circle. As a result, the machine stitch will be laid along the entire lower circumference.
- After stitching, the product must be turned inside out. The hole must be sewn up on the front side with a hidden seam or machine stitched.
Lined
A lined hat is made from a knitted outer material and lining fabric. If you plan to wear a hat with a lapel, then the color of the lining should be chosen so that it is in harmony with the main color of the hat. To sew, you need to create a pattern or use a ready-made printed pattern. A lined hat can have a classic cut, a beanie shape, or a model with triangular ears.
To sew a hat with a lining, you need to do the following:
- Cut out 2 pieces from the main and lining fabric.
- Turn the hat base blank inside out and sew the back seam and darts.
- On the lining piece, sew a back seam and a front dart. Leave the middle undercuts unsewn.
- Place the lining piece into the base blank. The front sides of both parts should be facing each other.
- Sew the bottom edges with an overlock stitch.
- Turn the hat right side out through the hole in the lining. Sew the hole closed with a blind stitch.
Distinctive features
What distinguishes the turban hat from other headdresses is, first of all, its recognizable oriental style. He is responsible for its uniqueness. Many modern fashionable hats vaguely resemble each other. But this is not about a turban hat: having an oriental flavor and an unusual shape, it stands out favorably against the general background.
The second important feature is the variety of varieties: you can wrap a scarf or scarf around your head, or you can put on a ready-made hat or headband.
Why is she chosen?
Celebrities, fashion bloggers and just street fashionistas, they all included a turban hat in their outfits. The secret of popularity is simple: they appreciated the advantages of such a hat:
- Versatility. Combine a turban with any outerwear, or wear it with an evening dress, it will be appropriate in any case;
- Practicality - such a hat will not only decorate your image, but will also hide a bad hairstyle or lack of styling from prying eyes;
- Variety: summer, winter and demi-season models. Wrap up airy scarves, or insulate yourself with a chunky knitted hat - in any case, you will be on trend.
Thanks to the variety of styles, absolutely any girl and woman will choose the right turban for herself. An exquisite oriental headdress will decorate both a young fashionista and an elegant older lady. And finally, a turban hat is simply stylish, beautiful and practical, just what what modern women value in clothing and accessories above all.
Double sided
A knitted hat for a child (the pattern and cutting diagram are presented later in the article) can be sewn from one piece of material and look exactly the same inside and out. Before sewing, you need to create a pattern.
To do this you need:
- Take a sheet folded in half and set aside from the fold an amount equal to ¼ of the length of the head circumference, and at the top measure the length of the cap and build a rectangle from the resulting points.
- From the top, retreat 2.5 cm from the fold line, and down a distance equal to ¼ of the length of the cap. Connect the resulting points and cut the corner along the line.
- On the other side, smoothly round the corner of the rectangle.
The resulting part is a pattern for half of the hat. When cut from the bottom and left, it will have folds.
To cut and sew a hat, you need to do the following:
- Fold the fabric so that the fold lines on the fabric coincide with the fold lines on the pattern, and cut out 1 solid piece of the hat with undercuts and seam allowances.
- Sew the middle undercuts using a machine.
- Fold the piece in half with the right side inward and sew with a continuous stitch in a circle. For turning inside out, leave an unstitched space of 4-5 cm long.
- Turn the hat inside out through the hole left and sew it with a hidden seam.
With ears
Making a model for a baby with ears does not have significant differences in sewing technology. The difference is that the pattern is not rounded, but has corners at the top in the form of ears.
The pattern of 1 half of the hat is a rectangle, the width of which is equal to the half-circumference of the head minus 1.5-2 cm for the tightness of the fit. The length of the rectangle is determined by the height of the header. To do this, you need to measure the distance from the line between the eyebrows to the back of the head and make an increase for the ears and lapel.
To sew a hat you need:
- From a vertical strip of fabric, cut out 1 whole piece of the hat with a fold.
- Cut the workpiece, leaving seam allowances (1 cm).
- Machine sew the side seams and turn the hat right side out.
- Place the hat in front of you, mark a central point on the top edge with chalk and set aside equal pieces of 3-4 cm in length on both sides.
- In the marked places, lay folds 1.5 cm deep, the folds of which should be directed towards the center line.
- Pin the folds with pins and place 2 securing stitches along the top edge in place of the folds.
- Finish the bottom of the product with an overlocker, fold it inward and machine stitch it in a circle at a distance of 1.5-2 cm from the bottom fold.
Another option for obtaining triangular ears is to lay 2 symmetrically located darts in the upper part of the cap.
A little history
In Egypt in the 15th and 16th centuries, the largest and richest turban was worn by the sultan. This headdress made it difficult for him to walk. The viziers had a more modest headband, but they liked to compete and prove that their turban was better than others. If a person wore a turban not according to his status, then he could easily be beaten with sticks.
In the 19th and 20th centuries, the turban became the main headdress. It was worn with evening dresses, for walks, and for meetings. Such an accessory was also loved by well-known actresses such as Barbra Streisand, Bianca Jagger and Ava Garder.
You don't necessarily need to buy a turban. You can make it yourself from a scarf or handkerchief.
However, such a turban can quickly fall apart. If you want a durable and good women's turban, then we present you a master class from experienced craftsmen.
What does a real Budenovka look like?
The budenovka pattern is very simple. Initially, the hat was sewn in the form of a helmet made of cloth with a cotton lining. The cap consisted of 6 spherical triangles; a metal plate of about 2 cm was sewn into the top. An oval-shaped visor and a backplate with long edges were sewn to the cap so that they could be fastened under the chin. A mandatory element of any budenovka was a cloth star. Its color depended on the type of troops. In the winter version of the hat, the size of the star was 10.5 cm, in the lighter version - 8.8 cm. The star was the location for attaching the badge - the cockade.
As you can see in the photo, the winter budenovka was made of felt and had a quilted insulated inner layer. With minor changes, the budenovka served in the Red Army wars until the introduction of new uniforms with shoulder straps. The last photo of a fighter in Budenovka dates back to 1943.