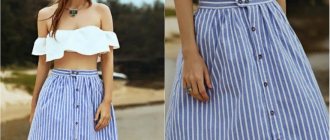
The famous fashion designer Christian Dior always argued that Any figure can be made attractive with the right skirt style. If a fashion boutique does not live up to expectations, then you should try to sew the product yourself.
A universal option is a tight-fitting and tapered pencil skirt. The pattern for beginners is so simple that even a girl who does not have a special sewing education can handle sewing.
How to choose the right fabric
It's no secret that a pencil skirt suits both slender and plump girls. When choosing fabric, it is necessary to take into account not only the shape of the figure, but also the season in which the item will be worn and its purpose.
Basic Rules:
- You should not buy bulk materials (for example, chiffon, georgette). They do not hold their shape well and require the use of lining fabric.
- For sewing summer and spring outfits, it is better to use knitwear, viscose, linen, and cotton. For winter - gabardine, velvet, tweed, wool.
- Hard fabrics look better on slender hips, and soft textures on full hips.
A pencil skirt is considered an office option, so it is recommended to choose either plain options or a strict checkered one.
The versatile black and white color can be combined with any top.
However, if the product is sewn from bright fabric, complemented, for example, with an asymmetrical frill, then it can look great in a festive look .
On a note ! In summer weekend outfits, it is better to exclude monotony and give preference to interesting colors. For the winter, you can sew a stylish leather skirt, complementing it with a fur vest.
Material selection
Almost any material is suitable for sewing a straight skirt. But there are still certain recommendations for choosing fabric for a pencil skirt. First of all, there is a relationship with the event to which the product is planned to be worn. The skill of the seamstress is also important.
For a business style, it is preferable to opt for crepe, loden, tweed, jacquard or gabardine. Any suit fabric looks appropriate. A model with a front slit will look especially original. The image will be elegant and strict.
If you plan to wear a skirt every day, then stylists recommend using denim, knitwear, cotton, linen or georgette. The most popular is knitwear. However, do not forget that this material very accurately conveys all the flaws of the figure. Consequently, only those with ideal shapes can afford a knitted pencil skirt. Otherwise, the use of shapewear is mandatory.
For evening events, materials such as velvet, lace, velor, suede, satin, and leather are suitable. The fabrics are quite complex and capricious; they are recommended for more experienced dressmakers. However, the result can amaze with its sophistication and inimitability. A pencil skirt with a slit will add sexuality and mystery to the look.
There are separate recommendations for beginners. They should be followed to avoid troubles during sewing. To achieve an ideal result, you should choose fabrics that:
- light and easy to process;
- do not contain elastane;
- do not crumble when cut;
- do not have a pattern;
- relatively inexpensive.
Based on the above criteria, it is better for novice dressmakers to choose crepe, linen, thick cotton, denim, and suit fabric. Material that contains synthetic additives is also welcome. In addition, such fabrics are easier to work with.
Atlas
Jeans
Crepe
Linen
Tweed
Knitwear
Cotton
Step-by-step instructions for making a pencil skirt pattern for beginners
First of all, you need to really assess your figure and decide on the size: measure the circumference of the waist (WT) and hips (H), the length from the waist to the widest point of the hips (D1), the length of the entire model (D2).
To pattern a pencil skirt, novice seamstresses need to measure the waist, hips and length of the future product.
To get the correct pencil skirt, the pattern for beginners is made on ¼ of the model.
Step by step it will look like this:
- A rectangle with a width of ¼ OB + 4 cm and a length of D2 + 21 cm is constructed on a sheet of Whatman paper.
- The length D1 is laid down from the top point of the rectangle.
- To determine the waist line, you need to divide the OT data by 4 and add 3 cm to the result. The final value is set aside from the upper right corner along the line and put a point T, which is connected on the pattern with a smooth line to D1.
- On the lower part, retreat 6 cm from the corner and place a point H, which is smoothly connected to D1.
The pattern is ready. All that remains is to cut it out and apply it to the fabric.
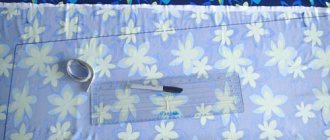
What will you need at work?
To sew a pencil-style skirt with your own hands, you should prepare all the tools that you will need for the work. When they are at hand, you can begin the basic manipulations. Regardless of which model is chosen, you will need:
- matter;
- threads;
- zipper closure of suitable size and shade;
- pins and needles;
- tape measure;
- pencil, as well as chalk or soap;
- iron;
- sewing machine;
- paper on which the skirt pattern will be constructed;
- scissors.
All tools must be selected as responsibly as possible. It is recommended to choose high quality products. When using them, the work will be carried out easily and as quickly as possible. The risk of problems will be reduced to a minimum.
Step-by-step instructions for sewing a skirt
Using the pattern, sewing a pencil skirt will be a simple and quick process even for a novice seamstress. First, you should decide on the size of the material: the width should be equal to half the volume of the hips, taking into account seam allowances, and the length of the cut should be two lengths of the skirt with a small margin for hems.
Then you can do the following:
- Fold the fabric in half (right sides facing each other) along its entire length.
- Place the pattern from one edge of the cut so that the fold of the fabric coincides with the inside of the pattern. Circle it with chalk. Repeat the same on the second edge of the cut.
- Cut out both pieces using tailor's scissors.
- Place the two halves of the blanks right sides together, overcast the seams, and then stitch them on a sewing machine.
- To decorate the belt, the upper part of the skirt should be folded twice 3 cm inwards and stitched with a zigzag stitch. Do the same steps with the lower part of the skirt, only bend it 2 cm.
This tailoring option is suitable for a simple skirt made of elastic fabric for a slender figure.
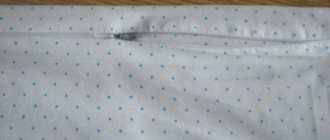
When choosing a thicker fabric, it is recommended to sew a zipper into the side seam.
High waist pencil skirt
In order for a woman with full hips to be able to afford such a style, she should sew a product with a high waist.
To do this, you will have to make some changes to the instructions described above:
- The upper horizontal line of the waist should be raised by 5-7 cm and point T2 should be placed there.
- Point T must be shifted to the left by 0.5 cm.
- Connect points T2, T and D1 with a rounded line.
Attention for beginners! When cutting fabric for a pencil skirt, it is important to deviate 1.5 cm from the pattern for allowances.
Before you finally sew the skirt, you should do a preliminary fitting and adjust the model to your figure . If necessary, you can sew a wide elastic band into the belt or make a zipper on the side. This will allow the skirt to fit better and highlight even fuller hips.
Skirt with one seam
To diversify your wardrobe, you don't have to buy a lot of different styles of clothes. This can be done using pencil skirts alone, sewn according to the same pattern for beginners, but in different ways.
A one-seam product is the simplest option.
So, by correctly laying out the pattern on the fabric, you can make sewing your skirt easier by making it with one seam. To do this, you need to select a cut that is equal in width to the length of the skirt (taking into account the hems at the waist and hem), and the pattern itself should be made not into ¼ of the model, but into half of the model.
In this case, the fabric does not have to be folded in half. Simply lay it out on the table in one layer, face down. Apply it twice along the inside of the fabric and trace the pattern with chalk, while one side line should be common.
All that remains is to cut out the workpiece and the recess formed at the junction of the patterns, indicated by the line T-D1 (or T2-T-D1). This will be the side dart. When sewing the connecting seam, you should sew a zipper into it .
This style has its own variations: you can move the seam from the side back, and so that the dart does not end up in the front center, it can be distributed on both sides, reducing the depth of each dart by half.
Yoke skirt
The product with a yoke looks elegant. It is not so difficult to complete: a simple pencil skirt is taken as a basis (pattern for beginners, described above).
If the element is planned on the front part of the model, then the pattern should be duplicated again on paper, and the required option should be drawn on this copy. Only after this can the material be cut into the required parts.
The yoke can be different in configuration (simple or curly) and in size, but darts (at least partially) will definitely fall into its area . After cutting the pattern, the dart openings are closed on the yoke.
If part of the dart remains on the main fabric, then there is no need to remove it.
A model with a yoke will look great in a high-waisted version. However, in this case, you should not turn up the waist; it is recommended to use non-woven fabric on the inside.
The yoke can also be supplemented with loops that securely secure the belt to the belt. Their length should be equal to the width of the belt + 2 cm for seams.
If you make a model with a frill (flounce), then the junction of the yoke with the main fabric of the skirt is perfect for inserting such an addition. This will help give the product a special charm and hide such figure flaws as the same width of the hips and waist.
Also, with the help of a frill, you can lengthen the product even from thick winter fabric, thereby protecting your knees from the cold.
Required Tools
Before you sew a pencil skirt with your own hands, you should acquire all the necessary tools. Only in this case can you safely begin the creative process. Regardless of the material and model, you must have:
- correctly selected fabric in accordance with your skills in tailoring;
- threads;
- a zipper that matches the color and size;
- needles, pins;
- centimeter;
- pencil, small piece of chalk or soap;
- iron;
- paper for creating a pattern;
- scissors, it is advisable to get two options - with a thin nose for working with small parts and large ones for cutting;
- sewing machine
The choice of tool should be approached with full responsibility. You need to give preference to quality products. Then the technological process will proceed quickly, without complications. Otherwise, the item may be damaged.
How to sew a skirt without a pattern
Not only real craftsmen can sew an outfit “by eye”, that is, without using patterns or patterns. A pencil skirt is an option when even a novice seamstress can easily cope with the task .
The simplest algorithm of actions is as follows:
- First you need to measure the circumference of your hips and decide on the length of the model. The standard length is knee-length or just below the knee.
- Having laid out the fabric in one layer on the table, cut out 2 rectangles, where the base should be equal to half the volume of the hips + 2 cm, and the height should be equal to the length of the skirt + 3 cm.
- Baste both fabrics and put them on for test fitting.
- To determine the curve line from the waist to the hip, it is better to use pins. They usually pin up excess tissue.
- After removing the workpiece, use a chalk to mark a line (along the pins) and then cut off the excess, leaving 1.5 cm for the seams.
- Now you can stitch together the fabrics and sew in a zipper on the side.
- A rectangle is cut out of fabric with a length equal to the circumference of the waist and a width of 4 cm. It should be sewn along the upper part on the inside of the skirt - in this way a belt will be designated.
- The lower part of the skirt just needs to be slightly tucked and stitched.
The entire procedure will take no more than 2 hours, taking into account the lack of skills of a novice seamstress.
A professional, of course, will do it faster.
Preparing for fitting. Fitting
The front and back darts are basted. The side seams and the middle seam of the back panel of the skirt are swept away. The slot is covered completely so that the narrowing along the side seams can be corrected.
It is better to baste a ribbon or an edge strip from the fabric along the upper cut so that the product does not stretch across the waist. Fold the bottom and sew with large stitches before fitting, in order to be able to estimate the actual length of the skirt.
Important! When trying on a sour cream skirt, make adjustments until the fit is perfect. This is easy to do if you put it on wrong side up. All dart openings and seam allowances will be visible and can be easily adjusted to fit directly on the figure.
In addition to narrowing, length, and tight fit, be sure to pay attention to the side seams. They must go strictly vertically.
Have the necessary additions and adjustments been made? It's time to start sewing!
Wrap pencil skirt
Without a pattern, you can make another interesting version of a pencil skirt - a wrap model.
To do this, you need to take a piece of fabric with a length equal to 1.5 times the waist circumference and a width along the length of the future skirt.
Next, perform the following steps:
- Hem the bottom and sides of the fabric rectangle.
- Wrap yourself with a piece of material so that one upper corner of the rectangle falls on the right side of the waist, and the second corner lies on the left side. This way we get the desired shape of the skirt. You can use pins to secure the edges of the canvas.
- Having determined the middle of the back of the skirt, make a cut to the length of the zipper, which you then sew in.
- Separately, cut a rectangle from the fabric (on the bias) with a length around the waist and a width of 3 cm. It must be basted to the skirt (from zipper to zipper), folding the parts with the right side inward.
- Fold the second edge of the belt and stitch it, and turn the belt itself over to the inside of the skirt and secure it there.
Any of the styles described above will be an excellent addition to a woman’s wardrobe. You can combine a pencil skirt with various blouses (both tight and slouchy options), elegant or business jackets and vests.
The product can also be supplemented with patch or sewn pockets, and trimmed with decorative buttons. The main thing is that even the simplest model can make a woman elegant.
Silhouette and bottom design
Next, you need to model the silhouette and make it narrower at the bottom.
The position of the seams on the sides is lined up:
- segments T3-B2 and T4-B2 are divided in two - the middles are marked as T31 and T41;
- from the obtained marks, draw perpendiculars down 5 mm - T32 and T42;
- extend T3-B2 and T4-B2 upward by 5 mm to obtain temporary points T3x and T4x for lengthening the sutures;
- perform a narrowing - move points H3 and H4 from H2 to the sides to the distance you need;
- draw a line along the side seam - smoothly connect points T3x-T32-B2-H3 and T4x-T42-B2-H4;
- mark the waist and bottom, connecting the marks T5xx-T3x and T6xx-T4x, and then H-H3, H1-H4 - the drawings for the panels are ready.
To model the “pencil” variety, you need to move away from the straight shape of the bottom. To do this, narrow the side seam. And for comfortable movement they make a slot at the back. Depending on the desired shape, you need to adjust the straight line of the seam inward by 1-2 cm (if the fabric stretches, a little more can be done). Next, you will need to draw a line upward from the obtained values - below the intersection of the OB axis with the side seam by 7-10 cm. Unlike the straight model, you need to form not a straight bottom, but a right angle - it can be corrected with patterns and a triangle. In other parameters, the front side remains unchanged, but the back side can be shaped differently.
3ladies.su