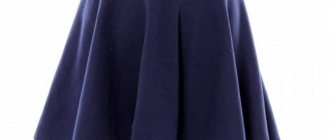
I welcome you, friends, to my resource. Today the topic of my article is “How to sew a sun skirt: step-by-step instructions with photos,” where I will tell and show you everything. And you can easily make yourself such a flared sun skirt using my step-by-step instructions with your own hands and will wear it with pleasure. And, if you need to, sew a flared skirt in two or even three suns.
For the first experiment, you should take cotton fabric without a pattern. Then you won’t have to struggle with stretching the fabric, adjusting the pattern and other nuances. Today we are just learning how to cut a circle skirt.
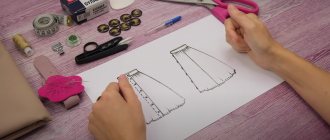
First, let's look at this question - how to correctly lay out the skirt pattern on the fabric. If we are sewing a skirt about 60 cm long and the width of our fabric is 140 cm or more, then the patterns should be laid out along the longitudinal line. If the length of the skirt is more than 60 cm, then it can be laid out as in Figures 1 and 2, depending on the width of the fabric.
It is possible (if the skirt is small) when a full circle is cut out at once. And the skirt comes out completely without seams. Then the pattern needs to be laid out differently.
Constructing a circle skirt pattern
So, let's start creating a skirt pattern. The name itself suggests that the pattern of this skirt is a circle. And here it is necessary to correctly calculate the radius of the inner circle (waist line) and the radius of the outer circle (hem line of the skirt). We take only two measurements: waist circumference (WC) and product length (DI)
For example, let’s take OT = 70 cm, CI = 60 cm. For calculations, we will use the formula for circumference C = 2*n*r, where π = 3.14.
We have C = OT = 70 cm. Substitute it into the formula and calculate r - the radius of the circle.
But since not everyone is good at mathematics, I propose this method of calculating the radius: FROM: 6.28 = r. When dividing, we get r = 11.15 cm. We take approximately 11 cm. This is the radius of the inner circle. Since the length of our skirt is 60 cm, the radius of the large circle will be R = 60 + 11 = 71 cm.
So, we have all the sizes we need. You can make the pattern initially from paper, and then lay it out on fabric. I always cut out a skirt - the sun right from the fabric. To do this, depending on the width of the fabric, I fold it in half or in four.
Let's figure out how to cut a skirt from two semicircles. To create a pattern, measure along the fractional line the radius of the large circle plus allowances for the seam at the waist and the hem of the product at the bottom.
In our example, this is 71+1+3 = 75 cm (1 cm for the seam at the waist and 3 cm for the hem). This means we measure 75 cm and fold the fabric in half at this mark. Carefully align it along the edge. The point at which we folded the fabric is the center of our circles.
It is more convenient to make a pattern with an assistant who will hold the beginning of the measuring tape in the center of the circle. But if it is not there, we do it as follows.
We secure the beginning of the measuring tape with a pin in the center of the circle. We measure the small and large radii and mark with a pencil or chalk (depending on the fabric). Then we turn the measuring tape slightly relative to the center and again mark the radii. That is, from the center where we have a pin, we measure r = 11 cm, make a mark and then R = 75 cm and also make a mark. Then we turn the tape a little more around the center and make marks. And so on until we reach the edge of the fabric.
This way we drew a quarter circle. And since our fabric is folded in half, it turns out to be a semicircle. Let's cut it out. Two such semicircles will make up the sun skirt. All that remains is to sew the side seams, sew on the waistband and fold the hem.
If the skirt is small and the distance (r+R)*2 is less than or equal to the width of the fabric, then the fabric should be folded in four layers at once. Fold once along the fabric, and a second time across. Of course, measuring the required distances. And then, with the same construction, you will immediately get full sun.
We crochet a stylish flared skirt with patterns and photos
A fluffy skirt can not only be sewn, but also knitted using different techniques.
An openwork flared crocheted skirt looks original. Such products look airy and festive.
The product is knitted in one piece. After taking the measurements, we cast on a number of loops. The column should be longer than the waist circumference. This rule for crocheted items must not be forgotten. At the end of knitting, we hem the belt so that you can insert an elastic band or lace. We also take into account that the crocheted skirt is made from the waist to the hem, so that during the work you can easily do fittings.
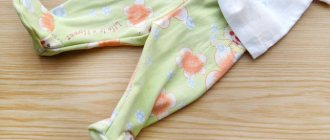
This “Sunny Bunny” flared skirt can be knitted from cotton threads for a girl:
You need to crochet the skirt model according to the pattern:
Crochet items are beautiful and practical. You will feel comfortable in them.
A flared skirt made with knitting needles looks no less impressive than something made with crochet.
We take measurements as standard:
- Waist circumference (OT);
- Skirt length (DU).
After taking measurements, you need to calculate the knitting density and estimate the number of loops per 1 cm of knitted fabric. If the item is assembled from two parts, calculate the required number of loops for one half of the skirt. To do this, we multiply the WOT (half the waist circumference) by the number of loops per 1 cm. This simple arithmetic is necessary before starting to knit any product.
The bright elegant skirt “Malvina” will please the little princess. Please your daughter by knitting her an exclusive fashionable new thing.
This pattern can be knitted using the following pattern:
It is recommended to embroider the finished product with rhinestones or beads, or knit a suitable vest, leggings, and handbag into a set. Let the baby feel like a queen.
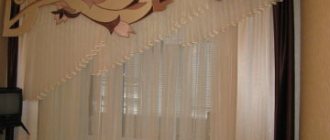
A flared skirt looks chic on any figure and never goes out of style. Study patterns and diagrams, read descriptions of master classes and create unique things with your own hands.
Sewing a circle skirt
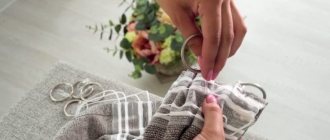
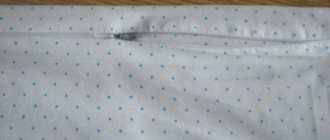
We sew one side seam completely, and in the second side seam we leave the top unsewn for sewing in a zipper. We sew in a zipper. For the belt, cut a strip of fabric along the longitudinal line OT+5 cm long, 7-8 cm wide. Fold the strip in half lengthwise and sew the ends together.
Then, having previously basted one side of the belt to the skirt from the front side, we sew it on a machine. After this, carefully bend the second side of the belt inward and sew it to the waist on the wrong side. Then we sew a seam so that it goes along the seam that was used to sew the first side of the belt. Attach a clasp.
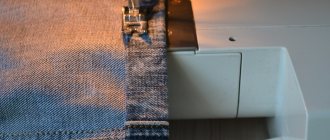
All that remains is to hem the hem. It all depends on how wide you want the hem to be. If it is narrow, about 5 mm, then there will be no special problems. Carefully baste the hem on the hem, iron it and you can stitch it by machine.
But if you want a wider hem, then after you have ironed the hem, you need to work with it some more. To ensure that the hem is hemmed neatly, you can do this in two ways. If the fabric is easy to iron, you need to iron it so that there is no wave.
If this does not help and the wave still remains, do the following. Make the largest stitch on the machine, loosen the top thread a little and sew the seam at a distance of 4-5 mm from the edge of the hem.
Then carefully pull one thread from the seam so that the edge of the hem gathers to the required length. Distribute the resulting gathers evenly and then hem the hem.
You can also gather the edge of the hem by hand by running a basting stitch along the edge of the hem instead of machine stitching. This will make it look more neat. Hemming the hem is the finishing touch to sewing a circle skirt.
Preparatory stage
Important : before you start working, decide on the choice of fabric, style and length. The flared skirt has several types. This is a flared skirt, half-sun and sun. The length can be maxi, mini, midi.
When choosing fabric with an ornament or pattern, it is necessary to take into account the correct alignment in the side seams. If you are unsure of your abilities, purchase a plain fabric. When planning to wear a skirt in the summer, buy thin material, it will add airiness to it. Lightweight types include silk, satin, natural cotton and linen fabrics. For the cold season, it is better to choose something thicker - velvet, mixed with wool, tweed.
So, we should prepare:
- A piece of fabric equal to two lengths of the planned product. Add 20 centimeters to hem and trim the waistband.
- Tailor's chalk.
- Scissors.
- Ruler.
- Sewing machine.
- Thread and needle.
- If there is a lining, then lining fabric.
- Pins.
- Iron.
- Zipper or wide elastic band.
Skirt in two suns and three suns
Sometimes the width of the circle skirt is not enough and then they sew a skirt of one and a half suns, two suns or three suns. They are all cut according to the same principle. You just need to take into account that the OT will be distributed not over one circle, but over one and a half, two or three.
If you want to get a skirt with two suns, then the radius of the small circle should be calculated using the formula C = 4*π * r. That is, to find the radius of a small circle, you need r = FROM: 12.5. We add to it the length of the product plus allowances and get a large radius R. For a skirt with two suns, you need to cut out four semicircles. And then sew them.
Sometimes it is necessary to sew a skirt with three suns. The cutting technique is the same, only the radius of the small circle is calculated using the formula C= 6* π*r. That is, r = FROM: 18.84. Otherwise, we do everything the same as when sewing a circle skirt.
How to sew a flared skirt with your own hands
Now we propose to sew a flared skirt according to the pattern we created.
- For beginner craftswomen, of course, it is easier to make the top of the skirt with an elastic band. In this case, when using the cutting example above, we will not need a side or back seam. The skirt is seamless, which significantly reduces sewing and processing time.
- The belt is cut out along the grain, its length is equal to the volume of the hips, and its width is 11 centimeters.
- Fold it in half with the inside out and iron it.
- Using a basting stitch or using a machine, we gather the top of the skirt and attach the belt to it.
- We insert the elastic into the hole of the belt, it should be the length of the waist. We lay a line, connecting it.
- We sew the ends of the belt with a neat seam and iron it.
- The bottom is processed with an overlocker and folded once. The width of the hem is no more than one and a half centimeters. Or it can be sewn with a decorative zigzag stitch on a machine.
So, even a non-professional can make a stylish item in a couple of hours that goes well with tops, jackets, blouses, turtlenecks, and leather jackets. Moreover, unique and inimitable.
Laying out pattern pieces on fabric
Option 1.
With a skirt length of up to 60 cm, you can cut a circle without seams from fabric 150 cm wide.
The fastener is made in a section in the middle of the back.
Option 2.
Long skirts (or when cut from narrow fabric) are cut in two semicircles with side seams. The fastener is placed in the side seam.
Option 3.
If you need a long skirt without side seams, and the width of the fabric is not enough, then it can be cut out with extensions of those parts that extend beyond the width of the fabric.
These seams create semicircles on the sides and look like a design element in finished products. And if the extension is small, then such seams at the bottom look completely invisible.
When cutting, do not forget about the allowances for attaching the extensions!
Even long sun skirts can be cut out in a single circle without seams, as in example 1, if you use fabrics 280 or 300 cm wide. Voile, tulle and other fabrics of this width are sold in the curtain fabric department.
Option 4.
Despite the presence of side seams into which you can insert a zipper, sometimes it is more convenient (or the model requires it) to insert a zipper in the middle of the back. To do this, the back semicircle is cut with a middle seam.
For cutting, it is convenient to fold the fabric in 2 layers with a transverse fold.
The influence of the direction of the warp threads on the details of the skirt on the position of its tails
In a conical skirt, the tails lie well if its parts are cut on the bias. By changing the direction of the warp threads on the skirt parts, you can control the position of the tails.
Option 1 - the tails are formed at the side seam of the skirt and in the middle between the side seam and the center line of the part.
Option 2 - the tails are formed at the center line of the part and at the side seam.
Option 3 - tails are formed at the center line of the part, at the side seam and between them.