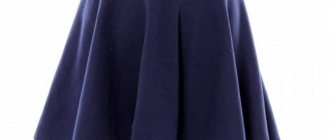
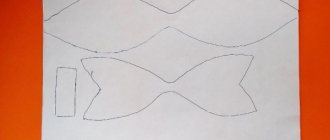
Skirt with counter pleats pattern
You don't need a pattern to make a skirt with counter pleats!
The main thing here is to make the correct calculation of the folds. Our model has 12 counter pleats, evenly spaced in a circle. The fabric is soft and fits nicely into folds. The unusual lemon color makes the skirt (and its owner) the number one object of attention! But this, of course, is a matter of taste.
Skirt pattern with counter pleats
We will do all calculations based on the following measurements:
- waist circumference From = 72 cm
- skirt length Di = 40 cm
Fabric width – 145 cm.
| There is no pattern as such. We cut out two rectangles across the entire width of the fabric, and in height equal to the length of the skirt (140x40 cm). Don't forget to add seam allowances and hem allowances. For the belt (3 cm wide) we cut a strip of 8x80 cm (this is already with allowances). The total fabric consumption for a given width is about 1 meter. At this point, the cutting of the skirt with counter pleats can be considered complete and we can begin marking the folds. |
What to do if the piece of fabric is small
Sometimes the fabric is slightly smaller than three girths. Don't panic. We simply change the algorithm for calculating the depth of the folds. We find the difference between the total width of the stitched panel without taking into account the seam allowance and the total width and divide it by their number.
For example: (220 - 20*5):20 = 6 cm
You can decorate the folds on the skirt in different ways. Some people like soft, flowing ones. Some people prefer tougher ones. To do this, they are ironed or partially sewn up. Whichever option you choose, it will only add to your charm. Choose what you like best!
How to mark counter pleats on a skirt
In this example, we will look at a way to calculate folds based on the existing width of the fabric. That is, for all sizes we take the entire width of the fabric, and the difference will only be in the depth of the folds. For large sizes the depth of the folds will be less, and for small sizes it will be greater.
First we sew the panels along short sections (side seams). The result is a ring, the cut of which is 2.8 meters in circumference.
We decide on the number of folds. There can be fewer or more of them, as desired. Our model has 12 folds.
We calculate:
- how much fabric will be included in the depth of all folds - skirt circumference minus waist circumference: 280-72 = 208 cm;
- the depth of each opposing fold - divide the resulting value by the number of folds: 208/12 = 17.3 cm;
- distance between folds – waist circumference divided by the number of folds: 72/12=6 cm.
How to make folds
We will place the last two sizes (17.3 cm and 6 cm) along the top edge of the skirt alternately, so that the side seams fall exactly in the center of the side folds and disappear into their depths.
Therefore, we start from the side seam, putting it on both sides along half the depth of the fold (8.6 cm), and then 6 cm; 17.3 cm; again 6 cm; 17.3 cm and so on in a circle. Make sure that the second side seam also falls in the center of the fold.
When marking folds, there is a possibility of error, since measuring millimeters accurately is not so easy. In this case, simply go from the side seams to the center of the skirt.
When marking the folds, place marks along the top of the skirt. The folds will be soft and not ironed, so there is no need to draw lines from top to bottom; marks along the top cut will suffice.
How to make counter folds
Now you need to lay counter folds according to the markings.
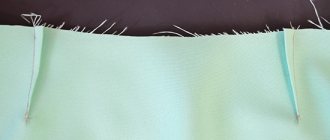
For each fold we have 17.3 cm. We fold each such gap in half with the face inward and aligning the fold border marks. At this point we make a short (5-7 cm) temporary stitch from the mark downwards perpendicular to the cut to fix the fold.
We mark the fold of the inner part of the fold with a notch. From the resulting large fold we form two identical folds directed towards each other (Fig. 1). The notch is aligned with the seam. The result is a counter fold. We pin it to the section of the skirt (Fig. 2).
|
|
The photo shows an example of a pleated skirt for a waist circumference of 90 cm. The pleats are of medium depth.
For our example with a 72 cm waist, the folds will be deeper and from the inside their folds will overlap each other. For thin fabric this is acceptable, but for thick fabric it is worth considering reducing the depth of the folds so as not to create excessive thickness at the waist.
Having laid all the folds, we lay a fixing stitch along the upper edge so that the folds do not fall apart when sewing. We start and end the line from the seam where the zipper will be.
We sew in a zipper, process the belt and bottom of the skirt. We remove temporary stitches in the folds.
How to mark up correctly
The markings are made directly on the fabric . And this is great because you don’t need to waste time creating a pattern.
We connect all the panels of fabric into a single piece. Lay out flat on the table face down. We place all marks at a distance of 18–20 cm from the top.
Circular folds
Set aside 1 cm from the side edge - it will go into the seam. It's 1/2 deep. Then we alternate width and depth. You need to finish 1/2 of the depth and plus 1 cm for the seam.
Bow pleats
For this option we mark in the following order. From the edge 1 cm - for the seam, from it ¼ depth, then alternately width and depth. We finish marking ¾ depth plus a 1 cm seam.
Important ! It is necessary to apply marks so that the seam runs along half the depth of the fold. Along its inner fold. If it does not fall in the middle, then the seam needs to be moved and, leaving 1 cm, the excess should be trimmed.
Shutdown
Next, you need to adjust the fold size at the waist. To do this, reduce the depth at the bottom by 1 cm on each side. Through the new points at the bottom and marks on the hips, draw a line to the waist. This will be the fold line.
We sew folds from the hip to the bottom of the skirt. We pin from the hip line to the waist. After this, we measure the width of the top of our skirt and find the difference with the waist measurement. We remove the difference evenly into the depth of each fold.
For example: the width of the panel at the hips is 102, at the waist it should be 74. The difference is 28 cm. Divide it by the required amount: 20 circular or 10 bow. This means we need to increase each waist depth by 1.4 or 2.8 cm, respectively.
We sweep the fabric according to the received marks. Be sure to double-check the width of the product at the hips and waist.
Having laid out the cloth on the table, we lay the folds in the desired direction and stitch it on top using a typewriter. After this, you can sew in the clasp and stitch the belt. The skirt is ready!
How to sew a skirt with counter pleats, master class with photos, step by step
THE MASTER'S WORK IS AFRAID!
How to sew a skirt with bow pleats without a pattern
The style we will be talking about visually increases the volume of the hips, gradually expanding down from the waist, which means it is ideal for owners of narrow hips, complemented by wide shoulders and ample breasts. But this model has no age restrictions. Well, except for its length. It is also important to note that for girls with curvy figures it is better to choose wide folds, as small ones make them look fat.
Skirt with soft bow pleats
How to sew a pleated skirt without a pattern
There is no need to create a special drawing for this skirt. The folds are marked directly along the face of the fabric with chalk or a piece of soap. That's where they are laid. To calculate the width of the required material, you need to multiply the waist size by 3, add 4 cm for a loose fit and 15 cm for adjustments according to the figure and seam allowances.
Consider the option of size 44/46 with the following measurements: waist size - 72 cm, skirt length 72 cm. The width of the fabric from which the skirt will be created is 120 cm. We cut the product strictly along the warp thread, otherwise distortion may occur in the process.
Let's find out what lengths we need. To do this, add 6 cm to the length of the skirt, of which 5 cm will be spent on hemming the bottom, and 1 cm on sewing on the belt. We get a length equal to 78 cm. So, you need two identical pieces of fabric 78 cm long and 120 cm wide, which we combine into one. The seam should be overcast and ironed. After this, lay the fabric face up and draw a chalk line indicating the waist. To do this, step back 1 cm from the top. Folds are marked along this line.
Skirt pattern with pleats. Cutting fabric and folding folds
The bottom of the future skirt is processed by stitching and bending the material, not reaching 5-6 cm to the edge. Now you need to decide on the width and depth of the folds on the skirt for the case when their number is 8. The waist circumference should be divided by 8 and we get a value equal to 9 cm. Now from the total width of the fabric - 240 cm, subtract seam allowances - 4 cm and divide result on the number of folds. We get the size of the fold depth - 20 cm.
The markings are made from right to left along the front side of the future skirt. First, you should set aside 2 cm - this will be the so-called seam line. Then mark a segment in length equal to the depth of the opposite fold divided by 4 - 5 cm. From this point, mark the width (9 cm), and then the depth (20 cm) of the fold. A segment equal to the depth should be divided by 2 and mark the middle of the opposite fold. Alternating width and depth, the entire canvas is marked. At the end of the marking, ¼ of the depth and 2 cm for the seam are again set aside. Through all the designated points we draw lines vertically down. The outer fold should be placed in the middle of the depth exclusively along the grain thread. Having finished marking, we draw folds along the same line. At the end of the basting, the resulting width is measured, from which the waist measurement is subtracted and the resulting result is divided by the number of folds. The figure obtained during the calculation is added to the size of the depth of each fold, along the segment indicating the waist.
Having finished working with the formation of folds, you should stitch the side seam. It is not completely stitched; a section equal to the length of the zipper used for the fastener is left unsewn. Now you should finish processing the bottom of the skirt. Then sew the fastener into the side seam. Sew a belt and a button to it to the product. Or make a loop on the belt and sew on a button. Iron the finished skirt. When ironing, do not forget that the folds of this model are soft, which means there is no need to iron them. Now you know how to sew a pleated skirt without a pattern, and you can easily sew wonderful skirts for any occasion.
LiveInternetLiveInternet
Let's deal with such a modeling technique as drapery.
To make it immediately clear to you what exactly we are talking about, I have prepared in advance several photo collections with different ways of draping fabric. But before we move on to the types of drapery, I want you to understand one thing...
All-all-all draperies are created in two ways:
The first method is the free flow of fabric directly over the body. That is, a certain piece of fabric is cut out (or several pieces of fabric are sewn together) so that there are holes in the structure for sticking the head and two hands through. And everything else flows freely throughout the body, forming flowing folds according to the laws of physics.
The second method is to flow the fabric over the base dress. First, the base dress is sewn. It could be an ordinary classically tailored sheath dress or a T-shirt dress or a bustier dress, or whatever. And then draperies made of fabrics are sewn on top of this dress - somewhere stretched, somewhere with a large allowance for freedom of flow. And depending on the shape of the piece of fabric sewn onto the dress, depending on exactly where we sew the drapery to the base dress, each time we get more and more new draped dress.
Now, let's look at the photographs and try to feel the principle by which this or that drapery is created.
Draperies made of dense fabrics. Although I just talked about the principles of fabric flow, this does not mean that only soft, flowing fabric can be draped. Draped dresses made of thick, even wrinkled fabrics look quite interesting. But, it seems to me, you can resort to cutting such draperies after you have become skilled at creating soft, flowing drapery dresses.
The most common types of drapery are over-the-shoulder drapes. When a piece of fabric is thrown over one shoulder and secured at the shoulder seam and at the waist or hips with hidden stitches or a specially sewn additional cut element. Such draperies are sewn on, as we see on the base dress. And you know what else they are good for? Firstly, they perfectly hide the excess belly and visually narrow broad shoulders. Secondly, if you suddenly put a stain on your favorite dress, you can extend its life by sewing a drapery like this in this place to cover the defect.
Wraparound drapery is an ideal option for women who are not completely satisfied with their figure. This sewn wrap-around drapery flows straight from the shoulder to the bottom of the hem, covering all unwanted folds on the body. In such a dress it is convenient to go on a visit, where a rich feast is expected. You can safely eat and not be afraid that you will swell like a balloon. Such draperies are very simple to cut and sew. In our article today, we will design just such a drapery.
Chiton draperies will also probably never go out of fashion. Such draperies can be cut either independently (fabric cut on the bias, with allowances for flow, will flow beautifully over the body) or with a base dress (and it is better to sew a base dress, also with a loose, non-fitting cut and from the same fabric as the top one) chiton-drapery).
Swing draperies - I decided to classify this type of draperies as a separate type of modeling. And I’ll make a separate article specifically for it.
Side seam draperies - all these draperies are created according to the principle of first lengthening the dress, and then shirring and shortening it along the side seams. This dress is easy to make if you first cut out a long, tight-fitting sundress from stretch fabric. And then sew a regular elastic band to the side seams of this sundress - it will tighten the dress at the seams and gather it into an accordion of horizontal draperies. Or the same effect can be achieved by sewing such a long-tailored dress in a gather on top of a short-tailored base dress.
Sector drapery - this part is cut out to be larger in size than on the base pattern and then, along the outlined lines-the boundaries of the sectors, it is gathered with an elastic band into a small fold.
Knotted drapery is a type of drapery that consists of a piece of fabric (or two pieces of fabric) tied into a knot. The fabric is taken and tied in a knot, and then the edges of the fabric from the knot are draped into a stretch, over the base dress.
Cross drapery is created when two pieces of drapery fabric are crossed and each draped on the opposite side. That is, we drape part of the left piece on the left side of the dress, we drape part of the right piece on the right side of the dress - and then we change their places and we already drape half of the left piece on the right half of the base dress, and we drape half of the right piece on the left side of the dress.
It is better to start learning drapery from a small section of the cut. For example, make a dress with a draped skirt. As in the photo below.
Or cut out only one part of the dress for drapery, for example the bodice. Do it like in these models - widen the bodice of the dress - and then narrow it back, removing all the excess into a drapery gather.
Now let's see what principle is used to model a drapery pattern. And we’ll do this using the example of one of the dresses from our photo selection. Well, let's take one from the last photo selection - I liked this beautiful asymmetrical dress in a muted orange color. This is what we will now model. It’s even nice to sew such a beautiful dress. I am already looking forward to how with a light gait on a beautiful May day I will walk under the canopy of chestnut trees in these lovely flowing folds. Ege-ge-e-ey!!! You'll see, it won't be that difficult - at first glance it seems one of the most difficult. But that’s why I chose him for this master class. So that you understand, what seems difficult turns out to be simple and easy.
So let's take a good look at our dress first. What do we see?
- This dress is cut at the waist - that is, the bodice is cut separately, the hem separately - and then they are sewn together.
- The bodice is cut on one right shoulder, and also has gathering on the left side. And apparently the bodice is assembled with 2 elastic bands sewn in parallel. They are sewn onto the bodice stretched, and then, shrinking, they pull the bodice along with them into a chaotic gathering.
- The hem also has an asymmetrical drapery, which folds into neat, even folds at the waist. The front of the hem and the back of it have the same cut.
- The dress has a zipper - its location may be in the center of the back - but most likely it is sewn into the side seam (left or right - we will sew into the right) and goes from the armpit to the hip line.
These observations will help us better understand the principles of pattern construction. Now we will do this very construction.
1 Divide the basic pattern into segments.
On the basic pattern of the adjacent silhouette, we draw the outlines of our bodice and hem. The outline of the hem matches the hem of the base pattern. But the bodice has an asymmetrical silhouette - a smooth line from the right shoulder to the left armpit. We drew the outlines and immediately cut them out with scissors.
Now that the segments we need have been extracted from the base pattern (and the excess has been cut off), we can begin modeling (from these segments of the base pattern) the details of the future drapery pattern.
We divide the basic pattern into segments.
2 Model the bodice pattern.
Now we take our bodice segment and make cuts on it corresponding to the directions of the folds of the drapery. Since the folds of the drapery on the bodice of our dress are horizontal, the cut of the bodice should also be horizontal.
We model the front bodice pattern.
We move the “blades” of the cutting to the sides - thus expanding the left side of the bodice. This expansion will then be pulled back - it will shrink into drapery folds - and our sewn bodice will return to its original shape.
You can immediately draw a line on the bodice pattern for sewing in the future elastic. We will then transfer this line in chalk onto the cut part.
And the pattern of the back bodice follows the outline of the front pattern. We don’t need to expand it - there is no drapery on the back - so we leave the detail of the back bodice unchanged.
We get these ready-made parts for cutting out the bodice of the dress.
3 Model the front hem pattern.
We take our “hem” segment of the basic pattern - and from it we will model a hem pattern with the intended drapery.
As we can see, the drapery along the upper edge of the hem is laid in folds - the same depth, and located at the same distance from each other.
Moreover, each of the first four folds additionally gives a soft rounded drapery fold on the side (right) side of the hem.
This means that the hem pattern needs to be expanded not only along the top edge, but also along the right side.
We model the skirt drapery - we mark equidistant points of the folds and connect them with lines.
In order for the expansion to be uniform, we will draw 4 equidistant points on the upper edge of the “hem” segment of the base pattern (in those places where the first four folds of the dress are located).
And we draw the same equally spaced 4 points on the right side of the hem.
Now we connect these points (4 on the side and 4 on the top side) with rounded lines - we draw the lines as we see future folds.
In addition to the four lines, we add two more lines - these will be the fifth and sixth folds - those that are located to the left on the dress.
Now we cut our parts along the drawn lines. We cut four lines to the end - we directly cut off pieces of future folds. And we don’t cut the last two lines all the way – we’ll just fan them out.
And now the resulting parts need to be laid out on a new sheet of paper, slightly moving the cut pieces of the hem folds away from each other, and spreading the cut ones apart. Select the distance by which you need to move and spread the hem pieces apart at your discretion - the further you move the pieces apart, the deeper the folds in our drapery will be.
On a new sheet of paper we lay out our pattern pieces like this and trace the resulting outline.
When the cutting parts have been laid out as required, you need to trace the resulting figure along the contour. When tracing, you do not need to strictly adhere to the contours of each detail - on the contrary, YOU NEED TO COMPARE EVERYTHING TO STRAIGHT LINES. Look, in the picture I have everything outlined exclusively with straight lines.
And be sure to mark the places of future folds on your new drawing - in my picture, each fold boundary is marked with small lines. Then, when we transfer this pattern onto the fabric, it will be easy for us to find places to lay the folds.
But this is not the final hem pattern yet. The fact is that we drew the front part of the hem. The back of the hem will look the same - only in a mirror image. And here's what's important...
It is important to make our hem one piece - that is, that the front and back hem are made from one single piece of fabric. So that there is no need to make a side seam on the right (drapery) side of the hem. After all, it will turn out ugly - drapery along which the side seam goes.
Therefore, we must cut the hem pattern in such a way that the hem has only one side seam on the left side. And the free flow of the right side was not disturbed by the rough line of the side seam.
Here, in the picture below, I depicted how to cut the hem so that the front hem and the back hem were joined together - that is, cut on a single piece of fabric.
We cut out such a solid piece (picture below). To do this, apply the pattern of our front hem to the fabric, first with one side - and then mirror the other side. We get to immediately cut the entire hem - both front and back.
But on the right side of the dress (in our cut-out one-piece hem figure this is the central part) there will still be a small piece of connecting side seam on top. Here, in the picture below, I showed it with arrows - these two edges will need to be sewn together (later when sewing the dress) - but we will sew a zipper in this place. It goes from the armpit of the bodice to this small section of the seam.
This one-piece cutting of the hem (front and back in one piece at once) helps to avoid the right side seam, which ensures free flow of the folds of the side drapery of the hem. On the right side there is only a small section of the side seam at the top (arrow).
4 Sew all the details of the dress together.
Now that our pattern pieces have been transferred to the fabric and cut out, we can begin sewing the dress.
- In the front part of the bodice we sew two pieces of elastic into the stretch along the lines marked on the front bodice pattern. The elastic is sewn in under tension. And then she shrinks and, together with herself, pulls the bodice of the dress into the drapery we need.
- Sew the front bodice to the back bodice at the shoulder seams.
- We form folds on the hem. We simply connect one to one line of folds drawn on our hem pattern (when cutting the hem, we finely transfer these lines onto the fabric) - we manually baste the laid folds with a thread and a needle.
After laying the folds, the upper edge of the hem should coincide in length with the lower edges of the front and back bodice - we will sew the hem to the bodice - which means the upper parts (bodice) should coincide with the lower parts (hem halves). If suddenly there is some discrepancy, then don’t worry, it can be adjusted by simply deepening the folds or, conversely, pulling out the missing length from the depths of the folds.
- We connect the upper bodice part of the dress with the lower hem part. We sew the upper edge of the hem (with the folds already laid along it) to the lower edge of the front bodice and the back bodice.
- We connect the left side seam of the dress - from the armpit to the bottom of the hem.
- We sew a zipper into the right side seam. This side seam goes from the right armpit and down the side of the bodice and even lower a few centimeters along the hem (the same few centimeters that we drew in the center of our cut hem and which were pointed to by the red arrows in the picture above).
- That's all, when the parts are sewn and the zipper is sewn in - all that remains is to process the edges of the neckline and the edges of the armholes (arm holes).
As you can see, drapery is a fun game of free creative modeling. Thanks to the fluidity of the fabric, any of your “miscalculations” can appear on the dress with an additional beautiful fold. That is, there are no clear rules in draping - therefore there is no room for “miscalculations”, mistakes or mistakes. We cut, expand, trace - and the pattern is ready. Once you cut it and spread it apart, this is how everything will drape, and this is how your new draped dress will look. And everything will work out for you - in any case.
Happy sewing.
Pleated skirt
And today we will calculate the folds directly on the fabric without a pattern.
a pleated skirt with a length of 70 cm + 6 cm (for the hem of the bottom - 5 cm, for the allowance for sewing on the belt - 1 cm) = 76 cm
For this skirt I needed:
- fabric 150 cm wide, take two lengths 76+76 = 152 and also cut out a belt = total 160 cm
- hidden zipper for skirt
For such a skirt with bow pleats, you need to take three hip circumferences in width.
- hip circumference = 100
- waist = 75
Only to the waist circumference measurement I will also add 3 cm for the freedom of fit. In total, my working waist measurement = 78 cm.
Pattern of a floor-length dress
To be more precise, a pattern for the top of the dress, where can I get it?
I have already sewn this evening dress with a half-sun skirt; to construct the upper part of the dress I needed a base pattern, which each of you can make once for yourself and then sew dresses on it many times, modeling new and different models. To construct the sleeve, use the sleeve base pattern. But if you have the same size as me, you can.
But I want to make some amendments the finished pattern
- since the dress is high-waisted, we raise the waist 6 cm up
- shoulder width - 7.5 cm from shoulder point
- front neckline - down 12.5 cm
Bow pleats on the skirt. Calculation
Now I will give a simple calculation for forming bow folds on a skirt . I cut my piece of fabric 150 by 160 in half lengthwise. To do this, you need to lay out the fabric so that the grain edge goes from top to bottom, and on the skirt the grain thread will go from top to bottom. Don't mix it up so your skirt doesn't get skewed later.
And in general, do not forget to wash the fabric and iron it with steam so that shrinkage occurs. There may be no shrinkage, or it may be very large (up to 20 cm per meter, if the fabric is natural).
We get two pieces of fabric 150 cm wide and 76 cm long.
We sew both cuts along one side seam. The result will be a canvas 300 cm wide.
I would like to clarify that the skirt will have two side seams, on one side seam I add a 1 cm allowance, and on the side seam where the fastener will be located I add 2 cm. In total, the width of 150 cm goes away when calculating 3 cm for the side allowances seams.
We process the allowances with a zig-zag and iron them.
We process the bottom of the skirt with bow folds , bending it by 5 cm (you can make a double hem to hide the raw allowance). We don’t reach the edges by 10 cm.
Now we lay the fabric face up and calculate the folds.
We measure 1 cm from the top of the fabric - the allowance for sewing on the belt and draw a line along the entire width of the fabric with a piece of soap or chalk.
Now you need to decide how many pleats you want to make on the skirt. I will make 8 folds.
To do this, divide the waist circumference with an allowance of 78 cm by the number of folds = 78 ÷ 8 = 9.75 (bow fold width).
Now let’s calculate how much fabric needs to be folded:
- Total width of the skirt panel = 150 × 2 = 300 - 6 cm (for side seam allowances) = 294 cm.
- We subtract from this width the waist circumference with an increase for the freedom of fit = 294 - 78 = 216 cm.
216 cm needs to be laid in 8 folds = 216 ÷ 8 = 27 cm per one counter fold.
What determines the calculation of folds
Before we begin the calculation, we decide what folds we will make: one-sided circular or bow folds. Regardless of the choice, the fabric consumption is the same, but the calculation of the main characteristics is different.
Attention ! All calculations are made based on hip measurements.
The width is made to your taste: from 3 to 7 cm. If we design one-sided circular ones, then the width will be half the depth.
For example, choose a width of 5 centimeters. Using our measurements, the number of folds is equal to the sum of the hip circumference (98) plus the allowance (4), then the sum is divided by the width (5). The result is 20.
In bow folds the width doubles. Therefore, we do the calculation differently: we divide the measurement for the hips, taking into account the allowance (98 + 4), by the width of 10 cm. In total, we get 10 folds.
Calculation of a belt for a skirt with pleats
For example, the desired belt width is 3 cm.
When cutting, the width will be = (3 × 2) + 2 cm for allowances = 8 cm.
Belt length = 78 + 1 cm allowance on one side of the belt + 4 cm for the fastener (3 cm fastener + 1 cm allowance) = 83 cm.
When calculating the fabric, we allocated 8 cm for the width of the belt; out of 160 cm of fabric, 152 cm was used for the length of the skirt - the remainder is the cut for the belt. We measure the required length of the belt, cut it out and glue the belt with an adhesive pad so that when wearing the skirt the belt does not stretch.
Usually the belt is cut out along the grain of the fabric, i.e. the lobar thread runs along the waist, as in this photo:
But in this model it was inconvenient for us to cut out the belt along the grain, since the entire width of the fabric for the skirt goes into folds (150 +150), and in order not to reduce the width of the skirt, we cut out the belt not along the grain, this is not critical, since we still have to duplicate it with a double.
We sew on the belt, process the fastener on the belt, as in this skirt. Insert a hidden zipper.
We process the bottom allowance that was left unfinished.
Iron the skirt with bow pleats , iron the folds if you do not leave them soft.
pleated skirt
We offer you a step-by-step master class on cutting and sewing for beginners. We will tell you how to sew a skirt with counter pleats with your own hands and not spend a lot of time and effort on it. In the end, you will end up with a beautiful and romantic skirt with a belt in a neutral style.
The thing will be universal. That is, you can sew a skirt for yourself or for a little girl - this cut is good for girls of any age. The choice of fabric will play a decisive role in this case. If you make a skirt from simple natural fabric (cotton, linen), it will be summer, from silk or velvet - for evening and dressy, from thick, calm fabric - casual or business.
Sewing a skirt of this cut is quite simple. Even a novice needlewoman can master the master class - our craft has only two side seams, and the folds are made with simple assembly. The only additional details it contains are linings, a small belt and a hidden zipper. However, it will not be difficult to deal with them.
What do we need?
- fabric 150*170 cm (sizes may vary depending on the length and volume of the skirt)
- lining material
- strong threads
- zipper size 15-20 cm
- glue strips
- two trouser hooks
How to sew a skirt?
Before starting work, you need to iron the fabric through gauze. The pattern for a pleated skirt is as follows.
Measure the length of the product and the width of the upper part according to your parameters. Please allow for seam allowances of 1.5 cm on the sides and 3 cm at the bottom. We need to make two skirt patterns, which we will sew together.
Let's start assembling counter folds (also called bow folds). The pattern shows exactly how they need to be laid. Try them on using safety pins. Fix, level and iron.
Now carefully baste the folds. Fit the product onto the model, and then sew on the folds.
Next, we process the side seam and sew the side edge on a machine. This only needs to be done on one side, since we will insert a zipper on the other. We straighten the allowances and smooth them with an iron.
Let's deal with lightning. We take an adhesive strip (its length is 3-4 cm longer than the zipper itself) and fix it on the fabric. We attach a zipper and sew it from the inside out.
Next we sew on the lining. We make it using the same pattern. We assemble the lining and sew it from the inside out.
Processing the belt. We make a strip of the desired width and measure the length along the waist circumference (+3 cm for the fastener). We treat the belt with an adhesive strip.
We place the belt with the right side to the outer part of the skirt and sew it on. We process the edges. After this, we sew the belt to the skirt again - now from the front side.
Now let's sew two trouser hooks to the belt.
Now all that remains is to process the hem. The hem needs to be ironed and stitched. Don't worry, the folds won't interfere with this.
Ready! You can sew two neat loops to the waistband of the skirt to insert a belt. In addition, the belt can be embroidered. If you want to embroider on the main part of the skirt, it is better to do this at the pattern construction stage so that the oncoming folds do not interfere with this too much. It is better to sew the rest of the decor onto the finished skirt.
A pleated skirt can be of any length. In any case, it will look beautiful. Experiment with looks, colors and fabrics. Making your own skirt is easy, so you can create a variety of looks.
Folds: preparation for work
For example, you want to lay a fold 1 cm wide, and make the distance between the folds 3 mm. You will need to cut out the piece taking into account the allowance for pleats. For each fold you need to add its double width. Transfer the fold lines (blue in the diagram) to the front side using a method suitable for your fabric: basting, chalk or soap. The distance between these lines will be equal to three times the width of the fold plus the distance between the folds (in our example 1+1+1+0.3= 3.3 cm). All folds and tucks must be laid in the same direction (except for counter folds, if provided for by the model). On the pattern diagram it is indicated by an arrow indicating in which direction to tilt the fabric after folding.
Loose folds are usually fixed with additional stitches, which are laid at a distance of 7 cm perpendicular to the folds. We recommend ironing the pleats through additional fabric, and to ensure the pleats are tight and last a long time, iron the fold lines on both sides of each pleat. Stitched folds do not require additional fixation.
Our master class will teach you how to sew not only the simplest folds, but will also show you how to lay folds - waves. This type of fold can be used to decorate, for example, the pockets of a blouse or jacket, or to decorate the front panel of a fabric bag.
So, let's learn how to sew folds with your own hands!
Open pleats
Mark fold lines on the right side of the fabric. The distance between these lines will be equal to three times the width of the fold plus the distance between the folds.
Fold the folds along the lines to the desired width and secure with basting or pins.
Sew the folds to the desired width along the entire length.
Iron the folds in the desired direction and place two securing lines, at the top and bottom, perpendicular to the folds. The distance between lines is 7-8 cm.
Stitched pleats
Mark fold lines on the right side of the fabric. The distance between these lines will be equal to three times the width of the fold plus the distance between the folds.
Baste the folds to the base, folding them along the fold line.
Sew close to the edge along the entire length.
Counter folds
Mark fold lines on the right side of the fabric. The distance between these lines will be equal to three times the width of the fold plus the distance between the folds.
Fold the folds along the lines to the desired width and secure with basting or pins.
Sew the folds to the desired width along the entire length. Iron the folds towards each other symmetrically to the selected line inward.
Or iron the folds in different directions relative to the selected line.
Place two securing stitches, top and bottom, perpendicular to the folds. The distance between lines is 7-8 cm.
Skirts with counter pleats
join the discussion
Share with your friends
Pleated skirts have a very rich and ancient history. Over the centuries, they are either forgotten or put back on a fashionable pedestal.
Today, such skirts are again at the peak of popularity. Modern fashionistas have managed to miss feminine, romantic styles, so retro-style skirts have become incredibly relevant.
Not many of us pay attention to the fact that the folds on different models of skirts and dresses can differ significantly - it all depends on how the product is tailored.
In this article we will tell you about skirts with counter pleats: their features, as well as how to sew such a skirt yourself.
Peculiarities
In one of the articles we talked in detail about skirts with bow pleats. In fact, bow and counter folds are the same thing. Counter folds, when viewed from the front side of the product, are folded towards each other.
If you turn the product over and look at it from the wrong side, the folds will be directed in opposite directions - such folds are called bow folds. So counter pleats are the other side of bow pleats.
A skirt with counter pleats can be of absolutely any length - from mini to maxi. The styles are also very diverse.
Not only wide fluffy skirts, but also narrowed or straight models are draped with counter folds. For example, a pencil skirt decorated with folds along the hem, or a tulip skirt with two or three deep counter pleats, looks very interesting.
To form beautiful, stable folds, it is important to choose the right skirt material.
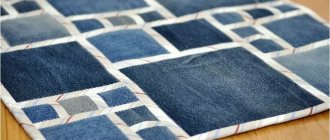
For winter models, dense, warm fabrics, such as wool or tweed, are used. For the spring-autumn season, denim or classic jacket fabric is often chosen. In summer, preference is given to lighter materials - chiffon, cotton, lace, viscose, etc.
Folds
Folds are a universal decorative element for both women's, men's and children's clothing. Folds can be used in any style of clothing. Most often they are located on the front of the product, for example, parallel to the clasp or in the center of the bodice.
Sewing folds with your own hands is not at all difficult and our master class will tell you how to sew straight and counter folds, as well as how to make raised folds - waves.
What to wear with?
A skirt with counter pleats looks very elegant and a little flirty. It can be combined with things in a variety of styles: it all depends on the model and material of the skirt itself.
For example, summer models made of light, airy fabrics are usually quite voluminous, so it is better to combine them with a tight-fitting or straight top, be it a thin top, tank top or T-shirt.
A short denim jacket or denim shirt tied with a knot at the waist will also fit harmoniously here.
Skirts with counter pleats made of dense materials are often worn as an element of a business suit. In this case, they are good to combine with formal shirts or more informal blouses (depending on the dress code), turtlenecks or jackets.
If the skirt has a tight or semi-fitting silhouette, then the top can be looser.
Any skirt, including those with counter pleats, looks best with heeled shoes. Therefore, you can combine it with office shoes, sandals, boots or high-heeled boots.
Those who prefer flat soles can pair this skirt with elegant flats, ballet flats or even sneakers.
How to sew?
If you have at least minimal knowledge in the field of cutting and sewing, then creating a skirt with counter pleats will not be a big problem for you. In addition, this model does not require a pattern - all measurements are transferred directly to the fabric.
The most important thing is to correctly calculate the folds. But first you need to stock up on tools and materials for the job. So, we will need:
- textile;
- zipper (preferably hidden and matching the fabric);
- tailor's scissors;
- tailor's meter;
- threads;
- chalk, bar of soap or washable marker;
- a set of pins and needles;
- sewing machine;
- iron.
Patterns
- Before wearing the markings, the material must be ironed well. Then spread it out on a flat, hard surface.
- Let's start measuring: we need to know the length of the skirt, as well as the waist circumference and hip volume.
- We decide on the desired length of the skirt, add 3 cm to process the hem and mark the length on the fabric (there is no need to take into account the belt). We cut the canvas to length.
- Next we need to calculate the number, width and depth of the folds. We described in detail how to do this in the article “Skirts with bow pleats.”
- In accordance with the calculations made, we mark the location of the folds on the canvas.
Sewing
- The next important stage is the formation of folds. We secure each fold with pins and basting, then carefully iron it - approximately 1/3 of the entire length.
- The upper edge of the product should be processed by stitching a belt to it. To give the belt rigidity, we put an adhesive “cobweb” into it.
- Having sewn the belt, we sew a hidden zipper into the middle seam of the product. Then we baste and stitch the middle seam.
- We process the hem of the skirt: bend the bottom edge by 1 cm, iron it well, then bend it another 2 cm; we process the edge of the finishing line.
A fashionable skirt with counter pleats is ready!
A simple way to sew a pleated skirt with your own hands without a pattern
Hello my dear needlewomen! I was pushed into today’s master class by my schoolgirl daughter, who wanted a pleated skirt. But there was no time for sewing, so we went with her to the shopping center to buy a skirt. And guess what? Not found! In order not to upset her, I sewed the skirt myself. And the sewing took less time than we spent searching for the right purchase. I will share with you the process of creating a pattern and sewing technology; it is quite simple for a beginner in sewing to handle. So let's get started.
How much fabric do you need to sew a pleated skirt with your own hands?
The pattern of the school skirt is suitable for size O (hip circumference) up to 75 cm, with a fabric width of 150 cm. If you want a larger skirt for sewing, you should use the fabric *2
It is better to take fabric for a skirt in a large stripe along the lobar (along the edge) or in a checkered pattern. The width of the stripes will help you create beautiful folds. I took thin suiting wool; viscose, gabardine, satin and denim are also suitable for sewing.
- Fabric consumption can be calculated using the formula = D (length of the skirt from the waist) + 14 cm.
- Elastic band 2.5 - 3 cm wide. Equal to (measure waist circumference) - 5 cm.
- threads in the color of the fabric