Measurements
Measurements to be taken from the figure:
| Measure | Designation | Example | |
| Back length to waist | Dst | 41 cm | |
| Front length to waist | DPT | 44 cm | |
| Chest height | Vg | 24 cm | |
| Center of the chest | Tsg | 17 cm | |
| Shoulder length | Dpl | 12 cm | |
| Bust | Og | 92 cm | |
| Waist circumference | From | 74 cm | |
| Neck circumference | Osh | 38 cm | |
| Chest Width | Shg | 31 cm | |
| Back width | Shs | 34 cm |
Why do you need a basic pattern?
- Ready-made patterns are made to fit a standard figure. Do you have a standard size figure? If not, create the patterns yourself. You will be able to take into account all the features of your figure - breast size, posture, hips, bulge of the abdomen.
- All patterns for different product models are obtained by modeling the base pattern. That is, having built the base once, you will then be able to sew more than a hundred clothing models using it!
- Sometimes creating something new is easier than redoing it. Correcting and adjusting a finished pattern will take no less time than making a new pattern.
- It happens that you want to sew something for which there is no pattern. For example, you saw her in a store, in a photo or to an unfamiliar girl.
- Even if you use ready-made patterns from magazines, you can adjust the product if you only know the principles of design, that is, you know what to adjust and how to do it. And in the basic pattern, changes after fitting are minimal and even a beginner in sewing can cope with them, or are completely reduced to zero.
Well, do you also want to make your sewing easier? Then let's learn how to build a pattern ourselves.
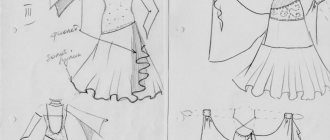
Construction of the bodice
Net
The middle of the back, the vertical line on the left, is equal to the measurement Back length to waist - Dst (in my example 41 cm).
The middle of the shelf, vertical on the right, is equal to the length of the shelf to the waist DPT (44 cm).
Back width = Chest circumference / 4 - 1 cm, in my case 92/4 - 1 = 22 cm.
Shelf width = Bust circumference / 4 + 1 cm, 92/4 + 1 = 24 cm.
Neck
Neck close to the neck:
Back neckline depth = Neck circumference / 16;
Width of back and shelf necks = Neck circumference / 6;
Shelf neck depth = neck width + 2 cm.
My example: back neck: depth 38/16 = 2.38 cm; width 38/6 = 6.3 cm. Shelf neck: 6.3 and 8.3 cm.
Shoulders
On the shoulder line, use a protractor to mark an angle of 18 degrees for the back and 26 degrees for the front, then use a ruler to draw the shoulder lines.
Bottom of armhole
Low point of armhole: Length of back to waist / 2 + 1. Set aside from waistline.
41/2 + 1 = 21.5 cm
Reference point for constructing the armhole
B1 = Back length to waist minus back length to armhole (previous figure) minus back neck depth divided by 3 and add 1.
B1 = (41 - 21.5 - 2.3) / 3 + 1 = 6.7 cm.
Set aside from the middle of the back Back width / 2, 34/2 = 17 cm
From the middle of the front set aside chest width / 2, 31/2 = 15.5 cm
Armhole
Bust dart
We find the center of the dart by setting aside the Bust Height (24 cm) from the top of the construction, and half of the Bust Center to the left (17/2 = 8.5 cm).
Draw the first dart line from the middle of the shoulder to the chest height mark. Draw the second line from the bottom point to the shoulder line, retreating the amount of the tuck opening on the shoulder line.
The dart opening is equal to 1/20 of the bust circumference.
tuck solution = 92/20 = 4.6 cm
The second dart line should be the same length as the first. In order for the shoulder line to align when closing the dart, the remainder of the shoulder in relation to the second side of the dart must be drawn at an angle of 72 degrees.
We move the reference point of the armhole to the opened solution.
Redrawing the armhole
Back dart
The dart on the back is located in the middle of the shoulder line and forms an angle of 90 degrees with it.
Dart opening = +/- 1 cm, dart length = +/- 7 cm.
It should be noted that shoulder darts on the back are rarely used in small sizes, but they cannot be avoided in large sizes, as well as for products made from thick, heavy fabrics (jackets and coats). If the work uses soft, easily draped or stretchable fabric, then shoulder darts are not made on the back.
Lesson 1. Introductory part
In this section you will learn how to work with the course, what you need
pay special attention.
Lesson 2. Taking additional measurements for modeling
This lesson explains in detail how to properly remove additional
measurements for modeling. It explains why and what measure is needed.
Lesson 3. Increases for loose fit
The lesson explains which increases in freedom of fit are the most
perfect for dresses with cut-outs under the bust. Let's look at why this is important and
what does this affect?
Lesson 4. Adjusting waist darts
Let's look at how to correctly adjust waist darts so that
The fit under the bust and at the waist was sufficient and beautiful.
lesson 5. Adjusting the cut-off bodice
A competent adjustment approach is clearly shown and explained.
bodice of a cut-off dress. A unique technique that allows horizontal
cutting lines maintain the correct shape in the finished product and in
further use of the dress.
lesson 6. Cut-away dress under the bust with a quarter-sun skirt
Let's figure out how to correctly calculate and construct a skirt pattern
quarter of the sun for a dress that is cut under the bust. What does it cost?
consider.
lesson 7. Drawing model lines for the silhouette of the year
In this video tutorial we will show you how to perform modeling correctly
the bottom of the dress according to the silhouette of the year. Let's look at this example at
Dolce&Gabbana dress models.
Lesson 8. Drawing lines for flare
This lesson explains where to start flaring wedges
year, from which place is it better to start. Example shown
drawing lines and dividing the lower part of the dress into details.
lesson 9. A quick way to build and design godet wedges
Let's look at the simplest design option for Godet wedges. This
This option allows you to perform any gluing quickly and accurately
wedge in a dress, on any number of wedges in a year.
Lesson 10. Drawing model lines for dresses with a wrap bodice
The video tutorial shows how to apply model lines for a bodice with
smell. What is very important to consider when you model such
bodice for a dress with a seam under the bust. Important details are explained
and techniques.
Lesson 11. Modeling darts into reliefs on the bodice
Let's figure out how to apply relief lines on the bodice and how to correctly
convert the chest dart into this relief. It clearly shows how
beautifully design this line of relief even if the chest dart is very
big.
Lesson 12. Modeling darts for gathers under the bust
Let's look at how to correctly transform darts into a gather under the bust.
We take into account the important nuances of the dart configuration and reflect this on
pattern.
Lesson 13. Modeling a shaped underbust
In this tutorial you will learn how to design curly (not horizontal)
undercut in a dress, how to properly model the waist and chest
darts for such models.
Lesson 14. Preparing pattern pieces and fabric
This lesson provides recommendations on cut-off dress models
chest, according to fabric choice. And we prepare the final patterns for
cutting out dresses.
My online cutting and sewing courses for beginners
My core principles are honesty, openness and caring for my students. I am 100% confident in the quality of my product. Today in my sewing school “Beloshveika_school” there are three directions of teaching cutting and sewing for beginners in online format:
1) Design - this course is suitable for those who want to learn how to create patterns and take measurements of a figure. To successfully pass here you do not need to be an ace in drawing or have any special skills, the information is presented easily and simply
2) A basic course in cutting and sewing is the basics. I suggest taking it to all beginners who are in search of sewing knowledge and don’t know where to start. This course was pieced together from my offline (live) sewing courses, which I have been teaching in the city of Ufa since 2014. I know at what stage students may have difficulties, so I can help you
3) Course on sewing pajamas and underwear This course was born in the process of working on master classes on home clothes, when I saw that my interest in it deserves separate training. In this course we sew using ready-made patterns, so it is perfect for complete beginners who are still afraid to delve into the processes of constructing patterns. Honestly, you can even take this course with your children, because it is interesting, and you can get results very quickly!
What design methodology will I use?
In design I use the EMKO method. It stands for the Unified Method of Clothes Design, it was invented back in the Soviet era, it is time-tested and is still successfully used in their work by leading ateliers and fashion houses.
In fact, there are many technologies in design - this is the English system, Muller and Son, TsOTSHL and others. And in the end, when building according to one of them, a pattern is obtained for the model that is planned. But from the height of my many years of experience, I can say that the best technique is experience! Only by trying and experimenting, constantly working and learning new things can you find the very system for creating ideal patterns.
The design method is a tool in the hands of the tailor. Therefore, you can not stop at one system, take for yourself the best from each and draw on something new.
Therefore, I advise you not to sin on the methodology; if your product does not fit your figure perfectly, analyze your work, perhaps you made mistakes in the calculations.