How to sew a corset with your own hands - from pattern to sewing
Of course, the corset is the main part of the wedding dress.
It still remains stylish and irreplaceable for emphasizing the beauty of the bride’s figure. It can be decorated with embroidery, rhinestones, pearls, feathers, bows, which will make the dress more original and special. That is why when sewing a wedding dress, one of the key points is how to sew a corset with your own hands. This is, of course, not an easy task that requires thorough preparation. When modeling an outfit, take into account such nuances as the purpose of the bodice, material, and body type. Also note that the basic bodice patterns are equally suitable for an evening dress, a wedding dress or a casual dress. It all depends on the decor and fabric.
Let's look at the main types of corsets.
Decorative
This look is intended for girls with a figure that does not require adjustment. It is often also called a corsage. Therefore, such a corset is classified as ordinary clothing. Perfect for brides with an ideal figure and pregnant women.
Slimming
Designed to correct the figure (change the shape): lifting the chest, shaping the waistline, supporting the back. With such a corset, the bride is more graceful and elegant.
For sewing, they mainly use thick fabric (can be cotton) for the lining, then the top fabric (main) is sewn from the same fabric or from any material you like, for example, satin, guipure, lace. The advantage of the density of the fabric is that it will not give the product a wrinkled appearance and unnecessary folds. If the corset is decorative, you can use silk.
The fittings include the following corset fastening elements:
- locks;
- eyelets;
- lacing ties;
- hooks;
- buttons;
- whalebone for a slimming corset;
- spiral bones for curved seams;
- steel bones for straight seams. It is better not to use cheap plastic bones, as they bend and curl.
Lacing is done either at the front or at the back, or both at once. For slimming corsets, it is good because you can adjust the tightening force, adjusting the corset to the desired size, regardless of whether you gain weight over time or lose weight. The main thing is to know when to stop and not to overdo it when tightening the corset.
It is better to buy bones already having the pattern in hand and, of course, knowing the length of the corset. Reducing a bone on your own can cause some trouble. Please note that the bone should be 2 cm shorter than the seam of the corset, so it will not be noticeable and will not tear the fabric.
You will also need these tools:
- ruler;
- fabric hole punch;
- disappearing marker for pattern modeling;
- strips of cellophane;
- scissors;
- hammer for fastening eyelets;
- sewing machine;
- rotary knife;
Materials and tools
Tools and materials play a key role, as does pattern construction. Cotton fabric is used for the base, and any high-quality fabric is used for the top. It is undesirable to purchase bulk material; when attaching eyelets and frequent use, there is a risk that the fabric will simply come apart. As accessories you need to purchase:
- eyelets, buttons or hooks;
- locks;
- ties;
- whalebone;
- regilin;
- spiral and steel bones.
Lacing is performed both from the back and on the center line in front. Also, both options can be combined in one model. The appearance of the item directly depends on the accuracy of the fastener design.
Tools for modeling the product and its assembly are needed in full: a ruler, cellophane strips, a sewing machine, devices for attaching eyelets, scissors, and a cutting tool. You can always practice and sew a corset for a dress from inexpensive, available material. When working with a clean version, it will be difficult to make adjustments.
Bones
Eyelets
Regilin
Corset cord
Select a template
Having decided on the style, purpose of the corset (shaping, decorative), its appearance (modern, retro or even business style), the shape of the bust, length, etc., try to sew it from cheap fabric as a model.
The advantage of the template is that it can be adjusted at different stages of sewing. This will be more difficult to do with the clean version. Also keep in mind that sewing a corset takes quite a lot of time and the rough version will shorten it, especially if you are sewing it for the first time.
Selecting the best model
As a rule, this wardrobe item is associated with a wedding dress. It is quite possible to sew it even with your own hands. This does not require any special skills or knowledge. The main thing is to choose the simplest possible model. More complex options can be made by experienced craftsmen.
Beginning craftswomen should not undertake making such models. Initially, it is better to create a basic version, familiarize yourself with how the pattern is constructed and the sewing process itself. If this venture is successful, you can begin to create more complex models.
All women's corsets can be divided into two groups. They are decorative and with a drawstring. The first ones are used if there is no need for figure correction. In order for the silhouette to acquire the most elegant, graceful appearance, they resort to wearing slimming corsets equipped with cups that lift the breasts. In them, the back appears straighter and the waist is thinner.
You can make a corset from various materials. The main thing is that they are resistant to prolonged use. Designing clothing for the purpose of reducing belly fat is strongly discouraged. Due to prolonged contraction, significant harm can be caused to internal organs.
When choosing a suitable model, there is no need to study it according to Muller. If you want to correct your figure, the pattern is made taking into account the following recommendations:
- to lift the breasts, preference is given to products with a clearly defined neckline area, equipped with cups;
- to make the waist narrower, when constructing clothes you need to make the center line as pronounced as possible;
- in the case of general tightening, standard options are suitable.
The lining in this case should be cotton and soft enough. The fabric for the outer part is selected based on personal preferences. For example, satin, satin or guipure are suitable. You just need to take into account that the more serious the correction must be, the denser materials are preferred.
Taking measurements
Whatever pattern you choose for a corset, dress, skirt or other type of clothing, it should match your body type and fit only your body size. This is the main rule.
To take measurements, measure:
- chest girth;
- waist circumference (in the place where you want to make it);
- hip circumference (along the line of protruding bones);
- also measure the distances: waist line - point under the chest, waist line - bottom along the side seam, waist line - bottom of the abdomen.
Stitching parts
Sew the main fabric pieces together at the side seams, and also the lining fabric pieces.
Cut the seams at the waist and bust at appropriate intervals to avoid puckering at the curves. Turn the ends of the seams in different directions and iron them.
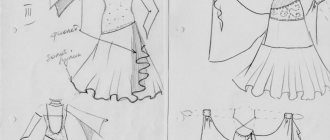
Constructing a pattern using a dummy method
Now the tattooing method is gaining popularity. Let's stop there.
To make a pattern, prepare a mannequin, a disappearing felt-tip pen and strips of cellophane 20 cm wide and 40-45 cm long. The number of strips depends on the planned number of parts.
- Drawing a corset. Tie the laces on the mannequin (you can use elastic bands) horizontally along the chest line, under the chest and at the waist, as well as on the stomach (12-13 cm from the waist line).
- Using a dry erase marker, draw lines along the tied laces, then remove them.
- Mark the side seams and the center of the front and back.
- Mark the raised seams of the corset.
- Take a strip of cellophane and place it on the center front of the mannequin. Draw the lines of the first part (from the fold to the relief) with a pen.
- Attach and translate the side and back pieces.
- Remove the parts and check them for evenness of the relief line.
- Add seam allowances.
Sewing straps
Decide how wide you want the straps. This number must be multiplied by 4. Cut two strips of the required width and sufficient length. Here the straps are 1 centimeter wide. This means you need to cut strips 4 centimeters wide. Fold the edges of the strips inside out towards the center so that they touch, and iron. Then fold the strips in half and stitch on both sides.
How to take measurements for making a slimming corset
Making a slimming corset for an individual figure begins with taking measurements from this very figure. Detailed instructions for those who want to order an individual model, as well as for all those who would be interested. What you will need to take measurements:
1. Soft sewing centimeter. 2. Ruler. 3. Ribbon, string or rope to tie at the waist. 4. List of measurements (template attached). 5. Handle.
It is better to take measurements in underwear or thin, tight-fitting clothing.
I recommend that you do not take measurements yourself, but ask someone to help. It is advisable that the assistant have experience in this matter. But if there are no assistants, use a tall mirror, and the photos clearly show where and how the measuring tape should be located.
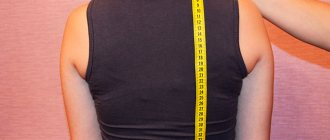
Chest circumference. It is removed tightly around the body along the most protruding points of the chest. When doing this, wear a tight, supportive bra, especially if you have large breasts.
If the breasts are small and the corset is planned to have a push-up effect, the thickness of the bra should be appropriate.
Circumference under the bust. Removed tightly around the torso at the base of the chest.
Find the waist line. The waist in a corset is not always the narrowest part of the body. The fact is that physiologically the place between the pelvic bone and the last rib lends itself to tightening. In this case, when wearing a corset, you can breathe easily and there is no discomfort.
Feel for this place and tie a ribbon at this level. You need to tie it tightly, the ribbon will always try to slide up.
In the top photo you can see that the usual waist level is located 4 centimeters above the tape. However, the tightening in this place will be precisely on the ribs.
Waist circumference. We take measurements before eating, not after!