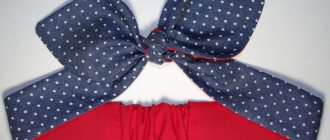
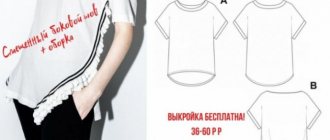
Today I will show you how to sew a headband in 30 minutes. After sewing it, I realized how comfortable and practical this headdress is. How did I ever manage without her? After all, it is suitable not only for summer, but also for warm autumn, when it is still hot in a hat and it is desirable to cover your ears. I’m also terribly lazy in terms of figuring out how to beautifully tie a scarf on my head, but with this headband I don’t need to waste time, everything has already been thought of and I just put it on my head and voila, an instant beauty)!
To sew a headband, you don’t have to buy fabric; look in your closets, you might have scraps of fabric lying around. For example, I took my neckerchief, which I don’t wear, but now it has found its use.
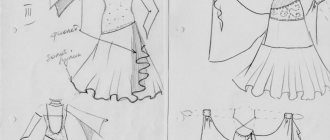
Solokha on the head with your own hands: pattern and production
Solokha is a women's hair accessory in the form of a headband. Inside the headband there is a wire that maintains the shape of the hairstyle. With its help you can quickly style your hair. To create a hairstyle, you just need to twist the edges of the straw. The accessory for women is presented in a wide range and style: for everyday occasions, for work, for evening events.
Stylish headband
Solokha is a universal accessory that is suitable for women with different haircuts. It is suitable for any look, helps to emphasize individuality and make the look stylish. From the ends of the decorative headdress you can weave bows, knots, and also complement your hairstyle with various invisible pins, hairpins, and clips.
Solokha accessory for women
Indian style headband
Those who love the boho style know that this style loves unusual accessories, for example, many girls like the Indian headband:
This interesting ethnic Indian accessory can be made from strips of leather, beads and feathers. You can use cord of three colors instead of leather.
Historical reference
Solokha is one of the types of headband. The accessory got its name from the heroine of N.V. Gogol’s work “Evenings on a Farm near Dikanka” - Solokha, who was famous for her bad character and hung out with devils. The main character wore an unusual headdress - she folded an ordinary scarf several times and tied it around her head, leaving small ponytails on top.
Such accessories were most popular in the middle of the last century. This can be seen if you look at old pin-up photographs, where all the famous models pose in a stylish solokh. However, in later years, the unusual headband was widely used by many fashionistas. In the 21st century, the accessory has again become popular; many world stars wear it to various events and ceremonies.
The original headband on pin-up models
Important! Today, straw can be purchased in many stores, but you can also sew it yourself, based on your taste preferences.
You might be interested in: Patterns and sewing of trousers, as well as palazzo skirts
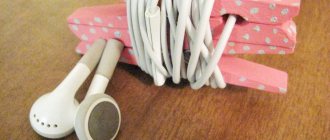
Pantyhose bandage
Another very simple master class is a summer bandage made from tights. Of course, the most interesting accessory for this would be colored tights, but regular black ones will also work.
In our work we use 2 pairs of tights of different colors.
Cut off the top part. If the tights have a heel, cut that off too. If it’s not there, leave the sock as is.
Fold it as shown in the photo.
Next, we need to make the same “braid” in the middle of the strip.
Tighten the knot as tightly as possible.
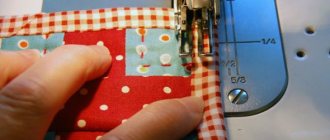
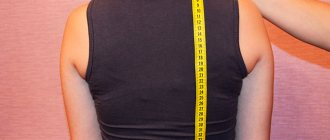
We measure the volume of the head and mark the size of the strip with a pencil or soap.
We pin it with a pin and sew it on a machine or by hand with threads matching the color of the tights with a fine stitch.
We cut off the excess elastic. The new accessory is ready. Original and unusual, you must agree!
What is needed for work
Before work, it is necessary to prepare auxiliary equipment;
- a piece of fabric up to 90 cm long and up to 15 cm wide (the exact dimensions depend on the volume of the head). If the bandage is double-sided, you will have to take two pieces of fabric up to 7 cm wide and up to 90 cm long;
- scissors;
- strong threads, needles;
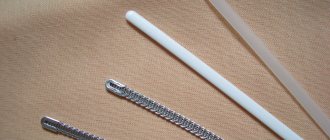
- a piece of wire up to 170 cm long, its diameter should be within 2 mm;
- cardboard (for creating samples);
- a simple pencil;
- measuring tape.
Sewing materials
Important! To decorate a fabric headband, you need to prepare beads, rhinestones, seed beads, and sequins.
Narrow ribbon headbands are amazing
I was simply captivated by these narrow ribbon headbands with their simplicity of execution, beauty and elegance. Moreover, you can make them even without a sewing machine. It is enough to buy some narrow rep or satin ribbon (the size of the head and the number of strips is the length of the ribbon), then you need 2 strips of leather and a piece of elastic. And you can choose absolutely any option.
If you don’t like the grosgrain ribbon, take any suitable fabric, fold it so that it doesn’t spill out, and stitch it by machine or by hand with a blind stitch. Then all that remains is to iron it.
The accessories presented below are a little more complex and require more time to manufacture. For this work you need to use a ring or beads. Here you can no longer do without a sewing machine and cord. This master class is performed as follows: strips of fabric are cut, their width depends on the diameter of the cord. We sew the strips, cut them, and turn them inside out. Next, we thread the cord inside and at the end of the work we decorate the product with beads. You can do without a cord, but then the strip will not look so voluminous.
Suitable for whom and for what occasions?
Due to the abundance of types, solokha can be worn under any clothes and for any events:
- parties;
- Job;
- walks around the city;
- summer holidays in hot countries.
Women's headbands for summer
The accessory looks appropriate on women with any hairstyle: both long and straight hair and cascading haircuts. Using an elastic band or wire, you can create voluminous hairstyles that are suitable for any event.
Important! The product is also used for newborn girls.
Solokha is a stylish head accessory that gained popularity back in the last century. You can sew the product yourself. To work, you only need fabric, a little wire or elastic and decorative elements. It will only take 30-50 minutes to make a stylish headband.
Striped jacquard pattern
An interesting headband made using the jacquard technique from two types of yarn: Fabel from Drops with characteristics of 205 meters in 50 g, 50 g in black and Delight from the same manufacturer (175 meters in 50 g) in lilac color. Take circular knitting needles No. 2.5 on a 40cm fishing line. Density: 26p.=10cm. The description is presented for head volume: 54-56 and 58-60 cm.
Description of work:
- You need to knit in the round. Cast on 120/135 stitches and knit 4 circular rows. p., 1 r. - purl p. and 1 r. – facial p.
- Next, go to pattern M1 (8 or 9 jacquard repeats, depending on size). For sizes 54-56, knit 1 rapport in height along cx. M1 and go to cx. M3. For size 58-60, knit 1 rapport in height and then continue according to pattern M2, then according to cx. M3.
- Then knit 1 circular r. Fabel yarn and add 1 p. (=136 p.)
- For both sizes: continue according to pattern M4 - 1 repeat. Then knit 4 p. elastic band 1 by 1 (Fabel). Finish 1 p. – persons. and finish the job. Fold the bandage in half and reinforce the end.
Stripe Ice Princess
A voluminous pattern with braids will decorate any product.
To make this model of stripes for women, you will need Andes yarn made of wool and alpaca, 100 grams of 97 meters and sp. No. 6. See the pattern diagram below. Density 13p.=10cm. Make a set of 19 loops + 1 edge. and knit the pattern according to the diagram. Try on the headband according to your head size.
Braid headband pattern
Knitting stages taking into account the type of accessory
When choosing a model, you need to focus on the season and yarn. If only cotton or acrylic is available, then the accessory will be for summer, warm spring, autumn. Made from wool - for the cold months. We should also pay attention to knitting headbands for little girls. Many children cannot tolerate wool and have very sensitive skin; in this case, it is wiser to use cotton, synthetic materials, or sew a knitted lining underneath.
If the headband is knitted in the round, it is very important to carefully pick up and cast off the stitches, as the edge will attract attention and outline the face. If the strip is knitted lengthwise, then in this case we pay attention to the edge loops, constantly tightening the thread so that the edge does not turn out to be too loose, nothing should stick out from it. If necessary, you can crochet the finished headband in a circle, but in this case the elasticity will be lost, the accessory will stretch less and fit the head worse.
Summer openwork
Very simple to make, but with a delicate and beautiful knitted headband you can please your little princess. This children's model is designed for a head size of 46 cm, but you can always increase it. Knitting is done in circles. You can take toe knitting needles or on a fishing line (40 cm), use No. 3. Yarn - cotton with acrylic, you will need about 30 g.
The process consists of the following steps:
- Cast on 100 loops, close in a circle.
- We knit the first row - 3 knits, 1 yarn over, 3 loops in 1 knit, 1 yarn over. We repeat the report until the end of the row.
- Second row - knit stitches. If you plan to knit not in a circle, then all even rows are made with purl loops.
- Third row – 1 yarn over, 3 knit stitches, 1 yarn over, 3 knit stitches. Repeat until the end.
- The fourth row is with facial loops.
- Next, repeat from the first to the fourth rows to the desired height.
- The baby's bandage is ready. You can decorate it with a decorative flower or bow, or thread a satin ribbon.
Since cotton is not elastic, you can insert a thin elastic band into the accessory to match the color of the yarn. Then the headband will definitely not stretch and will stay tightly on your head.
Cast on 18 stitches on knitting needles
Knit to the required length, bind off the loops. Sew side seam
Overlapping headband
A very popular headband option that is knitted by women of different ages. Due to the overlap, the accessory resembles a turban. If desired, you can pin a brooch or large bead into the center, but the overlap itself looks beautiful. For knitting you will need yarn with a meter of 100 m per 100 g, knitting needles No. 6–7. A pearl pattern is used.
The step-by-step process looks like this:
- Cast on 16 stitches on the knitting needles, remove the edge stitch, knit 1 knit stitch, 1 purl stitch, alternate until the end.
- In the second row, shift the pattern, knit purl stitches above the front stitches, repeat.
- We knit 20 cm, after which we divide the loops into two knitting needles of 8 pieces each, and knit separately strips 9 cm long.
- We overlap the strips, return them to one knitting needle, and continue until we get the fabric of the required length.
- All that remains is to sew the headband into a circle. You can do this with a needle or crochet.
- The finished headband with overlaps needs to be tried on. If desired, decorate or crochet in a circle.
Crocheting can reduce the size and will help if the bandage has stretched over time.
Cast on 16 stitches, knit 20 cm
Divide the loops into two knitting needles of 8 pieces each.
Knit length 9 cm
Overlap the strips and place them on one needle
Tie the required length
Stylish oversized
The voluminous headband looks large, airy, and creates an oversized effect. To work, you will need half-woolen yarn with a yardage of 240–280 m per 100 g, knitting needles No. 4 and 2. The thicker the yarn, the more voluminous the accessory on the head will look.
- On thin knitting needles number 2, cast on 26 stitches, knit two rows with knit stitches (garter stitch).
- Switch to thick knitting needles number 4, knit the third row with one crochet after each knit stitch. The result will be 50 loops.
- We knit up to 14 rows in stockinette stitch.
- In the 15th row we shorten the loops, knitting 2 together on a thin knitting needle, returning to the initial 26 loops.
- We knit 5 rows with facial loops, after which we again switch to a thick knitting needle and add loops with yarn overs, getting 50 loops on the knitting needle.
- Next comes 14 rows in stockinette stitch on thick knitting needles, after which we cut again, knit 5 rows in garter stitch and increase again.
- We finish with two front rows as soon as the length suits. All that remains is to sew the headband into a headband with knitting needles.
You can reduce or increase the headband not only by the number of sections, but also by reducing the rows of the front stitch.
Scheme
Cast on 23 loops and knit 22 rows
After 22 rows the rapport pattern is repeated
Thus knit to the required length
Close the loops
Cast on loops on both sides of the braid and knit with an elastic band
Knitted 8 rows with an elastic band, all that remains is to sew a bandage
Simple strip for beginners
Option for beginner knitters. Despite its simplicity, it turns out to be a worthy accessory for girls of any age. You will need any thread with a meter of 200–240 m per 100 g, as well as knitting needles No. 3.5. For stitching - a needle or crochet hook. You can choose any pattern at your discretion: rice, tangle, elastic, front or back stitch.
- Cast on 18–25 stitches on two needles, depending on the desired width.
- Take out one knitting needle, knit the first row with knit stitches, turn.
- Next, we also knit the bandage with facial loops until we get the desired length. In the process, try it on your head and stretch it slightly. You can use any other pattern or put a braid in the center.
- Close the loops and sew the strip with a needle. Can be crocheted.
The thread for stitching can be used the same one used for knitting, but divided in half so that the seam is not thick.
Knitting accessories
For the bow, cast on 28 stitches + 2 edge stitches and knit in stockinette stitch for 26 rows
Cast on stitches on circular needles and knit in the round with a single piece of fabric
Sew a bandage, secure a bow
Children's headband with ears
A very cute knitted accessory for a girl. As a base, you can use a bandage made from any not very textured pattern. The beauty is that this option comes with charming ears. They can be made in the same color as the base yarn or played in contrast.
Step-by-step production of a headband with ears includes the following steps:
- Knit any simple headband using stockinette stitch or elastic of a suitable size. Sew it into a headband, be sure to try it on a girl.
- Take a hook and tie two eyes (the size and shape are chosen at the discretion of the master).
- If desired, tie a contrasting thread around the ears.
- Sew the elements to the bandage. Can be placed on the sides or on top.
Ears on headbands for younger girls can be decorated with bows, flowers, plastic berries, or a ladybug can be “seated.”
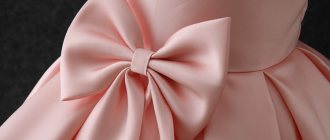
Product decoration
You can wear a simple headband, but it is better to add a couple of decorative details to make the accessory look more beautiful and interesting. This will not require much time and effort. The central part of the product must be intercepted with thread, pulled together and the ends firmly fixed from the inside out.
Sew a simple button, bead or bow onto the front part. It is better to make jewelry that will match the rest of your clothes. All parts must be well recorded.