What types of welt pockets are there?
There are more than 10 different types of pockets for things. Each is unique in its own way, but you need to take your time to create them, and it’s better to measure the sides again before taking the scissors. Afterwards there are photographs of pockets and a short description for anyone, as well as tips for creating them for specialists and those who have recently started sewing.
Welt pocket “in a regular frame”
In the photo we see a rectangular frame and an insert with a different fabric . To do this, you first need to measure the sides, then draw with chalk or specialized pencils for fabric.
Then make a slot in the very center of the frame, and carefully tuck the edges into the middle. Next you will need an iron. You need to iron the edges of the frame evenly. Only then can you invest in additional fabric, turning the ends of each fabric in one direction.
To ensure that everything comes out smooth and without shifting, also iron the additional fabric and initially use needles for adhesion.
Welt pocket “in a difficult frame”
This option is simply a variation of the first version. However, it additionally includes a specialized part from an additional shred.
Welt pocket with flap
This option with a valve looks very nice.
It is divided into a component with one facing and two. When making the product, this option is almost no different from the usual one with a frame, but it will require a specialized valve. Make it to size separately.
The valve itself is initially created on the reverse side . Afterwards, cut the part that was made so that the sides do not move apart and insert the valve there.
Another option is done in a similar way, but the frame will have two facings and therefore there will be an additional line above the valve .
Welt pocket with zip fastening
This complex species has three varieties at once. It's a simple zipper. For it, use a zipper, which is initially sewn to the additional material. Then create it as a simple component with a frame.
With a leaf, it will be useful to create a leaf in addition to the blank with a zipper, and insert it first when sewing in so that it is on the front side.
Framed slotted zippers
Models like zippers in a frame should be considered very popular options.
Welt pocket with leaflet
The leaf represents a separate part that is connected to the product, and the creation is carried out using a simple frame technology.
Here the sides on the sides of the leaves will be stitched, rather than stitched, with a visible seam along the front side.
However, there is also one with stitching on the front side, this is already a type with a leaf and stitching ends.
Welt pocket
The execution of this model is placed next to a simple frame, only here there is no need for backing parts, but only a narrow strip and additional stitches that will secure the leaves.
Outwardly, it will be difficult to distinguish it from a simple one with a leaf. But as soon as you touch it with your hands and try to invest something there, you begin to understand that there is not much space there, or rather, your fingers immediately rest on the seam of the leaf.
Framed welt pocket
The fake can be not only with leaves, but also an ordinary “framed” model. It also does not require additional parts for the internals, because the compartment itself will not be there. Only as in the previous version of the details for creating a frame.
Welt pocket with flap
Initially, draw the edges - this is an elongated rectangle . Then create an additional part. There is no need to make a compartment, and therefore the inside is only a small part that will connect to the sides outside the frame. But this model needs a flap; it should be made along the width of the dart and sewn on the reverse side. After the outer side is cut, the sides are turned out and the already ironed product will require the ideal stitching for the edges of the cutout.
Slit pocket
Quite an interesting model. It will be difficult for beginners to understand. The drawing itself is presented here in three lines. Next, create all the necessary insides - these are the walls of the product and one more part that will fix the seams of the gap.
Cut after the seams only along one line.
Edge welt pocket
In terms of the building, this type is very similar to model 9 and even 1. But its feature is that externally all the details are hidden with the help of a small and thin edging.
Valves
The valves are a kind of “lid” of the pocket . According to their form, they come in all sorts of shapes. They can simply repeat the bottom of the product itself. In most cases, they are made dense so that they perfectly hold their shape. Therefore, very often these “lids” consist of two layers of fabric, which the seamstress folds with the wrong sides facing each other and makes a small hem in the middle .
The line itself runs a millimeter from the edge. This is real craftsmanship and ultra-fine work . You can use an iron before stitching. This will make the fabric more pliable and outline the corners.
Slotted
In terms of execution, they are considered the most complex option due to the required ideal precision and accuracy when transferring marks (lines) to the product, making cuts and laying lines.
The variety of shapes is limited to oval, rectangular or diamond-shaped. Found on all types of clothing. The location depends on the specific type of welt pockets. When making welt pockets in a frame, the slit is made directly in the main fabric, which requires a certain accuracy and precision. The option with an insert flap is a detail of a men's jacket, coat, classic jacket; the classic version with a zipper is the calling card of sports-style clothing.
- Separately cut parts are used for lining pockets, often serving a decorative function.
- Welt pockets with a flap skillfully hide the entrance to them; they come with one or two facings.
- In addition to its decorative function, a leaf with stitched or set-in ends in such products strengthens the sides of the pocket hole. Often used when making fake pockets.
- Welt pockets with a zipper (preferably a decorative one) are made on clothing models made of thick fabric, and therefore are considered the simplest.
Leaves
Actually, some pockets are covered with leaves. Under them you can easily hide not only the entrance to the hole, but also a wide zipper. Very inventive details. And they also have a lot of varieties . Similar elements can be single. For example, to be located and have a hole at the top or bottom. For a vertical pocket on the right or left side.
For oblique cuts, specialized diamonds are made . The seamstress always watches the thread so that, in general, the entire component is a common whole. There are also types of leaves that are made short at the edges. Such options for a zipper are quite convenient.
Turnings
Facing is the name of the fabric with which craftsmen finish cutouts . However, they do not always follow the shape of the product and are a single fabric. They can be made from absolutely opposite fabric and such a design idea.
External pockets
Processing patch pockets
These elements include patch pockets, which can be simple, with a flap. It makes up one common part and a separate flap sewn side by side.
It is not difficult to make such an item of clothing. You need to think over the shape and size of the part and draw it on a sheet of paper, measuring 1 cm on each side for the hem of the fabric. Depending on which side the inlet hole will be located, we make a larger hem in order to stitch it in the right place. The patch pocket can have different shapes: square and round, semicircular and polyhedral, rectangular and trapezoidal. You can fantasize freely, depending on what clothes they will be on. Let's see how they are made in the next photo.
Dolevik
In any case, the upcoming incision should always be reinforced with specialized tissue . This strip or rectangle is called a lobe. This component is represented either by thin cotton fabric or non-woven fabric. In most cases, the width is from 6 cm. After installation in the right place, this part must be well secured, and hand stitches help to do this. The stitches should be placed on the longest side along the top and bottom of the rectangle. Make stitches approximately 2-3 cm apart and 0.5 cm from the edge.
Definition of the word “Pocket” according to TSB:
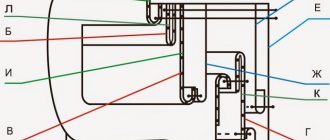
Pocket in a frame Pocket
(Karman) Theodor von (11.5.1881, Budapest, - 7.5.1963, Aachen), scientist in the field of mechanics. He studied at the Budapest Technical University (1898-1902), then at the University of Göttingen. Professor and director of the Aerodynamic Institute in Aachen (since 1913). In 1930-49, director of the Guggenheim Aerolaboratory of the California Institute of Technology (USA). K.'s works: on aircraft engineering, applied mathematics, strength of materials, theory of elasticity and plasticity, structural mechanics, aero-, hydro- and thermodynamics. As a scientific director, he took part in the construction of many technical objects - airplanes, helicopters, rockets, suspension bridges, as well as in the creation of the first supersonic wind tunnels and ballistic installations. Member of the Royal Society of London, other Academy of Sciences and scientific societies. Works: Collected works, V. 1-4, L., 1956. The wind and beyond. Autobiography, Boston, 1967.
Burlap lining
Key fabric can also be used as a fabric for this internal component . However, in the case when a specialist sews a coat or something made from thicker fabric, it is better to use specialized lining material. Various options can be used in size . They can be one-piece or consist of parts.
Valance
A valance is a kind of covering made of key fabric that will cover the entrance to the product . There is one rule to remember for him. Its pattern will be in compliance with the directions of the grain thread and only from the fabric of the key product.
With effort and hard work you can achieve impressive results. And things are always more functional with pockets. Its variety can make a thing individual.
Constructing a patch pocket pattern
Pusher for manicure and how to use it. types and types of pushers, choosing the right pusher for nails. How to use a cuticle pusher correctly?
In accordance with the dimensions and shape of the pocket specified during fitting of the product, its outline is drawn on a sheet of paper. The shape of the lower part of the pocket is chosen according to the taste and desire of the performer and depends on the direction of the sides and the radius of the curves.
Initially, the pocket is drawn without curves, for example, in the form of an ABZHE rectangle.
To construct roundings in the lower corners, squares are built (for example, abvE or a1b1c1E) and with a radius equal to the side of the square, corner roundings are made from the center b (b1). If we take the side of the square OL equal to half the width of the frame (AB/2), then the lower part of the pocket will be drawn from the center O in a regular semicircle, without a horizontal section.
If you have some drawing skills, roundings of small radii can, of course, be drawn without construction, that is, by eye.
If you want to make the pocket tapering or expanding downward, its contour is first drawn in the form of a trapezoid of the selected shape.
Then equal distances are arbitrarily measured from the corners E and F on the side and bottom sides (Ea1=Eb1, Zha1=Zhb1). The centers of the roundings b1 are located at the intersection of perpendiculars drawn to the corresponding sides of the pocket at points a1 and b1.
In the following figure, the outline of the pocket is designated ABB, and the line of entry into it is AB. If the upper edge of the pocket is processed using a special allowance, then it is drawn to the pocket entry line (ADGB). The size of the allowance is usually taken to be 3.75-4 cm. Along the oval contour of the pocket, make an allowance for the width of the seam (1 cm) and continue it 1 cm above the pocket entry line (AB).
Based on the resulting pattern, the pocket is cut out of the fabric in such a way that the direction of the pattern coincides with the direction of the pattern of the main part of the product.
For a description of the processing sequence for an oval-shaped patch pocket with stitching at the very edge, read the next part.
In Dahl's dictionary
m. pouch sewn to clothing, or on a belt, kishen, zep. Pocket, pocket, pocket will detract. pocket contemptuous pocket enlarged Tight, thick pocket, thick in the pocket, rich, with money. The pocket is thin, empty, no money. Fill your pocket, get rich, gain a lot of money. The pocket is full of holes, its owner is a spendthrift. The pocket is bursting, it’s hard, it’s expensive, it’s unprofitable. Hitting your pockets, getting money in a swindling manner. It’s getting dark in one pocket, dawn is breaking in the other, it’s empty. Grab it in your pocket - it's a hole in a handful! In one pocket there is a louse on a lasso, in the other there is a flea on a chain. In one pocket is Ivan Skinny (fast), in the other is Marya Legotichna. The floors are covered in braid and the pockets have holes. Don’t look in other people’s pockets, but look after your own. Count the money in your pocket. Hold your pocket tight. Don’t rely, Roman, on someone else’s pocket. It's easy to pay from someone else's pocket. Keep your pocket! They gave me a hundred rubles, but didn’t take it out of my pocket. The request does not fit into your pocket. Hud talent if your pocket is empty. People are judged not by their intelligence, but by their pockets. If it were in the barn, it would be in your pocket. It’s good for those, it’s good for others, but it’s not bad for us if our pockets are full. I can't afford the idea. And I really want to, but I can’t do it in my pocket. The soldier has no pockets, but he hides (puts away) everything. You'll hide your head in the priest's pocket. Four floors, eight pockets, at the clerk's. Varvara has everything in her pocket, a thrifty person. I don’t bow to Grandma Varvara, I have mine in my pocket. Why go to Varvara, it’s like it’s in your pocket. He won’t reach into his pocket for a word (doesn’t walk). The last penny falls out of a thin pocket. He doesn't have a pocket, but a sieve. The pocket is full of holes. The hole is not in the pocket, but in the handful. Pour from the right pocket to the left; from bag to bag. Either the eyebrows are thick, or the pockets are empty. (Krylov). Hush, Misha: Vanya is in your pocket! close. Lyuba Ivana, take care of your pocket. It curls into your soul and into your pocket. Hit your pockets. By chance my hand fell into someone else's pocket. Friendship is friendship, but don’t get into your pocket (or your peas). A righteous cause, but it started to itch in my pocket. This trouble has hit our pockets. If you don’t finish checking, you’ll report back in your pocket (you’ll pay extra). If Ivan the Great were small, and I had a big pocket, I would put him there! A pocket card, in a cheating game, is a split card into which a large bill is inserted and pulled out if the card wins. Pocket, related to pocket. Pocket watches, hand-held, not wall or table watches. Pocket money issued for measuring expenses. Pickpocket, pickpocket, pickpocket, mazurik, draftsman, who rummages through pockets. Pickpocket, pickpocket.
Pocket sewing
After drawing the template on paper, you need to transfer it to the pocket pattern. Then the fabric is cut and folded along the contours of the fold line on all sides. The inlet hole is wrapped twice so that the edges are tight and more durable. The remaining edges are processed on an overlocker or using an overlock foot. Then the edges are folded into the middle and ironed well. Many craftswomen use a glue stick to ensure that the fold line fits tightly to the main part before sewing. You can iron the fold lines with a hot iron through a damp cotton cloth.
After this, mark with chalk the place on the clothing where the pocket will be sewn and apply the part on top. You can pre-baste the element in its permanent place with stitches. All that remains is to stitch it on.
Non-slit pockets (pockets in the seams).
The seam pocket is used in various types of women's and children's clothing with carved shaped lines or inclined darts. The entrance to the pocket can be decorated with a leaf, flap, flounce, lace or piping. The main types of pockets located in the seams include: with leaves in the seams of the shelves, without leaves in the seams of the shelves, with flaps in the seams connecting yokes with shelves, in the side seams of trousers, skirts, etc.
The details for processing seam pockets are the same as for processing welt pockets. The process consists of three stages: processing of finishing parts (valves, leaves) and lining, assembling the pocket. Processing of trim pieces and pocket lining is similar to processing them in welt pockets. The assembly of the pocket differs somewhat depending on the type of product, the location of the pocket and the sewing properties of the materials used.
A pocket with a leaf in the seams of the shelves is processed in the same way as slotted ones.
Using the auxiliary pattern on the front side of the shelves, mark the lines for the location of pockets on the front and side parts. Along the line to the front of the shelf, the leaf is stitched together with one part of the lining with a seam 1 cm wide. Along the seam of stitching the leaves, the shelf is folded, swept and ironed. On the front side, parallel to the fold of the pocket, a finishing stitch is laid, if required by the style. To the side of the shelf, along the notches or marked lines, sew another part of the pocket lining with a seam 0.7–1 cm wide, connect the front and side parts of the shelf with a seam 1 cm wide, having previously swept them with simple running stitches. The ends of the pocket are secured with a double backstitch, and the lining is stitched with a 1 cm wide seam, securing the ends of the stitching, and at the same time straightening the cut corners. From the front side, the leaf is straightened, basted, the ends are finally attached to the shelf from the front side with hidden stitches (four or five), and then from the back with cross stitches across the entire width of the leaf at a distance of 0.5 cm from the edges.
The sides of the leaves are mainly stitched by machine: the first line is 0.1–0.2, and the second line is 0.3–0.4 cm from the edge; if the leaf is stitched with a finishing stitch, the second line is exactly in line with the leaf stitch.
The finished pocket is ironed from the back and front sides through a damp iron.
Pockets without leaves in the seams of the shelves are processed in this way. An allowance of 3–4 cm is given to the cuts of the shelf parts in the area where the pocket is located. On the front part of the shelf (to protect against stretching) on the wrong side along the intended line (the seam of the front and side parts of the shelf), an edge is laid or an adhesive fabric is glued with a slight tension . The side and front parts are swept away and ground down, leaving a free entrance to the pocket.
The pocket lining is stitched to the cut of the seam allowance of the front part of the front (seam width 0.7 cm). The shelf is bent along the intended line and the fold is ironed. The second part of the pocket lining is stitched to the cut of the side part of the shelf (seam width 0.7 cm). If the model provides for finishing stitching, then it is laid along the intended line. The pocket lining is straightened and stitched together with allowances for processing it with a seam 1 cm wide. If there are no allowances on the front and side parts of the front (along the line of entry into the pocket), the edges are processed using hemming and hemming. This method is used if the seam connecting the parts of the shelf in the pocket area has a curved shape or the design does not provide allowances for processing the pocket.
A facing is sewn to the cut of the front part of the shelf in the pocket area, and the shelf is basted, forming an edge 0.2–0.3 cm wide. A valance is sewn to the cut of the side of the shelf, the seam is ironed and the front part of the shelf is connected to the side, then the pocket lining is sewn down.
Features of pockets
Pockets were originally invented as a functional element for carrying small things without a bag. In the 18th century, voluminous pockets were present on both men's and women's clothing. But when classicism and Greek draperies came into fashion, women's dresses began to be sewn without hidden pockets. In addition, among the elite, the tendency to wear a dress with patch pockets did not spread, since such an outfit was considered bourgeois. Large patch pockets were actively used in uniforms, on military jackets and cargo pants. Their presence was explained by an urgent need.
Wartime of the last century also significantly influenced fashion. Fashion houses showed women's suits with voluminous pockets that looked too much like military uniforms. Since the 30s, loose-fitting dresses with pockets have won the hearts of women all over the world! Unlike the men's wardrobe, the women's pockets played an exclusively decorative function.
In-seam pockets
They are considered the easiest option to process, although they are made in seams of different locations: vertical, horizontal and even inclined. Used in women's and children's clothing models.
- To make simple products, the entrance on the patterns is marked with transverse marks. The burlap is cut separately.
- The option with two zippers is not complete without the zipper itself, with the help of which the entrance to the pocket is formed.
- The product in the seam for attaching the yoke is used in models with cut-off transverse parts.
- A simple and easy-to-make option with a cut-off barrel is a characteristic detail for skirts, shorts or trousers.
- Regardless of the chosen type, pockets have a significant impact on the completeness of the product as a whole, its style, being an integral part of the design idea.
As an advertisement.
Valves
The valves are a kind of “lid” of the pocket . They can be very different in their form. They can simply repeat the bottom of the product itself. They are usually made dense so that they hold their shape well. Therefore, often these “lids” consist of two layers of fabric, which the seamstress folds with the wrong sides facing each other and makes a slight hem inward .
The stitching itself runs a millimeter from the edge. This is real skill and very delicate work . You can use an iron before stitching. This will make the fabric more pliable and outline the corners.
Types and models of patch pockets.
Greetings to all readers of the blog milla-sidelnikova.com!
So, what types of patch pockets are there? You will learn their names, shapes, models and much more from this article.
There are no other models that are included in the patch pockets group. This is the largest group of all types of pockets.
There are two types of patch pockets: simple and complex.
Simple patch pockets.
Both corners of the top edge of a simple patch pocket are most often straight. But the bottom edge of the patch pocket can be anything you want.
- With right corners.
- With rounded corners.
- With pointed corners.
- With a rounded (arched) bottom edge.
- With cut corners.
- Oval shape. Etc.
Although there are other pockets, with straight corners along the bottom edge and beveled along the top.
- With one corner beveled (inclined entrance).
- With oblique (oblique entrance).
The upper edge of a simple patch pocket can be processed with a one-piece turn-up, a separate detail - a turn-up (from the main or finishing fabric, on the front or wrong side), binding, or facing.
Simple patch pockets also include kangaroo pockets.
The creative imagination of designers generates more and more new forms of patch pockets, and this process will be endless as long as humanity itself exists.
Sophisticated patch pockets.
Complex patch pockets can be made with gathers, reliefs, folds and flaps. They can be decorated with frills and flounces, trims and piping, ribbons and lace.
The location of patch pockets on a product can be very different. No one and nothing limits the desire of designers to express themselves through finding new locations for pockets.
On some products you can even find patch pockets located right in the center of the back. Of course, it is not possible to use such a pocket without outside help. Yes, probably not necessary. Such pockets are made on products rather for decoration.
The entrance to the patch pocket, of course, can be made from any side. But is it reasonable to do it from below or to the right, from the side, for the left hand? Here, common sense still always prevails over the flight of creative thought of designers and the entrances to “working” pockets are most often made from above or from the side, under the right or left hand, respectively.
Before you start attaching the patch pocket to the product, you need to mark the exact location of its placement on the product. The protruding corners, sides and all convexities and concavities of the patch pocket must be exactly transferred to the main part.
This is especially true for symmetrically located pockets. The distances from both pockets, to the bottom edge of the product, to the top, to the mid-front line and side seams, should be the same and symmetrical on the main parts.
The discrepancy in distances of literally half a centimeter is immediately visible.
The patch pocket piece can be cut from the main fabric. And if there will be no problems with plain fabrics or fabrics with a very small design, pattern, etc., then on products made from fabrics with checks, stripes (vertical and horizontal), floral patterns with direction, and other complex patterns, It is necessary to adjust the pattern of the pocket part to the pattern of the main part.
With the top edge processed and the remaining sides folded, the finished patch pocket should “sit” in its allocated place on the main part, and their designs should merge into a single whole.
If for some reason it is quite difficult to do this, then the pocket piece can be cut out from the main fabric along an oblique thread, at an angle of 45⁰.
The patch pocket can also be cut from additional finishing fabric. The pattern of such a patch pocket does not require combination with the pattern of the main part.
Unless, of course, symmetrical pockets or other details, such as collars, cuffs, fastener strips, etc., if there is such a design idea, of course, should be the same.
Large patch pockets and patch pockets made of easily stretchable fabrics are reinforced with interlining materials suitable for the properties of such fabric. These can be either adhesive cushioning materials or woven ones. Both types of cushioning materials are cut exactly to the shape of the pocket. Woven fabrics are cut using bias threads.
Now you need to process the prepared patch pocket part.
Source
How to knit patch pockets correctly with knitting needles?
First you need to decide on the size of the pockets, thread color and pattern. They can easily turn into bright decor, especially on children's clothing.
Knitted owl pocket
Very attractive owl pocket. It requires two patterns and only two buttons. It looks quite unusual.
For work use:
- yarn of two colors;
- knitting needles according to the thickness of the yarn;
- two buttons for decoration.
Measurements
Measure the necessary parameters for the future product - length and height.
Sample
Using a two-color pattern, make a small square with knitting needles and calculate the knitting density for it. Later, determine the number of loops for the first set and how many rows are needed to complete the pocket. Also take into account that the elastic pocket has a slight bend.
Two-color pattern
Make a two-color version using two threads. It will be very convenient to knit it, since a thread of the same color goes through two rows at once, and at the moment of returning to the front side, another thread appears on this side, and there will be no unnecessary broaches on the wrong side.
Start
After the unusual and attractive pattern, which in the work will personify the body of the bird, the head will later be followed by the second motif. This is the head of a bird and should be done with a simple 1*1 elastic band.
Assembly
Sew the pocket along the bottom border and along the sides, but only to the middle. Then secure the upper corners with buttons. There you go. The elastic band will stretch and therefore there will be a small gather along the upper border.
Pocket with leaves knitting needles
in the shape of a trapezoid A cute and very convenient option with knitting needles can be made in the shape of a trapezoid. It only requires two fabric patterns. And both of them are so unusual.
To work you will need:
- medium-weight pocket yarn;
- knitting needles according to the thickness of the thread.
Measurements
Measure the required measurements for the trapezoid pocket. Measure the bottom line of the pocket. Next is the height and the short side.
Sample
Knit a small square with knitting needles and use an elastic knitting pattern for it. This is a very unusual and rare "bed" pattern. Then calculate the knitting density and then the width in loops and height in rows.
Canvas
Start knitting according to the measurements of the bottom. Knit to the middle line and start making shortened rows. To do this, knit rows and do not use the last two loops. Then knit the leaves of their pattern along the entire line. It remains to complete 4 rows with an elastic band. There you go.
Sew it on three sides, leaving the oblique side unstitched.