A side welt pocket with a flap and two facings is used in the manufacture of jackets and lined jackets:
Processing diagram indicating cut details:
Designations on the diagram: from the main fabric: A-front; B – upper facing; B-valve; G – lower facing;
from lining fabric:
D – valance; E – pocket lining; F – valve lining;
from cushioning material:
Z – lobar; I – valve gasket; K – gasket of the lower facing; L – gasket of the upper facing.
Configuration of cutting details necessary for processing the knot and n.o. they are presented in the table:
| the name of detail | Sketch | Warp thread direction |
| Made from main fabric | ||
| Before | Parallel to the cut of the side below the top side hinge. | |
| Valve | Like on the front | |
| Upper facing | Along the detail | |
| Bottom facing | Along the detail | |
| Made from lining fabric | ||
| Valance | Along the detail | |
| Pocket lining | Deep into your pocket | |
| Valve pad | ||
| Made from adhesive cushioning material | ||
| Dolevik | Along the detail | |
| Upper facing gasket | Along the detail | |
| Upper facing gasket | Along the detail | |
| Valve gasket | Like on the valve |
The processing diagram for a side welt pocket with a flap and two facings, indicating the order of stitching, is presented below:
Sequence of processing a pocket with a flap and two facings
| No. | Name of technologically indivisible operation | THAT | Sketch |
| 1. | Duplicate the valve with an adhesive gasket | Laying the adhesive pad to the underside of the valve symmetrically relative to the side and bottom sections | |
| Baste valve with valve liner | Folding with the right sides inward, aligning the cuts, sweeping along the flap, placing the flap in the corners, w.w. 0.6 cm | ||
| 3. | Stitch the valve with the valve lining | From the side of the valve lining sh.sh. 0.5-0.7 cm | |
| 4. | Trim the flap seam allowance at the corners | Not reaching the turning line 0.15 cm, at the same time removing temporary threads, cutting them after 1.5-3 cm | |
| 5. | Turn the valve right side out | Straightening the corners | |
| 6. | Sweep the edges of the flap | Sweeping from the side of the flap lining, straightening the piping from the flap 0.1-0.2 cm, using oblique or straight stitches (depending on the fabric) | |
| 7. | Iron the valve | From the side of the valve lining through the iron, slightly moisturizing | |
| 8. | Remove temporary threads from the valve | Cutting them every 1.5-3 cm | |
| 9. | Iron the valve ready | From the side of the valve lining through the iron, slightly moisturizing | |
| 10. | Check the quality of valve processing | Quality of stitches, WTO, symmetry of paired parts | |
| 11. | Mark the valve width line on the valve | Measuring with a ruler or along a pattern from the bottom edge of the valve (the orientation line of the fold of the upper facing is applied) | |
| 12. | Duplicate the top and bottom facings with adhesive pads | From the wrong side | |
| 13. | Iron the top facing | Folding the front side out in half lengthwise | |
| 14. | Iron the bottom facing | Folding the front side out along the 1/3 | |
| 15. | Stitch valance to pocket lining | Laying the valance with the wrong side on the front side of the pocket lining, aligning the top and side edges, folding the bottom edge of the valance inside out by 0.7-0.8 cm, adjusting the sh. 0.1-0.2 cm | |
| 16. | Stitch flap and top facing to valance with pocket lining | Laying the flap with the flap lining on the valance, aligning the top edges and with the side edges of the valance symmetrically extending beyond the sides of the valve, placing the top facing on the valve with a fold to the intended line and with the side edges of the facing symmetrically extending beyond the sides of the valve | |
| 17. | Mark the location of the pocket on the front | On the front side, along the pattern, with 4 lines (the distance between the longitudinal lines is equal to twice the width of the two frames, between the transverse ones - the length of the entrance to the pocket) | |
| 18. | Glue the lobe to the front | From the wrong side at the location of the pocket, symmetrically relative to the intended lines | |
| 19. | Stitch top facing with flap and valance with pocket lining to front | Laying the facing with a fold at the top to the top marked line, with the side cuts symmetrically extending beyond the side marked lines, stitching the stitching of the facing and flap onto the hem, starting and ending at the level of the side marked lines. | |
| 20. | Sew the bottom facing to the front | Laying the facing with the wide side up, fold down to the bottom marked line, w.w. 7 mm, starting and ending at the level of the side marked lines | |
| 21. | Check that previous operations were performed correctly | On the shareholder side, the lines should be parallel, starting and ending at the same level. The distance between the lines should be equal to twice the width of the frame. | |
| 22. | Cut the entrance to the pocket | From the lobe side, in the middle between the lines, starting from the middle of the pocket in both directions, not reaching the side marked lines 1-1.5 cm, cutting into corners, not reaching the threads of the lines 0.15 cm | |
| 23. | Turn the facing seams to the wrong side | At the same time turning out the pocket lining | |
| 24. | Sweep seams for stitching facings and flaps | Using straight or oblique stitches 0.5-0.7 cm long at a distance of 0.2 cm from the stitching lines, removing seam sagging | |
| 25. | Iron the entrance to the pocket | From the wrong side and right side through the ironing iron | |
| 26. | Stitch the bottom edge of the pocket lining to the bottom edge of the bottom facing | Folding the parts with the right sides inward, aligning the joined and side sections, w.w. 1 cm | |
| 27. | Sew pocket lining | Sh.sh. 1 cm, starting and ending the stitch by sewing the corners of the pocket opening onto the facings along the base with a triple backstitch | |
| 28. | Remove temporary threads from the pocket | Cutting them every 1.5-3 cm, removing them with a peg | |
| 29. | Iron the pocket ready | From the wrong side and right side, through the ironing iron, moisturizing, straightening unevenness and wrinkles, removing lasses |
Source: https://sigolochky.blogspot.com/2015/04/blog-post_12.html
Technology of pockets in a frame with a flap and with a leaf
Home >> We model and sew >> Technology of pockets in a frame with a flap and with a leaf
In the previous master class you could learn how to make framed pockets yourself. But in products, especially in models of jackets, coats and raincoats, more complex versions of these pockets are often found. They can be with a rectangular or shaped valve.
Therefore, in this master class I will show you the technology for making them, in detail and with photos. And you will learn how to make a pocket with a leaf.
Jackets with framed pockets and flaps
- Leaflet pocket technology.
- The size of the mock-up part of the leaf along with the allowances is a rectangle with sides of 13.2 cm and 8.2 cm, cut from the main fabric of the product, or from a contrasting one, if you have chosen such a model of a jacket or coat.
- To calculate the size required for your model, multiply the height (width) of the leaves by 2, since the part is folded in half.
For example, the height of the finished leaf is 3.5 cm, and the length is 12 cm. The size of the allowance is 1.2 cm. This means that you need to cut out a rectangle with sides 12 + 1.2 = 13.2 cm and 7 + 1.2 = 8.2 cm.
602
Cut out and stitch the leaf
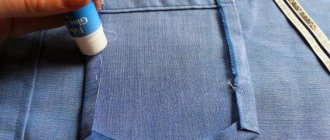
I advise you to cut out the part a little more, since some fabrics, depending on the composition, give additional shrinkage, despite preliminary decating (ironing with steam) of the entire piece of fabric before cutting. This is especially true for woolen and loose fabrics, for tweed.
Duplicate the details of the leaf with adhesive material, and only then cut out the parts exactly to size - photo 1.
Fold each piece in half with the right sides facing inward and stitch them along the side edges at a distance of 6 mm from the edge. Then turn the parts inside out, iron and sew control lines at a distance of 3.5 cm from the fold (for a prototype model) - photo 2.
How to apply marking lines for pockets and prepare burlap parts - in the first part of the master class “Framed Pocket - Technology”.
Attach the piece of paper to the pocket marking line on the shelf, aligning its cut and the pocket cut line, fold down - photo 3. Place the burlap part with the valance as in the photo. Baste the details.
Technology of stitching leaves to pocket
Sew the burlap piece with the valance and the leaf along the control lines, starting and ending them 2 - 3 mm from the edge. Sew 2 – 3 securing stitches – photo 4.
Cut through the pocket, carefully making undercut triangles (more on this in the 1st part, as well as on how to stitch the burlap parts of the pockets).
Turn the burlap part with the valance inside and lift the leaf up - photo 5.
We sew the burlap of the pocket and the leaf
- Sew the burlap parts together and sew the leaves with a blind seam by hand or topstitch.
- Examples of jackets with pockets with leaves.
- The pocket leaves can be made from the main fabric of the product, for example, in classic jackets, or from a contrasting fabric.
Women's jackets with leaf pocket
You can especially often see pockets with leaves in blazer models or popular tweed jackets in the Chanel style.
Chanel style jacket with leaf pocket
Such pockets can decorate both a smart jacket made of jacquard fabric or fabric with a shiny effect, and a model in a sporty style.
Jackets with leaf pocket
How to make a pocket in a frame with a flap.
The details of the pocket flaps, if you are sewing from relatively thin fabric, you can cut all 4 from the main fabric. If it is made from a denser material, then it is better to cut out 2 parts from fabric and 2 from lining material. Duplicate the upper parts of the valve with adhesive material - photo 7.
Usually I cut out parts with allowances of 6 - 7 mm. In order for the pocket with lining fabric parts to look neat, along the contour of the lower part of the valve, on 3 sides, cut another narrow strip 1 - 2 mm wide. As you stitch and iron the pieces, the outer edges will move inward a little.
Cut out and sew a pocket with a flap
Pin or baste the top and bottom flap pieces, pulling the lining fabric piece lightly to align the edges, and sew with a fine stitch - photo 8.
Iron the seam line, trim at a distance of 2 - 3 mm from the edge, trimming at the corners. Turn the flap out and iron again, moving the bottom piece inward. Carry out a control stitch at a distance of 5 - 7 mm from the cut line - photo 9.
Make a welt pocket into a frame using the technology of the first master class. Place the finished flap piece in the pocket slot - photo 10. From the wrong side, sew the flap piece to the top facing piece - photo 11. Then you can sew the pocket burlap parts.
Finished pocket flap
Examples of jackets with pockets with flaps.
Pocket flaps in jackets and coats can be, like leaflets, made of the main fabric or a contrasting color, located horizontally or obliquely, with sharp corners or rounded. Check out some jacket designs for inspiration.
Models of jackets with pockets with flaps
Jackets with pockets – Chloe, Balmain
I also recommend looking at the technology for making an English collar or a shawl collar.
Internal pockets.
Jackets often have internal welt pockets on the left shelf. The technology for making it is the same as for framed pockets - photos 12 and 13. You can easily handle this on your own.
Internal pockets on the jacket lining
Source: https://lana-web.ru/hiem_sami/tehnologia_karmanov_s_klapanov_i_listokoi.html
RЈСЂРѕРєРё шитья. Прорезной карман «РІ рамку» СЃ клапаном Р§.1
РќР° СѓСЂРѕРєР°С... шитья продолжаем изучать RїСЂРѕСЂРµР·РЅС‹Рµ кармаРSC‹. РќР° этот раз прорезной карман «РІ рамку» СЃ клапаном. Такие карманы выполняются, главным образом, РЅР° пкджаках. Ознакомимся как сделать RµРіРѕ правильно. Р' РѕСЃРЅРѕРІРµ него лежит уже известный нам Прорезной карман "РІ рамку".
Framed welt pocket with flap
A welt pocket differs from a patch pocket in appearance and sewing technology.
If the patch pocket is sewn on (pocket details are superimposed on the main part of the product and attached), then the entrance to the welt pocket is nothing more than a well-processed cut made on the main part of the product. Look at this pocket, its burlap is invisible from the front side, the entrance to the pocket looks like a frame and is closed with a flap. Such pockets are usually made in jackets and jackets.
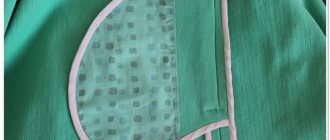
This article discusses in detail the technology of sewing a welt pocket in a frame with a flap for a jacket with a cut-off side; the burlap of the pocket is made of lining fabric, and due to the elongated upper facing it is not visible even when the flap is turned up.
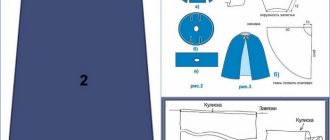
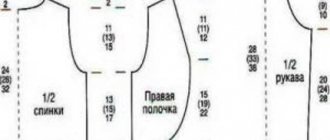
Details
- 1 – front of the jacket, the parts are glued with non-woven fabric, a raised seam and a dart are made,
- 2 – the upper part of the flap, glued with non-woven material, the lower corners are rounded, the dimensions of the part: 14.5 x 6.7 cm, taking into account seam allowances, the finished width of the flap is 13 cm,
- 3 – lower part of the valve, lower corners are rounded, part dimensions: 14 x 6.5 cm, taking into account allowances,
- 4 – bottom facing, glued with non-woven material, size: 17 x 4 cm,
- 5 – top facing, glued with non-woven material, size: 17 x 6.5 cm,
- 6.7 – pocket burlap, lower corners are rounded, part dimensions: 17 x 14 cm, including allowances,
- 8 – strip of non-woven fabric for duplicating the cut at the entrance to the pocket, size: 17 x 3 cm.
Master class on sewing a welt pocket in a frame with a flap
- On the front side of the product we mark the place of entry into the pocket, a line passing through the cut that was left when making the scoring barrel, 13 cm long.
We transfer the line to the wrong side. On a strip of non-woven fabric, mark a section 13 cm long exactly in the center.
Glue the strip on top of the interlining on the front of the jacket, so that the horizontal center of the strip coincides with the marked line.
- We place the valve parts with their right sides facing each other, grind along the sides and bottom sides 0.7 cm from the edge. The lower part of the valve is slightly smaller than the upper one, so when sewing we stretch it a little so that the edges of both parts match. Due to the difference in size and the alignment of the edges after stitching, the valve has a curved appearance.
- We apply the facings and burlap pockets with the right sides, sewing 1 cm from the edge (I will secure both the top facing and the burlap while sewing 0.5 cm from the edge and align the burlap with each other when sewing the burlap).
- We cut off the valve allowances by 0.3 cm, make notches in the corners, turn them inside out and iron them well.
- We iron the seam allowances with burlap to the burlap side.
- On the top of the wrong sides of the facings we mark a section 13 cm long (the length of the valve in its finished form), that is, we retreat 2 cm from the sides.
Align the marks on the bottom facing with the marks on the front line. We sew the bottom facing with burlap to the shelf: at a distance of 0.7 cm from the upper edge of the facing, we lay a straight line 13 cm long, EXACTLY from mark to mark (this is very important), we do not put bartacks, we leave the ends of the threads of sufficient length to tie knots on both ends of the line.
Align the marks on the top facing with the marks on the front line. We attach the top facing with burlap to the shelf in the same way as we attached the bottom one.
- Pull the ends of the threads to the wrong side and tie knots.
On the wrong side, we mark the cutting lines: we retreat 1.5 cm from the ends of the lines, draw a straight line 10 cm long, strictly in the middle between the lines and, accordingly, parallel to them, from the ends of the line we draw segments towards the ends of the lines, but just short of reaching to them (about 1 mm). We cut the shelf along the marked lines, only the detail of the shelf, do not touch the facings. It is very important that the cuts come close to the ends of the stitching, but do not go into them, otherwise there will be holes, but not cutting too much is also bad, it will be impossible to turn the facing out evenly.
- From the wrong side, iron the edges of the cut shelf, as shown in the photo.
- From the front side, along the stitching line, we turn the top facing with burlap onto the front side, iron it, turn it inside out through the slot, pull it up, make sure that an even rectangular strip remains on the front side, iron it.
- We do the same with the bottom facing. You will get a frame.
- Fix the sides of the frame. To do this, we grind the “triangles” from the cut of the shelf to the facings. We turn the sides of the shelf right side inward, secure them with tailor's pins, and lay the lines exactly along the bases of the triangles. We don’t put fasteners, we tie knots.
- Fix the top and bottom sides of the frame. Using basting stitches crosswise, we fix the even position of the frame parts. We place the stitches exactly in the grooves of the seams for stitching the facings with the front. We don’t put fastenings, we bring the threads to the wrong side and tie knots. Remove running stitches. Iron it well.
- We retreat 1.5 cm from the top of the flap (this is the part that will be hidden under the pocket frame) and draw a line. Place the valve under the frame.
From the wrong side, we wrap the top facing with burlap (the fold line coincides with the top side of the flap), fix the facing with the flap inside. We sew a straight line exactly along the seam of the frame. We do not put fasteners. We check that the valve is sewn evenly into the fold of the facing. We bring the threads to the wrong side. We tie knots.
- On the wrong side of the shelf we combine the burlap pockets. We adjust if necessary. We stitch the facings and burlap together 0.7 cm from the edge, and place bartacks at the beginning and end of the stitching. We sew the edges using an overlocker or a zig-zag seam.
The welt pocket in the frame with a flap is ready. The jacket has a lining that will completely cover the inside of the top of the jacket and the burlap of the pocket.
Finished pocket in a frame with a flap on the front side of the jacket:
You can make a similar pocket for your jacket or jacket yourself.
Source: https://howtosew.ru/poshiv-detaley-odejdi/proreznoj-karman-v-ramke-s-klapanom.html
Types of welt pockets: what types of welt pockets are there?
769 Reading time: 5 min.
What types of welt pockets are there?
There are more than 10 different types of pockets for things. Each one is unique in its own way, but you need to create them without haste, and it’s better to measure the sides once again before taking up the scissors. Then there are photos of the pockets and a brief description for each, as well as design tips for DIYers and those new to sewing.
Welt pocket “in a simple frame”
In the photo we see a rectangular frame and an insert with another fabric . To do this, you must first measure the sides, then draw with chalk or special pencils for fabric.
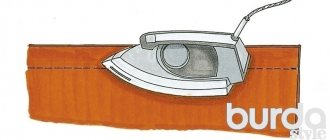
Then make a slit in the center of the frame and carefully tuck the edges inward. Next you will need an iron. It is necessary to iron the edges of the frame evenly. Only after this can you insert additional fabric, turning the ends of each fabric in one direction.
To ensure that everything turns out smooth and without displacement, also iron the additional fabric and initially use needles for joining.
Welt pocket “in a complex frame”
This option is simply a variation of the first version. But it additionally includes a special detail made from an additional piece of scrap.
Welt pocket with flap
This option with a valve looks very nice.
It is divided into an element with one facing and two. When making the product, this option is practically no different from a simple one with a frame, but it will require a special valve. It is made to size separately.
The valve itself is initially created on the wrong side . Then cut the part that was made so that the sides do not diverge and insert the valve there.
The second option is done in a similar way, but the frame will have two facings and therefore there will be an additional line above the valve .
Welt pocket with zip fastening
This complex species has three varieties at once. It's a simple zipper. For it, use a zipper, which is initially sewn to additional fabric. Then create it as a simple element with a frame.
With a leaf, it will be useful to create a leaf in addition to the blank with a zipper, and insert it first when sewing in so that it is on the front side.
Framed slotted zippers
Models such as zippers in a frame should be considered very common options.
Welt pocket with leaflet
The leaf represents a separate part, which is combined with the product, and the creation takes place using a simple frame technology.
Here the sides of the leaves will be stitched, rather than stitched, with a visible seam along the front side.
But there are also ones with stitching on the front side, this is the type with a leaf and stitching ends.
Welt pocket
The execution of this model is located next to a simple frame, only here no backing parts are required, but only a narrow strip and additional stitches that will secure the leaves.
Externally, it will be difficult to distinguish it from the usual one with a leaf. But you just have to touch it with your hands and try to put something there and you realize that there is not much space there, or rather, your fingers immediately rest on the seam of the leaf.
Framed welt pocket
The fake can be not only with leaves, but also a regular “framed” model. It also does not require additional parts for the internals, since the compartment itself will not be there. Only the same elements as in the previous version for creating a frame.
Welt pocket with flap
Initially, draw the edges - this is an elongated rectangle . Then create an additional part.
There will be no need to make a compartment, and therefore the inside is only a small part that will align with the sides outside the frame. But this model needs a flap; it should be made along the width of the dart and sewn on the wrong side.
After the front side is cut, the sides are turned out and the already ironed product will require an even stitch for the edges of the cutout.
Slit pocket
A very interesting model. It will be difficult for beginners to understand. The drawing itself is presented here in three lines. Next, create all the necessary internals - these are the walls of the product and an additional part that will fix the seams of the gap.
Cut after the seams only along one line.
Edge welt pocket
In structure, this type is very similar to model 9 and even 1. But its feature is that externally all the details are hidden with the help of a small and thin edging.
Valves
The valves are a kind of “lid” of the pocket . They can be very different in their form. They can simply repeat the bottom of the product itself.
They are usually made dense so that they hold their shape well.
Therefore, often these “lids” consist of two layers of fabric, which the seamstress folds with the wrong sides facing each other and makes a slight hem inward .
The stitching itself runs a millimeter from the edge. This is real skill and very delicate work . You can use an iron before stitching. This will make the fabric more pliable and outline the corners.
Leaflets
Some pockets are covered with leaves. Under them you can easily hide not only the entrance to the hole, but also a wide zipper. Very inventive details. And they also have a lot of varieties . Such elements can be single. For example, to be located and have a hole at the top or bottom. For a vertical pocket on the right or left.
For oblique cuts, special diamonds are made . The seamstress always monitors the thread so that the whole element is a single whole. There are also types of leaves that are created short at the edges. Such options for a zipper are very convenient.
Turnings
Facing is the name of the fabric with which craftsmen process cutouts . But they do not always repeat the shape of the product and are a single fabric. They can be made from completely contrasting fabric and this is the designer’s idea.
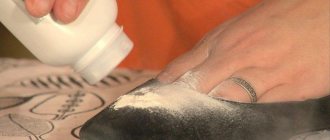
Dolevik
In any case, the future incision should always be reinforced with special fabric . This strip or rectangle is called a lobe. This element is presented either in thin cotton fabric or non-woven fabric.
The width is usually used from 6 cm. After installation in the required place, this part needs to be well fixed, and hand stitches help to do this. Place stitches on the longest side along the top and bottom of the rectangle.
Make stitches approximately at a distance of 2-3 cm and at a distance of 0.5 cm from the edge.
Burlap lining
The main fabric can also be used as fabric for this internal element . But in the case when a master sews a coat or something made from thicker fabric, it is better to use a special lining material. In terms of size, you can use different options . They can be one-piece or consist of parts.
Valance
A valance is a kind of covering made of the main fabric that will cover the entrance to the product . It is important to remember one rule for him. Its pattern will be in compliance with the directions of the grain thread and only from the fabric of the main product.
With effort and hard work you can achieve an excellent result. And things are always more practical with pockets. Its variety can make a thing individual.
Did you like it?
Loading…
Found a mistake? Select it and press Ctrl + Enter. We'll fix everything!
Source: https://tkaner.com/furnitura/karman/vidy-proreznyh-karmanov/
One-piece pocket briefcase, master class | Sewing Advisor
A one-piece briefcase pocket with a flap can often be found on clothing for both adults and children. Such a pocket has a three-dimensional shape, and the entrance to it is usually covered with a flap. Our master class will tell you in detail how to create a pattern and sew a one-piece briefcase pocket with a flap with your own hands.
One-piece briefcase pocket with flap: preparation for work
How to sew a one-piece briefcase pocket with a flap with your own hands? We will tell you how to sew a rectangular pocket with right corners and a flap with rounded corners. The pocket itself can be either a square or a rectangle; its size depends entirely on the design of the model. You also need to decide what the maximum thickness of the pocket will be.
To provide this thickness for the pocket, an additional piece is needed: the sides and bottom. This part can be cut out separately, or it can be made whole - this is exactly the type of pocket we will talk about in our master class.