For the off-season period, a women's raincoat is one of the most comfortable and sought-after items. Unstable spring and autumn weather often gives unexpected surprises in the form of cold rain and fog in the mornings, clear and sunny weather in the afternoon. That is why the raincoat is a very relevant wardrobe item until the onset of summer days.
Of course, the easiest way is to buy a raincoat in a store, but it is not a fact that you will be able to find exactly the thing that will fit your figure perfectly or will match your color and quality of fabric. For example, raincoats for obese women can only be found in special stores and their cost is quite high. It's not at all difficult to sew a raincoat with your own hands.
Fashionable women's raincoats for spring and autumn
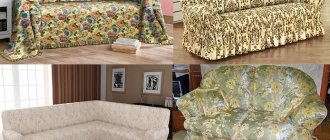
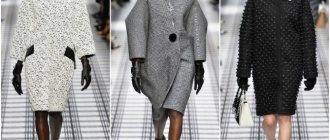
Raincoats almost never go out of style and this season is no exception. The vast majority of fashion houses presented a wide variety of models in their ready-to-wear collections. When studying fashion trends, it is worth immediately noting that a classic raincoat is always relevant.
As for styles and lengths, fashion designers advise paying attention to double-breasted styles of classic cut and loose models; the length can be very different, from short raincoats like a parka jacket to very long maxis. As you can see in the photo, every fashionista can choose a raincoat according to her taste, figure and preferred style.
The trend is for loose-fitting raincoats just below the knee, which are suitable for both slender, graceful girls and ladies of elegant age with curvy figures. Double-breasted raincoats are presented in a wide range, lengths from mini and medium to long floor-length models. Elegant classic models have a very simple cut, a classic English collar with lapels or a shirt type. Almost all fashionable models of raincoats have a belt with a buckle.
Lovers of feminine romantic style also have something to choose from. Many collections feature models with a cut-off waist and a wide bottom. Length – up to or just below the knee and maxi. The color of a raincoat in modern fashion is the personal preference of every woman.
You can safely choose fabric in bright colors or printed material in the online store. For classics, it is recommended to give preference to light shades from milky to light beige and coffee. Many fashion designers presented maxi raincoats in dark colors and black.
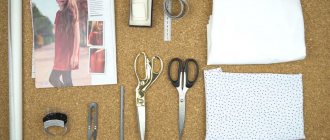
Materials, tools
To work you need the following:
- Material (wool, drape, cashmere);
- Non-woven fabric;
- Lining.
- Sewing machines;
- Threads (for basting, for stitching);
- Chalk or a piece of soap;
- Scissors;
- Pins;
- Needle for basting.
Attention! Before sewing the coat, the material is washed in warm water and glued with non-woven fabric. Similar steps are repeated after the oversized coat pattern is made.
Sewing tools
Raincoat fabric
To choose the right fabric for a raincoat, it is important to take into account some nuances - the climatic and seasonal conditions of the region where you live, your body type and model. For classic straight or slightly flared styles, plain raincoat fabrics such as Duspo Milki, artificial or natural leather are suitable. It is better to sew a waterproof insulated raincoat from quilted wool on synthetic padding. Short raincoats for girls and young girls can be made from bright printed materials, for example, from Duspo print or print stretch faux leather.
What measurements will be required?
Required measurements:
- ОШ - neck circumference.
Measure the base of the neck.
- OG;
- FROM;
- ABOUT. If there is a belly, you need to place a magazine or ruler.
- CG;
- ShG;
- ShS;
- DTS;
- VB;
- DTS1;
- VG;
- road accident;
- Accident1;
- Chest dart solution;
- military industrial complex;
- VLOOKUP (bottom);
- ShP;
- Druk;
- OP;
- OZ.
Increases
Adjacent - semi-adjacent:
| Abbreviation | Increase | meaning |
| PDT | To the length to the waist line | cm + 40 mm (under the belt, if any) |
| POG | To chest circumference | 100-200mm |
| SWEAT | To the waistline | 80-220 mm |
| FOB | To the circumference along the hip line | 100-140 mm |
| PShS | Bring your arms together in front, measure the width of your back - width + increase | 80 mm |
| PSHG | To chest width | 60 mm |
| Shoulder | Shoulder seam | Up to 2 cm |
| Pdli | To product length | 2 cm |
| Pop | To shoulder circumference | 90-150mm |
| Pdlr | To sleeve length | Up to 2 cm |
If you are sewing a straight-cut coat, the following increases will be required:
| Abbreviation | Increase | meaning |
| PDT | To the length to the waist line | 10+ 50 mm (under the belt, if provided) |
| POG | To the circumference along the chest line | 200-300 mm |
| PShS | Back width | 80-100 mm |
| FOB | To the circumference along the hip line | 200-300 m (when sewing a trapezoid, the increase must be increased) |
| PSHG | Back width | 60-90 mm |
| Shoulder | Along the shoulder seam | Up to 3 cm |
| Pdli | By product length | Up to 2 cm |
| Pop | By shoulder circumference | 150-200 mm |
| Pdlr | On the sleeve | Up to 2 cm |
You might be interested in what a pattern is and why it is needed
Sewing a raincoat - stages and nuances
The pattern of a medium-length double-breasted raincoat with an English collar and welt pockets with flaps consists of:
- Back – 2 parts;
- Front – 2 parts;
- Sleeves – 2 parts each;
- Collar – 6 parts;
- Front trim – 2 parts;
- Collar trim – 2 parts;
- Flaps for pockets – 2 parts;
- Knee strap – 1 piece.
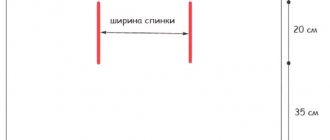
The photo shows a diagram for constructing a pattern, which can be adjusted according to dimensional data and individual characteristics of the figure. When preparing for work and cutting, you need to take into account that you will also need lining fabric and duplicating material for the front and collar hems. If the main fabric is soft, then you can additionally duplicate the upper part of the sleeve and back.
Stages of work:
- Machine stitch all the prefabricated parts - back, sleeves, collar;
- Sew pocket flaps into the front details;
- Sew burlap pockets from lining fabric;
- Insert burlap through the slit with the wrong side facing out and sew it in from the wrong side of the front;
- Sew, connecting the right sides of the hem to the front parts;
- Connect the shoulder seams, then the side seams;
- Sew in sleeves and collar;
- Sew lining fabric.
You can't stop sewing beautifully!
Outerwear, Children's, Master class
Hello, friends!
How to sew a cape or “Zorro” costume
Before the New Year's matinees, we had a need to sew a carnival costume for our son.
The legendary hero “Zorro” was chosen as a prototype.
I quote a few words about the hero: “... The legend of Zorro tells the story of the most fearless hero of all times and peoples, who helped the poor, protected the weak, and always found himself in the place where his help was needed...”
Of course, a 10-year-old boy secretly or openly dreams of being like such a hero...
The costume turned out to be easy to complete.
Using one of the principles of creating a carnival costume, which I talk about in the book “DIY Carnival Costume? Easy!”, we made the basis of the costume from black trousers and a shirt. You can replace a black shirt with a white one; my son wanted a black shirt.
We also needed a hat (you can make it yourself - by gluing the brim to the cylinder and painting everything black), we had a hat left over from previous holidays, we just glued the letter “Z” - the symbol of Zorro.
I cut the belt and glasses from fabric.
The only difficulty when creating a “Zorro” costume and similar costumes, especially for beginners in sewing, is cutting and sewing the cape.
I’ll tell you about the simplest, in my opinion, method of cutting such a raincoat - the tattooing method. It is also called dummy or mock-up. The essence of the method is that the product is formed directly on a mannequin or human figure.
I came across several patterns for a raincoat on the Internet (see figure below), but the good thing about the tattooing method is that you don’t need to build a pattern, in the literal sense.
For the cape, belt and glasses I used 1 meter of fabric.
I was lucky to buy double-sided fabric at once (at first I wanted to sew fabric in two colors): the front side is satin, the back is thin knitwear.
First, I cut about 12 cm from a piece of fabric for a belt and glasses, the rest was used for a raincoat.
How to sew a cape
I fold the fabric in half lengthwise and mark the middle.
I put a piece of fabric on the figure, aligning the marked middle and the seventh cervical vertebra, and cut off the sections in the center of the front with a pin.
Then I use pins to pin off the excess fabric on the shoulders and mark the end point of the shoulder.
With chalk I outline the neck line along the back and front.
I take off the future raincoat with a tattoo and basting, lay out the fabric and draw a rough drawing.
Then I fold the fabric in half again and draw the final design along the right side. Then I move the clarifications/changes to the left side.
I draw out the undersides of the cape.
Here you can experiment with the lower cuts, cutting them in an arc (red outline) or giving them a different shape. I just rounded the cuts. The front of the cloak turned out to be a little shorter, and at the back there was a small train (my son asked for this).
I sew the darts. In order for the cloak to look beautiful and neat from the inside, I add a piece of cotton braid to the seam allowances for sewing the dart.
Next, I fold the raincoat along the fold, make the adjustment and edge the neckline with a cotton ribbon. The stitch I chose was decorative.
I sew buttons on both sides (again, to make the inside look nice). I cut a piece from the cord, tie it, a loop is formed that will serve as a clasp. You can use a black narrow elastic band or a hair tie.
I cut out the belt, sew on the ties (but practice has shown that they are not needed, it’s enough to just tie a fabric belt). I cut out glasses and attach elastic to the edges.
I did not process all the open sections - the cloak, belt and glasses - with a stitch, but simply singed them over the flame.
The fabric is synthetic, so the fibers melted and the cuts turned out fray-free, at the same time, the product has a finished look.
I almost forgot, for “Zorro” you also need a sword!
It was made by my dad and grandpa from an old pointer, the neck of a plastic bottle and tape.
This is how we got “Zorro”
Do you agree with me that sewing a cape and a “Zorro” costume is not at all difficult?
By the way, the tattooing method can be used if you need to cut out a more complex product, for example, a poncho or dress.
Sometimes he can be very helpful.
Lots of books on sewing - CLICK
With best wishes, Elena Krasovskaya
This is interesting:
- How to sew a cape, pareo, skirt or kilt...
- How to sew a fashionable beanie hat with lining...
- How to quickly sew a spectacular evening...
- About illusions in clothing or how to change...
- Book “How to choose a sewing machine”
- We sew a pareo for the beach ourselves.…
Processing the bottom of the sleeves with facing
There are many ways to process the bottom of products and sleeves. In many ways, the choice of technology depends on the type of product - cardigan or poncho, as well as on the equipment available to the master and his professional skills.
Pattern No. 2
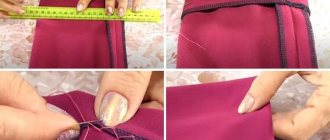
Facing is often used. This type of sleeve processing is performed according to the following algorithm:
- The facing is sewn to the sleeves;
- The parameters of the seam allowance for turning the facing are adjusted;
- The stitching seams of the facing are ironed, the edging from the main part is straightened;
- The facing is secured with hidden stitches;
- The bottom is ironed.
Bottom facing
Basic lining sleeves
When sewing a product, not always everything turns out as planned. Sometimes it happens that the sleeve was intended to be single-seam, and when the product is ready for fitting, it becomes clear that the sleeve width is not enough. In this case, the appropriate option is to sew on a two-seam sleeve, which means that a foundation is required.
2 lines are drawn on the sleeve, defining the position of the inner and elbow seam (the minimum distance is taken). The width of the allowances is marked - 15 mm and the part is cut out along with the seam, which acts as a pattern.
What does the lining look like?
Processing pockets in darts
There are many types of pockets used in tailoring. Among them is a pocket with a leaf: often used when sewing coats. Making this pocket is not difficult if you strictly follow the instructions:
- The pattern is applied to the front shelf, the location of the pocket is noted. The corners of the pocket are pinned;
- The pocket frame is stitched (basted);
- The location of the pocket is duplicated on the reverse side of the product. A strip of dublerin is cut out (the proportion of the material coincides with the vertical of the pocket part). The parameters of the dublerin strip are 3 cm larger than the pocket and 4 cm longer than the frame of the part;
- From the inside, the part is glued with dublerin and ironed;
- The pocket leaf is cut from artificial leather or other fabric - wool, contrasting material. Additionally, the leaf detail is duplicated if it does not have the required density.
Leaflet parameters:
- Width – frame width + 30 mm;
- Length – frame length + 30 mm.
The leaflet is folded in half and stitched. It is placed in the middle of the frame in a vertical position and sewn on, falling into the blazed border of the frame.
Attention! The frame has perfect angles - the machine stitching does not extend beyond the blazed line even a millimeter.
This is necessary so that when you turn the pocket inside out, it doesn’t warp, and all the corners are straight.
Type of pockets
Cut out the linings
There are several ways to cut the lining.
According to patterns
The width of the facing and hem is subtracted from the middle patterns of the back and front, an increase is made in the places of “subtraction”, and a double allowance is added.
If the patterns are cut, they are combined.
The pattern is glued along the waist line, end-to-end, with tape, the middle parts of the front and back facings and hems are cut off from the patterns.
Attention! The sleeve is cut out by combining the top and bottom patterns, and a double hemming allowance of 7 cm is added along the bottom of the product.
The remaining allowances are made in the same way as for the “top” parts.
We sew a raincoat in 30 steps without a pattern
Today we’ll talk about what interesting and necessary thing you can sew yourself without a pattern and how to diversify your wardrobe this spring. There are also a lot of photos waiting for you! Take something useful and smile.
Especially for you, we have prepared a master class “30 steps and a fashionable raincoat is ready!”, during which you will sew a unique item right on the go without complex calculations. We filmed every step to make sure you can do the same steps at home and get great results!
Fabrics can be selected and ordered online. For those who have never used such a service, you have a great opportunity to try it. There are delivery points in every city. So there shouldn't be any problems with delivery either.
For those who, year after year, try to find a long raincoat of interesting colors and suitable for a non-standard figure, our lesson will be especially useful. I think I'm not alone in this. So, we can choose the outer and lining fabric to your liking!
Cape-cloak for mother and daughter
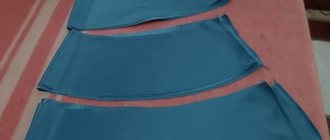
Modern family images are full of photos where adults and children are wearing the same clothes. If you also want such a set, then the easiest way is to sew a cape in the form of a cape.
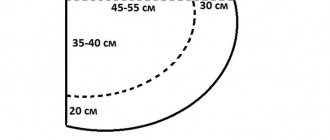
Using the material folded diagonally, you need to build a semicircle, the diameter of which is equal to the length of your arms, measured from one wrist to the other. The neckline is cut out, a cut is made in the front, and if necessary, a hood is drawn on the remaining flap. Further steps are to sew the headband, sew it in, process the cuts, and perform hems. The girl will be delighted if her mother chooses the fabric to her taste. Whether she likes floral motifs or would like to see cartoon characters, listen to the child’s wishes.
A raincoat is a stylish and fashionable item; it is necessary in any person’s wardrobe. It does not lose its relevance in the off-season, when the jacket is not a suitable option; it can also be worn in the summer in rainy weather when the temperature drops. A child over two years of age must have a raincoat and rubber boots in their clothing set. Then the baby will not be afraid of rain and wind.
Classic coat pattern
The pattern of a demi-season coat is modeled on the basis of the basic pattern of a women's coat with the addition of 70 mm for a loose fit, and the basic pattern of a two-seam sleeve.
Classic coat pattern
Back modeling:
- The location of the back line relief. From point A, 70 mm is deposited along the shoulder to the left. A relief seam line is drawn.
- The line of the middle back seam is straightened and drawn under the ruler from the waist line. The back piece is cut along the waist line.
- A flare is made along the lower part of the back parts by 50 mm.
Shelf modeling:
- From point B along the shoulder, 70 mm is deposited to the right. The chest dart is moved, and the line of the raised seam of the front is drawn. The waistline of the shelf rises along the side seam by cm;
- From the line running in the middle of the front, 60 mm are deposited to the right and left. The shelf is flared sideways at the bottom by 120 mm.
- From point C, 20 mm is laid down and the lapel is drawn. 230 mm is laid down from the horizontal line;
- The shoulder line is extended to the right and laid down along it;
- The lapel fold line is drawn. The neck line deepens, the lapel configuration is built - 14 cm;
- A turn-down collar is constructed, cut and spread along the upper edge by 25 mm;
- Loops and buttons are marked;
- The side of the shelf and the shelf and the edge are removed. The double-breasted sleeve is cut unchanged.
What the classic version looks like
Attention! To prevent the product from stretching or deforming, all parts are duplicated with gray non-woven fabric.
Additionally, the edges of the sides, armholes, fold line of the lapel, neckline, collar corner, and outer part of the valve are duplicated with the shared edge.
To sew a product, you need 3 m of loden with a width of 1.5 m. The parts of the back, front and sleeves are cut with allowances of 15 mm, allowances at the bottom - 40 mm.
Perfectly duplicates the figure
How to cut and sew a coat using patterns
Before you begin directly sewing the product, learn how to sew a coat, you should decide on the type of product: sewing a straight-cut coat will differ from making a loose-fitting coat, the sewing technology with a lining will have its own characteristics.
Type of cocoon coat, pattern
It doesn’t matter who will wear the coat - a girl or an adult woman - not every novice craftsman can accurately cut out a children’s set, and if there is a hood and other details, the complexity of the product increases, and the class of skill increases accordingly. The best mannequin for improving practical skills is a doll.
You might be interested in this. Useful information about computer-controlled sewing machines
It's easy to sew a raincoat
A product that does not require a pattern can be made by a person without special knowledge and skills. It is a little more difficult to sew a trench coat, even if there are patterns. They can be bought or downloaded on the Internet on websites that teach sewing. A craftswoman without experience should not take on the job if the raincoat is supposed to have a lining. This can be done beautifully and efficiently by professional seamstresses. You can contact the atelier, where they will cut and sew a raincoat of the desired style according to your figure.
If you know how to use ready-made patterns or have ever done this type of needlework, then the work will be easy to complete. You can design a raincoat based on patterns for a dress, you just need to increase the increments and expand the product downwards.
Main details:
- back;
- shelf;
- selection;
- sleeve;
- collar.
They will need to be laid out on fabric folded in half in the direction of the grain, outlined and cut. There will be 2 copies of all parts, and one copy of the back, since the pattern is laid on the fold of the fabric. Now all that remains is to baste, try on and sew the product.