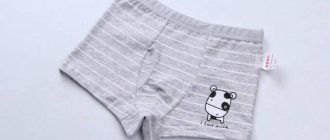
The pattern of men's family underpants is not as simple as it might seem, especially underpants for overweight men, starting from size 56. Incorrect calculations will lead to the fact that the panties will be uncomfortable, the threads in the seams will break, despite the fact that the panties seem to be loose.
DIY women's knitted shorts. Subscribe to my channel and you will learn how to sew various clothes.
The pattern for men's briefs is practically the upper part of men's trousers, so to make an accurate pattern you will have to do a little calculation and possibly adjust something during the fitting. But then, based on these calculations, you will be able to make a good pattern and use it constantly not only for patterning panties, but also for cutting light summer shorts with an elastic band. It is most convenient to create a pattern on graph paper.
Men's family pants should be comfortable, hygienic, practical, and therefore the fabrics for sewing men's pants should be soft, light and thin, but at the same time be durable and have a stable color. It is best to use chintz, satin or lightweight calico, 90 and 150 cm wide, for sewing panties.
Flower nursery Green Gate
Do you like indoor or garden flowers? At the Green Gate nursery you can buy rooted cuttings and divisions of various domestic and perennial garden flowers. We have a constantly updated collection of anthuriums and hibiscus. Flowers and plants are sent by mail.
Technology for sewing a baseball cap, from pattern to clasp. Subscribe to my channel and you will learn a lot of useful sewing tips from a professional.
What measurements are needed for men's briefs?
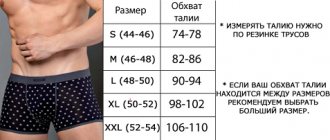
We offer a pattern for men's family briefs, made with short shorts without inserts. To construct a drawing of a pattern for men's underpants, the following measurements were used: St = 41 cm, Sat = 50 cm, Oh trouble. = 55 cm. For example, measurements taken: 176-96-82. St is half waist circumference. Sb - semi-circumference of the hips (at the widest point of the buttocks). Dinner. - thigh circumference at the highest point. To prevent the finished product from being too tight, allowances for a loose fit are used when creating patterns. Increases for men's underpants: Pb tall. = 2 - 5cm, Pb bad. = 5 - 6cm. For this size, we will choose an increase of 2 cm at the waist and 6 cm at the hips.
If you don't know how to take men's measurements correctly, see How to take measurements.
Sewing items of linen
They begin to sew the product by connecting the halves . The most reliable seam is considered to be a linen stitch, but you can also use a combination of an overlock stitch and one stitch.
In the proposed example, the halves were not processed, since the sewing was carried out for the purpose of testing the quality of the pattern and the correctness of the measurements.
The allowance for the elastic in the proposed example is 2 cm, which is quite enough to insert a wide elastic band.
The upper part of the product is placed on a double hem. Sew the top, leaving a small hole for threading the elastic. By inserting the elastic into the seam with a pin, the opening is stitched .
Basic knowledge of cutting will help you improve your pattern. For example, the proposed product can be made differently by equipping the panties with a wide decorative elastic band.
This is how, using the simplest manipulations with your own hands, you can sew original family pants, for which the proposed pattern of men's underpants will fit. So, size 52 is the average size of the product, however, it is recommended to adjust the pattern depending on the individual characteristics of the figure.
Constructing a pattern for men's underpants
The pattern begins by drawing a vertical line on a sheet of graph paper with the apex at point A. 1. From point A down, set the seat height: AH = 0.5 C6 + 1 = 0.5 X 50 + 1 = 26 cm and determine the length of the panties ( without allowances) according to the formula: AN2 = AN + 7 (increase) = 26 + 7 = 33cm. Both of these values are recommended for the second half (back), so you can immediately build the pattern and the second ladles. But we will give calculations sequentially, first for the front of the panties, then for the back.
MK men's boxers
Hi all! Today I will show you how I sew boxers for my husband. We take the pattern from this post. Many people ask if there is a master class on it. Now it is. And it is designed primarily for beginner needlewomen who don’t know where to start and think that sewing boxers is unrealistic.
Really! And it’s very easy! Let's please our loved ones? Then we prepare a cotton cooler with lycra (40 cm is enough for one panties), an elastic band 1.5-2.5 cm wide.
(calculate the length yourself, based on the elasticity, elasticity of the elastic and the preferences of the “client”), decorative patch, matching threads, needles, pins and a good mood! We will sew on an overlocker, fold the bottoms of the legs and sew on the elastic, I will use a double needle at the seamstress, you can use a stitcher. As a result, we get these panties:
We start by printing the pattern, gluing and cutting the parts.
The main part is cut alone with a fold. Don't forget to add 1.5cm seam allowance, hem allowance and double the width of the elastic along the top line. We cut the codpiece in the amount of 4 pieces with seam allowances and an allowance of two elastic widths at the top. There is one gusset, add a hem allowance of 1.5 cm on the short sides and a seam allowance on the long sides.
We sew down the parts of the codpiece in pairs. I sew panties with a narrow three-thread seam, with texture in the loopers.
We unfold one part of the codpiece and place it face up.
We place the main part on it face to face, aligning the corners along the top line.
And on top of it we place the second part of the codpiece face down. The corner is also compatible.
And we get a three-layer sandwich with the main part between the two parts of the codpiece. We fasten it with pins along the entire cut at a distance of one and a half centimeters from the edge.
And we sew it on an overlocker. This arrangement of the pins allows you to stitch directly on the pins along the pins without reaching them in front of the knife.
We get such a semi-finished product.
Now we unfold it onto the face (the seam will be inside between the parts of the codpiece) and place it in front of us, as shown in the photo.
We turn the upper part of the codpiece to the side...
...and fasten the corner with a pin, aligning the cut.
Next we wrap the codpiece around the main part. The codpiece is folded with the right sides inward and the main part is inserted between them. We combine the corners again and fasten all three layers with pins (we stick them again lengthwise at a distance of 1.5 cm from the edge).
We continue to cut off our future seam, carefully combining all three layers of the sandwich.
They chipped along the entire cut and got this “giant squid”, in which the entire main part was folded between two parts of the codpiece.
Here you can clearly see all three layers of our sandwich.
We sew on an overlocker. This is what we get:
Now we carefully turn our “squid” out, pulling out the main part from the codpiece and straightening everything evenly.
This is what it looks like from the face...
...and from the inside out. You see, there is not a single open seam inside, everything is clean and neat.
We pin the gusset to the front with a long cut. We lay out the middle seams on the codpiece in different directions so that it is not too thick.
We sew and check that all layers of the codpiece fit into the seam.
Pin the other side of the gusset.
We sew, turning the main part up. This is necessary so that the bend on the main part does not escape from under the stitching (and this, believe me, happens very often). Well, it turned out just right.
Now we grind the elastic into a ring, divide it into equal four parts and pin it evenly along the top edge to the wrong side
We sew it on the overlocker, stretching the elastic during sewing to the length of the cut.
We bend the elastic on the wrong side and pin it with pins often so that it does not move.
Next we bend the bottoms of the legs to a width of one and a half centimeters. Since I do this with a double needle, before hemming I process the cut using an overlocker (you can see this a little in the photo) - it looks much neater than just using a double needle without preliminary overlocking.
We iron it and get excellent exclusive men's boxers for our loved ones. )))
Bright sunshine and spring mood to everyone! Comfortable panties and satisfied men. ))))
The front half of the panty pattern
2. From points A, H, H2, set aside the measurement Sb (half hip circumference) with an increase of 1 cm, for a total of 26 cm. Designate new points A1, H1, H3.
3. From point H1, set aside 1/6 of the half-circumference of your hips to the right (50/6 = 8.3 cm). Do not take into account tenths of calculations (and further too), let it be 8.5 cm.
4. Now you need to find point B1. To do this, divide the hip circumference measurement by 6 and subtract 1.8 cm. The total will be approximately 6.5 cm.
5. Connect this segment with a straight line, setting aside 1 cm from points B1 and B.
6. Next, set aside 1 cm from point A1 and connect this new point to point A, as shown in the diagram.
7. Set aside 1/2 of the half-waist measurements on this line plus an increase of 3 cm, and place a point T, where AT = (41: 2) + 3 = 23.5 cm.
8. Now all that remains is to set aside a 4.5 cm long segment dividing the angle A1H1B in half and draw the line of the front seam with a smooth concave curve.
Preparing for work
Sewing men's underpants is not a difficult task. The most time-consuming part of the work will be creating the pattern. Beginning needlewomen are recommended to master the technique using the example of a simple pattern of panties without a side seam and gusset. The absence of side stitching allows not only to reduce fabric consumption, but also to eliminate some operations with cutting, thereby reducing work time.
You can sew men's briefs from any natural fabric, for example, chintz or fine knitwear. You will also need threads to match the color of the material, an elastic band and tailor's tools.
Beginner seamstresses are recommended to create a pattern on paper and then transfer it to fabric. Experienced needlewomen can design a pattern directly on a piece of material.
To work, you will need some measurements that should be taken from the “model”:
- Half waist measurement. Symbol - ST. In the proposed example, this measurement is 40 cm.
- Half hip circumference. Designation - SB. In the above diagram, half the hip circumference is 50 cm.
- The length of the product (DI) can be selected individually or use the standard one - 34 cm.
An increase of 3 cm should be made along the hip line. Designation - PB. It is also important to determine the degree of fit of the product to the body. That is, from 2 to 8 cm should be added to the SB.
If it is not possible to take measurements, for example, when preparing a surprise, you can determine the measurements using the existing panties. You can cut comfortable and original boxers by taking measurements from shorts and reducing them to the desired size.
Back half of the panty pattern
9. Horizontal segments AA1, HH1, H5H4 are equal to 1/2 of the half-hip measurement plus 6 cm, that is (50: 2) + 6 = 31 cm.
10. From point H to the left, set aside a segment of 2 cm and place a point (2).
11. From point H5, continue a straight line to the left by 1/4 of the hip circumference measurement minus 1 cm and place point B2. Н5Б2 = (50: 4) - 1 = 11.5 cm.
12. From point H5, continue down a vertical line 3 cm and place point H6. From point H6, move 1/4 of the thigh circumference minus 1.5 cm to the left horizontally and place point B3. Н6Б3 = (55: 4) - 1.5 = 12 cm.
13. Draw a straight line through points B2 and B3, extending it upward beyond point B2 by 1 cm. You also need to set aside a segment from point B3, but you can determine its value only by measuring the same section of the front half of the panties. Or simply place the front piece pattern on this line and make a mark.
14. Now all that remains is to adjust the waist line and draw a smooth line for the back seam. From point A1, move 1/2 of the waist semicircle plus 5 cm to the left horizontally and place point T1. A1T1 = (41: 2) + 5 = 25.5 cm. Next, from point T1, set aside 2 cm vertically and place point T2. Connect points T2 and A1 with a straight line.
Boxer briefs with a rounded pocket opening
1. Copy the drawing of the base of the knee-length leggings (Fig. 1).
2. To build the front insert, set aside 8 cm from T and B to the left.
TT1 = BB1 = 8 cm.
From B, put 0.7 cm outward.
Draw a new center line for the front of the boxers.
3. To determine the width of the insert based on the stepwise cut from Z, set aside 4 cm.
RY1 = 4 cm.
Make a cut for stitching the front insert through points T1, B1, R1.
4. The length of the step cut of the front part of the panties from the insert to the bottom is 11 cm.
R1H = 11 cm.
Measure the total length of the step cut (segment YAN) and transfer the resulting value to the back part.
YAN = Y2N1.
5. Draw the bottom of the panties in accordance with the drawing.
6. On the front of the panties along the bottom from H, set aside 11 cm to the left and draw a relief to the insert.
7. On the front insert, draw an entrance to the “pocket” 16 cm long in accordance with the drawing and a valance (inner part) of the front insert.
8. Segment 0.7 I divide into 4 parts and draw cut lines.
Boxer briefs cut details
1. Cut out all the parts.
Make cuts along the lines.
2. Draw a vertical (middle line of the front insert), attach parts of the front insert to it so that 0.5 cm of gaps are closed at the edge of the stitching of the part, and at the middle line move the cut parts apart by approximately 1 cm, while the step cut should be located at the midline (Fig. 2).
Align the cuts and mirror the anterior insert relative to the midline.
3. Copy the valance of the front insert from the drawing (Fig. 3).
4. Measure the length of the insert stitching cut and transfer the resulting value to the front of the panties (Fig. 4).
5. Close the solutions along the cut lines on the “gusset” in accordance with the measured length of the insert stitching cut (Fig. 5).
6. The length of the elastic band for the belt is equal to the measurement Waist circumference along the belt, the width of the band is 3 cm.
The drawing does not contain allowances for processing seams.
How to cut men's family briefs
To make it more convenient for you to cut the fabric, transfer the drawings of the front and back halves of the pattern for men's underwear to another sheet of cardboard or oilcloth along with the allowances. Allowances in the drawing are indicated in centimeters. It will be convenient for you to use the resulting panty patterns with allowances when laying out the fabric. At the same time, with such a pattern you will not forget to make seam allowances.
The patterns may have to be adjusted in the future, so it is better to sew test panties, make sure that the pattern is accurate, and then transfer it to cardboard or oilcloth. Such patterns are convenient to use when cutting and laying out fabric.
The front and back of the panties can be cut entirely. To do this, simply align the side seams of these halves together, then instead of four parts you only have two.
Boxer briefs
Boxers (briefs) are one of the classic types of men's briefs. Such models are distinguished by their great variety, in which every representative of the stronger half of humanity will find exactly what he likes. Boxer briefs are characterized by practicality, comfort and beauty.
The modern textile industry and innovative technologies are so developed that in order to purchase men's boxer shorts, it is not at all necessary to carve out precious time from your busy work schedule to go to the market or go to supermarkets, shops and boutiques. You can buy boxer briefs while at work or sitting at home on a comfortable sofa. The main condition is access to the Internet. But still, “there are still women in Russian villages” who prefer to sew men’s boxer shorts themselves.
Layout of panty pattern details on fabric
When laying out the patterns of the front and back halves of the panties on the fabric, it is necessary to observe the direction of the grain thread on the patterns and fabric. The directions of the grain thread for different fabric widths are indicated by arrows.
Note the fold line of the fabric for each width of fabric. With a fabric width of 85-90 cm, fold the fabric in half along the grain (lengthwise). In this case, for pant size 176-96-82 you need 1.04 meters of fabric.
With a fabric width of 140 cm, fold the fabric along the weft thread (across the fabric). In this case, the fabric consumption for men's briefs size 176-96-82 will be 0.52 m.
If you need to sew men's briefs in a large size, for example, size 56 or more, then the pattern of men's briefs must be made with an insert for the back half. The layout of the panties will have to be slightly changed and an additional wedge added to it.
Step-by-step description of sewing panties for men with a belly
For men with a belly, the most comfortable underwear is a large family size. To sew them, you can use any suitable pattern; for example, we’ll take the following:
They are very easy to sew:
- Fold the selected fabric in half, with the right side on the inside. Lay out the cut parts on it, trace them taking into account allowances (about one and a half centimeters) and cut them out with scissors.
- Fold the back and front pieces in pairs, wrong side up, and use a linen stitch to make a side seam.
- Also sew the step cuts - you should get two halves of the future product.
- Turn one of them right side up, the second one wrong side up, then place the first one inside the second one so that the front sides of the two parts face each other.
- Use a single stitch to sew the back and front middle seams.
- Turn it inside out and get almost ready-made “semeiniki”.
- Hem the bottom, but the pre-cut edge must be folded and ironed.
- Start the stitch at the top (where the elastic should go), stitch around, but not reach the beginning by a centimeter.
- Insert the elastic using a small pin.
The result is quite cozy, cute “family room”:
Their schematic representation can be transferred to cardboard and subsequently used as patterns for indoor shorts, made from thick knitwear. To better understand the process of sewing such things, you can watch the following video:
How to sew men's underpants
If you have at least a little experience in sewing bed linen, then sewing panties will not be a problem for you. Why bed linen? Because the connecting seams need to be “packed” with a linen seam. This is necessary because underwear has to be washed constantly and the cut edges of cotton fabric treated in a different way will fray.
Instead of a linen seam, you can stitch the seams and process them with an overlocker, but not with a zigzag stitch. There is no need to add a finishing stitch; unnecessary needle punctures will only destroy the fibers of the cotton fabric.
The lower sections of the panties are sewn with a hem seam (0.7 - 1.0), and the upper section (for the elastic) with a wide hem, 2 cm wide.
In this video you will learn the sequence of sewing women's or children's shorts from knitted fabric.
Don't forget about allowances and fractional direction
Seam allowances, depending on the processing (linen seam, overlock) can be in the range of 0.7 - 1.3 cm. Allowance along the bottom line (double hem) 1.5 - 2 cm. Calculate the waist allowance depending on the width of the elastic, but on average it will be within 3cm.
Don't forget about the direction of the fabric. If the width of the fabric is not enough, then it is advisable to make inserts or cut the pattern into two parts and make an additional side seam.