Learn how to sew a dress with a peplum step by step: patterns
And then you can choose the most convenient pattern method, for example:
- Fold the fabric four times, place a center point in the upper left corner and draw a line for the bottom cut; then draw a line for the top cut equal to the volume of the product.
- A more complex option: having set the length, separate the lower parts along the waistline, closing the dart on the peplum. Then make flounces on the peplum, turning it to the sides of the side seam. Afterwards, construct raised seams in order to hide the darts and then construct a collar and adjust the sleeve.
- Removable basque.
What is Basque
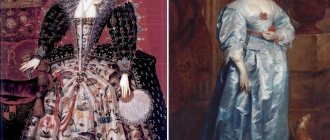
One of the finishing options for the product is basque. It is usually used to trim a skirt, dress, jacket and blouse. It needs to be sewn along the waistline in the form of a flounce or frill. Basques are distinguished by shape and size. It can be long or short, one-piece or cut out as a separate piece. It can also have different edges. Asymmetric and smooth edges are distinguished. If you show your imagination, you can give any product an amazing look using a peplum. If a jacket is chosen correctly for the skirt, the outfit will be elegant and fashionable.
What does a peplum look like?
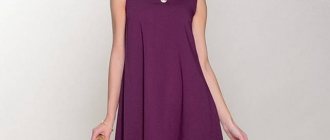
Making a dress with a peplum at the bottom: pattern of a romantic model
An ultra-fashionable, feminine dress with a peplum will emphasize any type of figure (except for a “pear” figure, since such a dress will make the bottom heavier) and is suitable for any height. A peplum is a wide strip of fabric sewn to the waist, sides, chest, shoulders and bottom. The peplum at the waist slims the silhouette and emphasizes the hips. If you want to add sexuality, then you should place it on the shoulders. A peplum located on the chest increases the volume of the chest. A beautiful model with a peplum at the bottom creates a romantic and playful image. It will also help to create a unique feminine peplum bow on the sides. It can be of different lengths, shapes, with folds, double, incomplete, asymmetrical and can hold shape, but this requires thick fabric or two-layer material. We suggest creating a romantic image.
From the very beginning, you need to create a drawing of the pattern for the base of the dress; to do this, take measurements. Measure:
- dress length;
- back length to waist;
- front length to waist;
- shoulder length;
- floor circumference of the neck, chest, waist, hips and above the chest;
- hip height;
- the distance between the high points of the chest.
Once you've created the base dress pattern, create a dress pattern with a peplum bottom and place it on the wrong side of the fabric and pin it together. Then add seam allowances, draw cut lines with chalk, and cut the pieces. Now sequentially grind and iron the grooves on the shelf. Carefully pin and baste the center back and side pieces. Next, pin the center back seam at the bottom. Pin the shoulder and side seams and baste. Be sure to overlock all seams and iron the shoulder and side seams, ironing the side seams in different directions. Finish the neckline and armhole. The dress with a peplum at the bottom is ready.
For petite and little girls, a dress with a peplum on the shoulders is suitable, emphasizing the breasts and making them seductive. Different types of models can reduce or enlarge large breasts, depending on the location of the peplum. For example: completely open shoulders make a woman's silhouette sexier, but reduce the size of her breasts.
In the summer, you should take a closer look at closed shoulders or with straps.
An interesting version of a dress with a peplum on one shoulder, it creates an unforgettable image. A double peplum looks impressive, especially for evening events. If you often change dresses and attend different events, a removable one is suitable for you; it can be easily fastened with buttons or hooks and thereby change the look. When choosing a dress, choose the color carefully. Black color looks seductive, emphasizing a slender silhouette and is an excellent option for any celebration if you choose the right accessory and shoes. A summer dress looks bright in green shades, as it is considered the color of harmony and joy. For young people, blue and red colors will look good; they also add volume. Don’t forget about accessories, shoes, hairstyle, makeup, manicure; if you choose everything correctly, you will create your own unique image. For overweight women, an unusual style.
A correctly selected dress with a peplum for obese women will correct your figure. The style of the dress itself, as well as wide peplums with folds and, of course, sleeves, will hide your fullness. To avoid your belly being visible, you need a dress with a peplum from the chest to the hips. If you want to hide your hips, then a dress with a peplum from the waistline and below is perfect. Dresses should only be with a wide peplum, otherwise the volume will only be emphasized. Place the peplum below or above the problem area. For a business woman, a light jacket and pumps will perfectly complement her look. For an evening look, it will be enough to wear bright jewelry and high-heeled shoes with the dress, but also do not forget about makeup and hairstyle.
Children's dress, how to choose a dress for girls.
It is important from a very early age to pay special attention to cut, color, style, pattern, combination, shoes and even accessories. After all, everything is formed from childhood. Clothing should be safe, wear-resistant, comfortable, one size or slightly larger, and of course stylish. Choosing a child's dress is an art. The dress should be attractive and loose-fitting so that the little lady can put it on and take it off independently. If the selected model has a clasp, then consider the convenience factor; it should be easy to unfasten and fasten. Make sure that the back seams on the dress are flat so that they do not irritate the skin. Every princess should be the most beautiful, so choose a beautiful and aesthetic dress.
The selected dress must be appropriate in size, seasonal and appropriate for the occasion. After all, you can choose a dress for kindergarten graduation; lace and ruffles will fit perfectly here. If it is a school graduation, then the choice expands, here you can choose the length, you can also choose a fitted or, on the contrary, loose, and decorations can be discreet or trimmed. Don't forget about your birthday, here you can choose any beautiful dress.
Master class on sewing Basques 0607
Photos in the process of being uploaded to the site.
This basque is made of artificial leather. The pattern is here.
Table - Specification of cut details
| the name of detail | Part code | Quantity in material | |
| 1 | Before | 001 | 2 |
| 2 | Back | 002 | 2 |
| 3 | Back frame/leaf | 003 | 2 + glue |
| 4 | Back valance | 004 | 2 |
| 5 | Top frame | 005 | 2 + glue |
| 6 | Bottom frame | 006 | 2 + glue |
| 7 | Burlap top | 007 | 2 |
| 8 | Burlap bottom | 008 | 2 |
| 9 | Pick-up | 009 | 2 + glue |
| 10 | Front waistband | 010 | 2 + glue |
| 11 | Back waist piping | 011 | 2 + glue |
| 12 | Bottom front facing | 012 | 2 + glue |
| 13 | Facing the bottom of the back | 013 | 2 + glue |
| 14 | Front lining | 014 | 2 |
| 15 | Back lining | 015 | 1 on the fold |
| 16 | Belt | 016 | 2 + glue |
| 17 | Belt loops | 017 | 1 |
CUT.
— The cutting of all parts can be done on the fold of the material face to face, since all the parts are symmetrical.
— The burlap of the bottom pocket 008 may be made of lining, but it will be visible.
— Belt 016 can be cut in one piece without a middle seam.
DUPLICATION.
In this model, it is completely (frontally) duplicated in front 001, hem 009, leaf 003, frames 005,006, all facings 010,011,012,013, belt 016. If the material is loose, then you can duplicate valance 004.
It is necessary to partially (zonally) duplicate the waist area on the back.
Parts duplication scheme
ASSEMBLY.
Pay attention to all the inscriptions on the patterns! Allowances for stitched seams are 10mm. There are photo instructions for sewing for this model on the website laforme.ru in the Master Classes section.
1- Stitch the darts on the back half of 002. Iron to the center.
2- Sew the middle back seam, press or press seam allowances. You can stitch the middle seam both before and after processing the pocket.
3- On the back half of 002, process a false welt pocket with a leaf with set-in ends. Leaf 003, valance 004. Standard processing, see any MK.
Mark pocket location
Iron sheet 003 in half lengthwise, aligning the cut with the center line of the mark. Sew along the bottom line of the mark shsh.10mm
Align valance 004 with the center line of the pocket and stitch shsh.10mm
It turns out 2 parallel lines with a width of 20mm
Cut the entrance to the pocket in the center and at an angle, leaving 1 mm before the stitching
Straighten the valance and frame inside out. Sew the valance to the frame allowance at the bottom
Stitch the cut corner onto the frame
Stitched corners
If desired, add a finishing stitch around the perimeter
4- On the front 001, process a welt pocket with frames. Iron the top frames 005 and bottom 006 in half lengthwise, inside out. Mark the position of the pocket on the front from the front side - dotted lines in the patterns. Place the frames on the front side, aligning the open edges and the pocket undercut. Place stitches along the 10mm wide cut strictly to the corner of the pocket. Then, similarly to the frames, place the burlap pockets face to face - the top 007 to the top frame, the bottom 008 to the bottom. Repeat the lines, falling into the previous ones. Cut the entrance to the pocket to the end, moving the cut to the corner of the pocket to the lines. Turn the burlap and frames inside out. Place a finishing stitch around the perimeter of the frame (if desired). Align the frames at the cut corner and fix it temporarily, then stitch the corner onto the frames from the inside out. Combine and stitch the burlap with each other; in the patterns, the lower burlap is slightly larger than the top - this is an allowance for different curvatures of the parts - the excess protruding amount of the lower burlap can be cut off after stitching.
Mark the contours of the frames and the corner of the pocket
Fix the ironed frames, aligning the open sections with the face
Adjust the frames shsh.10mm
The lines must end exactly on the mark
Combine the burlap with the frame cuts and stitch, falling into the previous lines
Cut the corner of the pocket entrance, not reaching the line 1 mm
Secure the frames to each other with a temporary stitch before stitching the corner
Stitch a corner
Stitched corner on the other side of the frames. Temporary stitch can be removed
Place the first part of the finishing stitch - above the top frame and from the end
Place the second part of the finishing stitch along the bottom frame
Stitch the burlap and trim the edges
5- Fix the pocket burlap along the side cut for comfortable stitching of the side seam - the burlap falls into the seam.
Secure the burlap along the side seam
6 - Sew the side seam, press or press seam allowances.
7 - The lining, facings and lining are assembled as a separate layer. Sew side seams on lining 014,015. Iron allowances. Instead of darts on the back, fix tucks.
8 - Sew waist facings 010.011 along the side seam. Iron allowances.
9 - Sew the lining to the waist facings. Place the lining slightly against the facings. Direct the allowances onto the lining.
10 - Sew the hem to the lining and waist facing. Iron the seam allowances on the facing area and direct them below onto the lining.
11 - Stitch bottom facings 012,013 along the side seam. Iron allowances.
12 - Stitch the hem facing to the lining and hem, leaving an unstitched area of 15-20cm in the center of the back. This is a technical hole for turning the product inside out. Direct the seam allowances upward onto the lining.
13 - Align the lining with the product face to face. Stitch along the edges and hems, stitch seam allowances to the hems.
Adjusted seam allowances
14 - Stitch along the bottom of the product, stitching the allowances onto the facings.
To reduce the thickness, you can cut off one of the allowances up to 3mm
15 - By cutting out allowances in the corners and side seams, turn the product right side out.
16 - Belt belts 017, cut into 4 parts. Belt loops in this model are optional and serve a decorative function.
17 - Align belt 016 with the outer cut along the waist with the skirt on the front side, leaving 1 cm ledges at the ends of the belt for turning. Stitch. Fold the inner section of the belt and sweep/iron it 1 cm.
Insert belt loops into the waistband seam
18 - Stitch the ends of the belt. Cut the allowance in the corners. Turn the belt onto your face. Sew the inside of the belt manually from the inside out using a blind stitch or stitch it with an overlay stitch.
19 - Sew over the loops - one at a time at the ends of the belt. There are 6 loops along the side.
20 - Sew buttons - 7 on the front side of the left side of the front, 3 decorative ones on the right side of the front and 1 secret one from the inside of the belt of the right side of the front to secure the left side (loop on the belt).
21 - Conduct the final WTO.