The ability to sew is a very useful and interesting activity. Firstly, at the same time you significantly save the family budget, and secondly, you can make a completely exclusive outfit with your own hands. But what if you have a desire to sew, but no cutting or pattern modeling skills? After all, ready-made patterns are not always exactly the version of the dress that we would like to sew. This article is specifically for beginner sewing enthusiasts. Now we will learn how to sew a light dress with our own hands without a pattern.
Where can I get money for a new dress?
A huge number of magazines provide detailed information about the latest trends in the clothing industry. The desire to follow fashion trends does not always coincide with economic opportunities, in which case the ability to sew will allow you to look modern and elegant.
In addition, in every family, over time, old things accumulate; by altering and updating them, you can sew a simple dress with your own hands and remain at the peak of fashion without unnecessary expenses.
Who was the first to take a needle into his hand?
When a man brought a mammoth skin into the cave, the woman was the first to guess that if she threaded a vein into a bone needle and stitched it through the skin, it would be much more comfortable to wear. This is how the first sewn clothes appeared.
Then, much later, male fashion designers firmly occupied the Olympus of high fashion, but sewing everyday clothes with your own hands remains a traditional women's occupation.
How to learn to sew?
The modern fashion industry offers a lot of literature with patterns and detailed descriptions of the technology of sewing dresses with your own hands.
The Internet space is replete with various master classes, offering online craft lessons, distance sewing schools.
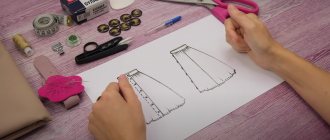
Drawing your own drawing
Independently constructing a pattern drawing using various methods is a troublesome task, requiring precise measurements, mathematical calculations and drawing skills, but for those who sew a lot and know how to model, it makes sense to spend several evenings creating a basic pattern drawing.
Based on the base pattern, a dummy is made from dense inexpensive fabric and adjusted to fit the figure, achieving a perfect fit. After fitting, corrections are made to the pattern and used for modeling.
Using this pattern, you can make a lot of impeccably tailored outfits with your own hands: from a simple dressing gown to a fantastic evening dress, from a sports swimsuit to a winter coat.
Robe
Calico can make a charming robe. We fit an oval into a rectangle 135 by 145 cm. We retreat 80 cm from its edge and measure 22 cm in both directions from this point. Now from these points you need to lay two perpendiculars 20 cm long. We will cut these two lines, as they will serve as armholes.
We process and bend the armholes. All we need to do is sew on a belt or ribbon, and the robe is ready.
You can sew clothes for newborns with your own hands from chintz. Baby vests, light blouses, caps for your beloved child. A dowry for a baby, a dress for a daughter, a robe for yourself - all this is quick, hassle-free and inexpensive, made from natural lightweight material.
We sew without patterns
Experienced tailors can make even complex products without a paper pattern; they make the necessary marks with chalk, soap or a special marker directly on the fabric.
Beginning needlewomen without patterns can try to sew simple models designed for relaxation with their own hands: beach tunics, capes, home clothes.
Taking measurements
The word “waist” translated from French means “figure”. It is better to measure your figure with an assistant; mark the waist line with a ribbon or elastic band.
You should stand straight, as naturally as possible, without trying to strongly pull in your stomach, straighten your shoulders, or otherwise “improve” your figure. If you plan to wear a dress with shapewear, then measurements should be taken while wearing this underwear.
Note!
- DIY satin ribbon bows: photos of original design ideas, step-by-step DIY master class
- DIY hair bands - ideas for decorating homemade rubber bands + step-by-step instructions for making them yourself
DIY shadow theater: step by step how to do it at home! 175 real photos
The circumference of the chest and hips is measured at the most protruding points. When measuring the volume of the hips, a measuring tape is laid along the most protruding points of the abdomen and buttocks. In this case, the measuring tape will not necessarily be parallel to the floor.
The centimeter is wrapped tightly around the figure, but not too tightly, so that the person being measured can breathe freely.
Based on the measurements taken, the size and type of figure are determined.
Cut
It will be difficult for beginners to make a dress without a pre-prepared pattern. Therefore, first you need to prepare sketches and calculate all the parameters. How to do it right? Cutting is carried out in several stages:
Measurements are taken on the 1st day of the start. You need to take correct body measurements. For further work, you can use a mannequin. The parameters that are taken into account when taking measurements include the circumference of the chest, hips and waist. They also measure the distance from the elbows to the shoulders, the armhole and the length of the item (measured along the spine). Typically, experts measure everything several times and determine more accurate results. In some cases, when drawing up a pattern according to your own measurements, you can leave a couple of centimeters of allowance in the armhole area or back seam. This fabric is then used as a spare if it turns out that the measurements were taken incorrectly.
2 Next, make the details for the pattern. To do this, transfer the measurements that were taken to a mock-up of the clothing, the style of which was chosen for sewing the dress. As a rule, the seamstress starts with large elements, and then moves on to small ones, while leaving allowances of 3-4 cm. You can cut off excess material at any time, but adding the missing piece so that the item looks perfect is almost impossible.
3 Afterwards, the craftswoman prepares everything for cutting. When the blank has been drawn on paper, they begin to transfer all the details onto the material and create a simple dress. All elements are drawn separately. After the cutter has checked all the dimensions, she transfers everything from the paper sheets to cardboard or oilcloth. It all depends on the fabric that will be used. In this case, all important details are highlighted with a colored pencil or marker. We are talking about darts, lines of the hips, chest, waist, lobes, etc. When everything is indicated, the distance between the key points is measured with a centimeter. If there are inaccuracies, the loose-fitting dress pattern must be redone. It is important that the measurements at the neckline or collar are the same.
4 Before cutting, the canvas is carefully examined: there should be no defects on it. If there are imperfections, they are outlined with chalk. Then the parts are placed on the fabric so that they touch the damaged fabric. If the master has chosen a material with a pile or pattern, the elements are laid out in the same direction. In this case, the fibers should be directed from bottom to top. The canvas is placed on the surface of the table so that the wrong side is on top. You can fold it 2 times. It is important to leave allowances, as otherwise there may be folds in the garment and the result will be ruined.
Measurements have been taken - what next?
Ready-made patterns in magazines are made for a standard figure. But what if the measurements taken of the chest, waist and hips correspond to different standard sizes?
Usually, ready-made patterns in magazines are given for several similar sizes; when copying, apply tracing paper to the drawing and draw lines corresponding to:
- in the upper part of the dress - bust size;
- in the waist part - waist size;
- in the hips - size according to the hips.
The transitions between drawings of different sizes are connected with smooth lines, the result is a pattern that best suits your body type, from which you can easily cut and sew a dress with your own hands.
It should be noted that when using ready-made patterns, it is necessary to take into account the height of the model and make proportionate changes to the arrangement of horizontal lines (waist, chest lines, location of pockets, length of sleeves and product, etc.)
Home dress in 1 hour
Even an inexperienced seamstress can quickly and easily sew a warm dress for home. We only need two measurements for cutting. And you won’t need a dress pattern at all.
For sewing you need to prepare:
- flannel fabric, with a width of 0.87 m, 2.4 m will be required;
- decorative tape or braid for decoration;
- threads, sewing accessories.
Description
Let's start by taking measurements. We measure the height of the chest.
The second measurement will be taken along the chest circumference.
Fold the fabric in half, wrong side out. From the top edge we set aside the height of the chest plus 1 cm of allowance. Mark the point.
At this level we set aside 1⁄4 of the chest circumference plus 5 cm.
From this point, draw a side seam line across the full width of the fabric.
In the corner we draw a smooth roll-out line 15 cm long.
Set the sleeve length aside 50 cm from the highest point of the shoulder.
Draw the width of the sleeve and connect it to the side line. We round the corner with a smooth line.
From the corner point we measure the length of the dress.
We cut out according to the markings, taking into account allowances.
We mark the second part, using the first as a template.
We cut out the second part.
We deepen the neck on the front part.
Place the front and back pieces right sides together and sew seams on the sides and shoulders. We process seam allowance cuts with an overlocker or use a zigzag stitch for overcasting.
The neck and sleeve sections are treated with decorative tape, braid or bias tape.
We make a hem along the bottom of the dress and stitch it.
Iron the finished dress.
You can sew an interesting A-line dress from knitwear using the video from the “Dress Therapy” channel. Sewing a warm dress will not take much time. The main thing is to choose thick knitwear of a suitable composition.
How much fabric to buy for a dress?
Ready-made pattern magazines usually indicate fabric consumption, which depends on the width of the material, size and style. If the material has a large pattern or checkered pattern, then you will need to combine the pattern and the consumption may increase.
Note!
- DIY bracelets | Selection of the best models and master class on making beautiful bracelets
- DIY bird feeder - interesting ideas on how to make it quickly and easily from scrap materials
- Do-it-yourself cold porcelain: the best options for porcelain products, step-by-step instructions and recipes for making it yourself (photo + video)
For a sleeveless straight dress with a fabric width of 140 cm you will need:
- if the hip volume is less than 120 cm - one length of the product plus 10-15 cm for hem and seams;
- if the hip volume is more than 120 cm - two lengths of the product plus an increase for seams and hem.
Fabric selection
We select the material in accordance with the requirements for the outfit.
For example, strict business dresses will require the use of thick, suit materials and restraint of color schemes. For a cocktail or New Year's outfit, we take light, flowy ones, with sparkles, sequins, lycra or elastane.
Each fabric material is interesting with its texture. For example, silk and chiffon are suitable for a flowy summer outfit.
To get a tight-fitting silhouette, you should pay attention to fabrics containing elastane.
For work suits, choose wool material with 10% synthetic fiber content.
If you want to sew an outfit with ruffles and frills, silk or crepe would be the ideal option.
Colors and prints are chosen depending on the situation. Floral designs are good for a date or a summer outing.
Solid colors - for outfits with frills, pockets, and various inserts for decoration. For every day, we are considering an option with graphic designs: checkered, striped.
When choosing a canvas, the type of figure is taken into account. Leather, satin, shiny, metallic fabrics will make the figure of a thin girl more rounded and feminine.
Boucle and tweed can distort a fragile physique, as they have a voluminous texture. Stick with the middle option.
If nature has rewarded you with large shapes, the ideal choice is crepe or jersey.
Outfits for every day should meet simple requirements. In summer - breathable fabric, in winter - retaining and retaining heat.
For the hot season, choose linen, cotton, satin, and chiffon. In the cold season - acrylic, viscose, thick knitwear, wool.
For evening outings, there are many options on sale: guipure, jacquard, neoprene, taffeta, brocade, chiffon, satin.
Pattern layout diagram
Lay out the patterns on the fabric taking into account the direction of the grain thread; this is very important so that the product does not warp.
The fabric is folded with the wrong side up and the pattern pieces are laid out on it. At this stage, it is necessary to take into account seam allowances and hem allowances, pattern alignment and pile direction (for fleecy fabrics).
It is recommended to make the seam allowances the same, as this will greatly facilitate further work on joining the parts when sewing a dress with your own hands.
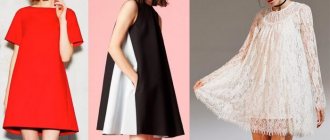
Style
A simple scheme would be perfect. This could be a shirt dress or a sheath dress with a laconic pattern. Seamstresses advise not to use unnecessary seams and details. An interesting combination of texture and fashionable accessories will look good.
Loose-fitting items are universal and suitable for any body type. This style is easy to cut and sew. At the same time, it can hide flaws and highlight advantages. Sewing a dress for the summer also involves its own subtleties: it is better to avoid additional details that will complicate the process.
For home clothes, you can work with patterns taken from one of your favorite things. Modeling a dress with sleeves and a collar is not difficult to sew, but for this you need to learn the technique. If you sew a sleeve or collar incorrectly, all the work will go down the drain. For young girls, any model is suitable: mini, long dresses and clothes in the boho style.
You can sew an evening dress based on a basic pattern, but it is better to choose a classic cut. Win-win options are “trapezoid” and “case” styles.
Sew a sheath dress
The sheath dress is a timeless classic, ideal for any body type.
Different length options, neckline shapes, degree of fit, and choice of material make this model universal: you can sew a weekend, cocktail, or home sheath dress with your own hands.
Sewing such a dress with your own hands will not be difficult for both experienced and novice needlewomen.
Taking measurements to create a dress pattern
When creating a dress pattern, in addition to the basic measurements: POT, POB, POG, etc., a number of other additional measurements are required. For example, it is necessary to calculate the center of the chest (CG) on the pattern, measure two types of “Breast Volume” measurements (POG I and POG II), etc. If you need information on this topic, the website has a detailed article on How to take measurements for a dress.
Flower nursery Green Gate
Do you like indoor or garden flowers? At the Green Gate nursery you can buy rooted cuttings and divisions of various domestic and perennial garden flowers. We have a constantly updated collection of anthuriums and hibiscus. Flowers and plants are sent by mail.
Simple two-piece dress
How to sew a simple dress consisting of two separate rectangular panels connected to each other using buttons:
- Cut out two rectangles from plain cotton or linen fabric. The length of the rectangle is equal to the length of the future product (for size 44 about 100-110 cm), the width is equal to half the circumference of the hips plus an increase of 10-12 cm (for size 44 54-55 cm).
- A neckline is made 20-25 cm wide and 5-10 cm deep on the front panel, 2-3 cm on the back panel.
- Both panels are edged with contrasting bias tape.
- Sew buttonholes on the front panel: 1-2 on the shoulders, 5-8 on the sides (depending on the size and length of the product).
- Sew buttons of a contrasting color onto the back panel.
- From the remnants of the main fabric or contrasting fabric, a long belt is made, which is tied around the waist in 2-3 turns.
An original do-it-yourself dress, made without tedious sewing - ready.
How to sew a dress with your own hands quickly and without a pattern
Option one
We will need a large piece of fabric. Its dimensions depend on the length of the future dress and the volume of your hips. It is better to choose light, flexible fabrics for this model. Sewing is very easy. It is necessary to overcast the sections, make and sew straps. All that remains is to wrap the material around the body (see picture) and thread the arms through the straps. The simplest dress without seams is ready! You can add a belt to it.
Option two
A wonderful home dress can be made from knitted fabric. We use a T-shirt as a pattern. We place the T-shirt on the fabric folded in half and trace it. We increase the dimensions in width and length, and provide seam allowances.
We make seams on the shoulders and sides. We tuck, stitch the armholes and roll out. If desired, the sections can be processed by facing.
Option three
For such a dress, it is best to use stretch fabric. We will need a cut of 1.4 by 1.6 m. Fold it in four - see the picture. We measure our hip volume. Set aside 1⁄4 measurements from the fold line plus an allowance for a loose fit.
Next, draw a vertical line to a height of 0.6 m. Unfold the fabric in two layers and sew two side seams to the specified height. Use a smooth line to round the corner. Trim off excess fabric. Draw a neckline 4 by 40 cm. Process the cuts. The dress is ready!
It is advisable to sew clothes for the summer heat from natural, breathable fabrics. For example, sew a dress - a tunic for the beach from chiffon. How to do this - see the next video on the “Dress Therapy” channel. This straight cut model is very simple to make; we will do the cutting without patterns, straight from the fabric.
Option four
Select the fabric you need and fold it in half. Mark as shown in the figure. We make the side seams. We make a drawstring at the waist. We insert a ribbon or elastic band into it. We invite you to watch Yulia’s video on the “Dress – Therapy” channel. In it she will tell you how to sew a dress without a drawstring pattern.
Option five
For such a draped dress, it is best to use flowing fabric. It can be silk, muslin, satin. The cut dimensions should be approximately 2 x 3 m. They may change depending on the required thickness of the folds, their number, and the length of the dress.
Along the center line of the canvas, make a cut at an angle, forming the depth and width of the rollout. Work two lines using a drawstring. Topstitch the back seam. Insert the ribbon into the drawstring and bring the ends forward. The dress can be tied with a ribbon under the bust.
Option six
This dress, cut at the waist and with a floor-length skirt, is ideal for plus-size girls with sizes 48 or more.
For the top part, we need a cut of 1.4 m, measuring from the shoulders to the waist line plus 10 cm. Fold the fabric in half along the height of the part, cut it. From the edge we set aside the width of the sleeves - 25 cm each. From the bottom we measure 45 cm. Between the sleeves we measure 1⁄2 the width of the hips plus 9-15 cm.
We cut along the lines, getting two sleeves and panels of the dress. We perform side and sleeve seams. We fold and stitch the upper sections of the dress, forming a drawstring. We insert an elastic band into it.
We turn up the bottom of the sleeves and stitch them, forming a drawstring, insert an elastic band into it.
We cut out the panels of the skirt and stitch them on the sides. We gather or make folds along the waist line. Sew the top and bottom of the dress. Fold and stitch the bottom edge of the hem.
Simple summer dress with ties
With your own hands you can easily and quickly sew a summer dress from cotton fabric without seams. The dress is put on over the head, the back panel is tied at the front, the front panel at the back.
- The width of the back of the dress is equal to the volume of the hips, or 5-10 cm less than it. The width of the front is half the volume of the hips plus 15-20 cm.
- Fold a piece of cotton fabric equal to twice the length of the future dress lengthwise and mark the line of the shoulders (approximately half the length of the cut).
- Place markers on the waist line for the width of the back and front of the future dress.
- Draw a smooth semicircular line connecting the marked points - this will be the sleeve.
- Add a 1.5 cm seam allowance and cut out the piece.
- Cut out the neck so that the head fits freely. The depth of the neckline at the front should be greater than at the back.
- Finish the neckline with bias tape.
- Turn in 0.5 cm, then another 1 cm on the side seams and stitch them.
- You can cut out two pockets from leftover fabric and sew them onto the front of the dress.
- Cut out 4 finished ties 3 cm wide and sew them on the waist line to the back and front panels. The front ties should be longer.
The dress is comfortable to wear as a beach or home option.
Shift dress
We invite you to sew a light loose-fitting dress with your own hands without a pattern. Sewing it will take a little time; you don’t need to be able to build and model complex patterns at all.
We will need:
- textile;
- sewing supplies, threads.
Description
Before cutting, let's take measurements:
- product length (DI);
- front length to waist (DPT);
- chest circumference (CH) and hip circumference (HC). When marking, we will use the larger of these values.
In our master class, the construction was made for the option when OB is greater than OT.
We cut out two rectangular blanks with a width equal to OB and a length equal to DI plus 3 cm. The location of the grain thread should be directed along the length of the dress.
Fold the fabric in half with the wrong side facing up. In the photo, size B = DI + 3 cm; size A = 1⁄2 OB. We pin the layers of fabric with pins, preventing movement when marking and cutting.
Along the length from the lower left point, measure B = DPT + 1.5 cm. Draw a straight line at the waist level.
From the same lower left point, vertically upward we set aside Г = 1⁄4 OB + 1.5 cm. Mark the outer point of the shoulder line with an allowance. We draw a curved concave line from it to the waist line. Then from the waist line we draw a curved line to the bottom line. These will be the side seams that go into the bottom cut.
We cut out the dress according to the markings. We do not cut the fabric along the fold line. We ended up with two identical pieces – front and back.
Mark the width and depth of the rollout. We determine the sizes according to your wishes. Similarly, guided by our own wishes, we mark the depth of the armhole. We mark the open area along the bottom line. It is approximately equal to 1⁄4 OB. In the remaining areas intended for stitching, mark the amount of allowance. It is equal to 1.5 cm.
We cut out two blanks for a belt 6 by 72 cm.
Fold each piece in half along the long side, wrong side out. We sew the perimeter along two long and one short sides. We sew the line at a distance of 5 mm from the edge.
Turn it inside out and iron it. We sew the cuts of the free edge.
We sew the sections of the back and front parts. We fold the parts of the dress with the right sides facing each other, sew the shoulder seams, and iron the allowances. Along the neckline we make a turn on the wrong side and iron it.
We make decorative stitches at a distance of 7 mm on both sides of the stitching seam. At the same time, we fix the allowances.
On the wrong side, pin the side seams of the front and back on both sides.
We insert belt parts into the seams along the waist line. Please ensure that the edge of the belt coincides with the level of the corner.
The waistband seams on the long sides were at the bottom. We pin three parts at once - the front, the belt and the back.
We machine stitch, starting from the bottom point of the armhole to the beginning of the hem line.
What a side seam with a built-in belt looks like on the front side is shown in the following photo.
Press the side seam allowances. We turn the seam allowances on the armholes to the wrong side and iron them. We sew the edges of the armholes.
We turn the seam allowance along the bottom edge of the dress to the wrong side and iron it. Sew the edge of the dress.
Transformable dress made of elastic fabric
Such a dress can be sewn with your own hands only from very elastic materials that stretch in different directions, such as knitted polyester, viscose, elastane, lycra, spandex.
The successes of modern chemistry have led to a revolution in the textile industry; today, artificial fabrics are increasingly replacing natural ones. They allow air and moisture to pass through, but do not shrink when washed, do not wrinkle or fall off.
The edges of parts cut from such fabrics do not require additional processing, there is no need to overcast them, so dresses from them can be sewn with your own hands very quickly and even without a pattern, and it will look very original.
To make a stunning summer convertible dress you will need approximately 3 meters of very stretchy synthetic fabric that looks the same on both sides.
The shape of the transforming dress drawing resembles a highly elongated isosceles acute triangle with an acute angle of about 5-7 degrees.
The fabric is folded in half along the grain line and pinned to prevent the panels from sliding relative to each other. The front of the dress will be on the side of the fabric edge, and the back will be on the fold side. On the diagonal of the resulting rectangle, set aside a distance equal to its length, mark the bottom line of the product in a semicircle and cut it out.
From the bottom of the front, lay up the length of the skirt to the waist (for example, 75 cm) along the diagonal line of the rectangle, plus the desired depth of the front cutout (for example, 25 cm), and mark the end point of the front seam.
The diagonal line of the rectangle may not coincide with the line of the middle front; it is better to move it a little (5-10 cm) closer to the edges, in which case the ties will be wider. The length of the ties is approximately 2 meters.
From the bottom of the product to the starting point of the neckline (100 cm), the cut line is straight; above this point, the line of the ties is slightly convex. The ends of the ties fade away to the top of the panel. The line of the middle of the front and at the same time the front side of the long ties are cut out.
From the bottom of the product on the back side, set the length of the skirt upward (75 cm) plus the desired back height (15 cm). A narrow (5-7 cm) drop-shaped cutout of the back and at the same time the back side of the ties are made. The neckline on the back should not be made too deep and wide; it is better to adjust it after trying it on.
Sew the middle front seam. If the skirt is very long, then for ease of walking, a slit is left at the bottom.
This dress without a pattern, made with your own hands, is ready.
Interesting simple dress patterns for beginners
If your wardrobe is missing a certain outfit, you can sew it yourself. To create a pattern, you will need a measuring tape to take measurements. The type of dress determines what the pattern will be and what body measurements need to be taken.
Straight long
Even an inexperienced dressmaker can handle such a simple, floor-length summer model.
To create a pattern, you need the main measurement - hip circumference.
Photo of the pattern:
If the chest circumference is wider than the hip circumference, then for the pattern we take into account the chest circumference.
Draw a rectangle, its width is equal to hip circumference x 1.4 (increase for folds). If you want a fuller ruffle, multiply the hip circumference by 1.6. The length of the robe will be 65 cm, from the waist about 40. The length is equal to the height of the rectangular pattern. The length of the gathers is equal to the width, and the height will be 12 cm. Seam allowances are not taken into account.
We apply the pattern to the fabric and cut it: you get two parts. The stitch allowances for the dress are 1.5 centimeters, along the bottom, top of the dress and the top of the frill - 2.5, on the short sides of the frill and one long side - 1.5.
We sweep a piece of fabric across its entire width vertically. Now you need to stitch, process the cuts, straighten the seam allowance in different directions, and go over it with an iron.
We turn the hem, sweep and stitch. The bottom edge of the dress frill should be folded and stitched.
Now we place the frill on the top of the panel, sweep it along the edge, then sew it as a single piece.
We turn in the seam allowances along the top edge of the dress and the frill, baste, then sew. You need to leave a little space for threading the elastic. Insert an elastic band 2 cm wide and adjust its length. After trying on, connect the ends of the elastic with a stitch.
The open area of the drawstring must be sewn up.
Straight short
For a straight dress with a loose silhouette, it is enough to know the circumference of the hips or chest.
We take into account the parameter that is wider. Determine the length of the product. It is measured along the back, from the seventh cervical vertebra to the hem.
Before cutting, the material is processed through a damp iron. The fabric is folded right side inward, edge to edge. Lay out on a flat surface, with the fold facing away from you.
We lay out the parts, make markings with chalk, and at the same time mark the seam allowances along which we will cut the blanks.
Photo of the pattern:
Baste the shoulder and side stitches.
ON A NOTE! Before sewing, be sure to do a fitting to determine the neckline and openings for the sleeves.
Before the sewing process, the pockets are turned and ironed.
We prepare the sleeve head for assembly. We process the darts on the back, and go through the stitches with an iron in the same way. Now we grind the shoulders, sides, iron, and process the cuts. We sew in sleeves, pockets, and finish the hem of the dress.
For this type of short robe, it is better to choose solid colors, such as white, black or red. Pockets can complement the look.
Summer sundress
A fitted summer sundress will become an indispensable outfit in your wardrobe (see photo).
This model can be sewn for a little girl. For summer, chintz canvas is ideal. We take measurements for the child and take into account the length.
The dress will have a seam down the back where there is a hidden zipper. For the pattern you need to know the circumference of the chest, waist and hips. Place the back and shelf on the fabric and outline with chalk.
The shelf should be 2 cm larger than the back, the same applies to the bottom of the shelf. A straight line is drawn from the waist line to the bottom. Our coordinate point is ¼ hip volume + 2 cm.
Now you can cut out the details and baste.
We must not forget about allowances and hem folds. The workpiece must be tried on to determine the neckline; we also note the shoulder width and armhole cutout.
We grind the darts and iron them down. We mark all the cuts. Now we sew the side stitches and the line along the back to the beginning of the zipper.
Iron the sides and back. We fasten the shoulder seams with pins. Draw a line for the neckline and armholes, cut them out, taking into account 1 cm allowances.
Sew the facing of the back and front. We process the bottom cut with an overlocker. Now we need to process the zipper on the back. We decorate the cuts of the neckline and armholes with facings, from the inside there should be a piping. Align the bottom and sew with hidden stitches. Ready.
For pregnant
When preparing for motherhood, it's not easy to find an outfit that fits your figure. The seamstress’s own imagination and skill will help with this.
An outfit with a bat sleeve looks beautiful. Knitted materials are perfect for dresses for autumn.
Photo of the dress and pattern:
The softness of the textile will not restrict movement or cause discomfort.
The chest circumference is measured and 10 cm is added to the front and back for a loose silhouette.
Now you can start cutting out the parts. We estimate the shoulders and sides and try on the workpiece. If everything fits, you can sew.
We sew all the seams, decorate the neckline and hem.
Ideas for obese women
The case is a versatile and stylish form for an outfit. Suitable for work, walking.
Photo of the pattern for this simple dress:
The pattern is made for size 46, you can adjust the sizes to suit your personal needs. To do this, we take measurements of the chest circumference, waist and hips. We also adjust the shoulder length and sleeve opening to suit your parameters. Be sure to take allowances into account.
We make the workpiece by sweeping away the side and shoulder seams. We try it on, form the desired neckline and armhole. We process the darts and iron them.
We assemble the product, sew in the armholes, sew down the side seams, and decorate the neckline and bottom.
Chiffon
Dresses made from chiffon fabric are beautiful, flowy and feminine.
The top resembles a regular top; we take measurements of the chest and waist circumference.
Photo of the pattern:
You can make the top using your ready-made summer T-shirt. We cut the skirt in a semicircle, taking into account the length of 10-15 cm. The difference between the length of the back and the front is adjusted independently, at your discretion. We take into account allowances of at least 1.5 cm.
We sweep away the blanks and carry out fitting. Now you can sew the seams, insert an elastic band along the waist line. We process the hem of the skirt, neckline and armholes with a Moscow seam or zigzag. This style is original and will not take much time.
Silk
A trapeze dress can be worn to a party or to a restaurant.
This flared style is perfect for overweight women or expectant mothers in the early stages of pregnancy.
The A-line dress is the simplest to make.
Photo patterns for various sizes:
We prepare the back and shelf, baste it, do a fitting and adjust the opening and neckline to suit ourselves.
We sew the seams. We process the bottom, neckline and armholes with bias tape.
You can sew a boudoir outfit from silk fabric.
To sew, you will need the following measurements:
- length of the product;
- armhole height – from the shoulder to the line under the chest;
- waist circumference;
- neck girth.
Fold the piece of fabric in half and secure with pins.
Find the middle of the fold and mark it. Divide the neck circumference by 4 and add 3 cm. We mark the result from the middle of the fold on the right and left. We make a cut between the obtained points. Along the longitudinal edge of the fabric we mark the height of the armhole. Assembling the dress is simple.
We sew the side seams together and secure the shoulders with pins so that they are symmetrical. We try on the product and sew the shoulder seams. The second line of folds is made under the chest, stitching along the laid line in front and back.
Now you can think about the decor. Lace is useful for decoration. They decorate the neck and hem.
If you decorate it with a beautiful belt and choose a material reminiscent of ancient times, you will get a vintage style. Choose pastel colors and complement the look with pearl or lace accessories.
Boudoir dresses are made from chiffon, knitwear and other light, delicate fabrics.
Made from knitwear
We sew the dress ourselves, slightly tapered at the bottom, it is called a cocoon.
The model is simple, you only need to measure the circumference of the chest or hips, shoulders. Buy a small zipper. A belt would be an appropriate accessory. It would be interesting to make secret pockets on the sides.
The essence of tailoring is simple, we cut out the details of the future dress. Don't forget about seam allowances. We sweep the shoulders, sides, do the fitting, sew. We process the neckline, hem, and sleeves with a zigzag.
Elegant and simple evening
A floor-length evening gown will be the highlight of your wardrobe.
You can consider a standard festive long outfit. It is worth focusing on fabrics with sequins, beads, lurex or guipure.
To construct a straight and fitted full-length robe, you need to take measurements.
You need data on chest, waist, hips, neck and shoulder length.
When constructing a dart, the vertical line of the rectangle is the length of the product, the horizontal line is the circumference of the chest + 2 cm. We measure the length of the back and front. It is measured from the base of the neck to the waist through the center of the chest. The length of the product is measured from the waist to the bottom.
On the rectangle we mark the chest line, which is measured from the shoulder to the center of the chest. Next, mark the waist line. The width of the back and armhole is marked along the chest line. To calculate this parameter, you need to divide the chest volume by 4 and add 2 cm. At the top of the rectangle, mark ¼ of the neckline parameter, from this point we rise up 1.5 cm. To make a shoulder seam, we retreat 1.5 cm horizontally from the final point, draw the shoulder. It should deviate at the extreme point by 1.5 cm from the top of the rectangle.
After building the back, we move on to the shelf.
On the bust line we determine the center and mark the opening of the darts. Raise the perpendicular upward, mark 2.5 cm on both sides from the resulting point, draw a dart in the form of a triangle with the top in the center.
Draw a shoulder seam located 2.5 cm below the top line of the rectangle. The extreme point should be 4 cm from the side of the rectangle. After this, we determine the middle of the armpit area, retreat 2 cm and draw an armhole line.
Now we mark the darts at the waist. To do this, we calculate the difference in the girth of the chest and hips, and then divide by three, draw on the side seam and in the middle of the shelf. The lower peaks should not reach the hip line by 4 cm, and the upper peaks should be on the chest line.
Now we draw a side seam from the waist line, which at the hip line should completely correspond to half the measurement.
All that remains is to make the patterns, not forgetting to add seam allowances. Work begins with processing the darts. Next are the shoulder stitches, neckline and armholes. Then there are side stitches and finishing of the hem.
Summer
An effective scatter that can be quickly and easily made.
The neckline and hem of the dress are decorated with satin ribbons, beads or sequins.
Massive beads look beautiful.
The essence of the work is simple:
- make a pattern as shown in the diagram;
- sweep and try on;
- grind;
- We process the neck and hem at our discretion.
Photo of the pattern:
Flying beauty in Greek style will make you feel like a goddess. You can quickly sew such a dress with your own hands without a pattern.
We take measurements from the seventh cervical vertebra to the bottom, multiplying the data obtained by two. Take a piece of fabric of the required length, measure the center, this will be the neck.
Now you need to put the blank on yourself and model it to your taste. We process the seams of the neckline, hem, sides, and add designer items.
Drawstring without pattern
To sew such a fashionable outfit, you don’t need a pattern, because working with it is easy and simple. We take a T-shirt and we will use it to navigate.
Draw a rectangle, its width and length depend on what kind of outfit you want.
The back and shelf can be the same. We sew the side stitches, turn the top, and insert a ribbon or elastic band. We process the hem.
How to Wear a Convertible Dress
The elastic fabric drapes easily, presenting the owner’s figure in a favorable light; a dress sewn with your own hands from high-quality “butter” knitwear can be used as an evening option. The number of combinations is limited only by the owner’s imagination.
- the long ends are crossed at the neck, passed under the arms and tied in a bow on the back;
- twist the ends in front with a tourniquet, tie around the neck, pass under the chest, tie in the front;
- wear it like a skirt, tie the long ends around the waist in the form of a belt;
- put both ends on one shoulder, you get an asymmetrical model;
- straighten the ends on the shoulders in the form of kimono sleeves, close the back, wrap the ends around the waist.
- Turn the dress over with the seam back, cross the ends over the chest, and tie it with a bow at the back.
Knitted dress with peplum
Knitwear can make a beautiful outfit with a peplum.
- We fold the material lengthwise, put a T-shirt on it, and trace it.
- 2 parts are cut out. If the peplum will be sewn in, the waistline should be cut.
- A rectangle is cut out of knitwear, the length of which is equal to the waist circumference and increased by 2 times.
- The length of the peplum is from 10 to 20 cm. Lightly smear it on a machine with a weak thread tension.
- Fold the top and bottom parts, insert a peplum between them, and grind them down.
- We process the neckline, sleeves, and bend them.
Finally, I would like to appeal to novice dressmakers: try sewing a dress without a pattern from a simple material, and then feel free to sew from whatever you want.
Also read on our website about what summer skirts are currently worn