It just so happens that any man in the course of his life from time to time has to do work associated with physical stress and contact with pollutants.
Moreover, this can happen in a variety of conditions: in cold and rain, under the rays of the scorching sun and in damp, windy weather. Therefore, choosing suitable equipment for them is “a matter of first importance and necessity.”
The best choice for such cases is a good work overall, which will protect against all sorts of negative factors and allow a man to feel comfortable and at ease in any conditions. By the way, you can purchase it in specialized stores or make it yourself, taking into account all the features and parameters of your own figure.
Decoration
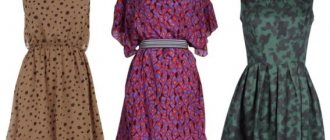
Every year, the female audience is offered many models of different designs, differing in shape, color and method of decoration. Decorative elements and minor details that carry a certain meaning allow you to accentuate the style of overalls.
The choice of items is determined by the purpose of the ensemble and the style of clothing. If you are putting together an elegant look, then it is appropriate to use dresses with bows, wide frills, and lace appliqués . When going on a romantic date, you can wear a dress with an open back and guipure inserts in the neckline. For a business meeting, samples with drapery or a wide satin belt are acceptable. For a country walk, denim overalls with scuffs and leather patches will come in handy.
What is taken into account when designing modern workwear?
Tailoring of workwear is carried out in two categories of designs, depending on its purpose, the characteristics of the materials used and the complexity of the work performed by its owner.
This:
- Off-season items made from cotton and mixed fabrics, cloth, tarpaulin, etc.
- Insulated items made of cotton, wool and other fabrics (in this case, the pattern of workwear for men and women should have large seam allowances).
Work wardrobe items have such unified details as pads that strengthen elbows and knees, pockets and flaps for them, etc.
Different fabrics can be used to create them, but most often they are:
- Spunbond is a durable non-woven (polymer) fabric of white color.
- Twill is a breathable, wear-resistant fabric with diagonal thread weaving.
- Mixed fabrics – most often have a cotton base and are very comfortable to wear.
- Tyvek is an artificial (polymer) material with increased strength and ductility, providing a high degree of protection.
When patterns of men's or women's workwear are used, it is necessary to take into account for which categories of workers the products are created.
Sometimes, for sewing special clothing, it is necessary to use materials that have special qualities: waterproofness, increased heat protection, reflective properties, etc.
For those who are not entirely satisfied with the sale of ready-made workwear, we offer drawings of the basic structural basis of some items for a typical figure. Based on them, it will be possible to create different items of this wardrobe, using different fabrics and protective materials for sewing them.
Men's insulated bib overalls
You can download a free pattern of insulated men's dungarees using the following links:
Paid sizes
| Size height 176 cm | Bust | Waist circumference | Hip girth | The price of the pattern is 65 rubles. How to buy here? |
| size 44 | 88 | 78 | 94 | |
| size 46 | 92 | 82 | 98 | |
| size 52 | 104 | 94 | 110 | |
| size 54 | 108 | 98 | 114 | |
| size 56 | 112 | 104 | 118 | |
| size 58 | 116 | 112 | 120 | |
| size 60 | 120 | 118 | 124 | |
| size 62 | 124 | 120 | 128 | |
| size 64 | 128 | 124 | 132 |
* As a result of payment, a file with a pattern is automatically sent to your specified email. If the file has not arrived within 30 minutes, then you need to send a request to search for a pattern. No need to pay again!
Patterns are given without seam allowances.
The bib overalls are designed for insulation of small and medium thickness.
The composition of the pattern set:
Measurements of sample sizes of patterns:
It is recommended to insert a wide elastic band into the middle parts of the straps.
Recommendations for choosing fabrics: raincoats, water-repellent fabrics, quilted, baloon fabrics. Sintepon, batting, wool or other insulation can be used as insulation, and fleece or regular lining fabric can be used for lining.
Men's overalls are distinguished by their comfort and versatility. Elastic tape at the waist and straps will provide the necessary tightness and support. The details of the pockets and the lower parts of the trousers can be made of decorative fabric in different color variations and textures.
Difficulty level is above average.
Cutting from the main fabric: • front half – 2 parts; • rear half – 2 children; • front and back parts of the strap – 2 parts; • middle part of the strap – 2 parts; • patch pocket – 2 children;
Cutting from lining fabric:
• front half – 2 children; • rear half – 2 children;
• patch pocket – 2 children
materials.tell4all.ru
A bag for all occasions
Old clothes are a haven for creating new bags. From an ordinary T-shirt or sweater you can make a soft bag for shopping or storing vegetables on the balcony in a suspended state. Sweatpants make a great bag for storing exercise shoes. But old jeans or overalls are turned into a reliable and durable bag with a stylish design.
Purpose of workwear
Men's work overalls are special universal-purpose clothing that can be used in a wide variety of situations both at work and at home . However, in some enterprises wearing it is mandatory.
The distinctive features of this form of clothing are:
- Practicality. Work overalls are made of durable, non-staining fabric that is easy to care for.
- Functionality.
- Convenience.
Purposes of its use:
- Protection from high or low temperatures, radioactive and electromagnetic influences.
- Prevention of injury due to sparks and flames.
- Ensuring comfort when working with fatty substances, oils, petroleum products, acids and other chemicals and compounds.
- Protection from dust and other industrial contaminants.
Areas of application:
- In construction;
- When performing installation work (at enterprises of various profiles, in auto repair shops);
- In the food industry;
- When performing welding and electrical installation work;
- In the chemical, furniture and processing industries;
- In agriculture, etc.
This is interesting: Pattern Winter overalls for Baby Born dolls
Combination methods
In order to answer the question of what to wear with a jumpsuit - a dress, it is necessary to determine its purpose, special properties and seasonality. Each model is unique and when composing a look, you should take into account not only your own taste and fashion preferences, but also the possibility of combining the jumpsuit with other clothes.
In summer, it is appropriate to throw an openwork elongated jacket and a lace bolero over a light dress. In cold autumn, a short leather jacket, a drape pea coat or a long mohair cardigan will come in handy. Spring looks will help you create viscose sweaters with a V-shaped or round neckline with buttons, and winter ensembles will be complemented by a fur cape or a knitted wool poncho.
Sweatpants for wardrobe benefits
Often, sweatpants become boring or deteriorate around the knees. It seems like the only solution is to throw them in the trash, but that's not true. You just need to trim the crotch area and the bottom of the legs with scissors, and then sew it in the middle. A minimum of time will be spent, but a new skirt will appear in your wardrobe. And old jeans can easily be turned into a high-waisted skirt by cutting off all the excess parts and not even sewing, but making buttons to connect the two sides of the parts.
Sewing tools and materials
In order to sew a jumpsuit in accordance with the rules, and the product itself turns out neat, you need to prepare in advance. The most important stage is the preparation of tools and selection of fabric:
- You need to choose a good fabric. To make working with textiles easier, it is advisable to check the cuts, which should not crumble.
- It is advisable to prepare elements for decoration in advance and think through their location in the model.
- To make a pattern, you need paper, a simple pencil, and a measuring tape.
- To transfer the design onto the fabric, you should prepare safety pins and chalk.
- To form textile parts you will need scissors.
- To make a basic item, it is recommended to use a needle and thread to create basting stitches.
- The final step will be stitching all the elements together, so a sewing machine is required. You can cover the seams with a special adhesive, which is now often used in sewing.
- Additionally, you need an iron, a flat surface, and a table lamp.
Important! The tailors themselves spend a very long time preparing for the job, because every detail can become a decisive component.
Additional tools and materials may be needed when installing more complex parts of the product.
How to sew a men's jumpsuit with a bias fastener using a pattern
- Description of the pattern.
- What's included, what to sew from and how to download the overalls pattern.
- How to cut a men's jumpsuit with your own hands.
- Seam allowances.
- Step-by-step sewing sequence.
Buy and download this pattern
Description of the pattern
Sizes: 42-52 and 52-62 (the buyer receives all sizes of the selected gradation)
File format for downloading in the order:
PDF in full size and without seam allowances.
By paying for your order you will receive links to download two files of a men's overalls pattern for each size gradation you have chosen:
- A4 PDF file, adapted for printing patterns on A4 sheets of paper in any program on any device, including mobile phones.
- Multi-format PDF file for printing on sheets of any format from A0 to A4 on a printer or plotter in Adobe Reader.
Sewing difficulty level: simple - suitable for beginners learning to cut and sew. Sewing requires basic skills in working with an overlocker, a household overlocker and a machine with an adjustable zigzag stitch.
What's included, what to sew from and how to download the overalls pattern
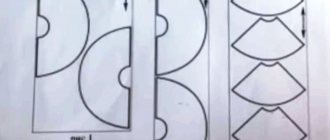
A set of patterns for men's overalls consists of:
(picture 1)
- Shelf.
- Back.
- Sleeve.
- Hood.
The hems are cut out according to the shelf pattern.
Style and fabric consumption for overalls
This jumpsuit style fits most men's figures, except those with a very large belly. The silhouette of the jumpsuit is loose.
An additional fastener line has been added to the back detail, which will allow you to use the jumpsuit as pajamas.
The fabric consumption for overalls with a width of 180 cm will be 250 – 270 cm, depending on height and size.
For sewing, you may also need a “cuff” (“dovyaz”). The flow rate of the cuff pipe will be about 25 - 30 cm, depending on the desired width of the cuff.
To make sewing easier, it is better to choose zippers with narrow braid and medium-sized teeth. It is highly advisable to choose a zipper with two sliders (“dogs”).
What to make a men's jumpsuit from
It’s hard to imagine a better fabric for overalls than footer.
Fleece can also be used, but due to the width of 150 cm, the layout on it will be awkward for beginners.
The lining and inside of the hood can be cut from a cooler of the same or contrasting color.
Instructions for purchasing the pattern and printing it yourself
How to buy a pattern
How to print a life-size pattern on sheets of A4 - A0 format
How to choose a pattern size without taking measurements and using tables
Ready-made life-size patterns download for free
Buy this jumpsuit pattern
How to cut a men's jumpsuit with your own hands
We choose the size not by number, but by the desired volume of the product. PG (chest gain should be about 6 cm). Try on patterns before choosing a size!
Having a ready-made overalls pattern in hand, before cutting you should pay attention not only to the overall length of the product, but also to the so-called “saddle length”.
For overalls, it is better to measure it not as in trousers, but from the jugular cavity through the groin to the seventh cervical vertebra. Let me remind you that in trousers the saddle length is measured through the groin from the waist in front to the waist in back.
So, the length of the saddle (Dsed) of the overalls should be loose enough for a person to sit.
Height is regulated at the bottom.
If necessary, the legs at the bottom can be tapered to fit your favorite trousers. It should be tapered evenly and smoothly.
When adjusting the length of the pattern, do not take into account the cuffs - the overalls fit better if there are slouches.
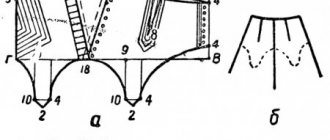
Seam allowances and cuff width calculations
When sewing footer clothing using an overlocker, there is no need to add seam allowances. But, if you cut the part of the right shelf to attach the zipper braid, an allowance of 1 cm at the cut site is necessary (Figure 2). The same applies to the fastener behind the back - along the cut line we add an allowance of 1 cm.
Of course, in some cases, the zipper can be stitched to the shelf without cutting the part.
How to cut a jumpsuit using a ready-made pattern
The layout (Figure 3) does not look complicated, but if you cut the right shelf for the zipper, you will first have to cut out the left shelf and the “middle”, then the right shelf (solid).
And the remaining parts can be cut out two at a time, as with regular cutting.
Cuffs - strips of fabric are cut from dovyaz according to Oz (wrist circumference) and Osh (ankle circumference) measurements. Width calculations are very simple:
Finished cuff width + 2 cm
Step-by-step sewing sequence
- We start with the clasp on the left shelf. As mentioned above, the zipper braid can be sewn onto a solid top flange or by placing it between the “left flange” and “middle” parts. On the right shelf there is a zipper along the edge of the side.
- It is advisable to make pockets only if you have experience. If you have no experience, then it is better to try making a pocket on a piece of fabric. The marking is arbitrary - it can be higher, it can be lower. How to sew pockets with zippers
- Stitch and secure the sides. Iron.
- If there is a fastener on the backrest, then the middle seam of the backrest and the seat of the backrest are first sewn down on an overlocker using a knitted seam. The seams are ironed and then the fastener is processed. The fastener sections should be overlocked with an overlocker and then the zipper should be sewn on.
- Then, sew the shoulder seams with a reinforcing strip on an overlocker and iron them.
- Sew in the sleeve using an overlocker without first tucking in. Iron the seam.
- Side-sleeve, step, bow-seat, hood seam - are sewn on an overlocker and ironed.
- The hood is fitted to the neck. The fit is “regulated” by darts or folds. Please note that darts or pleats should not overlap each other at the top and bottom hoods. When all the estimates are completed, the hood is sewn into the neckline.
- The cuffs are ironed in half and sewn into a ring. The stitching seam is ironed onto the sleeve pad.
- Lastly, the cuffs are stitched on the overlocker.
This is interesting: Pattern Waterproof overalls for children (size 92-122)
Recommendations for choosing fabric
Beginning craftsmen who decide to create a summer combined model on their own can use a piece of chintz or flax. In general, for the manufacture of overalls, fabrics that are highly breathable, so-called “breathable”, are recommended: viscose, chiffon, cotton. The jumpsuit can be worn as an evening outfit. Silk and elastic materials are suitable for this case. They can be combined with leather or lace. Practical tight overalls for every day are made from fabrics for making suits and coats, as well as from denim and corduroy.
You can calculate the size of the required cut as follows:
- the length of the trousers from the waist to the floor is multiplied by 2 and added 0.5 m.
Typically, a jumpsuit requires 3 to 3.5 m of fabric.
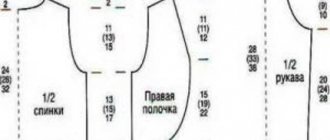
Men's overalls. Constructing a pattern drawing
Fig.1. Men's overalls (size 48)
To draw a pattern for a men's overalls (Fig. 1), you need to take the following measurements.
2. Length of trousers on the side………….102cm 3. Length of step. …………………….76 cm 4. Length from waist to knee….58-60 cm 5. Waist semicircle……..42 cm 6. Hip semicircle……..50 cm
Constructing a pattern drawing
Rice. 2. Pattern drawing for the front and back halves of the trousers
Construction of the front half of the trousers (Fig. 2)
Draw a right angle with the vertex at point A. Length of the trousers. From point A, set aside 102 cm (the length of the trousers as measured) and place point H, from which a straight line of arbitrary length is drawn to the right. Step length. From point A, 76 cm is set aside upward (step length according to the measurement) and point W is placed. From point W, a straight line of arbitrary length is drawn to the right. Knee length. From point A, 58 cm is laid down (length from waist to knee according to measurement) and point K is placed, from which a straight line of arbitrary length is drawn to the right. Waistline. From point A, set aside 27 cm to the right and place point T (1/2 of the semi-circle of the waist by measurement plus 6 cm for all sizes): 42:2+6=27. From point T, a straight line is lowered down until it intersects with the line from point W. The intersection point is designated by the letter Ш1. From point A, 2 cm is laid off to the right. From point T, 1 cm is laid down. Points 2 and 1 are connected. Step width. From point Ш to the right, set aside 30 cm and place point Ш2 (1/2 of the semicircle of the hips by measurement plus 5 cm for all sizes): 50:2 + 5 = 30. From point Ш2 a straight line is lowered down until it intersects with the line from point H and the intersection point is designated by the letter H1. Ironing line. Line ШШ2 is divided in half and through the division point a straight line is drawn up to the intersection with the line A T (the intersection point is designated by the letter T1), and down to the intersection with the line HH1 Bow line. From point Ш1 the top is laid off 6 cm. From point Ш1, dividing the corner in half, 3 cm is laid down. The bow line is drawn through points 1, 6, 3, Ш2. Crotch line. 2.5 cm is set aside from point H1 to the left. Points Ш2 and 2.5 are connected. Side seam line. From point A, 17 cm is laid down, from point H to the right - 2.5 cm. The side seam line is drawn through points 2, 17, Ш, 2.5. From point 2 (waist line) 4 cm is laid down. This distance to the pocket is stitched. Darts at the waistline. From point T1, 2 cm is set aside to the right (dart depth). Then the distance 2 and T1 is divided in half and 2 cm is set aside from the division point to the right (dart depth). From the marked points, draw fold lines 3 cm long down. The bottom line passes through points 2.5 and 2.5. The width of the trousers at the bottom can be adjusted as desired.
Construction of the back half of the trousers (Fig. 2)
Draw a rectangle ABCD. Pants width. The lines of the rectangle AB and DC are equal to 30 cm (1/2 the semicircle of the hips by measurement plus 5 cm for all sizes): 50:2+5 = 30 Length of the trousers. The lines of the rectangle AB and BC are equal to 102 cm (the length of the trousers as measured). Step length. From point D upward, set aside 76 cm (step length as measured) and place point W. Step width. Through point Ш, draw a straight line to the right until it intersects with line ВС (the intersection point is designated by the letter Ш1), and to the left by 7.5 cm (1/4 of the distance ШШ1): 30:4 = 7.5. Knee length. From point A, 58 cm is laid down (length from waist to knee) and point K is placed, from which a straight line is drawn to the right until it intersects with line BC. The intersection point is designated by the letter K1. Waistline. Line AB is divided in half, 4 cm is set aside upward from the point of division. From point B, line AB is extended to the right arbitrarily. Then, from point 4 to the intersection with the continuation of line AB, draw a line 23 cm long and place a point T (1/2 of the waist semicircle by measurement plus 2 cm for all sizes): 42:2+2=23. The waist line from point 4 is extended to the left by 5 cm. The line of the elephant (seat). The distance 7.5 W is divided in half and 1 cm is set aside from the division point downwards. Points 5 and W are connected by a dotted line, divided into three equal parts, 1.5 cm is set aside from the lower division point to the right at right angles to the dotted line. (seats) are carried out through point 5, the upper point of dividing the dotted line and points 1.5, Ш, 1, 7.5. Crotch line. From point K, 4 cm is set aside. From point D, 1 cm is set aside to the left. Then points 7.5 and 4 are connected with a dotted line, divided in half, and 0.5 cm is set aside from the division point to the right. The crotch line is drawn through points 7.5 , 0.5, 4, 1. Side seam line. 4 cm is set aside from point C to the left. Points T and 4 are connected. Dart at the waistline. The waist line from point 4 to point T is divided in half, a dotted line (at a right angle to the waist line) 10 cm long is lowered from the division point downwards, and 1.5 cm are set aside to the right and left, which are connected to point 10. Bottom line. Passes through points 1 and 4. The width of the trousers at the bottom can be adjusted as desired.
Upper part for men's overalls (Fig. 3)
Rice. 3. Pattern drawing for the upper part of a men's overalls
Draw a rectangle ABCD. Chest width . The lines of the rectangle AB and DC are equal to 14 cm. Length of the breast . The lines of the rectangle AD and BC are equal to 24 cm. Waist line. From point C, line BC is extended downward by 1 cm. Points 1 and D are connected. Straps sewing line. From point A, 3 cm is laid down, and 5 cm to the right. Points 3 and 5 are connected. Straps. The width of the straps is 5 cm, and their length is equal to the length from the waist line of the back over the shoulder to the line of sewing the straps to the top of the overalls
Standard model
The product has a straight silhouette with long trousers and a T-shirt type top.
- Extend the lines of the recess for the fit and the corresponding seam of the trouser construction by a few centimeters. This will ensure comfortable walking.
- Add approximately 1 cm to the step width of the rear and front panels.
- Connect the back of the dress and the back panel of the trousers into a single piece. The waistline on such a pattern should be clear.
- Prepare additional strips to decorate the cuts on the sides.
- The style provides a straight silhouette, so darts are not needed.
Modeling a standard model pattern
You can make design changes to the drawing of the bodice as part of the overalls. The trouser drawing in this case should be left unchanged.
- Place 2 cm down from the front neckline. Draw a new neckline.
- On the armhole line on the side, mark a distance of 1 and 3 cm.
- Make the shoulder outline shorter by 3 cm.
- Draw new contours of the armhole in front.
- Move the dart from the bust line to the side.
- Deepen the back neckline by 2 cm and the armhole by 1 cm.
- Make the shoulder 3 cm shorter. Draw a new armhole on the back part.
Winter overalls. Instructions for sewing and printing patterns
WINTER JUMPERSUIT
INSTRUCTIONS FOR PRINTING PATTERNS AND SEWING SEQUENCE
Materials: main material – raincoat and jacket fabrics with water-repellent impregnation; lining material – special silk materials based on viscose fibers and threads in color combination or contrast with the main material, intended for lining; insulation - (artificial (synthetic winterizer) or mixed layer with natural additives (cotton, sheep or camel wool) or their substitutes (bamboo, swan's down) surface density - 80-100 g/m2.
Structural additions to this model:
to chest girth up to size 52 - 6 cm, starting from 54 to 58 - 7 cm, starting from 60 - 8 cm;
to hip circumference - up to size 52 10 cm, from 54 to 58 - 11 cm, starting from 60 - 12 cm.
When ordering a pattern you receive 3 pdf files:
- A file with instructions for printing a pattern, containing a control square and the measurements according to which the pattern was constructed;
- File with pattern in A4 format, for printing on a regular printer
- File with a pattern on one large sheet - for printing on a plotter
Pattern sample:
* PRINTING ON A4 FORMAT PRINTER:
When printing patterns in A4 format, open Adobe Reader and check the “Actual size” checkbox (or uncheck “Fit to page size”) in the print settings.
Note the test square (or grid) on the pattern sheet. Its size is exactly 10 by 10 cm. It is needed in order to understand whether the printing scale is set correctly on your printer. Before printing the entire pattern, print out a sheet with a red square and measure it. 10cm sides? This means you can print the remaining sheets of the pattern. If the sides are more or less than 10 cm, you need to adjust the print scale of your printer. Otherwise, the pattern will not print correctly.
After printing all the pattern pages, glue them together in the order shown: the letters (A/B/C+) indicate the column, and the numbers (01/02/03+) indicate the row. The first (top left) pattern sheet will have the number A01.
*PRINTING ON A PLOTTER:
When printing a pattern on a plotter, open the pattern file in Adobe Reader (or Foxit Reader). Click on the "File" menu item, then select "Print". Select the Poster print mode under Page Sizing and Handling. Make sure the Segment Scale field is set to 100%. Check the boxes for Cutting Marks, Shortcuts, and Split Large Pages Only.
The following designations are used on the pattern:
Parts Specification
Main material
- Lower front part of trousers – 2 parts
- Knee pad – 2 parts
- Upper back of trousers – 2 parts
- Lower back of trousers – 2 parts
- Yoke of the back of the trousers – 1 piece (with fold)
- Back – 1 piece (with fold)
- The central part of the bib – 2 parts
- Cut-off side part of the bib – 2 parts
- Slope (windproof facing under the fastener) – 1 piece
- Wedge insert for a zipper on the side seams of the trousers – 2 parts
- Buckle holder on bib – 4 parts
- Buckle holder on the back – 4 parts
- Bottom of trouser lining – 2 parts
Lining material
- Pocket burlap – 4 pieces
- Front lining of trousers – 2 parts
- Back lining of trousers – 2 parts
- Back lining – 1 piece (with fold)
- Lining of the central part of the bib – 2 parts
- Lining of the side part of the bib – 2 parts
- Windproof part of the trouser lining – 2 parts
Attention! The lower part of the trouser lining can be made of either main or lining material. You can cut all the other parts first, and then cut this one from the material that remains.
When cutting, add seam allowances: on parts cut out from the main material - 1.5 cm, except for facing cuts, i.e. those that will be ground with lining material. Along the facing sections – 0.8-1.0 cm. Along the bottom edge of the trouser parts – 4 cm.
The average consumption of the base material is 2.0 - 2.5 m (with a width of at least 150 cm), depending on the size and height; lining material consumption is about 1.8 - 2.2 m (with a width of 150 cm), insulation consumption - 1.6 - 1.8 m (with a width of at least 150 cm).
An example of the layout of the parts of the overalls:
To make overalls you will also need:
— “zipper” braid - 40-50 cm for fastening;
— two zipper tapes - 18 cm for pockets;
— two zipper tapes - 20-25 cm to allow expansion of the trousers along the side seams;
— two fasteners with adjustable straps;
— 0.5 m of the simplest elastic band for windproof parts;
— 1.0-1.2 m of wide elastic to emphasize the waistline;
— sewing threads
Technological sequence for processing winter overalls
ATTENTION! Two different technologies can be used to sew insulated overalls. The first involves connecting the insulation to the base material, i.e. parts of the top, and the second involves connecting the insulation with the lining parts. Due to the fact that the first processing option is more complicated, we decided to give a detailed description of it.
- Sew the insulation onto the cut parts at a distance of 5 mm from the cuts.
Attention! Insulation can be of different volumes. For the upper part of the overalls, it is better to take a small amount of insulation.
Prepare holders for the bib and back fasteners.
Attention! The parts of the bib fastener need to be hemmed on three sides, turned right side out, ironed and finishing stitched on three sides. Depending on the design of the fastener, you need to secure the holder in the bib fastener. The details of the armhole holders on the back need to be hemmed on three sides, inserting elastic straps. Turn the holders right side out and iron. Sew a finishing stitch on three sides.
- Baste and then stitch the center parts of the overalls to the sides. Stitch the seam allowances to the center pieces.
- Baste and then stitch the back to the trimmed side pieces of the bib along the side edges. Press seam allowances.
- Fasten the strap holders along the upper edge of the back and the fastener holders along the upper edge of the bib.
Attention! At this stage, it is better to do this with hand stitches, since when trying on, the tilt of the holders is most often adjusted depending on the posture and height of the shoulders.
- Sew shape-forming darts on the knee pads of the front parts of the overalls.
Attention! Darts can be sewn using a stitched or applied seam, i.e. finishing stitch on the front side.
- Sew the pintucks along the side and crotch sections of the front parts of the trousers. Iron it.
- Iron the knee pad seam allowance along the top and bottom edges.
- Stitch the knee pads to the front of the trousers along the top and bottom edges.
- Sew the bottom backs of the trousers to the tops. Press the seam allowances. Sew a finishing stitch along the stitching seams.
- Sew the back of the trousers along the middle edges. Press seam allowances. Sew a finishing stitch along the seam.
- Sew the yoke to the back of the trousers. Press seam allowances.
- Sew a finishing line along the stitching seam of the yoke.
- Fold the front and back pieces of the pants together, right side to side, matching the side seams. Check symmetry. Place control marks (notches) along the side sections defining the ends of the zippers.
Attention! The zipper should be 2 cm shorter than the stitching line. Fastening on the side seams, allowing you to adjust the width strictly to the hem line of the bottom!
- Sew the front and back of the trousers along the side seams between the control marks that define the end of the pocket and the beginning of the fastener to allow the trousers to widen at the bottom. Press seam allowances.
- Baste and then stitch the zipper tape to the front and back of the trousers in the area where the trousers can widen at the bottom (Fig. 1, line 1). Baste and then stitch the wedge insert to the front and back of the trousers along the seams of the zipper tape stitching (Fig. 1, line 2). Press seam allowances toward larger pieces.
- Sew a finishing stitch on three sides (Fig. 1, line 3).
Rice. 1
- Finish the pockets in the side seams. Processing technology may vary depending on the type of zipper braid. In Fig. 2 shows processing options. Option 1 – open “tractor” zipper. Option 2 – closed zipper.
Fig.2
- baste and then stitch the zipper braid to the front and back of the trousers along the side sections (Fig. 2, line 1);
- sew the pocket burlap parts to the front and back parts of the trousers along the seams of the zipper tape (Fig. 2, line 2);
— sew a finishing stitch along the line of entry into the pocket (Fig. 2, line 3);
- sew a backtack stitch at the ends of the pocket
- Baste and then stitch the fronts of the trousers along the middle edges. Press seam allowances.
- Sew a finishing stitch along the middle edges of the front portions of the trousers.
- Baste and then stitch the front and back of the trousers in increments. Press seam allowances.
- Sew the finishing line along the crotch seams.
- Baste and then stitch the top of the overalls to the trousers at the waistline.
- Sew the zipper along the middle section of the front of the overalls (Fig. 3, line 1).
- Iron the windproof facing under the fastener in half, sew the top edges, turn the corners right side out and iron.
- Stitch the windproof facing to the seam allowance of the zipper tape to the right center part of the bib (Fig. 3, line 2).
Rice. 3
Attention! At this stage, it is necessary to try on, adjust the position of the clasp holders and straps, as well as the length of the trousers, taking into account the presence of elastic.
- Prepare the windproof parts of the lower parts of the trousers: sew the parts along the side sections with a backstitch, stitch the allowance for finishing the bottom edge on each part and insert an elastic band (Fig. 4, line 1).
Fig.4
- Prepare the lining of the overalls: baste and then sew the lining parts in the same way as the top parts, inserting a windproof piece into the seam of the connection between the lower and upper parts of the trouser lining (Fig. 4, line 2). Press the seam allowances.
Attention! To be able to turn the overalls right side out after connecting to the top, it is necessary to leave a 20 cm long hole in the middle seam of the back of the trousers.
- Stitch the top edge of the back and bib with lining.
- Stitch the bib lining to the seam allowances of the zipper stitch to the center part (Fig. 3, line 3). Iron it.
- Fasten the elastic band along the raised seams of the bib. Sew finishing stitches above and below the elastic.
Attention! This is a rather complicated operation. You can first make finishing stitches, connecting the lining and the top, and then insert elastic between the stitches and secure it to the relief seam allowances.
- Sew a finishing stitch along the zipper stitching seam. Iron it.
- Baste the top facing edge of the overalls using hand stitches. Iron it. Sew a finishing stitch around the edge.
Attention! If this operation is difficult for you to perform, then you can adjust the overcast seam allowances onto the lining, iron and secure the overcast edge using the “fluffing” technology.
- Sew the lining to the trousers along the bottom edges (through the hole in the lining). (Fig. 4, line 3)
- Baste the allowance for finishing the bottom sections of the trousers and sew a finishing line along the edge (Fig. 4, line 4).
- Sew up the hole that you left so that you can turn the overalls right side out after connecting to the lining.
- Iron the overalls when finished.
Wear it with pleasure!
Dress made of trousers
If you have long and very wide trousers lying around in your wardrobe that you no longer want to wear, you can use them to create a new outfit for yourself. There is nothing complicated about this: you just need to raise the pants to chest level, using one leg as the main part, and cut the second in half and wrap it around the waist, presenting it as decoration.
Uniform requirements
The first overalls for workers appeared in America, where they were made of durable and practical denim, fastened along the main seams with decorative stitches from threads of a contrasting shade.
Since those times, denim fabric has gained incredible popularity, and work suits began to be used in various industries, practically without changing their appearance and “surviving” to the present day.
Features of the cut
Traditionally, work clothes such as men's work overalls are available in two versions:
- In the form of overalls. It looks like pants with straps and an additional section of fabric sewn in the front and with a height up to chest level. Most often it is accompanied by a jacket.
- In the form of a jumpsuit. It looks like a one-piece suit with a straight silhouette, consisting of pants sewn with a jacket, without darts or reliefs. The fit at the waist is achieved through the use of a hidden drawstring, which can be either fixed or not fixed.
It wouldn't hurt to buy gloves to go with the overalls. Do you already know which winter work gloves should be chosen in your case?
Maybe you need anti-vibration gloves? Find out all about them by clicking here.
Materials
The choice of material for the manufacture of men's work overalls depends on the specifics of its further use. The most common of them are:
- Spunbond . It is a type of white non-woven fabric on a polymer base. It is characterized by increased strength and low electrical conductivity. Used for sewing “disposable overalls” used in the food and chemical industries, as well as medical and pharmaceutical laboratories to protect underwear from tears and contamination.
- Twill is a dense, wear-resistant fabric with diagonal thread weaving. It has high breathability, ensures optimal thermal exchange of the worker’s skin, and creates a comfortable microclimate for him to work in any conditions.
- Blended fabrics with a cotton base . Resistant to deformation, extremely comfortable to wear.
- Tyvek . Another material of artificial origin, synthesized from polymer fibers. Has increased strength and ductility. Designed for the manufacture of work clothes with a high degree of protection.
In addition, for operation in special conditions, special types of materials are used that have certain sets of qualities , for example:
- Waterproof;
- Fire resistance;
- Improved thermal protection;
- Airtight;
- Reflective properties.
Materials with the listed characteristics are used for sewing overalls used in high-risk conditions. In particular, products with reflective elements are used in road construction.
Additional items
As a rule, clothing of this type is equipped with various elements that make its use even more convenient and comfortable.
Most often these are
patch pockets, with one or several sections , located on the chest, hips and back of the trousers, fastened with flaps using buttons.
In this case, back pockets usually have reinforcement at the bottom. Exception: models made of spunbond, manufactured without any finishing elements , characterized by a uniform structure and smoothness. They do not have pockets or flaps and are equipped only with a removable protective hood.
Buttons, snaps or zippers can be used as a fastener in work overalls . Fastening option: front or side. Sleeves with cuffs. The area of the knees and elbows may have additional reinforcing pads.
Pattern for men's overalls
Authors of the article: Valentina Nivina Alexander Nivin
Pattern for men's overalls.
Chest circumference 104cm,
Waist circumference 94cm.
The pattern is given with seam allowances!
The presented model of men's overalls is primarily intended for winter recreation and sports. In the previous article, we presented you with a pattern for a men's vest, and this dungaree can serve as a worthy companion to this vest.
The size of the overalls (as well as the vest) is designed for men with a chest circumference of 104 cm and a waist circumference of 94 cm.
Men's insulated bib overalls with a wide belt at the front and a tailored back.
Straps with elastic bands threaded through them at the front are sewn directly into the top seam of the waistband.
The fastening in the middle of the front is a zipper and buttons.
The front halves of the trousers have welt pockets with a leaf.
The bottom of the trousers has slits at the back with zippers. Valance wedges are inserted under the zippers.
On the back along the waist line, you can sew a regular elastic band or stitch a drawstring 1-1.5 cm and pull in an elastic cord with fasteners.
The selection of fabric for the top of the overalls depends on the purpose of the product. For winter recreation (skiing, sledding and just playing in the snow), it is better to opt for water-repellent synthetic fabric. Current markets offer us a wide selection of fabrics with various characteristics, so there should be no problems with the material for lining and insulation. It all depends on the client's wishes.
THE PATTERN IS PROVIDED WITH SEAMENT ALLOWANCES!!!
for stitched seams 1cm,
for overcasting 0.7 cm,
for the hem of the bottom 3 - 5 cm.
Preparing the pattern for work is extremely simple. Click on the diagram located at the end of the article and the pattern for men's overalls will open in a new window.
Print out the pattern sheets and connect them according to the diagram.
Be sure to check the scale for consistency. On a printed sheet with a 10x10 cm square depicted, sides of 10 cm should correspond to exactly 10 centimeters.
Cut out the details of the overalls and you can get to work. The patterns are ready.
Important! Before cutting, check that the measurements taken correspond to the parameters of the pattern. Pay special attention to the length of the overalls (note that the pattern already has allowances, including for the hem of the bottom). If necessary, adjust the pattern and only then proceed to cutting.
The back trim pieces are cut from the main fabric. Although, if desired, the lower part can be cut from lining fabric.
We lay out the patterns on the fabric, observing the direction of the grain thread, chalk and cut along the chalking line (the patterns already contain seam allowances).
In addition to the main parts, you need to cut out a strap 89x7.5cm 2 parts.
Cutting details are given only for the top of the product.
The lining and insulation are cut according to the main patterns.
After cutting, baste the parts, try on the fit of the overalls on your figure, make all the necessary adjustments and start sewing.
NOTE. You can use the proposed pattern as a finished pattern, or you can use it as a basis for modeling. Those. without changing the main design lines, divide (draw additional lines and cut) the front and (or) back halves of the overalls into several parts, add pockets, flaps, yokes, knee pads and other details to your taste. Don't forget to add seam allowances along the cut lines.
Create and enjoy the results of your creativity.
I wish you courage in making decisions and determination in your actions, and you will succeed!
Leave your wishes and suggestions in the comments. We will definitely consider them.
If you have any difficulties with printing patterns, write and we will post a master class with the details of this process.
For the next article we are also preparing a pattern for the winter assortment.
If you find any errors, please let us know in the feedback form.
Download the program for viewing and printing patterns >>> | Pattern >>>
wesew.ru
Backpack
Any thick clothing can easily be transformed into a stylish and practical backpack. Here the game of imagination can come up with any accessory options. The main thing is to complement the new item with stylish decor so that it looks like new, straight from the store.
:
Address: 6th Kozhukhovskaya street, 23, Moscow, Russia, 115193
Reviews
Similar tasks
Other tasks in the category “Cleaning and help with housework”
- 600 rub
It is necessary to sew an apron and cap for a 5-year-old child, any material (chintz can be used).
Victoria S. Profsoyuznaya street, 3, Nizhnevartovsk
Ingenious cleaning of the forge with washing of the stove and oven, general cleaning of the bathroom
Anastasia Zavidnaya street, 3, Vidnoye, Leninsky urban district, Moscow region, Russia
It is necessary to wash, dry and treat several pairs of shoes of different types with protective and restorative agents.
Alexey street Universitetskaya Embankment, Chelyabinsk
Sew classic cut jeans according to my sizes. make skinny or something like that, I’ll show and explain everything. There are several pairs, after completing the first job, I will immediately contact you again
Azamat G. Ligovsky Prospekt metro station, St. Petersburg
Olga E. Nevsky Prospekt, 63, St. Petersburg
It just so happens that any man in the course of his life from time to time has to do work associated with physical stress and contact with pollutants.
Moreover, this can happen in a variety of conditions: in cold and rain, under the rays of the scorching sun and in damp, windy weather. Therefore, choosing suitable equipment for them is “a matter of first importance and necessity.”
The best choice for such cases is a good work overall, which will protect against all sorts of negative factors and allow a man to feel comfortable and at ease in any conditions. By the way, you can purchase it in specialized stores or make it yourself, taking into account all the features and parameters of your own figure.
DIY pattern for men's work overalls: simple and quick
It just so happens that any man in the course of his life from time to time has to do work associated with physical stress and contact with pollutants.
Moreover, this can happen in a variety of conditions: in cold and rain, under the rays of the scorching sun and in damp, windy weather. Therefore, choosing suitable equipment for them is “a matter of first importance and necessity.”
The best choice for such cases is a good work overall, which will protect against all sorts of negative factors and allow a man to feel comfortable and at ease in any conditions. By the way, you can purchase it in specialized stores or make it yourself, taking into account all the features and parameters of your own figure.
Instructions for measuring and cutting yourself
Work overalls for your own needs can be purchased at a special store or made yourself. To do this you will need ( for cutting a male model for height 170 cm, size 48 ):
- Mixed fabric (half cotton and polymer) – 3 m (fabric width 1.5 m).
- 75 centimeter zipper (with two locks: lower and upper).
- One zipper length 16 cm, 19 cm and 28 cm; 2 pcs. 20 cm each, for pockets.
- Velcro tape 2 cm wide - 40 cm.
- 2 buttons.
- Rubber-based ribbon 4 cm wide - 80 cm.
Elements of the pattern for men's work overalls:
- Two shelves.
- Pockets for it: right, with a 16 cm zipper, and a sew-on pocket with dimensions: 8 x 13 cm - 1 pc. One left pocket. Valves for it – 2 pcs.
- One back.
- Yoke – 1 with fold.
- One pocket with a 28 cm zipper on the back.
- Sleeves, front and back elements – 2 pcs.
- Reinforcing pads for elbows – 2 pcs.
- Folded cuff – 2 pcs.
- Gate - 1 pc.
- Back neck facing – 1 pc.
- Neck facing and lining – 1 pc.
- Front and back halves of trousers - 2 pieces each.
- Seat reinforcement – 1 pc.
- Knee pads – 2 pcs.
- Burlap for welt-type pockets (20 cm zipper) on the front panel of the trousers – 4 pcs.
- Side pocket with zipper 18 cm.
- Sash - 2 parts.
- Belt loops – 4 pcs.
- Trouser gusset – 1 pc.
Allowances: for seams - 1 cm, for the bottom of trousers - 4 cm, for pocket entrances - 2.5 cm.
Do you know how to choose the right workwear - men's winter overalls, so as not to make a mistake and provide yourself with warmth when working in cold conditions?
You will find everything about men's work coats here: how to choose them, their varieties, and sewing requirements.
And this article talks in detail about the uniform for firefighters and its classification.
Sequencing:
- Pockets are made and processed: the right one with a 16 cm zipper and a small sewn one.
- We process the top of the small pocket, then place it on the main one, tucking the side cut on the right side, and sew along the right edge and center.
- We sew the upper part of the main pocket to the zipper, on one side, turning its ends and leaving the allowances inside out, basting and ironing.
- The other part of the zipper, folded in the same way, is applied along the marking lines, facing the front part of the shelf. We wrap the entire pocket up and attach it. Then we turn it down and sew it on three sides according to the markings, capturing the ends of the zipper.
- We first process the second pocket, located on the left, from the top, then we make folds (it will be voluminous): the middle bow and edge ones, stitching the outer folds and placing the bottom part of the button in the right place. We grind out the valves by inserting a piece of braid with the upper part of the button into them in the central part.
- Iron the pocket allowances, fix the folds at the bottom and sew the pocket along the markings. We attach two valves above it.
- We iron the fold located on the side of the back patch pocket by stitching the bend. Sew a zipper on one side to the fold allowance. Iron the remaining allowances to the wrong side, tucking the ends of the zipper.
- We place the second part of the zipper facing the front part of the back along the marking lines, turning it to the left, attach the zipper and turn the pocket to the front side. We attach it on three sides, grabbing the folded ends of the zipper.
- We sew the yoke to the main part of the back using a double stitch.
- We connect the shelf to the back with double stitching.
- We connect the sleeve parts up to the cut mark. We are processing it. We make folds at the bottom.
- Attach the elbow reinforcement to the sleeve, turning the allowances inside out.
- Sew on the cuffs, adding velcro tape to them.
- We connect the cuffs to the sleeves.
- Sew the sleeves into the armhole.
- Attach the outer part of the collar to the neck.
- We connect the back with the shelf and sleeves.
- We sew the belt loops to the front and back and sew them on.
- We sew Velcro onto the knee pads.
- We attach the adhesive tape to the knee area and attach the knee pad, making sure that its parts match and are connected to each other.
- We sew the elements of the reinforcing part for the seat onto the rear panels of the trouser part.
- We sew the back parts of the trousers with double stitching.
- We connect their side seams.
- We sew on the pocket located on the right side, similar to the first pocket made earlier.
- We sew a 4-5 cm section of the middle seam on the front half of the trousers.
- Sew the gusset to the crotch elements of the front and back of the trousers.
- Sew the remaining section of the crotch seam.
- We connect the parts of the overalls. Iron the seams upward.
- Sew the belt on the front side.
- We insert an elastic band into it, measuring the required length, the ends of which are fixed near the front loops.
- Sew on the central zipper fastener. We fix the hem to its cuts, while simultaneously grinding the neck of the product, we process the outer part of the collar and the seam of the zipper location.
- We hem the trousers at the bottom and iron the overalls.
To learn how to sew overalls, watch this video tutorial:
A simple pattern and instructions for sewing men's work overalls
It just so happens that any man in the course of his life from time to time has to do work associated with physical stress and contact with pollutants.
Moreover, this can happen in a variety of conditions: in cold and rain, under the rays of the scorching sun and in damp, windy weather. Therefore, choosing suitable equipment for them is “a matter of first importance and necessity.”
The best choice for such cases is a good work overall, which will protect against all sorts of negative factors and allow a man to feel comfortable and at ease in any conditions. By the way, you can purchase it in specialized stores or make it yourself, taking into account all the features and parameters of your own figure.
Purpose of workwear
Men's work overalls are special universal-purpose clothing that can be used in a wide variety of situations both at work and at home. However, in some enterprises wearing it is mandatory.
The distinctive features of this form of clothing are:
- Practicality. Work overalls are made of durable, non-staining fabric that is easy to care for.
- Functionality.
- Convenience.
Purposes of its use:
- Protection from high or low temperatures, radioactive and electromagnetic influences.
- Prevention of injury due to sparks and flames.
- Ensuring comfort when working with fatty substances, oils, petroleum products, acids and other chemicals and compounds.
- Protection from dust and other industrial contaminants.
Areas of application:
- In construction;
- When performing installation work (at enterprises of various profiles, in auto repair shops);
- In the food industry;
- When performing welding and electrical installation work;
- In the chemical, furniture and processing industries;
- In agriculture, etc.
Uniform requirements
The first overalls for workers appeared in America, where they were made of durable and practical denim, fastened along the main seams with decorative stitches from threads of a contrasting shade.
Since those times, denim fabric has gained incredible popularity, and work suits began to be used in various industries, practically without changing their appearance and “surviving” to the present day.
Features of the cut
Traditionally, work clothes such as men's work overalls are available in two versions:
- In the form of overalls. It looks like pants with straps and an additional section of fabric sewn in the front and with a height up to chest level. Most often it is accompanied by a jacket.
- In the form of a jumpsuit. It looks like a one-piece suit with a straight silhouette, consisting of pants sewn with a jacket, without darts or reliefs. The fit at the waist is achieved through the use of a hidden drawstring, which can be either fixed or not fixed.
Materials
The choice of material for the manufacture of men's work overalls depends on the specifics of its further use. The most common of them are:
- Spunbond. It is a type of white non-woven fabric on a polymer base. It is characterized by increased strength and low electrical conductivity. Used for sewing “disposable overalls” used in the food and chemical industries, as well as medical and pharmaceutical laboratories to protect underwear from tears and contamination.
- Twill is a dense, wear-resistant fabric with diagonal thread weaving. It has high breathability, ensures optimal thermal exchange of the worker’s skin, and creates a comfortable microclimate for him to work in any conditions.
- Blended fabrics with a cotton base. Resistant to deformation, extremely comfortable to wear.
- Tyvek. Another material of artificial origin, synthesized from polymer fibers. Has increased strength and ductility. Designed for the manufacture of work clothes with a high degree of protection.
In addition, for operation in special conditions, special types of materials are used that have certain sets of qualities, for example:
- Waterproof;
- Fire resistance;
- Improved thermal protection;
- Airtight;
- Reflective properties.
Materials with the listed characteristics are used for sewing overalls used in high-risk conditions. In particular, products with reflective elements are used in road construction.
Additional items
As a rule, clothing of this type is equipped with various elements that make its use even more convenient and comfortable.
Most often these are patch pockets, with one or several sections, located on the chest, hips and back of the trousers, fastened with flaps using buttons. In this case, back pockets usually have reinforcement at the bottom.
Exception: models made of spunbond, manufactured without any finishing elements, characterized by a uniform structure and smoothness. They do not have pockets or flaps and are equipped only with a removable protective hood.
Buttons, snaps or zippers can be used as a fastener in work overalls. Fastening option: front or side. Sleeves with cuffs. The area of the knees and elbows may have additional reinforcing pads.
Instructions for measuring and cutting yourself
Work overalls for your own needs can be purchased at a special store or made yourself. To do this you will need (for cutting a male model for height 170 cm, size 48):
- Mixed fabric (half cotton and polymer) – 3 m (fabric width 1.5 m).
- 75 centimeter zipper (with two locks: lower and upper).
- One zipper length 16 cm, 19 cm and 28 cm; 2 pcs. 20 cm each, for pockets.
- Velcro tape 2 cm wide - 40 cm.
- 2 buttons.
- Rubber-based ribbon 4 cm wide - 80 cm.
Elements of the pattern for men's work overalls:
- Two shelves.
- Pockets for it: right, with a 16 cm zipper, and a sew-on pocket with dimensions: 8 x 13 cm - 1 pc. One left pocket. Valves for it – 2 pcs.
- One back.
- Yoke – 1 with fold.
- One pocket with a 28 cm zipper on the back.
- Sleeves, front and back elements – 2 pcs.
- Reinforcing pads for elbows – 2 pcs.
- Folded cuff – 2 pcs.
- Gate - 1 pc.
- Back neck facing – 1 pc.
- Neck facing and lining – 1 pc.
- Front and back halves of trousers - 2 pieces each.
- Seat reinforcement – 1 pc.
- Knee pads – 2 pcs.
- Burlap for welt-type pockets (20 cm zipper) on the front panel of the trousers – 4 pcs.
- Side pocket with zipper 18 cm.
- Sash - 2 parts.
- Belt loops – 4 pcs.
- Trouser gusset – 1 pc.
Allowances: for seams - 1 cm, for the bottom of trousers - 4 cm, for pocket entrances - 2.5 cm.
Sequencing:
- Pockets are made and processed: the right one with a 16 cm zipper and a small sewn one.
- We process the top of the small pocket, then place it on the main one, tucking the side cut on the right side, and sew along the right edge and center.
- We sew the upper part of the main pocket to the zipper, on one side, turning its ends and leaving the allowances inside out, basting and ironing.
- The other part of the zipper, folded in the same way, is applied along the marking lines, facing the front part of the shelf. We wrap the entire pocket up and attach it. Then we turn it down and sew it on three sides according to the markings, capturing the ends of the zipper.
- We first process the second pocket, located on the left, from the top, then we make folds (it will be voluminous): the middle bow and edge ones, stitching the outer folds and placing the bottom part of the button in the right place. We grind out the valves by inserting a piece of braid with the upper part of the button into them in the central part.
- Iron the pocket allowances, fix the folds at the bottom and sew the pocket along the markings. We attach two valves above it.
- We iron the fold located on the side of the back patch pocket by stitching the bend. Sew a zipper on one side to the fold allowance. Iron the remaining allowances to the wrong side, tucking the ends of the zipper.
- We place the second part of the zipper facing the front part of the back along the marking lines, turning it to the left, attach the zipper and turn the pocket to the front side. We attach it on three sides, grabbing the folded ends of the zipper.
- We sew the yoke to the main part of the back using a double stitch.
- We connect the shelf to the back with double stitching.
- We connect the sleeve parts up to the cut mark. We are processing it. We make folds at the bottom.
- Attach the elbow reinforcement to the sleeve, turning the allowances inside out.
- Sew on the cuffs, adding velcro tape to them.
- We connect the cuffs to the sleeves.
- Sew the sleeves into the armhole.
- Attach the outer part of the collar to the neck.
- We connect the back with the shelf and sleeves.
- We sew the belt loops to the front and back and sew them on.
- We sew Velcro onto the knee pads.
- We attach the adhesive tape to the knee area and attach the knee pad, making sure that its parts match and are connected to each other.
- We sew the elements of the reinforcing part for the seat onto the rear panels of the trouser part.
- We sew the back parts of the trousers with double stitching.
- We connect their side seams.
- We sew on the pocket located on the right side, similar to the first pocket made earlier.
- We sew a 4-5 cm section of the middle seam on the front half of the trousers.
- Sew the gusset to the crotch elements of the front and back of the trousers.
- Sew the remaining section of the crotch seam.
- We connect the parts of the overalls. Iron the seams upward.
- Sew the belt on the front side.
- We insert an elastic band into it, measuring the required length, the ends of which are fixed near the front loops.
- Sew on the central zipper fastener. We fix the hem to its cuts, while simultaneously grinding the neck of the product, we process the outer part of the collar and the seam of the zipper location.
- We hem the trousers at the bottom and iron the overalls.
To learn how to sew overalls, watch this video tutorial:
Rules of care
Since the material from which men's work overalls are made is usually highly wear-resistant and practical, caring for them is quite simple and not difficult. Products made from mixed fabric can be dry cleaned and machine washed at 60 degrees. They can be ironed and steamed.
However, bleaching using chlorine-containing preparations is strictly contraindicated for them.
Some types of overalls for men (for example, made from spunbond) are intended for single use.
Therefore, after use, they must be disposed of in the prescribed manner. This is especially true for workwear that comes into contact with toxic and radioactive substances.
Thus, it can be noted that men's work overalls are one of the most convenient and popular types of workwear used in everyday life and at work. Due to its protective properties, versatility and practicality, it is widely used in industry.
In addition, you can make it yourself, taking into account all the features of your figure and the nature of the work in which it will be used in the future.
1 Comment
fufayka.net
T-shirt sweatshirt
Unnecessary pants are an excuse to upgrade your favorite t-shirt. Having cut off the lower part of the trousers, they need to be sewn to the edges of the sleeves of the T-shirt to get a stylish sweatshirt with bright decor. You can use a similar idea to update your shirt or denim jacket with nice sleeves. The image will become unique and inimitable. You can modernize clothes in this way both for yourself and for your child.
Rules of care
Since the material from which men's work overalls are made is usually highly wear-resistant and practical, caring for them is quite simple and not difficult . Products made from mixed fabric can be dry cleaned and machine washed at 60 degrees. They can be ironed and steamed.
However, bleaching using chlorine-containing preparations is strictly contraindicated for them.
Some types of overalls for men (for example, made from spunbond) are intended for single use.
Therefore, after use, they must be disposed of in the prescribed manner.
especially true for workwear that comes into contact with toxic and radioactive substances.
Thus, it can be noted that men's work overalls are one of the most convenient and popular types of workwear used in everyday life and at work. Due to its protective properties, versatility and practicality, it is widely used in industry .
In addition, you can make it yourself, taking into account all the features of your figure and the nature of the work in which it will be used in the future.
Homemade swimsuit
If you have leggings in your wardrobe of unnecessary things, then with their help you can easily prepare for the beach season. Bright color and print will not be a hindrance, but rather even an advantage of new clothes. The top of the leggings can be used to create swim shorts. But the twisted lower parts of the pants will serve as the top of the swimsuit. You can add various decorations to it in the form of a ring, brooch or beads. Straps are made upon request.
contents .. 71 72 ..
Men's overalls - pattern
(Size 48, Fig. 177)
Rice. 177. Men's overalls
To draw a pattern for men's overalls, you need to take the following measurements. 1. Length of trousers on the side 102 cm 2. Length of step. 76 cm 3. Length from waist to knee 58-60 cm 4. Waist semi-circle 42 cm 5. Hip semi-circle 50 cm
Construction of the front half of the trousers (Fig. 178)
Draw a right angle with its vertex at point A.
Length trousers. From point A, set aside 102 cm (the length of the trousers as measured) and place point H, from which a straight line of arbitrary length is drawn to the right.
Step length. From point P up, set aside 76 cm (step length as measured) and place point W. From point W, draw a straight line of arbitrary length to the right.
Knee length. From point A, 58 cm is laid down (length from waist to knee according to measurement) and point K is placed, from which a straight line of arbitrary length is drawn to the right.
Waistline. From point A, set aside 27 cm to the right and place point T (1/2 of the semi-circle of the waist by measurement plus 6 cm for all sizes):
42:2+6 =27.
From point T, a straight line is lowered down until it intersects with the line from point W. The intersection point is designated by the letter Ш1. From point A, 2 cm is laid off to the right. From point T, 1 cm is laid down. Points 2 and 1 are connected.
Step width. From point P, set aside 30 cm to the right and place point Ш2 (1/2 of the semicircle of the hips by measurement plus 5 cm for all sizes):
50:2+5=30.
From point Ш2 a straight line is lowered down until it intersects with the line from point I and the intersection point is designated by the letter H1.
Line, ironing. The ШШ2 line is divided in half and through the division point a straight line is drawn up to the intersection with the AT line (the intersection point is designated by the letter T1), and down to the intersection with the HH1 line.
Bow line. From point Ш1, 6 cm is laid upward. From the point, dividing the angle in half, 3 cm is laid aside. The bow line is drawn through points 1, 6, 3, Ш2.
Crotch line. 2.5 cm is set aside from point H1 to the left. Points Ш2 and 2.5 are connected.
Side seam line. From point A, 17 cm is laid down, from point P to the right - 2.5 cm. The side seam line is drawn through points 2, 17, Ш, 2.5. From point 2 (waist line) 4 cm is laid down. This distance to the pocket is stitched.
Darts at the waistline. From point T1, 2 cm is set aside to the right (dart depth). Then the distance 2 and T1 is divided in half and 2 cm is set aside from the division point to the right (dart depth). Fold lines 3 cm long are drawn down from the marked points.
The bottom line passes through points 2.5 and 2.5. The width of the bottom of the trousers is adjusted as desired.
Constructing the back half of the trousers (Fig. 179)
Draw a rectangle ABCD.
Pants width. The lines of the rectangle AB and DC are equal to 30 centimeters (1/2 the semicircle of the hips by measurement plus 5 cm for all sizes):
50:2+5=30.
Knee length. From point A, 58 cm is laid down (length from waist to knee according to measurement) and point K is placed, from which a straight line of arbitrary length is drawn to the right.
Waistline. From point A, set aside 27 cm to the right and place point T (1/2 of the semi-circle of the waist by measurement plus 6 cm for all sizes):
42:2+6=27.
From point T, a straight line is lowered down until it intersects with the line from point W. The intersection point is designated by the letter Ш1. From point A, 2 cm is laid off to the right. From point T, 1 cm is laid down. Points 2 and 1 are connected.
Step width. From point P, set aside 30 cm to the right and put a dot (1/2 of the semicircle of the hips by measurement plus 5 cm for all sizes):
50:2+5=30.
From point Ш2 a straight line is lowered down until it intersects with the line from point P and the intersection point is designated by the letter H1.
Ironing line. The ШШ2 line is divided in half and through the division point a straight line is drawn up to the intersection with the AT line (the intersection point is designated by the letter T1), and down to the intersection with the HH1 line.
Bow line. From point Ш1, 6 cm are laid upward. From point Ш1, dividing the corner in half, 3 cm are laid down. The bow line is drawn through points 1, 6, 3, Ш2.
Crotch line. 2.5 cm is set aside from point H1 to the left. Points Ш2 and 2.5 are connected.
Side seam line. From point A, 17 cm is laid down, from point P to the right - 2.5 cm. The side seam line is drawn through points 2, 17, Ш, 2.5. From point 2 (waist line) 4 cm is laid down. This distance to the pocket is stitched.
Darts at the waistline. From point T1, 2 cm is set aside to the right (dart depth). Then the distance 2 and T1 is divided in half and 2 cm is set aside from the division point to the right (dart depth). Fold lines 3 cm long are drawn down from the marked points.
The bottom line passes through points 2.5 and 2.5. The width of the bottom of the trousers is adjusted as desired.
Constructing the back half of the trousers (Fig. 179)
Draw a rectangle ABCD.
Pants width. The lines of the rectangle AB and DC are equal to 30 centimeters (1/2 the semicircle of the hips by measurement plus 5 cm for all sizes):
50:2+5=30.
Length trousers. The lines of the rectangle AD and BC are equal to 102 centimeters (the length of the trousers as measured).
Step length. From point D upward, set aside 76 cm (step length as measured) and place point W.
Step width. Through point III, draw a straight line to the right until it intersects with line BC (the intersection point is designated by the letter Ш1), and to the left by 7.5 cm (1/4 of the distance ШШ1).
30:4=7,5.
Knee length. From point A, 58 cm are laid down (length from waist to knee) and point K is placed, from which a straight line is drawn to the right until it intersects with line BC. The intersection point is designated by the letter K1.
Waistline. Line AB is divided in half, 4 cm is set aside upward from the point of division. From Point B, line AB is extended to the right arbitrarily. Then, from point 4 to the intersection with the continuation of line AB, draw a line 23 cm long and place a point T (1/2 of the semicircle of the waist according to the measurement plus 2 cm for all sizes):
42:2+2=23.
The waist line from point 4 is extended to the left by 5 cm.
Elephant (seat) line. The distance 7.5 W is divided in half and 1 cm is laid down from the division point. Points 5 and W are connected by a dotted line, divided into three
equal parts, from the lower point of division to the right at right angles to the dotted line, 1.5 cm are laid down. The line of the elephant (seat) is drawn through point 5, the upper point of division of the dotted line and points 7.5, W, 1, 7.5.
Crotch line. From point K, 4 cm is set aside. From point D, 1 cm is set aside to the left. Then points 7.5 and 4 are connected with a dotted line, divided in half, and 0.5 cm is set aside from the division point to the right. The crotch line is drawn through points 7.5 , 0.5, 4, 1.
Side seam line. 4 cm is set aside from point C to the left. Points T and 4 are connected.
Dart at the waistline. The waist line from point 4 to point T is divided in half, a dotted line (at a right angle to the waist line) 10 cm long is lowered from the division point downwards, and 1.5 cm are set aside to the right and left, which are connected to point 10. Bottom line. Passes through points 1 and 4. The width of the trousers at the bottom is made as desired.
Upper part for men's overalls (Fig. 180)
Draw a rectangle ABCD.
Breast width. The lines of the rectangle A B and DC are equal to 14 centimeters.
Breast length. The lines of the rectangle AD and BC are equal to 24 centimeters.
Waistline. From point C, line BC is extended downward by 1 cm. Points 1 and D are connected.
Rice. 180. Pattern drawing for the upper part of men's overalls
Straps sewing line. From point A, 3 cm is laid down, and 5 cm to the right. Points 3 and 5 are connected.
Straps. The width of the straps is 5 cm, and their length is equal to the length from the waist line of the back over the shoulder to the line of sewing the straps to the top of the overalls.
contents .. 71 72 ..