Bolero is an original item of women's wardrobe. Initially, it was an element of traditional Spanish clothing. And in the 19th century it became widespread throughout Europe.
Now this stylish cropped jacket is back in fashion. With its help, you can create new looks with already boring dresses, sundresses or tops.
There are several options for bolero: made of knitwear, lace or fur, artificial or natural. It is suitable for both going out and everyday office style. The stores offer various versions of this wardrobe item. However, it is difficult to choose the right color and style that will look beautiful on your figure.
There is an exit! You can sew a bolero with your own hands. We'll tell you how to do this.
How to sew a bolero with your own hands?
Every magazine that offers patterns and detailed descriptions lays out the technique for sewing this product. This includes Burda Moden, Chic, Atelier and many others. If you don’t have a magazine at hand, and especially if you want to sew it according to your own measurements, you can build the base yourself. And then change it - add frills along the bottom or along the entire perimeter, remove or add any elements.
Below is one guipure bolero pattern. The numbers are average. You rely on your own measurements.
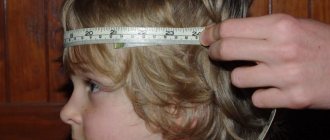
- Back length.
- Chest circumference.
- The length of the sleeve.
- Wrist circumference.
You can calculate the half (for Og and Oz) and quarter measurements (for Og) in advance. Construct a drawing by substituting numbers from your own measurements.
For sewing you will need fabric (Di + Dr + hem), scissors, needle, pins, thread, satin bias tape.
- Transfer the drawing to the cut.
- Cut out taking into account allowances and cut.
Allowances along the bottom of the product and the outer edge can be ignored, since they will be processed with bias tape.
- Connect the shoulder seams of the shelves to the backs. Sew.
- Sew the unstitched sleeve into the open armhole.
- Sew the sleeve seam and the side seam in one seam.
Don't forget to overlock or zigzag all the allowances. Better yet, treat them with bias tape - this will turn out more neatly and professionally.
- Iron the item.
- Fold the bias tape in half lengthwise and press the fold line.
- Stitch bias tape around the entire perimeter of the bolero.
- Sleeves can be hemmed without bias tape by turning the seam allowance twice to the wrong side.
Sewing a guipure bolero with your own hands turned out to be quick and easy. Now we can say that clothes for the holiday have a twist and have a finished look.
This is interesting: Bolero pattern for girls (aged 5-10 years)
Insulated model
The oriental-style product has rounded edges and flared, one-piece sleeves (or tapered sleeves with cuffs). The base material can be dense - plush, faux fur. The insulated product is supplied with a lining.
- Measure your chest circumference.
- Fold the piece of fabric in half, face inward.
- Set aside the length of the back part from the edge.
- Draw the corresponding straight line.
- From the fold, mark 1/4 of the bust measurement with an addition of 3 cm.
- In the corner, mark the neckline with a smooth line.
- Mark the hole depth.
- Add a one-piece bell sleeve detail.
- The sides of the product are shaped.
- Cut out the resulting back piece. Cut out a shelf along its contours.
- Divide the front part of the model into two equal parts. Make the neckline deeper.
- Cut the lining in the same way.
Boleros can be made from a number of materials, including fur. Some models are not recommended to be combined with neck jewelry.
msk-moda.ru
What you need for work
To sew a bolero you need a minimum number of tools and materials, most of which everyone has in their home.
- Paper or tracing paper.
- Pencil and ruler.
- Textile.
- Needle and thread.
- Sewing machine.
- Scissors.
- Safety pins.
- Buttons and fasteners.
The material must be chosen depending on what you plan to combine this item of clothing with.
Advice! Guipure, satin and velvet are suitable for evening outings. For everyday use, knitwear, cotton or women's suit fabrics.
Bolero knitting sequence
Any knitted product begins with a sample - making a fragment with a format of approximately 10x10 cm. It is knitted in compliance with the pattern repeat (repeating fragments) if it is assumed according to the pattern.
Important! You cannot use another hook or knitting needles when determining the knitting density. The sample is made according to the pattern of the yarn pattern for the upcoming work, and with the tools that will be used to knit the bolero - knitting or crocheting.
When the sample is ready, it is advisable to lightly steam it through damp gauze. After wet-heat treatment, the yarn will “lay down” as in the product after washing.
After this, the density is determined - how many loops or columns fit into 10 cm of work. This indicator is multiplied by the measurement results to obtain the required number of loops.
Some needlewomen often act differently - a secret for beginners is how to crochet or knit a bolero.
They lay out a sample made with an exact repeat of the pattern along the bottom of the pattern, determining how many of them will fit along the width of the back, front or sleeve. This is the most accurate way to determine the number of stitches when casting on the first row. Next, knit the back, front and sleeves.
Variation on the theme of the cape
If we are sewing bolero from guipure, we suggest trying this model with a hood. You can wear it to any celebration. Its pattern is elementary - a circle and a rectangle.
- The circle is the cape itself. On one side you need to cut to the center. Cut a smaller circle in the center for the neck.
- The rectangle is the parts of the hood. Its smaller side is equal to ½ the circumference of the neck. You will need two such parts.
We cut out all the elements from guipure. We connect the parts of the hood and sew it into the neck. We process all allowances, outer edges with bias tape. You can sew on a ribbon or a button or a hook so that the cape stays on your shoulders without falling off.
The result is a luxurious model.
Model based on a finished T-shirt
An improvised bolero model can also be made from a ready-made T-shirt.
- In front, in the center of the product, draw a straight line from the neck down.
- Make the appropriate cut.
- Cut off the existing collar.
- Fold the edges of the cut center front, catching the neckline.
- Place seams corresponding to the folds.
- Thread an elastic band or lace into the resulting continuous drawstring.
- At the bottom, the ends of the ribbon can be left uncut, leaving decorative ties.
- Alternatively, use a hidden hook instead of ties.
mycrafts.ru
What to combine with
Boleros can be combined with absolutely all styles. The main thing is that the item fits your figure. The bolero looks ridiculous with tops with bare shoulders or oversized T-shirts/blouses (any size). Looks appropriate with fitted skinny trousers or jeans. A bolero of any cut fits perfectly on thin people if combined with skirts of any length and fitted blouses (tops, T-shirts).
If the jacket is decorated with furs or rhinestones, it is best to wear it with simple knee socks or fitted blouses. It should not be worn over ruffles or frills.
You might be interested in this: How to use old jeans to sew something
Advice! Overweight women with large breasts should avoid short jackets, because they already visually add volume.
Under the dress
Even a novice craftswoman can quickly sew a bolero with her own hands without a pattern. To do this, you need to be patient and attentive, because any work requires calmness and determination.
Cut No. 2
The product can also be made with long sleeves. To do this, take an old long-sleeve T-shirt, blouse or tired knitwear. First, you need to cut the front of the T-shirt exactly in the center in a vertical direction (that is, from the bottom to the neck). You will also need to cut off the collar. Then cut a long strip of fabric from the bottom - this will be the edging. You can make a edging from braid to match the color of the bolero.
Women and girls of all ages used insoles to stay warm during the cold winter months. They have the same appearance as layers, except that they are shorter and their purpose is to be more decorative. Fur making will take you back to the Victorian era when they were very popular garments. You can make your abduction using faux leather that you bought at the store. Choose from a variety of faux furs in any color, but don't go with any animal like pink and purple.
Write this measurement on paper. 2 Place the tape measure on the back of your neck and measure the length of your back to find out what is the measurement needed to steal. If necessary, fill in several pages of newspaper to ensure the mold is large enough. 4 Place the synthetic fabric on a large flat surface and place the paper form on it. Hold it by the fabric with pins. Following the mold, use sewing scissors to trim. 5 Using a sewing machine and thread, stitch the seam into place. Start at the corner at the top of the abductor. Work on the front, around the bottom, and then on the other part of the front corner of the neck. 6 Add a closure to the neck. Leave a 12-inch excess on either side of it to remove the steal as in step 7. Turn the unfinished edges of the lid over the ends of the hinges. Sew the seam covered with a sewing machine to prevent fraying of the seam. Bring the right sides together and place the pins, then stitch around the top and sides.
- Place the tape measure on them as if you were placing a finished stole.
- Write it down on paper. 3 Reset your measurements in magazine paper.
- Simply fold the mold in half at the back and cut two pieces of fabric.
- Cut it the same size as you steal it.
- Turn your garment around and add a clasp.
Shepherd's Vest - It's Sunday.
We attach or sew a strip of fabric 5 cm wide on the arms. You can take 6-7 cm. It depends on what width of the edging you want. We fold the braid or fabric with the cut inward so that the edges do not spill out. We sew the top carefully (we process the sections of our blouse or T-shirt. This is what the seam should look like:
Loose fur pattern
Pattern for a short and straight jacket, fur and lined, offered by Advantages in size 38. Free registration required to download the pattern.
Knitted bolero for girls
The bolero is knitted by our readers, admire this beauty!
Knitted cape for girls
Hello needlewomen! I found a bolero cape on the Internet and decided to try knitting it. This is what happened. I used angora thread (100g/450m). Author Oksana Belioglo. Bolero knitting pattern:
Read more…
Knitted pink bolero for girls
A pink bolero for a girl is knitted. Bolero size: for 4 years. To knit a bolero you will need: 200 g of pink Scilla yarn (100% cotton, 105 m/50 g); knitting needles No. 4 and No. 4.5; 1 button. Double elastic: contrasting thread
Read more…
Knitted dress and bolero for girls
Size: for 6-8 years. You will need: “Azalea” yarn (30% cotton, 70% viscose, 330 m/1oo g) - 250 g yellow, 150 g light green, knitting needles No. 3 and 3.5, set of double needles No. 3. Knitted dress Samples matings:
Read more…
Knitted openwork bolero for girls
Openwork sleeves - boleros will definitely come in handy for your daughter on a cool summer evening or will serve as an excellent addition to an evening outfit.
Dimensions: 92/98 (104/110) 116/122. Knitting openwork sleeves (bolero) You will need: 150 (200) 200 g of white Candy yarn (100% Read more…
Knitted melange bolero with raglan sleeves
Bolero size: 2-2.5 years. To knit a bolero you will need: Angora fine print yarn (50% mohair, 50% nylon, ZOOm/50 g), knitting needles No. 2, thin satin ribbon. Bolero knitting density: 24 stitches x 34 rows = 10×10 cm. Basic patterns:
Read more…
Knitted cream bolero for girls
The main knitting is done on knitting needles with 2×2 elastic. The sweater pattern is a rectangle. Its width is equal to the width of the back plus 10-16 cm for the sleeves. The length is equal to the length of the back from the neckline to the hip line plus the width of the collar (10-12 cm). Number of loops
Read more…
This is interesting: Bolero pattern for a baby
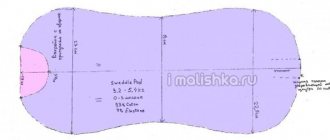
Bolero jacket pattern
Bolero pattern 1. Click to enlarge
Bolero pattern 2. Click to enlarge
Bolero pattern 3. Click to enlarge
Additionally, you need to build a two-seam sleeve pattern .
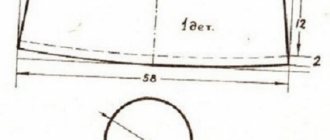
How to model a bolero pattern
On the pattern of the back of the dress, set aside 7 cm on the side. draw a horizontal line. Cut along the line.
Close the upper part of the waist dart on the pattern.
Complete the one-piece stand-up collar as shown in Bolero pattern 1 .
Apply modeling lines to the front of the dress pattern, as shown in Bolero pattern 2 .
Cut the chest dart along one side and glue along the lines.
Adjust the edge line if necessary.
Additionally, reshoot the selection.
Master class: how to sew a guipure bolero without lining
So, we have guipure on a knitted base. From it we cut out the details: shelves, backs, sleeves, hems, back neck facing.
From the satin we cut the base using the same details: shelves, back, hem and back neck facing.
We reinforce the details of the hems and the satin back facing with an adhesive pad.
Then we place the guipure cut parts with the wrong side on the front side of the satin parts and baste them.
The satin will serve as a kind of lining and at the same time as a background.
We connect the side and shoulder seams of the bolero, the seams of the sleeves, the hem with the facing of the back neck. Iron all seams.
We fold the hems with the product with the right sides inward, aligning the middle of the back neckline and shoulder seams, as well as all the cuts and grind them.
We cut the seam close to the stitching, iron it, turn it over the face and sweep it out. We baste and hem the hem allowance for the bottom, secure the facing at the shoulder seams and a little along the back, remove the basting. We iron everything again.
We bend the sleeves, hem them, iron them.
We sew in the sleeves, seating them along the edges, sew them in and slightly iron the fit. Attach the shoulder pads.
Model with facing
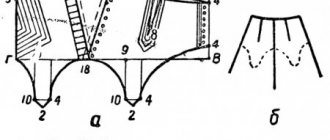
A product with a facing around the perimeter can be obtained by modeling the pattern of a standard bodice without darts (with a raised side seam in front), consisting of front, back, and sleeve parts.
- Get rid of fragments below the waist level by setting the length of the product.
- On the side seam line of the front piece, set aside 4 cm from the edge of the armhole.
- From the resulting point, draw a straight line to the center of the neck.
- Measure 2 cm along the shoulder line of the back piece towards the sleeve and 1.5 cm along the center seam at the back. By connecting the resulting points with a smooth line, get a new neck contour.
- Do the same with the front part.
- Stitch the front and back necks to a width of about 3.5 cm.
- Using a facing of the same width, process the bottom of the sleeve, the fastener, and the bottom of the model.
- Mark the front fastener 2 centimeters from the inclined line of the sleeve.
- Repeat the line 3.5 cm from the previous one, expanding the fastener bar.
- Round off the transition lines of the fastener into the front facing.
- Place the buttons on the resulting strip, dividing the fragment into 4 equal sections.
liveinternet.com
Tips for sewing bolero
- No need to make a drawing on the material . First, make a pattern on paper, and then, using safety pins and special tailor’s chalk (you can replace it with soap) transfer it to the fabric.
- Start with seams that need to be sewn from the wrong side.
- Before sewing, iron or steam the material as some fabrics may shrink.
- Thick fabrics may form wrinkles when joining parts . Therefore, you need to carefully monitor this and periodically straighten the fabric.
- Always try on the product before sewing the main seams on the machine . It is better to immediately identify shortcomings and make adjustments than to rip out the seams and alter the product later.
Subscribe to our Social networks
Which is better: bamboo or cotton socks?
What is a beanie hat?
Selection of yarn and tools
Bolero is a cropped knitted top (to the waist) that came from the wardrobe of matadors. Fashion comes, fades, returns again, or transforms into current new items.
Boleros can be knitted from warm yarn to create a warm short jacket.
A good alternative to heavy knitted coats and cardigans, you can take it on business trips and trips without worrying that a knitted bolero will take up a lot of space in your travel luggage. But there will always be an opportunity to warm yourself when the weather changes.
Summer yarn with a cooling effect - for openwork patterns crocheted or knitted. It is produced from cotton and linen, viscose and bamboo, synthetic silk and polyester. An elegant item can be decorated with beads, stones or sequins.
A warm bolero can be knitted from “winter” yarn - skeins based on wool, mohair, alpaca or llama. Wool blend with the addition of angora (rabbit fluff) or mohair (goat fluff) - for warm clothes. Acrylic and wool mixture are an inexpensive alternative for the off-season.
Classic bolero with raglan sleeves
Raglan is a popular way to make hand-knitted items. There are several ways to perform raglan on top.
In this case, it is important to take into account the “sprout” or several additional rows at the back of the head, so that the item does not pull back and does not form a wrinkle on the front of the neck. Therefore, this method is often used by craftswomen who have some experience.
Bolero with raglan, made from the bottom, can be with seams on an inclined line or seamless. It’s very simple to do - after decreasing according to the pattern in the armpits, all the details are transferred to knitting needles with a flexible connection.
Important! Do not confuse the alternation of parts on a common knitting needle before knitting raglan - right front, right sleeve, back, left sleeves, left front (all with the right side). After this, decreases are made along the seam of the raglan sleeve in a standard or decorative way. In the decorative line, mark the stripes of solid raglan with pins so as not to get confused.