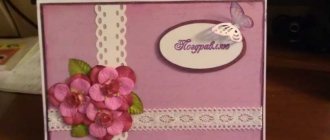
We draw with ribbons - this is what we can say about the technology of making a picture from ribbons using the kanzashi technique. And today, we will explore several ways to create such products from satin ribbons that are suitable for your interior.
The tradition of decorating your home with various decorative items has been known since time immemorial. In all centuries, people have sought and implemented new methods and ideas for filling the interior of the house with interesting objects. One of the most popular products is, of course, paintings and panels. They are painted on canvas, laid out with their own hands using mosaics from a variety of materials, and embroidered with beads, threads, and ribbons. One of the most unusual ways to create paintings and panels is the oriental kanzashi technique, using small pieces of ribbon and handicrafts to create real masterpieces. The main theme used to create such works is, of course, flowers. First of all, the kanzashi technique was aimed at creating delightful hair decorations. And already, a little later, craftswomen from different countries began to find other uses for flowers made from satin ribbons. So, over time, needlewomen began to create amazing paintings using the kanzashi technique for the interior.
To make a unique painting or panel with your own hands, you need to study a detailed master class for beginners with examples of detailed photos presented in this article. So, let's draw with ribbons.
Simple patterns
To create a picture with flowers from satin ribbons you need:
- canvas for arranging the composition;
- several needles;
- lilac thread;
- satin ribbon in green, yellow, purple and lilac;
- comfortable hoop;
- graphite.
The design of the selected flower must be transferred to the canvas blank. The first time it is better to use a simpler drawing. For example:
For craftsmen who have little experience behind them, the image shows the stitches that are used in embroidering a picture with patterns of flowers using threads of satin ribbons. When the drawing is transferred to the canvas, it must be secured in a hoop.
The feelings when embroidering with ribbons should resemble the feelings that prevail when writing text, that is, lightness and ease.
The tape must be secured. The three petals located at the top are embroidered with a straight stitch. It is necessary to pull the needle with the main material to the front side. The length of the petal is controlled by the pattern and during the contact process the needle comes out to the wrong side.
After completing the embroidery of the upper petals, the embroidery of the petals on the sides and bottom continues. Their implementation is similar to the upper petals.
When the flower petals are ready, it is necessary to embroider the core of the plant. This means that it is necessary to use a loop stitch. A seam is made with a needle pointed to the side; you should remain on the wrong side and sew the seam again. The loop is tightened and the needle returns to the wrong side. The petals located at the bottom are decorated with floss thread.
Related article: Box made of newspaper tubes: master class with photos and videos
Stem embroidery is done by twisting the stitches. The needle must be on the front area, turning, forming a ribbon. You must remember to secure the seam with a knot.
The leaves are sewn using a ribbon stitch. The tape is straightened and pierced with a needle. After which the tension level of the satin ribbons is adjusted. Actions continue until the composition is completed.
Everything you need for ribbon embroidery
Ribbon embroidery, which makes the paintings look three-dimensional, can be made from different materials. In any case, you need to have basic tools for the job:
- Embroidery needles. Regular sewing needles are not suitable.
- Aida canvas or regular linen fabric. You can also use cotton, fleece or felt.
- Satin or silk ribbons. It is recommended to choose a material specifically for embroidery, of a certain softness and width.
- Markers for marking.
- Hoop.
Embroidery needle
Embroidering roses
Necessary materials:
- high density fabric base;
- floss threads;
- white beads;
- needles with wide and narrow ears;
- satin ribbons of pink (5 cm wide and 4 m long) and green (2.5 cm wide and 5 m long).
The first step is to make roses of different sizes. To do this, use a pink ribbon, the edge of which is folded and fixed with a needle. The unoccupied edge of the ribbon is bent back, then the ribbon is twisted into a roll, this will be the core of the rose.
When creating the rose itself with your own hands, you need to bend the ribbon to the base each time the flower is twisted, you need to fix it with threads and carefully sew it on, as shown in the photo.
A dark green tape is inserted. The twisted tape is secured from the inside with hidden stitches.
The same tape will be used to create leaves. Leaves are cut out from ribbons and singed with a lighter, attached to the embroidery using hot silicone glue.
Rose is ready!
For an unusual feeling of shimmer and heterogeneity of the composition, it is necessary to tint the flower with liquid acrylic paint. The same acrylic paint is used to paint the veins on the sheets and the background.
What stitches are used in ribbon embroidery
To embroider beautiful pictures, it is enough to learn the basic stitches that are used by needlewomen:
- Half loops with attachment - the needle is attached from the inside out, pulled up and to the left, forming a loop. Then they make a puncture to the right and hold the loop.
- Loops in a circle - the material is secured on the wrong side, the needle is pulled to the front side and a puncture is made near the place where the tape comes out, and it is pulled out to the wrong side. Insert a pencil into the loop. They pull the needle out to the front side and make a puncture on the back side next to the place where it was pulled out.
- Loop with an attachment - pull the satin to the front side, make a puncture on the back side, bring the needle a little higher and place the ribbon behind the needle. Make a loop and secure it with a piece of fabric.
- Twisted loop - bring the tape to the front side, make a loop from right to left, press with your finger. They make a puncture on the wrong side to the left of where the satin comes out and bring it out in the center of the loop, tighten the ribbon.
Ribbon embroidery stitches
Fire red rooster
Required equipment:
- satin ribbons of different colors;
- sackcloth;
- floss thread;
- comfortable hoop;
- needles and scissors;
- tracing paper and pencil.
It is necessary to find the center of work. To determine the center of the burlap, it is folded in half and then in half again. Along the fold lines, the fabrics are separated with a “back needle” seam. When the canvas for work is prepared, it is necessary to redraw the image of the bird on tracing paper. After which the pet is transferred onto the burlap on tracing paper.
Related article: How to properly wash floors when there is a child or animal in the house
Having a finished sketch on the canvas, it can be inserted into the hoop, stretching the fabric. The work with ribbons begins with the embroidery of the largest details; in this exhibition, these are the breast and neck of the bird. It’s easier to start with four stitches on the neck of the rooster with a gold-colored satin ribbon. The thread length of each line is about 15 mm. After that, four more similar lines are made on the chest. But their length is shorter and equal to 10 mm.
According to the diagram outlined above, the entire body of the pet is filled in turn. The stitch angle for the bottom part should be changed. To give volume to the embroidery, some stitches are duplicated. More often, a double layer is used on the neck and chest, in our case it is a yellow satin ribbon. When embroidering the second layer, the stitches are placed in the required direction. Straight ribbon stitches are used to fill out the pet's lower torso. For work, satin ribbons of blue and deep blue colors are used. The cockerel's wing is embroidered with ribbons of the following colors: blue, yellow, deep blue. The bird's head and beak will be golden yellow.
In order to achieve a natural beak, straight ribbon stitches are passed along it. The cockerel's head is also embroidered using curved stitches. In this case, the shortest stitch is applied first, and then subsequent lines are made. In conclusion, it turns out that each subsequent stitch slightly overlaps the previous one. The beard and comb are “drawn” with a scarlet ribbon using a straight stitch. French knots are embroidered in place of the eyes.
Curved stitches are used for the cockerel's tail. To create it, various shades of blue are used. A twisted stem stitch is used to create the long claws and paws of poultry. Short claws are highlighted with straight twisted stitches. When embroidering flower stems, a “back needle” stitch is used.
Straight stitches are also used when embroidering petals, and French knots are used for the core. To embroider grass, regular stitches of different lengths are sufficient.
Related article: How to make food for dolls from plasticine with photos and videos
The embroidery is ready, you can seal it, insert the embroidery into a frame and hang it on the wall or give it to someone as a gift!
It is also possible to embroider a formidable warrior rooster, as in the photo.
Features of embroidery with ribbons
The peculiarity of embroidery with ribbons is that the result is significantly different from embroidery with satin stitch or cross stitch threads. The picture turns out voluminous and bright. It is impossible to create two identical images. In any case, the work will differ from the example from which the needlewoman embroidered. Often the type of finished work even depends on the mood of the embroiderer. The second feature and advantage is the ease of the process. Even a child can master satin embroidery. And you can create a complex image already in the first stages of training.
During embroidery
Embroidery with satin ribbons
It is cheaper to embroider pictures with satin ribbons than with silk ones. Satin is a budget material, but has a number of features that make it inferior to silk. These are thicker ribbons that may be difficult to pass through fabric, but can be used to create denser patterns. It is recommended to take material specifically for embroidery. Regular ribbons are wide for creating pictures.
You might be interested in this: How to properly embroider pictures and clothes with rhinestones
The advantage of the atlas is its affordable price. Therefore, novice needlewomen are recommended to choose an atlas for their first projects.
Satin ribbons
Embroidery with silk ribbons
Silk embroidery is popular, despite the high price of natural material. Ribbons made of this material are softer, they do not visually touch the fabric, and the picture looks airy. They are also convenient to work with due to their structure. The shine of silk ribbons beats satin; it is more natural and lighter. There are no problems with choosing a color. Another advantage of silk is that it passes through the fabric quite easily. The natural material contains no substances hazardous to health.
Silk ribbons
Materials and tools for work
The main material is tapes, a huge assortment of which can be found on the shelves of specialized stores. They vary in size, material and color.
You should pay attention to their lightness and strength. These qualities will allow you to preserve the basic properties of the tapes during numerous interactions with them.
Flower hearts
A few tips and rules for a voluminous flower heart from experienced embroiderers:
- start by choosing a print, stop with those flowers with which you are familiar.
- prepare all the necessary accessories (needles, ribbon of a certain length, scissors, fabric, hoop, thread, beads, lighter).
- review the recommendations again, consolidate the material.
- start with large flowers; they will form the basis of the heart and decorate them with small blades of grass and spikelets of the field.
Panel in the shape of a heart
Dandelion
If you are already interested, then be patient and work hard to get a good result. Then you will gain victory and become the author of your own composition.
Useful tips
The path to a masterpiece always begins with basic knowledge. Throwing simple loops, knots, and cobwebs is the basis of the most complex technique. For example:
cobweb
Take a separate piece of fabric and practice securing and making straight stitches on it. I would like to mention the “Japanese stitch” method. There is some similarity here with a straight seam. Its peculiarity is that it passes through itself and through the fabric. First you need to pierce the tape itself, and only then the base. In this way we obtain original compositions of flowers and leaves:
japanese stitch
Experiment. Let the flowers fall on the material with voluminous airy buds, and small thin petals sparkle on the canvas with the smoothness of silk threads. Butterflies, dragonflies and bees will not only add naturalness, but also breathe life into it.
Initial stages
To begin, prepare a ribbon so that one edge is cut at an angle of 90 degrees and scorched with fire, and the second end is cut obliquely - this is what needs to be inserted into the ear:
It is important to learn how to pin. One of the edges, cut at a right angle, needs to be folded by about 3 mm and then, piercing it, you get a knot:
If everything works out, start creating. All information, diagrams are on the Internet or in the store. Ready-made ideas from professionals will be a godsend for beginners.
Daisies
Materials and accessories
To make such simple but cute daisies you will need:
- narrow tape;
- glue;
- button;
- thread, needle, scissors.
Description
Cut pieces of ribbon twice as long as the diameter of the finished flower. For one flower you need 6-8 blanks.
Apply a small amount of glue to the center of each tape. We fold the free ends to the center and glue them.
We collect a lush flower from several petals. We fix them with glue or a few stitches. We decorate the center with a button. If desired, the button can be covered with a satin ribbon.
Fabric selection
One of the features of embroidery is that you can choose any fabric depending on the skill and level of complexity of the work. Beginner craftswomen are recommended to buy a set with Aida outline, this makes it easier to form flowers. But there are actually many options for canvas. Cotton fabrics include matting, cambric, muslin or satin. The fabric can be thin or thick linen. Chiffon, silk or chesucha are used as the base. It is more difficult to embroider on woolen fabrics such as crepe, tweed or jersey.
Ribbon embroidery on linen
Handicrafts as an aid to development
This type of creativity is in demand not only among girls. It is perfect for both their modern mothers and advanced grandmothers. Each generation will find its positive sides in this hobby:
- development of fine motor skills and, as a consequence, mental formation
- spatial thinking
- imagination
- sense of taste and style
- diligence and hard work
- accuracy and attention
- perseverance
From a psychological point of view, it helps
- finding a way to assert yourself
- release of energy through the hands
- finding inner harmony
- making friends with similar interests
Such skills develop the child and fill the hearts of the older generation with joy. And working together unites all family members.
Additional composition elements
At the end, iron the work and therefore fix the petals properly. It is very important to iron the product only from the wrong side. The thin texture can stick to the iron and the sunflower will literally burn. Most people do not complement the composition with other colors, considering it unnecessary.
It’s a great idea to highlight the composition using wildflowers and herbs. They must be made using the same olive iris thread. You will get a spectacular bouquet of wildflowers that will decorate any room in your home in the form of a picture and will certainly attract interest. And even more so if you decorate your coat or blouse with them.
Don’t be afraid to experiment and add something new to traditional techniques, this is how new directions appear in the world of HAND MADE. There are a huge number of specialized sites on the Internet where lessons for beginners will allow you to improve your skills and become a real professional.
There are countless different seams and stitches in needlework. See our sections on embroidery of various kinds of flowers and pictures. I wish you success and patience in creating masterpieces with your own hands! Have a good mood and inspiration.