This tie goes well with a formal suit and makes your look elegant. With the help of this beautiful accessory you can give your outfit a formal and solid look, as well as a bright and informal look.
The bow tie was worn by Winston Churchill, Abraham Lincoln, and such famous movie characters as James Bond.
This accessory can be worn not only by men, but also by women, creating stylish and memorable images with it.
A bow tie can be purchased at a store, or you can make it yourself from materials available at home.
Video of butterfly making workshops
Self-knit tie
This tie option is a little more complicated, but the result is a real fashion masterpiece. You can sew a butterfly for a man using this master class. To work you will need:
- Thick base fabric.
- Lining fabric.
- Threads to match.
- Pattern paper.
- Pencil.
- Chalk or disappearing marker.
- Accessories.
- Scissors, needle and pins.
First you need to start making a pattern; it is a little more complicated than a butterfly with an elastic band. If it is not possible to print, you can attach the pattern paper to the monitor screen and carefully redraw it.
The finished pattern should be applied to the base fabric from the wrong side, trace it along the contour, retreating 7-8 mm, and then cut out. The result should be 4 identical parts. You also need to cut 4 similar pieces from the lining fabric. If a dense material is used, for example, suiting fabric, then there is no need for lining.
After all the parts of the bow tie are ready, you need to sew them from the wrong side with the lining. The next stage is to sew each pair of parts together face to face. Next, you need to cut off all the corners so that the finished tie looks more neat, turn the parts right side out and sew up the holes. Then each detail of the tie must be basted with wide stitches using any contrasting thread and carefully ironed. After the work is completed, the threads must be carefully removed. The final stage is sewing on the fastener.
Thus, you will get a classic self-knitting butterfly. If you wish, you can tie the stylish accessory once and then use the clasp. Or, on the contrary, tie a bow tie in front of the mirror every time, enjoying the authentic process.
Materials and tools
For sewing a bow tie, fabrics that are practical to use and do not require complex care are suitable. When choosing, seasonality is taken into account. So, for the cold season, tweed and wool are optimal, for the warm season - denim, cotton (canvas, oxford, thin material), satin.
For adult men, solid colors look good: black, burgundy, white, dark blue. Pastel colors are popular: pale blue, peach, milky, gray-silver. Representatives of the stronger sex who like to attract attention should turn to bright colors: yellow, pink, red, purple. There are a variety of prints: polka dots, checks, geometric shapes. Daring fashionistas will appreciate designs in the form of skulls, palm trees, and deer.
Butterflies made from printed fabrics look much more interesting than plain ones. This is a great option for graduation or any other special occasion.
Butterflies for boys are decorated using bright prints. Popular images are hearts, unicorns, flamingos, as well as various inscriptions. Kids will also love models decorated with their favorite cartoon characters.
To sew a bow tie yourself, in addition to the main fabric, you will need the following materials and consumables:
- non-woven fabric or dublerin;
- threads matching the color;
- elastic band or stretch tape;
- accessories for making fasteners;
- decorations - optional.
During the work you will need scissors, crayons or felt-tip pens for marking the material, and a set of needles. If you don't have a sewing machine, you can do the work by hand. To obtain a high-quality result, blind hemming stitches (“fluff”, “back needle”) are used. Regular double-pass running stitches will do.
Tweed
Wool
Canvas
Atlas
Clasps
This is interesting: Tie pattern for a boy
Butterfly on an elastic band
It’s very easy to sew almost any DIY butterfly from fabric around your neck. At the same time, it is best to practice on a simpler model, especially since sewing will take you no more than an hour.
The first stage is the pattern. Finding and printing a similar pattern on the Internet is not difficult. You can also create a pattern yourself; for this you will need a pencil, a ruler and an ordinary A4 sheet. Draw on paper a rectangle 50 cm long and 14 cm wide, as well as another smaller rectangle - 7 cm long, 4 cm wide. Don't forget to leave 1-2 cm for seam allowances. Carefully cut out the resulting patterns. Pin each one to the fabric and then trace with a disappearing marker or crayon.
To do this, cut out two similar pieces from non-woven fabric and iron the tie pieces with an iron. Then you need to fold the large rectangle in half and sew the sides from the wrong side with neat stitches. Don't forget to leave a small hole to turn the tie inside out. The same thing needs to be done with a smaller rectangle.
It is most convenient to turn out the parts using a pencil or a cocktail straw. The next step is to blindstitch the holes and then iron both pieces. A small detail - the jumper needs to be ironed so that the seam is in the middle. Then you need to fold the jumper in half with the seam facing out and sew up the edge. After this, you can finally form folds on the large part and push the jumper through it.
The last step in creating a stunning elastic accessory is the strap. Instead of an ordinary elastic band, you can use any elastic band. For example, a velvet ribbon is perfect. It is best if the butterfly comes with a regulator. To do this, thread the braid through the jumper, then through the adjuster and through the hook, then back into the adjuster on the other side, now you can sew on the tip. At the other end of the tape you need to make an ordinary loop. If desired, the resulting accessory can be decorated with decorative elements, for example, beads or seed beads.
Step-by-step description of production
Below are detailed instructions on how to sew butterflies of different shapes. There are three possible options: a traditional butterfly with an elastic band, with clasps and a multi-layered version. All these options are discussed in the master class below.
Simple with elastic band
For this butterfly model, polyester, cotton fabric or silk are suitable - the material can be combined if desired. The creation process begins with cutting out a tie. The instructions include the following steps:
- It is necessary to draw a rectangle measuring 50x13 cm - after applying the markings to the fabric, you need to cut out the resulting piece.
- Then the same shape needs to be cut out of thermal fabric - after this, the two parts are folded and connected with pins along the cut.
- You need to cut out a jumper - it is marked 7x6 cm. The same is done with thermal fabric.
- A stitch is made along the longitudinal side of the butterfly, and the outer part needs to be folded and hemmed.
- After this, the product itself is turned inside out - it must be ironed using an iron. The butterfly must be secured with a stitch - to do this, fold the butterfly in half, and lay the stitch 12 cm from the fold line.
- Excess fabric is cut off, and the cuts and allowances need to be stitched.
- A tie is formed from the model and ironed again. An additional stitch is placed in the center, and the folds are laid evenly.
- At the end, the product must be wrapped using a prepared jumper, and the ends must be connected with stitches. You can use additional decorations for decoration.
An elastic tie is convenient and quick to put on.
On the clasp
In this case, it is recommended to use satin fabric to make a boy's bow tie. Usually the width of the butterfly is about 5 cm: for this you need an additional two pieces of tape of 11 cm, 1 piece of 25 cm and another 7 cm.
- A piece of tape 11 cm must be bent at a right angle and folded in half - this position is fixed with a pin;
- The 7 cm tape is folded in the same way, but in a mirror way.
- Then the parts need to be processed with running stitches - a thread is left to hold the parts together;
- The long part of the tape needs to be folded in half and the center marked on it - then fold the edges in with an overlap (somewhere within 1 cm). Running stitches are laid, and the thread is tightened and thrown over a couple of times.
- Two parts are connected.
- To make a jumper, you need to pull the 7-centimeter piece to the center, and attach fasteners to the elastic band; the size adjuster is also attached here.
- It is enough to glue the finished butterfly parts to an elastic band and wrap it with a jumper.
This tie can be fastened very simply and quickly around the neck using special fittings.
Multilayer
In this case, to make a butterfly, you need to prepare fabric measuring 11x11 cm for the main part and 3.5x5.5 cm for the jumper.
- You need to cut a piece of satin ribbon 30 cm long (the width is about 3 cm) - it is recommended to burn the edges with a match.
- From a large part you need to form a bow and fasten it with a pin. The same is done with a narrow part.
- The elements need to be connected and stitched in the center.
- On the small part you need to tuck and iron a 1 cm strip.
- The jumper is attached to the wrong side of the product.
- A hairpin or elastic band is attached to the bow - the fittings are pulled through a small fastener. You can use Velcro.
You can choose both simple one-color options and those that contain several shades.
Wooden bow tie
A bow tie made of wood has a special charm. This accessory is ideal for those whose life credo is to surprise and break standards and stereotypes. Anyone who wears it will definitely not go unnoticed!
The idea of making a bow tie from wood came directly from the creation of wooden ties, which were invented by the young designer Nelson Sampaio. This is a kind of know-how of modern fashion, fully meeting such standards as environmental friendliness and environmental protection.
Movie character designs for men
Creating such an accessory will be especially interesting for those who are interested in wood carving. This is an interesting experience!
The simplest material for creating a butterfly is plywood. If you already have experience working with wood, then you can take denser natural samples. You can use elastic, fabric, or leather for the material of the tie.
The advantage of making an accessory from wood over fabric is that it is possible to create holes, perforations, and patterns.
Wooden bow tie for men
During the work, you can use tools such as a file, grinder, jigsaw, laser machine.
You will need:
- grinding tools,
- stain,
- black paint,
- satin or fabric ribbon,
- glue gun,
- rubber,
- 2 fastenings.
Wooden butterfly for a boy Step-by-step work plan:
- Schematically draw the shape of a butterfly on the material.
- Cut using tools.
- Sand with sandpaper until the shape is smooth.
- Paint the edges with black paint.
- Treat the butterfly with stain.
- Make a strap or elastic band according to the method described in the previous paragraphs.
- The center part can be decorated with a satin ribbon.
- Attach both the elastic band and the jumper with a glue gun.
You might be interested in: Rules for hemming curtains with your own hands on a typewriter
Shape selection
Another point in favor of making bow ties yourself is the ability to choose your own model. There are several types of accessories that differ in the method of tying knots:
- Self-knitting butterfly . One of the most popular and relevant options. Here you can experiment with knot tying techniques. You can choose both simple one-color options and those that contain several shades. Looks great with any jacket.
- Butterfly on the clasp . The product can be fastened very simply and quickly around the neck using special fittings. No additional steps are needed here.
- Attachable models . Such butterflies are attached to the shirt in the area of the top outer button - a special clothespin is used for this.
It all depends on the person’s preferences: you need to choose for yourself which tying method seems most convenient. Usually they prefer to do the self-knitting type, since other options require additional steps and costs. Also, all butterflies are divided into several types according to their shape:
- Classic option . In its shape, the product resembles the wings of a butterfly, and the width of such an accessory reaches about 6.5-7 cm. They look great on any figure of a man.
- Large Butterfly . This type of butterfly is suitable for large representatives of the stronger sex who have a fairly powerful neck. Typically, the width of such a product reaches about 8.5-9 cm. Thin young people are not recommended to wear this model.
- Diamond Point . In its shape, such a product resembles a diamond: the butterfly has slightly angular tips, which are given the shape of a rhombus. The product looks original due to the use of asymmetry on a traditional base.
- Rounded Club . This model is distinguished by rounded tips - this option looks stylish and unusual. Perfect for informal events and parties.
- Continental tie . This butterfly looks like a simple strip of fabric with wide ends. It is secured with a clasp: one end of the butterfly is placed on the other
Attachable models are attached to the shirt in the area of the top outer button - a special clothespin is used for this.
If we talk about which model is easiest to sew at home, then you should choose the traditional option or the Large Butterfly model. Others can also be done, but the process will be a little more complicated.
Scheme and technology of execution
The process of making a butterfly from a tie is a little complicated, so you should follow these steps:
- choose your favorite tie to transform into a new form of accessory;
- place your middle finger on top of the thick end (seam side up) under the tie, and your ring and index fingers above the tie. Thus, you should carefully fold the two side edges of the tie down towards the seamless side;
- then fold the entire wide end towards the seamless side, inserting it into the stitched loop and pull it away with your free hand;
- beginning of the fold. At this stage, it is determined how wide the bow tie will be. To do this, just put your 4 fingers on top of the inserted edge and, holding the thin end of the tie, place it on top of your fingers, thus forming one layer of the butterfly;
- In order for the accessory to be as close as possible to a bow tie, you need to make a couple more folds. To do this, you simply need to place your hand on the fold you have already made and repeat the process for the two flaps;
- then bend the thin end to the middle of the future butterfly and press it to the seam. Holding the formed layers of the butterfly, wrap the thin end around the vertical layers of fabric and pass it under the beginning of the thin edge;
- pull the thin end, holding the formed butterfly, to tighten the knot and allow the folds of fabric to fold into a true butterfly;
- to fix it on the neck, you need to push the free thin edge of the tie through the knot in the same place where it was pushed through the first time when the bow shape was made. At this point you need to tighten the knot again to prevent it from slipping.
Popular articles Diagnosis and repair of a switching power supply
Expert opinion Helen Goldman Male stylist and image maker
It is advisable to use this method only when the need for a bow tie arises right now.
Kanzashi butterfly for boys made of satin ribbons
Such butterflies can be made from satin ribbons. And since such work is done with your own hands, it will have an exclusive and unique look, because no one else will have it.
To work you will need:
- Black satin ribbon 5x9 cm, 5x21 cm and 5x26 cm;
- Scissors;
- Lighter;
- Tweezers;
- Needle with thread;
- Glue gun;
- Black rubber band.
Manufacturing process
- Take the smallest piece of tape, 9 cm long, and fold the outer edges towards the center. In this position, everything is secured with a hot glue gun.
- The remaining two segments are folded in half and the center is determined. The edges of the tape are brought to the intended center line. Apply a little glue to the sides and secure. Do the same with the second piece of tape.
- The smaller piece is placed on top of the larger piece so that the folded edges are on the inside.
- The center of the bow is gathered on a thread so that 3 folds are obtained. To do this, the needle is inserted from the outside from the top, 3 stitches are made and the needle is also brought out from the outside. The thread is pulled a little, secured and cut. All wrinkles are corrected.
- Take a black elastic band, the size of which is determined from the size of the neck. The elastic should not be too loose to prevent the bow tie from dangling. At the same time, it should not tighten the neck tightly. The edges of the elastic are brought together and secured with glue. It is this part that glues the elastic band to the butterfly.
- The central part of the butterfly is covered with a pre-prepared strip, which is glued to a glue gun. Excess edges are cut off and scorched with a lighter.
Tying butterfly
If you can tie a regular tie, you can also tie a bow tie.
Draw a pattern according to the diagram below, add allowances and cut it out of the fabric. You will need 2 parts
If necessary, they are glued with adhesive. Place the pieces on top of each other face down and sew, leaving room for turning. Turn inside out, paying special attention to the corners and smooth lines near the widest point. Make a basting around the perimeter of the entire tie and iron it well. Remove the basting and learn how to tie your creation. This tie made from two fabrics of different shades looks interesting.
But the classic version involves using one color in the tie.
This tie made from two fabrics of different shades looks interesting. But the classic version involves using one color in the tie.
And those who do not know how to tie a bow tie can learn step by step instructions.
Ribbon decoration
A butterfly made with your own hands from ribbons will help emphasize the elegance of your child. After all, what is done independently is always appreciated and attracts special attention. This master class will tell you how you can make a butterfly using the kanzashi technique without using a sewing machine or other tools.
What we need:
- satin ribbon 5 cm wide;
- another satin ribbon is half narrower;
- rubber band;
- wire and tie;
- a narrow ribbon for the middle.
We need to cut the wide ribbon into strips, where the first will be 24 centimeters long, and the second – 29. Now we put the short ribbon into the long one so that the short one peeks out a little. We need to make a bow from what we received. When this is successful, we tighten it in the middle, but so that we get beautiful folds.
We take a narrow ribbon and do the same with it as with the others - you should get a bow, which we attach in the middle with a wire or tie. Now we need to take an elastic band and sew or glue it to our banner. Don't forget the middle of the bow - hide the tie with another ribbon.
Lazy bow tie
This model, unlike the classic version, does not require complicated tying. It owes its popularity precisely to its ease of use and neat appearance. “Lenivka” is universal - it is suitable for both the groom’s wedding dress and the costumes of schoolchildren and kindergarten graduates.
To sew a men's bow tie you will need:
- fabric for the main part (gabardine or something similar is suitable - a material of medium thickness, with minimal stretch) - a flap with dimensions of 13 by 24 cm;
- fabric for jumper - 4 by 7 cm;
- fabric for the strap – 5 by 60 cm;
- metal fittings;
- hot glue;
- threads, sewing accessories.
How to sew a butterfly with your own hands - step-by-step master class
For the main part you need to make two blanks - a large one and a small one. A bow tie pattern for a man can be made by marking it directly on the fabric.
This decision is made so that the made butterfly is more magnificent. Therefore, we sew two parts that we place on top of each other. The top one should be one or two centimeters smaller than the bottom one.
Iron the blanks for the main parts. Then we make counter turns - first along the long side, then we turn the ends towards the center. On the blank for the lintel we also make hems and stitch. We perform all these operations so that the front sides of the parts are on the outside.
We do not process the sections, since we will hide them during further processing.
Sew both pieces in the center using a zigzag stitch.
We bend the strip for the strap in half along the long side and stitch it.
We turn the strap inside out and iron it, placing the seam in the center of one of the sides.
We stack the parts of the butterfly one on top of the other. The smaller one should be on top. We compress the strips in the center, forming a uniform “accordion”. We fix the folds with hot glue.
We wrap the butterfly in the center with a jumper and fix it with hot glue.
We attach the clasps and adjuster to the strap. To do this, first thread the strap through the adjuster, then thread it through the hook. Then we pass it through the regulator again, but from the opposite side. We sew the end of the strap.
We tuck the strap under the center of the jumper.
Sewing a men's bow tie with your own hands is finished!
A butterfly for a boy is made using the same technology. The pattern of a bow tie for a child is made with your own hands in the proportions of an adult accessory, but taking into account the scale.
Material selection
The material for making a bow tie can be either practical to use or require a special approach.
Textile
To obtain clearer shapes of the product, choose dense types of fabric:
- Burlap or thick cotton, other types of fabrics of natural origin. A bow tie made from such fabric will be appropriate in choosing a variety of looks. The shape will not be lost, even if you do not use sealants (non-woven fabric, dublerin, etc.).
- Thin fabrics of natural origin. They can be used along with dense fabrics, but will require the use of sealants to maintain their shape and presentable appearance.
- Fabrics of artificial origin. Various synthetic fabrics, which can easily be used in the manufacture of a bow tie, will also require additional compaction, since they are not able to maintain a clear shape while wearing.
The fabric is very practical to use, it allows you to choose the optimal color, ornament, pattern of the future product.
For those who are taking on sewing a bow tie for the first time, it is recommended to choose types of fabric that do not fray at the edges. This may create additional difficulties when sewing.
Tree
The base of a bow tie is made of fabric, braid or leather. But the “butterfly” is carved from wood. The most popular material for making such accessories is plywood (fibreboard). But for particularly practical people, the circle expands to any wood that is on the farm. Even recyclable materials are suitable (disassembled housing of an old watch or radio, music speakers, etc.).
The shape of the product can be more varied, unlike those options that are made of fabric. The presence of holes, patterns, perforations, and prints also allows you to create an exclusive bow tie model. The middle is usually made of braid or fabric. Wood is also used for such purposes.
Wood products look very original and unusual, emphasizing the creativity and sense of style of their owner.
Leather
Genuine leather is increasingly used to make accessories. Products made from thick pigskin are especially popular. Its density allows you to apply various images, patterns, and logos on it.
Thin types of leather serve on the principle of fabric. Some options require the use of a sealant.
Other materials
It is possible to create a masterpiece in the form of a bow tie using paper, plastic, wire, metal, thread (knitted or crocheted), eco leather, artificial leather, polymer clay, felt and more. You can decorate with rhinestones, rivets, sew-on figures, and embroidery. The result may turn out to be the most unexpected and unique, but definitely stands out from standard butterflies.
Having decided on the material that will be used to make the bow tie, you need to focus on the shape of the product.
Making an accessory for a boy
In order to figure out how to sew a butterfly for a boy, it is enough to understand that it is created according to the principle described above. It will differ from the male version only in the size of the bow and elastic band itself.
The lazy butterfly is the best option for a child, because... He most likely won’t be able to tie a regular “self-knit” beautifully on his own.
Bright prints in accessories for boys
You will need:
- tape 1 m long, at least 4 cm wide;
- threads;
- needle;
- scissors, glue gun, black elastic band or the color of the fabric, 1 cm wide;
- 2 fastenings for elastic bands.
As a material for a child, you can take gabardine fabric, suit fabric, or crepe tape.
Make it using the same principle as a men's bow tie, changing only the parameters.
Characters from your favorite cartoons fit perfectly into the boyish design
What is needed for production?
To make a butterfly we don’t need a lot of materials, just stationery and the ribbon itself. So, the work will use scissors, glue, thread and a needle. A lighter or matches will also be useful for processing fabric.
You will need to cut a strip 1 meter long from a wide ribbon, and 60 centimeters from a narrow ribbon. Of course, you can ask the store employee to immediately cut off the required length if you are sure that the satin will never be needed again. However, the experience of needlewomen suggests that you should always have supplies of various materials. It is possible that you may make a mistake and somehow spoil the material, so it is better to play it safe and take more at once.
Important! If for some reason you do not have a thin tape, you can work with a thick one, simply bending the edges inward.
simple butterfly
If there is no time or, as they say, both hands are left, then the simplest method will come in handy.
- Cut 3 rectangles from cardboard: 8 by 13 cm, 13 by 23.5 cm and 11.5 by 22 cm.
- Attach to the fabric and circle them, remove. Cut out the details.
- Fold the piece 12 by 23.5 cm in half lengthwise and iron it well.
- Now straighten and fold not lengthwise, but crosswise, and iron it too.
- Straighten and bend the long ends on both sides to the longitudinal fold line. Smooth.
- Without straightening the workpiece, do the same with the short ends. But fold it overlapping a little. Iron.
- Perform the same manipulations with a part 11.5 by 22 cm. You will get a double butterfly. But you can skip this step.
- The 8 by 13 cm part is the jumper. It needs to be folded in half lengthwise and ironed.
- Unfold and tuck the long tip to the fold line.
- Continue rolling until you get a narrow ribbon. Iron the workpiece.
- The two main parts need to be pulled together a little in the middle.
- Sew the edges on a small piece and make a ring out of it.
- Place two large pieces together, sew them in the middle and thread them through the ring.
The bow tie is ready.
Cut a piece from the elastic equal to the circumference of the neck
It is important that the final accessory does not dangle or press. We take into account that there will still be a clasp
Both buttons and hooks will do. Thread the elastic through the ring. Sew a fastener to the edges. That's it now.
DIY leather butterfly: process features
When you want to do something unusual, practical and stylish, you should opt for extraordinary solutions, for example, leather as the main material for a bow tie for a boy or man.
To make an accessory you will need very little material, and it can be either genuine leather or a high-quality substitute. The tools remain unchanged.
For a butterfly, a child from 3 to 10 ribbons (finished product size 10×5 cm) will need:
- main part - length 20 cm, width 10 cm;
- jumper - length 7 cm, width 5 cm;
- elastic band for fixation (according to neck diameter).
Add 0.5-0.7 cm to each element for allowance.
The process begins with the manufacture of the main part. To do this, fold it with the front side inward and grind it down taking into account the allowance.
The part is turned inside out, folded into a bow and sewn up using a typewriter.
They work in the same way to make a jumper.
The parts are fastened by machine or by hand, and an elastic band is threaded through the jumper.
Sewing a tie for a man
You can buy it in the store, but you can sew it yourself in an hour. You can choose the fabric, color, and size yourself. You can sew a bow tie for a man using a sewing machine or by hand. What is needed for this:
- Thick fabric;
- Sewing machine;
- Ruler, pencil;
- Scissors, chalk, pins, thread;
- Braid, accessories for it.
Popular articles Original congratulations on March 8
Step-by-step instruction:
- Make a simple pattern consisting of two rectangles: 24x13 cm and 4x7 cm.
- Cut out the main part and the jumper from the fabric. You can duplicate a large piece with non-woven fabric if the fabric is not thick enough.
- Fold the main part inside out, machine sew along the larger side, retreating from the edge by 4-5 mm. Turn out.
- Iron the stitched part so that the seam is in the middle. Fold in half with the seam facing up and sew the narrow sides together.
- Place the resulting ring with the seam facing up and iron it.
- Now sew the jumper, repeating the same steps. Fold it in half inside out, stitch, turn it inside out, iron with a seam at the top in the middle, fold in half, stitch, press.
- Form folds on the large piece and thread it through the jumper.
- Nicely straighten the folds on the butterfly and thread the ribbon into the jumper.
- Make any fastener at the ends of the ribbon. Sew a button and eyelet on opposite ends; take a regulator and a bra hook for the fastener; sew two small hooks and make two small loops for them on the opposite end of the ribbon. The butterfly is ready!
How to sew a tie with your own hands
A tie is a product that is tied in a knot or bow around the neck, collar of a shirt or blouse. Made from fabrics and knitwear.
theknot.com
Types of ties
A tie does not have a clear gender and age characteristic; it can be either an addition to a classic men’s suit, or part of the collar of a children’s shirt, or a detail of a woman’s blouse.
pinterest.com
A special version of the neck accessory is a men's bow tie. A plain silk bow tie is worn on special occasions when the dress code requires it. The colored and textured model emphasizes the stylistic features of the image.
wordpress.com
A men's classic tie is quite standard in appearance. It is a narrow strip of two-layer plastic fabric that expands downward in the shape of an angle. Depending on fashion trends, the length of the product, width and lower angle change.
If a classic tie made of jacquard silk or satin can be purchased ready-made, then a fancy, unique one can be easily made by yourself.
Preparing to make a tie
Basic principles that help you create an accessory that ties beautifully in a knot.
- Properly selected dense but flexible fabric of plain, diagonal or jacquard weave.
- The placement of the cut parts is oblique, that is, at an angle of 45 degrees to the grain thread.
- Some sewing operations must be done by hand.
wordpress.com
Materials and tools
- Tie pattern.
- Main fabric measuring at least 90x90 cm.
- Thin sliding fabric for the inside.
- Ruler and chalk.
- Pins.
- Sewing machine.
To understand how to sew a silk tie, the reverse side looks a certain way.
blogspot.com
Stages of making a tie
- Using a measuring tape and an existing tie, estimate the length of the future product when untied.
- Draw a tie pattern on paper: a triangle approximately 9.0 cm wide at the bottom (depending on the model), up to 50 cm long (finished - at least 145 cm).
Line up the corners of the bottom edge at a slope of 45 degrees (on the fabric they will correspond to the warp and weft threads).
rukikryki.ru
- Extend the triangle by extending the bottom corners by a width equal to two times the width of the tie (the extension represents the wrong side that will be overlapped).
rukikryki.ru
Place the silk face down on the table, straightening it out carefully. Place the pattern at an angle of 45 degrees. Transfer the contours, extending them to the previously calculated length (approximately 145 cm). Cut out the detail. If necessary, using a fabric coinciding with the grain thread, create the length of the main part from two parts, stitching them at an angle of 45 degrees. Cut out the detail. Lay out the lining material and, using the template, draw the contours of the facings. The dimensions along the contour should be 0.5 cm narrower than the main part up to 30 cm long. Cut out the facings in the corners or in one solid piece. Cut out a tack that, when finished, has a width of 2.5-3.5 cm and a length equal to the width of the tie minus 2-3 cm.
joeandcheryl.com
Clean the corners. Apply facings with pressed seams and sew with hidden stitches, stepping back from the fold of the main part by 0.5 cm. Stitch the corners using a sewing machine. Press seams and trim seam reserves. Turn out the corners. Iron the seam reserves and the edges of the piece overlapping onto the wrong side.
moodfabrics.com
Pin the edges together without overcasting them. Secure the edges with hand blind stitches.
blogspot.com
If there is a lining equal to the contour of the front fabric, hem the corners except for long cuts. Turn out. Sweep and iron. Pin the edges together, pressing the open edges inward.
wordpress.com
Secure the pinched edges with blind stitches using thin or silk thread.
tumblr.com
Prepare the loop by stitching it along the length of the piece. Turn inside out, iron and attach with hand stitches. As an option, you can secure the short open sides of the bartack loop inside the blind seam of the tie. Iron the finished tie through a thin cotton fabric from the wrong side.
How to choose a men's tie
Do not forget that a tie, like any item of clothing, must correspond to the overall style of the image and be appropriate in a particular situation.
For everyday wear, choose a tie made of colored fabrics, patterned or knitted.
In situations of business meetings and negotiations, an elegant monochromatic option that does not stand out from the overall tone of the suit will help.
If there is a speech coming up, a bright accessory will focus attention on the speaker’s persona.
For a black tie situation, choose a formal suit with a bowtie as defined by the uniform's dress code.
theluxurychannel.com
How to make butterflies for boys from satin ribbon using the kanzashi technique
Kanzashi is an increasingly popular technique for creating fabric jewelry, decorative flowers, and hair clips that are folded into the shape of flower petals. This is a whole art that allows skilled craftswomen to create woven products of unprecedented beauty. The “kanzashi” technique, in case you were wondering, was invented in Japan.
To begin with, we present to you the first master class. For work you will need the following materials:
- satin ribbon (its width should be 5 cm);
- decorative satin ribbon (width 2.5 cm);
- rubber;
- tie and wire;
- narrow satin ribbon (needed for the middle).
- First, cut the satin ribbon into two pieces of appropriate sizes - 5 by 24 cm and 5 by 29 cm.
- Let's put them together. To do this, we insert a shorter satin ribbon into a longer one, while lifting the short one.
- Now, with dexterous fingers, we give the ribbon the shape of a butterfly. The middle can be fixed either with a tie or a small piece of wire (you choose what is more convenient for you, or what is available).
- Now we take the prepared decorative satin ribbon. In exactly the same way we make a small bow out of it. Carefully attach the decorative bow to the main one.
- Next, we glue an elastic band and a bow with a ribbon to our product.
Thus, you were able to see for yourself how easy it is to make a butterfly from satin ribbons. As you can see, no special skills are required here, so even a beginner can easily cope with a master class of this kind.
Is it possible to make a bow tie out of an ordinary tie?
If you look back in history, you can see that many famous bow tie wearers were scientists, writers, and politicians. Even children can wear a bow tie for the reason that ready-made tied models are available for sale, which simply need to be adjusted in length and simply fastened.
Do you use a regular tie to tie a bow tie?
Not really
It is worth noting that in a situation where this accessory is needed immediately, it is quite possible to use an ordinary tie to form a beautiful bow tie.
For reference! To get a beautiful bow tie, you will need a narrow tie of medium length.
The ability to tie a bow tie beautifully is a kind of rite of passage to become a gentleman. Mastering this wisdom is not easy. Therefore, at first, photo instructions on how to tie a bow tie should be at hand. It is best to print it out and hang it near the mirror. As practice shows, in order to learn how to do this well and quickly, you need to repeat this procedure 50–60 times.
Knitted option
Knitted butterflies look very interesting, especially if they are made with your own hands. Such ties began to appear quite recently, and women wear them. After all, what a girl won’t do to look beautiful and stand out among others. Such decorations are crocheted, which allows you to make the accessory openwork and interesting.
In order to knit this butterfly, you need to take hebesh yarn, a small button and a hook number 2.
Now we knit air loops. You will need as many of them as the length of the butterfly, but keep in mind that the chain should fold into a ring. Therefore, the length of the butterfly is half the chain of air loops.
Next, in single crochet columns, we knit as many rows as the width of the product. When the part is knitted, we begin to knit the strip on which our butterfly should be attached. We collect a chain of air loops - the length of the strip. We begin to knit the first row without crochets. Knit to the width of the ribbon. When the ribbon is ready, on the last stitch of the row we cast on 20 chain stitches or less, and knit single crochet rows, while attaching everything to the base of the ribbon. We do this for the middle part of our butterfly. And symmetrically from this ring we knit the second side of the ribbon. Next, look at the photo and work according to the described scheme of this product.
On the second half of the ribbon we make loops - holes for the button. This is done by skipping buttonholes. Now we take our butterfly, select the middle and stretch the bow into a ring on a ribbon. This is how our bow tie turned out. Now we sew on the button, and you can glue some pebbles and beads onto the middle ring.
These knitted ties can be made for both children and adults. Of course, knitted butterflies are worn by women or crocheted for small children.
Wooden bow tie
A bow tie made of wood has a special charm. This accessory is ideal for those whose life credo is to surprise and break standards and stereotypes. Anyone who wears it will definitely not go unnoticed!
The idea of making a bow tie from wood came directly from the creation of wooden ties, which were invented by the young designer Nelson Sampaio. This is a kind of know-how of modern fashion, fully meeting such standards as environmental friendliness and environmental protection.
Popular articles Stained glass on a mirror
Movie character designs for men
Creating such an accessory will be especially interesting for those who are interested in wood carving. This is an interesting experience!
The simplest material for creating a butterfly is plywood. If you already have experience working with wood, then you can take denser natural samples. You can use elastic, fabric, or leather for the material of the tie.
The advantage of making an accessory from wood over fabric is that it is possible to create holes, perforations, and patterns.
Wooden bow tie for men
During the work, you can use tools such as a file, grinder, jigsaw, laser machine.
You will need:
- grinding tools,
- stain,
- black paint,
- satin or fabric ribbon,
- glue gun,
- rubber,
- 2 fastenings.
Wooden butterfly for a boy
Step-by-step work plan:
- Schematically draw the shape of a butterfly on the material.
- Cut using tools.
- Sand with sandpaper until the shape is smooth.
- Paint the edges with black paint.
- Treat the butterfly with stain.
- Make a strap or elastic band according to the method described in the previous paragraphs.
- The center part can be decorated with a satin ribbon.
- Attach both the elastic band and the jumper with a glue gun.
Another way to create a kanzashi butterfly from grosgrain ribbon
The technology for making such a butterfly is, in general, similar to that described above, but there are a couple of nuances (this is due to the difference in the materials used).
Therefore, we will still consider all the step-by-step actions of this master class. At the beginning, as usual, we prepare the following materials for work:
- grosgrain ribbon 4 cm wide;
- decorative ribbon with some pattern;
- a narrow ribbon (you will need it for the middle);
- tie or wire;
- double sided tape;
- an elastic band.
- We will make our elegant bow from a solid grosgrain ribbon, without cutting it like satin. To do this, we first wrap the ribbon in such a way that we end up with a blank for a bow, approximately 10 cm. Next, we put a ribbon under this bow and bend it a little further than the top one.
- We bend the tape on the other side in exactly the same manner. The result should be something like this:
- We bend the third layer at a slightly beveled angle and do the same on the other side. It turns out like this:
- Now we fix the center with wire or a tie, giving the workpiece the final shape of a bow.
- Cut off the rest of the tape and melt its edge. Now we make a bow from a satin ribbon with a pattern. Its edges will need to be secured with double-sided tape.
- Now we turn the ribbon over so that the bow ends up with beautiful sharp edges. Having finished the bow, we attach it to a bow made of grosgrain ribbon.
- In the same way as in the previous master class, we glue an elastic band to our bow. After this, wrap the ribbon twice, make a knot and place it right in the center. As a result, we get a beautiful butterfly made from grosgrain ribbon, which we made entirely with our own hands:
What is the further care of things using the kanzashi technique?
At first glance, it may seem that such bow ties are, how to put it correctly, disposable. But this is not true at all. Ties, bows, and hairpins made using the kanzashi technique can be washed. The only thing is that this should not be done in a washing machine.
Dissolve literally a few drops of detergent or regular shampoo in a bowl of warm water. Dip your product into this water and, in areas of heavy contamination, gently rub the fabric with cotton swabs. You can also use the soft side of the sponge. Once all stains are removed, simply rinse your tie under cool water.
As for drying, there are certain rules here too. You need to lay your product out on a flat, soft surface. If some of its details have lost their former shape, return the previous appearance of your bow/hairpin using pins. You can dry the item with a hairdryer at medium temperature.
After drying, we recommend spraying your product with strong hold hairspray. This will protect it from dust particles and other contaminants.
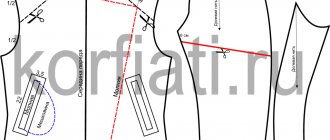
Preparing the layout for cutting.
The next step is preparing a vector pattern layout for cutting on a laser machine. The drawing for constructing the layout in a vector program was taken from Atelier magazine No. 9 for 2006 - . This link is a png file that is ready for printing. On the same page there is a diagram that shows step by step how to tie a bow tie
Vector mockup of a bow tie for cutting on a laser machine.
In the layout we see two contours for cutting, the outer one is red and the inner one is gray. The fabric is cut along the outer contour on a laser machine, and along the inner contour I decided to cut a plastic pattern to draw a seam line.
Cutting patterns on a laser machine.
I lay the fabric on the laser machine table. Since I don't have a honeycomb table and the fabric sags a little between the slats, I placed a sheet of paper under the fabric.
Place the fabric on the laser machine table.
We start the cutting process on a CO2 laser machine.
Cutting patterns on a CO2 laser machine.
Then I cut out a pattern from impact-resistant polystyrene 4 mm thick. (what happened to be at hand) well, not made of plywood). Although, of course, any material available to you that you can cut will do.
Plastic template for cutting out patterns.
How to make a paper butterfly
A paper bow tie seems like a frivolous idea. It is not suitable for a tuxedo on special occasions, but it can be used for a fancy dress costume or for a child’s matinee. For those who are familiar with origami, the master class will not seem difficult.
Manufacturing instructions:
- Take a sheet of colored paper 15x15 cm.
- Fold it in half, wrong side up, and unfold.
- Fold four corners towards the center.
- Fold the top and bottom towards the center too.
- Fold in half from left to right.
- Fold the corners on the right towards the center and straighten them.
- Straighten the sheet. Using the folds created, bend the central part in half inward.
- Fold the top layer of the left corner to the right.
- Fold the left side back so that the corners match.
- Fold the top layer of the right corners towards the center.
- Bend the left corners towards the center line.
- Unbend the workpiece, straighten the central part.
Kanzashi butterfly for boys made of fabric
Such butterflies for boys can be made from fabric. Using this master class, you can recreate them very easily, using very little materials and time.
To work you will need:
- A piece of fabric 9.5x25 cm;
- Non-woven fabric;
- Ruler;
- Iron;
- Pencil;
- Scissors;
- Needle with thread;
- Safety pins;
- Rubber.
Manufacturing process
- Take a piece of fabric and non-woven it. To do this, a piece of fabric is unrolled and straightened on the working surface, and a piece of non-woven fabric of the same size is applied to the wrong side. Place a piece of fabric or gauze on top and iron it.
- The resulting workpiece is folded in half with the front side and notches are made in the center on both sides.
- Both edges of the workpiece are folded to the intended center of the segment and ironed on both sides.
- If after ironing a small hole appears in the center, then this is not a problem, since the center of the butterfly will still be covered with a piece of fabric.
- Using a ruler and pencil, mark the seam lines 0.5 cm. The work is done from the wrong side, because the stitching will be laid on this side. Thanks to this, you can control how the seam diverges. And because there are small irregularities that are convenient to correct.
- Using safety pins, secure both sides of the workpiece in the middle.
- Using a thread and a needle, sew the edges along the seam line.
- The resulting part is turned right side out. But in order for the corners to turn out evenly, they need to be cut with scissors without catching the seam lines.
- After the workpiece has turned right side out and all the corners have been turned out, you need to iron the entire part well. It is advisable to iron the back part so that there are no defects or stains left on the front part.
- A small piece of non-woven fabric is glued in the central part of the workpiece along the hole. This will hold the wings together and prevent them from spreading out. To do this, apply it in the central part, place a piece of fabric on top and iron it, after which the fabric is removed.
- Cut a strip of the same fabric and fold it along both edges. Afterwards it is ironed. You will need a very small piece. Both edges are connected and glued together using a piece of non-woven fabric.
- The workpiece is neatly and beautifully folded in the central part in the shape of a bow and wrapped in a pre-prepared strip of fabric. The edges of the strip are secured with a safety pin and sewn up with a needle and thread. The excess edges of the strip are cut off with scissors, leaving a small allowance of 0.5 cm. This tail is sewn to the bow so that this edge does not stick out.
- Insert an elastic band.
Both master classes showed that bow ties for boys can be made without much effort, just show your imagination and creativity.
How to make a tie with your own hands
Bend the lines on the fabric for a tie
A tie has long ceased to be just a part of a man’s look. Women borrowed this stylish accessory from men to add to their wardrobe. Moreover, in a woman’s image, the tie acquired a special sophistication, giving the owner of this item audacity and extravagance. Sometimes a woman needs a certain style and color of tie to dress up, which can’t always be found in city stores. In this master class we will tell you how to sew a tie with your own hands to solve this problem.
Required materials and tools:
- main fabric;
- lining fabric;
- threads to match the fabric;
- sewing supplies;
- sewing machine.
Bend the lines on the fabric for a tie
How to make a tie with your own hands? Cut a piece of fabric measuring 27 x 54 cm half the length of the arrow to make two 27 cm squares. Fold one square in half diagonally as shown in the photo and press it. These are displacement lines.
Cutting out the details
Attach the template to the fabric. Cut out a piece. Unfold the front, middle and back. The front and middle part should be in two parts, like the letter "M" on one end, and the middle part will have an "M" on both ends. Now you need to cut these points as follows: place the front part with the right side up. Place a ruler along the inside edge of the dot and along the right side of the piece, extending the corner of the dot as shown in the photo. Cut the required piece along the corner. Repeat these steps with the remaining parts. For the middle piece, cut the first end with the outer point on the left side. Then rotate the piece and cut so that the point points to the right. You should end up with a trapezoid shape as shown in the photo.
Ironing the edges
After all the steps, you should have the following parts: the front of the tie, the end of the ribbon, the near part of the tie, the lining, the front and inner lining. Press the folds. Place them on the wrong side. Lay down the lining fabric and iron it. Cut the fabric around the front, middle and back pieces.
Sew on the lining
Place the lining piece on the tie tab, wrong side down. Secure with needles. Sew using a sewing machine. Now fold the edges of the long side and press, fold the edges again and press. Place the tie under the press.
Sew a tie
Then fold the edges inside the tie and insert the lining. Iron and press the folds. Now starting from the bottom edge, start stitching the sides of the tie by hand. We used red thread for the demonstration, but you sew with thread that matches the color of your fabric. Tighten the thread and edges of the sides well. Continue until you reach the end. Iron the finished tie.
What you need
In order to understand how to make a bow tie with your own hands, you need the fabric itself, as well as additional materials and tools:
- Sewing threads (it’s better if they match the fabric);
- Braid or ordinary elastic band;
- Hardware parts (they will be needed for the fastener);
- Additional decorations;
- Non-woven fabric.
In addition, to make a butterfly you need to prepare scissors, felt-tip pens and crayons that will help mark the material, as well as needles. Ideally, it is better to use a sewing machine, but if you don’t have one, then all the work can be done by hand. When joining parts, it is recommended to use blind hem stitches, or you can sew using a double-pass basting option.
To sew a tie, you need to prepare tools and material.
Selecting fabric
Any fabric for a tie will do. The main condition is that it should not drag. Moreover, it can be dense or thin, plain, polka dot, flower, striped, shiny or matte.
Among our assortment of sewing products you can easily select the necessary fabric.
- Staple (why not) and cotton.
- Suit fabric and gabardine.
- Jeans and even leather.
- Satin, brocade and other non-stretch fabrics.
You can also take stretch material if it suits the outfit. But in this case, when cutting it, it must be thoroughly glued with non-woven material, double-lined material or beading. It will add density and prevent the tie from stretching. The same should be done with thin fabrics, otherwise the “wings” of the butterfly will sag and the desired effect will not be achieved.