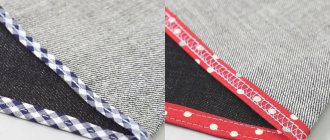
Finishing seam allowances with bias tape: 3 easy ways
Finishing seam allowances with tape is a great technique to not only make the backing look neat, but also to give the item individuality and show your attention to what you are doing. Such processing can be in tone or contrasting - in the latter case it also becomes a decorative detail.
Such processing may be visible if it is performed, for example, on an unlined jacket and worn unbuttoned, or it may not be visible if it is performed on a dress. But in any case, a beautiful and neat reverse side gives the product completeness and completeness. In our electronic catalog you will find patterns for sheath dresses, in which you can apply processing of seam allowances with bias tape, and patterns for jackets.
And here you will find other ways to process bias tape:
How to sew bias tape: 3 ways
You will need:
— ready-made bias binding or material and equipment for its manufacture;
- tailor's scissors;
- tailor's pins;
— iron and ironing board;
- sewing machine and thread.
Method 1
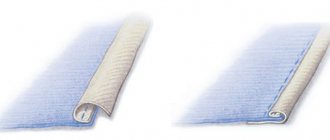
This is one of the most common methods, usually called the Hong Kong seam. It gives a beautiful and even finish if you try to make all the seams evenly. This method is better suited for processing straight or not too curved seams. If the seams of your product are curved, try using silk or other thin plastic material for the bias tape.
Step 1
Prepare a bias tape 2.5-3 cm wide. Read and watch the video here to learn how to make a bias tape:
What is bias tape
Step 2
Press seam allowances.
Step 3
Place the binding over the seam allowance and align the left edge of the binding with the edge of the left seam allowance. Secure the binding with tailor's pins.
Sew the binding with an allowance of 0.5-0.7 cm. The width of the allowance depends on how thick and loose the material from which the product is made is. On products made of thin fabric that is not prone to fraying, you can also trim allowances, for example, to 0.3-0.4 cm. Try to lay the stitching as evenly as possible: the appearance of the treatment depends on this.
Step 4
Unscrew the binding from the seam allowance and iron it.
Wrap the seam allowance with binding, hiding the raw edge of the seam allowance. Iron the binding. Before this, you can secure the trim with tailor's pins. The bottom edge of the binding does not turn up: it will be hidden by the seam allowance and will not fray, since the binding is cut on the bias.
Step 5
Sew a stitch that covers only the seam allowance and the binding. Sew along the front side and place the stitch exactly in the seam. Ready.
From the inside it will look like this:
How to quickly and beautifully process seam allowances in a lace product
Method 2
This is the fastest method, but it is primarily suitable for processing straight seams and may cause some errors. For this, it’s good to use ready-made, folded and ironed bias tape, this will speed up the process.
Step 1
Prepare the bias tape, fold and iron it. If you are using pre-made tape, skip this step.
Step 2
Press seam allowances.
Step 3
Now you need to kind of put the binding on the seam allowance. Finished binding usually has one side slightly wider than the other. Position the binding so that the shorter edge is on top.
Wrap the seam allowance with binding and secure with tailor's pins. check that the edge of the seam allowance lies evenly inside the binding, touching its central fold.
Step 4
Sew a stitch, securing both sides of the binding at once. As mentioned, this method may cause errors, especially on the wrong side:
But he is the fastest of the three. If you want a more accurate result, try the method below or the first method.
Processing product sections with finished bias tape
Method 3
This method is essentially a cross between the first and second. For this, as for the second method, you can use ready-made bias tape - this speeds up the work. At the same time, there are fewer errors with it, because the binding is stitched not with one, but with two lines. Another advantage is that the binding allowance at the bottom does not remain unfinished.
Step 1
Prepare the binding (including folding and ironing) or use ready-made bias binding.
Step 2
Press seam allowances.
Step 3
Turn the seam allowance away from the product, as shown in the photo, and pin the unfolded tape to the wrong side of the seam allowance, with the right side facing the seam allowance, aligning the edges.
Step 4
Stitch the binding to the seam allowance, stitching exactly into the fold of the binding.
Step 5
Fold the binding over so that it hides the raw edge of the seam allowance.
Sew along the right side, stitching the top side of the binding.
Photo and source: closetcorepatterns.com
Processing short seam allowances with bias tape
How to use bias tape on a round neckline with a front slit
Hello, dear craftswomen and sewing masters! Today I want to show you how you can trim a round neck with a slit along the front using bias tape . To be honest, I use this treatment extremely rarely. It is more convenient to process a neck with a cut using a facing. But I am performing this master class at the request of my readers.
We have already discussed with you how to process a neckline with a V-shaped neckline with bias tape, and I explained some points last time.
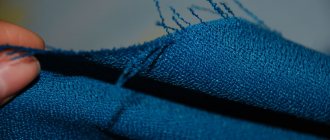
For work, as usual, I prepared a blank in the form of a neckline, with one open shoulder section and a finished bias binding, ironed in half. I made a small cut along the front, which can be as long as you need.
Don't forget to sew a backstitch along the entire edge of the neckline to prevent it from stretching on curved areas. It is not necessary to make a stitch along the cut.
We perform neck processing in two stages. First, let's look at the cut. Having unfolded it almost in a straight line, you need to baste bias tape to it, wrapping it around the edge of the cut on both sides. Pay attention to how the corner of the cut fits. It should be almost on the edge of the binding.
This is what it looks like with the outline. After this, we attach the binding using a machine along the front side.
Then we turn the front over to the wrong side and fold it in half. We have a corner that needs to be stitched up, which is what we do.
Iron this corner from the wrong side to one side and, if necessary, fasten it manually.
This is what happened on the front side.
After this, we proceed to the second stage and baste the bias tape along the neckline, starting from the open shoulder section of the back. Before reaching the cut, we stop and fix the place where the trim should end in the center of the front (along the edge of the cut).
We turn the binding to the wrong side in an open form and grind it down. This stitch can be done by folding the binding in half from the wrong side.
After this, you need to fold the edges of the binding inward and straighten the corner. Baste the remaining area up to the cut. The same procedure can be performed exactly the opposite way. First, stitch the edge of the binding, turn the corner out and begin basting the binding from the edge of the cut. Choose any option.
Similarly, it is necessary to process the neck on the other side.
After this, sew the binding on the front side, leaving thread tails along the edge of the cut. These tails must be threaded into a needle one by one and hidden inside the trim.
This is what happened as a result.
This way you can use bias tape to trim a round neckline with a front slit. As always, I want to warn you that it is much easier to perform such processing on dense fabrics than on thin and light ones.
But, if the fabric is transparent and such a cutout cannot be refused, then you will have to tinker and make it just like that. In another case, it is better to use turning processing, which I will talk about in another master class.
I hope that this processing method will help in working on products, and your sewing knowledge will be replenished with one more thing.
If you have any questions or suggestions, write.
Share useful information with friends and subscribe to site news to learn even more interesting things!
Best regards, Irina Shirokova.
4.5 2 votes
Rate this post
Consider a master class on processing the neckline with bias tape
The method of processing a neckline using bias tape presented in this master class is not very easy to implement. But the resulting neat neckline will please you.
So, start designing the neck of your product:
- Cut bias tape equal to the length of the neckline and 3-3.5 centimeters wide.
- Place right sides together at the beginning of your neckline. If your sewn product has a zipper, then the neckline must be processed before the process of sewing in the zipper begins. If your neckline is solid, then start from the back two centimeters before the shoulder, lay a line half a centimeter from the cut.
- Now you need to do the most labor-intensive part: stitch, slightly stretching the bias tape, so that when finished it does not tighten your neckline and does not stretch on its own, and does not go into waves. On straight places, tighten less, and on oblique places, that is, on curves, on the contrary, more, so as not to stretch. It is necessary to take into account the elasticity of the binding - if the bias binding stretches a lot, then tighten it more when sewing, and if the fabric is not very elastic, do the same. However, this is of course very difficult, so it’s better to pin the bias tape to the neckline and baste it - this way you can see how the tape fits and redo it if necessary. And then stitch it on the machine.
- It is very important to do this process very symmetrically. Fold in half and check. If you have a solid neckline, then when you reach the starting point two or three centimeters away, break the stitching and connect the bias tape, pull it tight. Then mark and connect along the lobar. Now stitch the binding to your neckline. If everything is symmetrical, the volume of the neck has not changed, cut the allowance to 0.3 centimeters.
- Straighten the neckline from the front side and mark 1.3-1.5 centimeters from the seam connecting the bias tape to the neckline. It is important to straighten the seam evenly so that the seam allowance is the same. Cut off the excess.
- Fold the seam allowance up to the cut, fold it over, covering the stitching seam by one or two millimeters, baste by one millimeter. Fold the ends of the bias tape inward.
- Iron the roller very carefully so as not to crush it; with the tip of the iron, try to direct the bias tape towards the stitching; you can pull it slightly. And the line will be almost invisible. Ready.
Using this roller you can process dresses and blouses, tops made of silk, chiffon and lawn, and thin cotton.