To understand how to sew a button, you first need to know what the main shapes, types and sizes of buttons are. To indicate the size of round products, two main systems are used - in millimeters or in lines (L). There are special tables for the relationship between these two systems.
infoniac.ru
To determine the size of square products, it is customary to use the diagonal. When working with products of non-standard shape, their size is determined by the largest side.
The most popular types are with two and four slots. There are also models with legs.
General recommendations
The button should match the product both in color and size. To make sure that a particular button meets certain parameters and requirements, you need to thread it through the button loop on the product. It should fit tightly enough so as not to unfasten when moving, but not be too tight - otherwise there is a chance of tearing the fabric of the product.
Before work, the “correct” threads are selected. Their main properties are strength. That is, they should not be easily torn by hand. Their density corresponds to the size of the fastener and its holes, as well as the thickness of the material. Experts recommend strong reinforced threads for sewing fasteners to coats, jackets and fur coats.
The ideal option is when the button and thread are identical in shade. Whether this item is mandatory depends on the type of button. If it is flat, then the color is chosen based on the button. If the product is on a leg, then it is recommended to use threads to match the fabric - this way they will be almost invisible.
It is more convenient for work if the length of the thread does not exceed 30 cm. If the thread is shorter, it will not be enough to complete the work. If it is longer, the thread will get tangled and form knots during the process.
When dealing with buttons with holes - especially large ones - it is recommended to double thread. At the same time, you need to make sure that they do not intertwine. This will negatively affect the overall appearance of the finished product. The use of single folding is justified when working with small buttons.
If you choose the double folding method, you should not make many punctures. Double thread and a small number of stitches will ensure sufficient sewing strength. Only if one fold is used, more punctures of the fabric are required.
When sewing buttons with holes, it is important to remember that the direction of the thread should be parallel to the button loop.
Before starting work, the mounting location is indicated on the front side of the product. The most convenient way to do this is with a bar of soap.
Each type and type of button has its own convenient sewing method.
How to sew a button correctly
Selecting suitable threads and buttons
Strong threads
To sew on buttons, you need strong threads so that the button can hold on longer. You can check the strength of the thread with your hands - if you break the thread with difficulty, then it is strong.
Thread thickness
Select threads of the appropriate thickness so that they can be used for the chosen fabric. For example, if you want to sew a button on a summer shirt, use thin threads rather than thick ones.
Thread color
Choose a color that matches the button. If the button is on a leg, then the color of the thread should match the color of the fabric, and if the button has holes, then the color of the thread should match the color of the button itself.
How to sew a button with two holes
- A securing stitch on the wrong side of the fabric is made so that the knot remains on the wrong side.
- Then you need to bring the needle to the back side of the material, attach the button to the sewing area and thread the needle through one of the holes.
- Several stitches are made, sewing between the holes. It is advisable to get into the same punctures so that the sewn button has an aesthetic appearance from the inside out.
- To complete the work, you need to remove the needle and thread between the button and the material and, grabbing the threads, make a couple of knots. There should be a kind of “leg” that will make fastening easier. Then bring the thread to the inside, fasten it and trim off the excess.
Sewing on buttons: useful tips
To begin with, it is worth mentioning the sizes and shapes of buttons. In addition, it is worth knowing that there are buttons with and without a “leg”.
Button size
Each button manufacturer sets its own size range. All button sizes can be specified in millimeters (mm) or lines (L).
If you decide to order buttons, you need to agree on the calculation system with the manufacturer. For example, if you decide to order size 30, then their size is 34 mm, and if 34L is indicated, then the size is 21 mm.
Here is a table to help you better understand these two number systems:
All these data apply to round buttons. Square buttons are sized on the diagonal, while custom sized buttons are usually sized on their longest side.
Button on the leg
If the "foot" is present, then this is a plus, since it reduces the tension that typically occurs between the button and the material when you unbutton and fasten the garment. This means that the “leg” will protect the clothes from tearing.
It is also worth noting that the leg hides the threads with which you sew the button, which means that the button can be sewn on with thread of any color, even if this color does not match the clothing.
But even if the button does not have a “shank,” you can make one from the thread you use to sew on the button.
How to sew a button with four holes
- Sew a securing stitch on the inside of the product.
- Then attach the button to the sewing site and bring the needle to the front side through one of the slots. For convenience, the holes are divided in pairs, each pair is stitched several times.
- To finish, the thread is brought out between the button and the fabric on the front side. Several knots are made around. Then the thread is brought out inside out, secured and cut.
- Another option for sewing on a button of this type is diagonally. To do this, the holes are divided not in pairs, but diagonally. The stitches themselves are performed in the same way as described.
syl.ru
Sewing on buttons
Button with eyelet. Option 1.
Try not to use knots.
1. Fold the thread into two folds.
2. Insert the ends of the thread into the eye of the needle.
3. Use a needle to grab a couple of threads of fabric where you are going to sew a button, and then thread (not all the way) through.
4. Thread a needle and thread into the resulting loop and carefully tighten it.
5. When the thread is secure, you can safely sew on your button.
Working with outerwear
On products made of dense fabric, to increase strength, two buttons are used simultaneously - on the front and back sides.
syl.ru
How to properly sew a button “on a leg”?
1. To sew a button correctly, you need to select a needle. If you sew a button by hand, then first of all select a needle of the appropriate size for the job.
A thick needle with a large eye is used for outerwear, such as sheepskin coats, fur coats, leather jackets, and coats.
A regular darning needle is suitable for light cotton fabric and, accordingly, medium-sized buttons.
A very fine needle should be used to sew buttons on blouses made of delicate silk fabric.
It doesn't take long to sew on one or two buttons. But, if you need to sew on a lot of buttons, then you can thread a thread folded in half into the eyelet. Then the total thickness of the thread will already be four folds. As a result, you can quickly sew on buttons with 2 or 3 stitches.
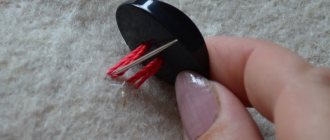
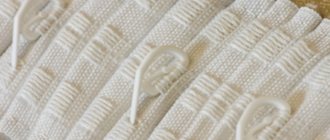
Buttons with a stem are sewn on by placing a match under it
Buttons with a foot The simplest technique for sewing on a button is to place a match or the refill of a fountain pen between the button and the fabric. To form a “leg,” you need a certain “clearance” that allows you to wrap a thread around the leg and freely put a loop on the button.
A match or other rod can be inserted not only from below the button, but also from above, as shown in this figure. This will make it even more convenient to sew on a button.
For thin fabrics and small buttons, you can use a pin or similar item. To sew a large flat button onto a heavy wool coat, use a wooden oven match.
Find the place where the button was previously sewn. Carefully remove any remaining old thread. Now pierce the fabric from the inside out, trying to get to the point where the thread previously passed. Pull it all the way, loop it past the match and thread it through the eye, pulling the thread taut. Insert the needle on the other side of the match.
If the buttons have holes, sew stitches in a cross or two parallel stripes, following the pattern used on other buttons. Don’t forget to make each stitch from different sides of the match.
Ten stitches are enough to securely fasten a button.
Attaching a Button After making about ten stitches (2 X 5) for a four-hole button, bring the needle out into the gap between the button and the fabric. Carefully pull out the match. Wrap the remaining thread in the needle around the vertical threads so that something like a stem is formed. To do this, you will need to wrap the thread at least five times. Then insert the needle through the base of the stem and into the fabric. Insert the needle from the inside out and pass it through the stem again, repeating this operation several times.
The “tail” of the thread can be secured much easier. After you make the last turn, pierce the resulting leg with a needle and wrap the needle 3-4 times with the same thread. Pull the needle out and tighten the resulting knot tightly. Now pierce the fabric near the leg and bring the needle to the wrong side of the garment, cut the thread. How to sew a button on a leg
Buttons with a foot For a flat button you almost always need to make a foot. This makes it easy to put it on a buttonhole, and even for decorative buttons (with a stem) the stem is sometimes made from thread. And only by sewing a button on a sewing machine, using a special foot, the buttons do not have a stem.
Now you already know how to sew on a simple flat button; are there really any special features for a button with a foot? It turns out that for a button that already has a stem, you also need to make a stem out of thread. More precisely, do not make a leg, but wrap the stitches under the leg several times with threads. This should be done so that the button has a little “freedom” and is not too tight.
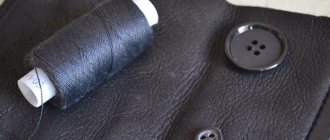
How to sew a button to a coat
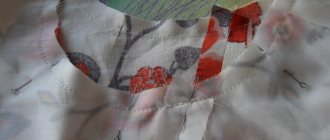
On items such as coats (fur coats, sheepskin coats) and those with rather thick linings, buttons are sewn on in a special way. Not one, but two buttons are used in one place. From the front side and from the back side. This is done for strength.
A knot is tied and the fabric is pierced as in the case of a button with two holes. The thread is threaded through one of the holes in the top button, and a match is placed under it. This is done in order to create a distance between the surface of the material and the button.
Then you need to sew on the top and bottom buttons at the same time through the same punctures. After several punctures, the thread is brought to the front side, the match is removed, and all the threads are pulled together with several turns of the main thread. A false leg is created on which the button will be held. It is necessary to tie several knots and secure the thread. The height of the leg depends on the thickness of the product.
This is what happened as a result. Buttons are sewn on both sides.
As you can see, there is really nothing complicated, and everything is done in an elementary way. Now you know how to properly sew buttons by hand. If you have never tried to do this, now you will definitely succeed.