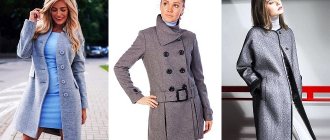
Often a well-preserved coat has been hanging in your wardrobe for years, but you don’t want to put it on because it’s an outdated style and too long. Of course, you won’t be able to remake raglan sleeves yourself, but you can shorten a coat or make a jacket out of it.
Shortening a coat in a studio is quite expensive, so try to learn how to shorten and hem the bottom of a coat yourself. No special tools or sewing machines are required for this; the main thing is to accurately determine the line along which you need to cut off the excess length of the coat.
The first video in the series on the topic “How to sew a women’s coat.” This video shows how to process a coat trim.
The second video in the series on the topic “How to sew a women’s coat.” This video shows how to process a pocket with a flap.
How to mark the hem line of a coat
Wear your coat with the clothes you will wear in winter or fall and have someone mark the shortening line with chalk. This is done like this: you should stand in front of the mirror without straining in the position in which you usually wear outerwear, and the other person should make the first chalk mark on the front of the coat. Gradually, you should turn to one side, and your assistant with a long ruler or triangle should remain in place and chalk marks on the front part.
The ruler should touch the floor, and the marks should be placed at the same distance from the floor. A continuous line is drawn along the marked marks, a hem allowance of 4-5 cm is added and the excess part of the coat fabric is cut off.
The hem of any coat is usually uneven (H) as the back stretches over time. This is facilitated by moisture (rain, snow), and since the drape coat is heavy, the back gradually stretches out much more than the side seams. In people with a stooped figure, on the contrary, the shelf stretches out. Therefore, you cannot rely on the factory cut of the coat and mark a new line from the old hem. In a long coat this discrepancy may not be noticeable, but in a shortened version it will immediately catch the eye. The new hem line can only be accurately determined using a ruler, taking measurements from the floor, as mentioned above.
How to sew a coat: step-by-step master class. Sewing a coat Stage 4
Hello. Sewing a coat is a big undertaking, but it can be done. Easier than assembling a hadron collider, and many women are capable of this, I’m sure, they just don’t need it. And you always need a new coat. And I will try to help with this.
Here I collect all the stages of creating a coat, plus step-by-step instructions on how to sew a coat with your own hands.
Initially I wanted a coat with reliefs from the shoulder, but I bought the fabric and everything changed. This is the model that emerged in my head. More precisely, it was drawn that way on paper; it was more beautiful in my head.
Having gone through all the stages of creating a coat:
I sewed this short coat for spring. Suit fabric, containing 70% wool. The coat at the time of photographing had no buttons and was pinned together. Photographed on March 8, stores will open in 3 days, what can you do?
So, we cut out the parts from the fabric.
- The shelf is completely duplicated. We apply all design lines on dublerin;
- we duplicate the back at the top and bottom;
- facing of the neckline and lining;
- We duplicate the collar details completely.
- And also all the small details that are in the design.
Assembling the top
- We assemble a shelf from component parts. Iron the allowances.
If the fabric is difficult to iron and the allowances on the curves are “pulled”, they need to be cut. Then we iron the allowances in one direction, cut them and attach them with a decorative stitch close to the seam.
We overcast the side seam allowances (and on the shelf too). My fabric is loose and I also overcast the middle seam allowances. If there are reliefs to the bottom, it is also better to overcast them.
If the fabric is jacket fabric and cannot be fitted, then both the lower and upper collars are the same on the stand (the lower one in the picture). If the fabric contains natural fibers, then the lower collar can be made in one piece.
A link to constructing an English collar is given above.
Sew the collar pieces together. Iron the allowances. We sew the stand and collar allowances close to the seam, securing them in this position.
Assembling the lining
- Hanger: cut out a strip 32 mm by 10 cm. Iron the edges inward and then in half, stitch along the edge, fold with a hanger and baste to the middle of the back neck facing.
- We connect the back of the lining with the facing of the back neck. Iron the allowances onto the facing.
I have a fold on the top of the lining. It is done for freedom, just the middle fold at the top deviates a couple of cm, and the bottom remains as wide as it was.
- We sew up the darts on the shelf. Or reliefs, in general, what we have is what we connect.
- We connect the side seams and overcast them.
- Fold the bottom of the lining twice and place a stitch (in the hem with a closed cut).
The length of the lining according to the pattern is the same as the coat. Therefore, you need to tuck half a cm more than the coat. For example, on a coat there is a 4 cm hem at the bottom, fold the lining 4.5 cm.
You can stitch seam allowances to secure this position of the lining.
Connecting the top and lining
- We cut the lining with the top face to face along the lines of the ribs and collar. Carefully cut out the allowances on the collar. We make sure that the collar fits exactly.
- We lay a connecting line. We cut out allowances at the corners.
- Turn it inside out, straighten it, iron it.
- Sew the lining to the sleeves.
To sew correctly, you can pin the lining with needles as it should be.
Then turn it inside out, pin it together, align the seams and stitch it.
The sleeve hem can be secured with machine stitching all the way through, or with hidden stitches, or simply along the seam of the sleeve a couple of centimeters from the bottom.
- We turn away the hem, pin the allowances as in the photo and sew at the height of the hem allowance (as I mentioned above - mine is 4 cm).
- Turn it inside out and iron it.
- Now the bottom of the coat can be sewn and tucked. You can hem it with hidden stitches or machine stitching all the way through. You need to start hemming a little further than the end of the hem, so as not to catch the lining.
How to hem the bottom of a coat
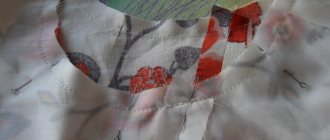
When hemming an item of heavy fabric, such as a coat, it is necessary to distribute the weight of the item evenly and to do this, make several rows of securing stitches so that the fabric does not wrinkle. A particularly high hem (4-5cm) or a hem made from heavy drape fabrics can be made using two or three rows of hand-tacking stitches, for example, herringbone, as shown in this photo. This method of hemming a coat, using several rows of stitches, will not pull back the edge of the finished product, and will evenly strengthen it along the edge.
In our example, we are considering a coat with a loose lining, that is, the hem will be attached separately, and the lining is not connected to the bottom of the coat, so the cut edge of the fabric needs to be serged or otherwise sealed.
The cut edge of a hem made from heavy drape fabrics can be finished with an edge band or an overlock stitch on an overlocker. If you don’t have an overlocker, you can use a zigzag stitch on a sewing machine. Such processing when shortening a coat is necessarily necessary for loose fabrics, since the edge of thick, heavy fabrics cannot be processed with a double hem, since jeans are hemmed. A double hem will make the seam rough and can ruin the appearance of the coat and even “print” on the front side over time.
It is very important, before hemming the coat, to glue the hem area with adhesive material. It is not necessary to glue the part that is folded, but the front side must be glued to the width of the hem. This will strengthen the fabric and prevent the bottom of the coat from appearing as a “wave”.
Press the hem line lightly. Pin the hem by pinning it halfway between the hem line and the cut edge of the fabric. Fold the edge over the pins and sew the hem from the inside using a herringbone stitch. Then re-pin the pins higher and repeat this operation.
The folded and hemmed edges of the coat must be ironed along the wrong side, being careful not to press down the iron too much. To steam the hem more strongly, you can iron it with a damp iron. It is not advisable to iron the coat from the front side, since the edge of the hem may be imprinted. See How to iron clothes properly.
Preparatory work
Before you start sewing the coat, you need to do some preparatory work. They include several stages:
- Preparing fabric for sewing coats. Fabric consumption largely depends on the style, size and pattern repeat. For example, if we are dealing with a large check, then we should buy fabric with a margin to adjust the print at the joints of the coat.
- Pattern. It is important that the pattern is created taking into account the characteristics of outerwear (loose fit, space for insulation and lining). The necessary changes are made to the finished pattern so that the model meets the measurements of the future owner or owner.
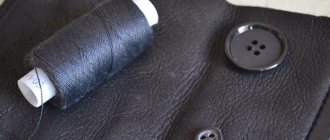
- Preparing the stock for sewing. The concept of stock includes lining material, double leather, threads, fittings, shoulder pads, etc.
- Preparing tools for cutting and sewing. They include all kinds of devices: from needles and thimbles to overlockers and ironing systems. The needles must be strong, the scissors must be sharp, and the sewing machine must be powerful.
In addition, during the preparatory work, a mock-up is sometimes created from thick fabric.
How to shorten and sew a coat lining
After the bottom of the coat is folded and hemmed, you need to align the lining of the coat. Put the coat back on with a new hem and carefully straighten the lining on the shoulders, back and front. It is important that it hangs down without clinging to the fabric of clothing inside the coat.
Again, with an assistant, mark the hemline, but now on the lining. From this line on the lining, 2 cm is first reduced, and then 5 cm is added. As a result, it turns out that the lining needs to be made longer than the hem of the coat by exactly 3 cm. But on the condition that the finished lining will be 2 cm shorter than the bottom of the coat. See also the article How to hem the bottom of a product with a hidden seam.
If the lining is sewn to the hem, then it is cut taking into account the placement of the fold, such as shown in this photo. It is impossible to sew a lining without a fold on the shoulders, as shown in the top photo, since it will definitely “pull” the hem or back. Firstly, it can simply cling to clothing, pulling up the edge of the coat. Secondly, some lining fabrics can “shrink” after waterlogging (rain, snow). That is why experienced tailors, before sewing a coat, perform a wet-heat treatment of the lining fabric, and in some cases, wet the lining and then dry it.
Duplicate
- The shelf is completely duplicated. We apply all design lines on dublerin;
- we duplicate the back at the top and bottom;
- facing of the neckline and lining;
- sleeve cap;
- We duplicate the collar details completely.
- And also all the small details that are in the design.
Duplication technology
Once upon a time, coat sewers used complex and labor-intensive glueless duplication technology. The modern abundance of adhesive materials allows you to get the job done quickly and relatively inexpensively.
The following materials are distinguished for duplication:
- Doublerin. This is a fabric with one adhesive side.
- Non-woven fabric. Non-woven cushioning material with adhesive coating on one side.
- Non-woven edges. Used for duplicating seams and cuts.
- Adhesive corsage tapes. Necessary for making belts. Glue webs and meshes. They are a layer of glue without a base. When used, they break the plasticity of the fabric, making it “wooden”.
Outerwear is duplicated in order to give it shape. Processing the edges of pockets, armholes and necklines prevents them from stretching and deformation.
What needs to be duplicated in outerwear
The technology for sewing men's and women's coats involves the use of completely duplicated parts and partial duplication of individual elements:
- The shelves, hemlines, top collar, collar, flaps and pocket leaves are completely duplicated.
- The sides of the shelves, the side parts of the shelves, the entrances to pockets and slots are subject to zonal duplication. Strengthening these areas prevents the fabric from stretching.
- To avoid excessive stretching, duplicate the bottom of the coat, sleeves, armhole sections and neckline.
- The fastener location is duplicated (for buttons, zippers and loops).
All types of duplication are performed before grinding down the parts. When strengthening fabric, it is necessary to observe the direction of the grain thread on the main material and the duplicating fabric. Duplicate elements are cut out without seam allowances so as not to weigh down the part.
Thus, strict adherence to the technology for sewing a men's coat (as well as a women's coat) allows you to quickly create a modern fashionable product that will serve its owner for many years and will always warm you up in cold weather.
Hem the lining
After you have finished with the main fabric of the product, it is the turn of the lining. Put on your coat and straighten out the lining. Ask your assistant to measure the bottom line of the lining; it will be 3cm longer than the bottom edge of the coat, but when finished it will be 2cm shorter than the hem of the garment.
If the lining is sewn to the hem, it is cut taking into account the fold. You cannot sew a lining without a fold on the shoulders, because it will pull on the hem or back.
The coat remains an incredibly popular fall wardrobe item. If you are ready to update your favorite item, and feel that you cannot do without the experienced hand of a craftsman, come to the Mobile Tailor.
We are happy to advise you on remodeling options after listening to all your wishes. You will be pleasantly surprised at the transformation of your coat.
<< Back to Lifehacks Studio