Selection of thread shade
Of course, an important point will be the selection of the required thread color. The task will be greatly simplified when the fabric of the product and the button have the same color and shade. If they are different , you should pay attention to what type of button it is.
A flat button attracts a lot of attention, and therefore its color should be matched to the color of the thread. When doing the work, the stitches that will be made on the front part will hide the color a little. If the buttstock is chosen on a leg, then the selection of thread should be carried out based on the color of the product (fabric), because in such a case the thread will not be noticeable from the outside.
Ten stitches are enough to securely fasten a button.
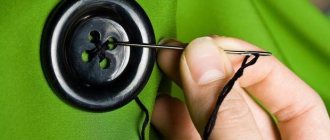
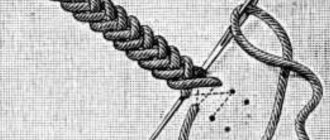
After making about ten stitches (2 X 5) for a four-hole button, bring the needle out into the gap between the button and the fabric. Carefully pull out the match. Wrap the remaining thread in the needle around the vertical threads so that something like a stem is formed. To do this, you will need to wrap the thread at least five times. Then insert the needle through the base of the stem and into the fabric. Insert the needle from the inside out and pass it through the stem again, repeating this operation several times.
The “tail” of the thread can be secured much easier. After you make the last turn, pierce the resulting leg with a needle and wrap the needle 3-4 times with the same thread. Pull the needle out and tighten the resulting knot tightly. Now pierce the fabric near the leg and bring the needle to the wrong side of the garment, cut the thread.
Needle selection
Before performing the process of sewing buttons, it is worth choosing the right working tool, in this case a needle. As a rule, a needle of medium length is considered ideal. But if a needlewoman is working with very dense fabric, then a needle of medium diameter and length will not be suitable.
The end of the thread must be tied in a knot when working. The work can be done either in one thread or in two threads. The choice depends on the size of the buttons. For small buttons you can use one thread. If the buttons are large, then they need to be sewn in two threads for greater reliability.
Final fixation
Reliable design and final fastening can be ensured using:
- Passing the needle through the fibers of the fabric on the wrong side;
- Tying a knot using the resulting loop.
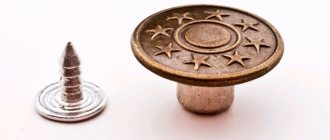
How to sew a stock on a leg
Designers and fashion designers usually sew this type of buttons on as decoration. Pedestal stocks are capable of carrying heavy loads, significantly more than their flat counterparts. This fact further confirms their necessity in the world of textiles, as well as the knowledge of how to sew them onto fabric. Since they are a massive element, to work with them it is worth using a strong thread that is folded in half. However, the thickness of the thread may not be suitable due to the small hole in the button on the stem.
It is worth starting the process from the wrong side. The fabric should be punctured together with the button puncture. Repeating this action is necessary; it should be performed several times. Getting into the same hole will ensure not only the beauty of the stitches, but also the strength of the element sewn to the clothing.
Do not sew buttons tightly, pressing them against the fabric. A special gap between the fabric and the button is necessary. Making such a gap is very simple .
To do this, take a match and place it between the fabric and the button, on the front fabric of the product. Then you need to make 4-5 turns under the button, piercing the fabric towards the underside of the fabric. Then you should fasten the thread. This way the thread on the button will look beautiful. The process is completed after cutting the remaining piece of thread.
Tips for those who are not comfortable with thread and needle
Experienced seamstresses advise using a thread that is not too long, which will ensure comfortable work and will not twist and leave tight loops.
In this case, the threads need to be selected to match the button. It should not be too thick or thin. Everything is as harmonious and beautiful as possible, this is the only way the fittings will quietly fall into place. In order not to worry about constantly sewing on a button in the future, you need to choose a strong thread that will ensure reliable fastening of the accessories to the clothing.
Experts also advise using high-quality fasteners made of durable materials so that the buttons last a long time and are reliable. Sewing a fastener with two holes is not difficult, even for someone who has never done it before. The main thing is to be patient and make marks on the fabric where the fastener and stitches that secure it to the surface should be located. This will make the task much easier.
DIY pearl earrings
Crochet round yoke for children's dress
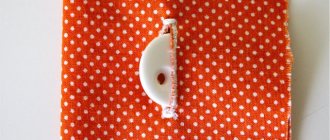
Sewing on a button with two holes
To sew on a button that has two holes, you need to take:
The choice of this thread size is determined by its ideal thickness. Very thin threads usually look sloppy on a sewn product. After threading the thread into the needle, you need to secure its ends into one small knot. After securing the thread to the product, you need to mark the location of the button on the garment. An ordinary soap remnant is ideal for this. Use it to make a mark in the form of a small cross on the front of the product.
After making the marks, you need to pierce the wrong side of the garment with a needle onto the front part of the product. Make sure that the thread is positioned slightly above the center of the soap mark. Then you need to thread the needle through one hole and thread the thread into its other hole. The sewn button will look neater if it falls into the same hole, designated earlier. When several repetitions of the above action have been performed and the thread looks like one piece, you can secure the sewn element.
Do not tighten the thread when sewing. After all, a thread that is pulled too tightly will ensure a very tight connection between the clothing and the button, making it not very convenient to fasten the product. The thread is tightened using a loop formed by looping the thread around the button and threading the free end through the loop. This manipulation must be repeated several times and the remainder of the thread should be cut off. The sewn stock will hold tightly and perform its function in the future.
Additional Tips
Finally, a few “subtleties” of a skill familiar to everyone from childhood:
- The main advice is don’t wait until the button gets lost. Otherwise, you will have to completely change the entire “button set” on the product. Always check the condition of the threads after washing or ironing, and immediately get to work, without putting it off until later. Spend a couple of minutes, but save money on completely replacing the fittings.
- When purchasing outerwear, try to save an extra set of buttons and subbuttons. Usually, they are attached to the product in a bag in the amount of 4 pieces (a pair of each type). If there is no such set, then this is evidence of a low-quality outerwear manufacturer.
- Sew buttons with several holes in the same way as those originally sewn (stitches diagonally or parallel).
- Try to ensure that the fittings are attached on the wrong side as neatly as on the outside.
- For clothes that you wear constantly, it is advisable, after sewing, to wrap the “leg” of thread several times, and then thread a needle and thread through this bundle and secure it on the reverse side with a stitch. This will provide additional protection for the threads from abrasion.
- You can do without a knot for fixation. It is enough to make a few stitches on the fabric before and after sewing. And then tie the end of the thread with a knot.
To speed up the process, use double thread.
How to sew a button with four holes
You can sew on a button with four holes using the same pattern as with two. With only one difference: they do it crosswise. This method allows not only to hold tightly to the item of clothing, but also to provide its owner with good spirits, as evidenced by the Old Slavic rune.
A button is not only an indispensable element of clothing, but also a harbinger of danger or good luck for its owner. If a person finds a button on the road, then you can be sure that the person’s path will be pleasant in nature with a positive ending. Pleasant changes on the path of life will not keep you waiting.
Finding a button in an unexpected place symbolizes advancement through the ranks and successful work. If a person finds a button with four holes, and its color is green or white, then you can expect good news and a monetary reward in the near future.
You should not pick up a found black button with several holes: this item does not bode well for its new owner.
If you notice that a button has come off from any item of clothing, do not immediately get upset. Firstly, you can return it. And secondly, it hints to its owner about changes in life, or more precisely, that now is the time to make a serious decision to change his lifestyle. A torn button may also indicate that in a person’s immediate environment there is an envious person who is preventing the person from achieving their goals.
Since ancient times, people have interpreted the torn buttons of a bachelor as a sign of his imminent marriage, or rather, the need for marriage.
Guzik (“button” from Belarusian) itself can act as a strong talisman. For example, if a person suddenly meets an unpleasant and angry acquaintance, then in order to reflect negative energy from oneself, one can button up oneself. They will help you build a kind of cocoon into which no flow of negativity can break through.
Losing a button is easy and simple. In magical terms, such a situation becomes a symbol of the loss of something in life and troubles.
Choosing buttons, threads, needles
In addition to having the desire to learn how to sew a button well and being confident that you are a needlewoman, you need to choose the right materials for the job. Otherwise, the result will be short-lived.
Choosing the right button
Accessories for fastening clothes differ not only in color, size and material from which they are made, but also in shape. Buttons are:
- Flat (with two, three, four holes). Suitable for high-density suit and coat fabrics. To make it convenient to fasten on a coat or jacket, they must be sewn with a leg made of thread. An exception is the sleeve vents on jackets and classic coats, where unbuttoning is not required. The same applies if the fittings are used for decorative purposes.
- With one hole, on the leg. If for flat “brothers” the role of “leg” is played by a stand made of threads, then for convex ones this is not required. Be sure to compare the thickness of the fabric and the height of the stem when selecting buttons. Otherwise, after sewing, they will sag or, conversely, interfere with fastening.
You may be interested in: How to sew curtains with eyelets
What are subbuttons and what are they for?
There is another type of button that has a completely different purpose. We are talking about plastic subbuttons that are sewn from the inside of a coat or fur coat at the same time as the main button. The buttons are smaller in size, with two holes, transparent. They act as additional fastening. Without buttons, you can simply tear out a piece of material if you accidentally get caught in a hollow fur coat or sheepskin coat. And this is a typical situation when traveling in crowded transport.
What threads are best to use?
There are 3 rules here:
- threads for flat buttons are matched to their color;
- for buttons on the leg - to match the color of the fabric;
- The thicker the fabric of the sewn product, the thicker and stronger the thread should be.
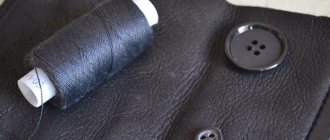
Avoid using cotton threads, otherwise sewing on loose buttons will turn into a hobby. Cotton threads, due to their natural composition, fray easily when wearing clothes. It is better to use more durable and versatile reinforced threads for sewing: they are suitable for almost all types of fabric.
Choosing buttons and threads is a small science
Comfortable needle
And at this point size matters. Everything is very simple:
- for fur coats, coats, sheepskin coats, leather clothes, take a thicker needle with a large eye;
- It is better to sew light fabrics, especially viscose, silk, satin, with thin and, most importantly, sharp needles to avoid snags on the fabric.
Don't forget a thimble to avoid pricking your fingers while sewing.
Fabric preparation
Have you collected everything you need? Now we examine the fabric in the place where the torn button was located. Did it come off “cleanly”, is there no damage to the material? Great. After clearing the area of old threads, you can start working. Did you have a blast? You'll have to tinker a little.
- When working with thin fabric, it is enough to glue the area from the inside out with a special adhesive-based material.
- On a coat, sheepskin coat or fur coat, you need to sew up the tear with a furrier's seam, and, if necessary, strengthen it or make a patch.
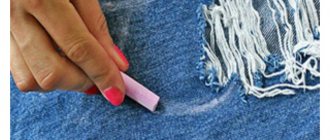
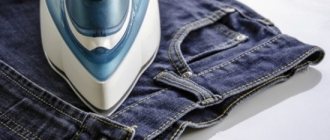
- If jeans are damaged, you need to insert a piece of suitable denim between the layers of the belt and stitch the tear with color-matched threads.
Needle and thread
The “patient” was dealt with. Now let's prepare the tools.
- Cut about 50 cm of thread from the spool. This length will be sufficient for work and will not get tangled or form knots.
- Insert the thread into the game by folding it in half.
- Align the ends of the thread and twist them together.
- Wrap the end of the thread around your index finger and make a knot.
- Leave about 0.5 cm of thread under the knot and cut off the rest.
We can sew!
The course of your actions will differ depending on what and what button you need to sew on. Most often we deal with flat buttons with 2 or 4 holes.