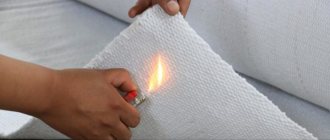
The sewing technology is exactly the same. The difference will depend only on the cut: a scarf - a cap, for example, or just a scarf. The difference in processing will depend on the finishing - if with lace, insertion, piping, then the processing will be more complicated. In this article we will look at a scarf with sewing trim. This makes the job more difficult. If you want to sew a simple headscarf or bandana, you just need to finish all the edges with a closed hem stitch. One of the difficulties in processing a scarf is the sharp corners at the ends of the scarf. They are processed in the same way for all types of scarves, except for scarves processed using an overlocker.
Materials and tools
It doesn't take much time to sew a scarf with an elastic band. Even a novice needlewoman can handle this. To work you need the following tools:
- sewing machine;
- threads of a suitable color;
- basting needles;
- chalk or pencil, ruler for creating a pattern;
- sharp scissors.
It is important to choose the right material for the job. Headscarves are most often sewn from natural fabrics. Batiste, chintz, calico, satin, and linen are materials that are well ventilated, absorb moisture and do not cause allergies. Therefore, children's scarves are often made from them. Viscose, as well as mixed fabrics with the addition of artificial threads, are good because they do not wrinkle, have bright colors, and do not fade for a long time. To create a romantic and elegant look, silk or chiffon is more suitable.
It will be difficult for a novice craftswoman to work with silk and chiffon. These fabrics slip and fray at the edges, so it is better to choose cotton.
Knitwear is also a suitable material for sewing a scarf. This fabric is convenient because it has all the advantages of natural materials, but is elastic and does not wrinkle. It is because of this that it is more difficult to work with knitwear. An unprofessional sewing machine often breaks the thread or skips stitches.
In order for the headdress to be comfortable, not to press or fall off, you need to choose the right elastic band. It is recommended to take a wide one (2-3 cm), but it should stretch well. You can take two strips of regular narrow elastic. The comfort of wearing a headscarf depends on its elasticity. This is especially important for children.
Making bandages
Headbands that cover most of the head are sewn using a similar technology. They are also suitable for men. When designing a product for boys, you can take fabric of a more restrained color and not make too many folds. The item will resemble a bandana, serve as decoration and help not overheat in the sun.
The bandage, which is fixed with an elastic band, can be made in a single layer without sewing the main piece of fabric in half. The drawing will differ from a scarf in the smoothness of the corners, but otherwise the pattern and sewing procedure are similar. The edges can be finished with hem seams, or an open or closed cut. To make the accessory, you will need two pieces of fabric - for the main part and the jumper.
Progress
- Fold the cuts in half along the long side, facing inward.
- Align the cuts, and then machine stitch along them, backing off about a centimeter.
- Press seam allowances.
- Turn out the elements for the bandage and the jumper and go over it with an iron - the seams should be in the center.
- Thread an elastic band into the drawstring and stitch one end.
- Gather the fabric over the elastic and stitch the other end.
- Place folds in short sections so that the width of the product is about 2-3 cm (you can simply gather the fabric).
- Sew the ends of the jumper to the assembled sections of the main part, placing them with their right sides facing each other (you need to make a seam of about 1 cm).
- Turn back the allowances on the product and go through the stitching (you can pre-process them on an overlocker, if you have one
imgbb.ru
If you work on an overlocker, it is advisable to set it to roller mode. An alternative is to hem the edges using a narrow double stitch. Try to find an elastic band that is elastic, durable and not too wide. Then the bandage will stay tightly in the right place, will not come off in your eyes, will protect your hair from gusts of wind, and you from heat stroke.
How to take measurements
In order for the headscarf to be comfortable and fit beautifully, you need to take the measurements correctly. The head circumference is equal to the total length of the product including the elastic band. To determine the size of the main part (kerchief), you need to measure the distance from one ear to the other across the forehead. To the resulting figure, add 3 cm on each side. This is necessary so that the seams are not located on the ears and do not rub.
The difference between the head circumference and the size of the main part will be the length of the elastic. The drawstring needs to be made larger so that it gathers in beautiful folds. To do this, you need to add 4-5 cm to the length of the elastic band. The width of the scarf can be determined without taking measurements. Depending on the model and size, it can be from 20 to 50 cm.
Accessory modeling
After measurements have been taken and all materials have been selected, you need to decide on the choice of model. Scarves with elastic inserts come in two varieties: headbands and scarves. They differ not only in width. The headband is made of two layers of material; it can easily be twisted into a rope and used as a hair accessory. That's why girls often choose this model. The scarf is sewn in one layer. Its purpose is to protect your head from the sun.
The elastic element can be sewn in different ways. Most often, the elastic is sewn into the drawstring and carefully attached to the ends of the scarf. There is no pattern for this accessory as such. You can draw it directly on the fabric. It consists of two rectangles. One wide one is the scarf itself, the other narrower one is the jumper for the elastic band. This is the simplest option that even an inexperienced needlewoman can handle.
The dimensions of the rectangles depend on the measurements taken. For a girl 2-3 years old, the scarf itself is made 20 cm wide, its length will be 25-30 cm. For an adult, the length starts from 35 cm, depending on the volume of the head, and the width can be up to 40-50 cm to cover the entire head . The rectangle for the elastic will be approximately 10 x 14 cm. When cutting, you need to add seam allowances (1-2 cm on each side).
The scarf can be made triangular. To do this, take a square piece of fabric and fold it diagonally. Then you need to measure the required length of the main part, the excess is cut off from the sharp corners, and a drawstring will be sewn in this place.
Let's start cutting
Before cutting, it is advisable to wash the selected fabric at 30 degrees, dry it and iron it. Or just steam thoroughly if you have an iron with a powerful steamer at home. This is done so that after washing the scarf does not decrease in size, since cotton fabrics shrink significantly during wet-heat treatment.
So, from the prepared fabric we cut out a rectangle measuring 45 by 29 cm (for an OG of 53 cm). This will be the main part of the scarf.
Next, cut out a smaller rectangle where the elastic band will later hide.
Sewing stages
Sewing a scarf with an elastic band is very simple, so you can easily make several of these accessories for the summer. Following the step-by-step guide for the first time, in the future you can do everything without instructions:
- First you need to cut the fabric. Two rectangles are cut out, the wide side of which must be placed along the longitudinal line of the fabric. Their size is determined by the measurements taken. Be sure to allow for seam allowances.
- Finish the edges of a large rectangle. You can simply fold the fabric twice. Sometimes a decorative stitch is made or lace is sewn on the front edge.
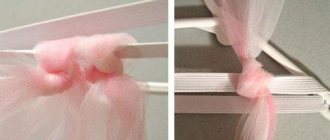
- The second rectangle needs to be folded with the right sides along the long part and stitched. Then turn it out. If the elastic is wide, it is simply inserted. If you use two narrow elastic bands, you first need to stitch the part in the middle. You will get a double drawstring.
- After inserting the elastic, the drawstring must be sewn on both sides. First, you should stitch one side, not forgetting to grab the elastic itself. Then, having gathered the part into folds a little, you need to sew it up on the other side.
- Now you need to make folds on the scarf itself. You can simply gather the fabric onto a thread or make arbitrary folds. To make the headdress look more beautiful, it is advisable to make them the same on both sides, the width of the drawstring. Next you need to stitch the folds, sewing on the elastic at the same time.
- Do the same on the other side. After this, the finished product must be turned out and ironed.
For a scarf, you should take brightly colored fabric
Pattern of parts
All sides of the parts must be processed
An elastic band is inserted into a small rectangle
The scarf parts are ready, now they need to be assembled and sewn
The easiest option
If a child is uncomfortable wearing a scarf with tied edges, and the mother does not have a sewing machine, then there is the easiest method to insert an elastic band into a finished product. Take a store-bought scarf and trim the sharp edges along a straight line. Next you need to attach a wide elastic band connecting both ends together.
To do this, you can simply sew it on by folding the edges of the scarf twice on the wrong side. Or you can hide the elastic in a tube made from cut fabric. The seams are all hidden inside, so it will not be visible that the scarf has been altered by hand.
How to decorate
The right color of a scarf can highlight a woman’s individuality, her elegance and attractiveness. Usually this accessory is an accent, so it is made of bright colored fabrics. The shape of the scarf can also be different. A narrow strip decorates and supports the hair, a wider one covers the head. The headdress may have a sun visor. Such models are more in demand for girls.
Adult headscarves are usually made without decorative elements; they themselves are a decoration due to their unusual shape and high-quality materials. It is usually recommended to color match them with other accessories or shoes. For children, it is appropriate to additionally decorate the headdress. If the scarf is sewn from a plain fabric, the decor can be bright. Rhinestones, beads, sequins, embroidery are suitable. Three-dimensional decorations are popular – felt appliqués, knitted flowers. A colored headscarf can be decorated with plain lace or braid.
A headscarf with an elastic band is a comfortable and stylish headdress for girls. But recently this accessory has become fashionable among women. With its help you can create a unique image. Moreover, sewing such a scarf is very simple, even a beginner can do it.
Decorating a scarf
There are different options for decorating the finished product. You can make a bow from the same material or add a flower by attaching a large bead, pebble or bright button to the center. The applique looks beautiful. Basically, these are three-dimensional flowers with petals, ready-made pictures of cartoon characters or famous fairy tales.
The original decoration is openwork lace around the seams. They can be purchased at sewing supply stores or crocheted from thin cotton threads yourself. The piping can be a gathered ribbon or a strip of contrasting fabric sewn to the product along the contour of the head, that is, along the hypotenuse of the scarf triangle.
Decorating the finished product is a manifestation of the craftswoman’s imagination. The choice of decorative elements also depends on the age of the future owner of the headdress. Why not consult with your child? Girls are wonderful dreamers and inventors. Their advice may turn out to be quite original, and after the idea is implemented, the child will be very happy to wear such a thing.