How to decorate ugg boots with rhinestones with your own hands? Shoe decoration
Individuality always adorns a girl.
How to decorate ugg boots with rhinestones with your own hands so that your legs are warm and look unique? Fashionistas and needlewomen want to know about this. Without the desire to be irresistible, it is difficult to force yourself to pick up glue, stones, beads, or a needle. And without the skill to work with your hands, you won’t get a beautiful pattern. There are several options for winter shoes made from sheep's wool.
A small variety of colors, some varieties of models, there are some that are decorated with shiny stones and sequins. But some girls want to see such “shoes” on their legs that no one else has.
How to avoid the visual effect of “short legs”?
The wide top of sheepskin boots visually “cuts” the silhouette, so the legs of a girl wearing UGG boots appear shorter. To avoid an undesirable visual effect, stylists recommend wearing UGG boots with leggings or thick tights that match the color of the boots. In this case, the “dividing line” of the leg will be less noticeable.
In addition, to make your legs appear longer, you should choose boots in which rhinestones are arranged in vertical rows. It would also be useful to emphasize the waist with a wide belt; this technique visually lengthens the legs, but it is not suitable for girls with an oval or rectangular body type.
Decoration
How to decorate ugg boots with rhinestones with your own hands? If you don’t know where the needles and threads are in your apartment and don’t know how to sew on buttons, there’s no point in reading about it. Buy a ready-made model and be happy. Don't want to buy standard shoes? Then find a skilled needlewoman who is not afraid to prick herself and pay her generously for her work.
For those who have golden hands, we will look at several options for decorating warm sheepskin shoes with your own hands. You can glue rhinestones, beads, and pearls using a special frost-resistant glue, which becomes transparent after use and becomes invisible on felt boots and ugg boots.
Diversity can be added with embroidery, satin ribbons, sequins with holes in the middle.
To get started, you should prepare, you will need:
- regular ugg boots or felt boots in a color pleasing to your eyes;
- rhinestones, pearls, sequins, metal rivets, spikes, stones of different sizes and shapes with one flat side;
- a piece of soap;
- thin brush for painting;
- ruler, triangle, compass, prepared set with tools, scissors, set of pencils and colored pencils, eraser;
- a large sheet of sketch paper;
- special glue for leather, frost-resistant, becomes invisible after drying;
- stencil of your own design;
- self-adhesive ready-made pattern of pebbles;
- sticky masking tape;
- a set of oil paints;
- multi-colored satin ribbons;
- floss threads;
- lace.
A little history and features
Australia is considered the birthplace of such boots, but there is a version that the ancestor of shoes was New Zealand. Initially, such boots were the favorite footwear of farmers and hunters.
Uggs are shoes whose main advantage is comfort.
At the beginning of the twentieth century, during the First World War, pilots fell in love with ugg boots. Light and warm boots kept my feet warm on cold planes. A little later, in the mid-60s, ugg boots in the cold season appealed to the original and free hippies. It was the naturalness of the materials, the extraordinary style solution and the incredible comfort of the boots that attracted the attention of cheerful rebels.
Ugg boots for hippie style followers
Translated, “uggs” sounds like “ugly.” One of the fashion magazines named it the ugliest shoe of the century. But despite this, UGG boots are considered the most comfortable and stylish shoes.
Ugg boots are distant relatives of felt boots
But already in the late 80s, ugg boots became a real trend in the USA. Since then, the popularity of boots has not subsided, and thanks to interesting design solutions and decor, each new season gives the whole world Ugg boots in an updated version.
Ugg boots are a classic that will never go out of fashion completely.
Several rules remain unchanged:
- Classic Ugg boots are made of suede.
- The inner lining is made of sheep wool.
- The sole is usually flat and low.
Ugg boots are warmth, comfort and convenience.
There are several companies in the world that produce such boots, but the most famous brand is UGG; they were the first to produce ugg boots as fashionable and stylish shoes.
Modern tendencies
The fashion industry does not stand still. Therefore, there are a great many variations of the original boots. The upper is not always suede, it can be warm, slightly rough, knitted fabric, imitation suede or leather, natural materials and much more.
Modern ugg boots with knitted decor
Ugg boots made using the pouring method have earned particular popularity among fashionistas. The peculiarity of such models lies in their manufacturing technology.
Tall black ugg boots made using the pouring method
The material is treated with a special compound, which allows you to achieve maximum moisture protection and wear ugg boots even in rainy weather. The color scheme of such shoes was initially presented in only a few variations (brown, black and sand).
Sand-colored ugg boots
Later, designers offered fashionistas blue, pink, white and even red UGG boots. Maximum attention is also paid to the decor.
The boots are decorated with embroidery, metal rivets, contrasting borders, ethnic patterns, and embroidered with beads and beads.
Today, by showing your imagination, you can create such original boots with your own hands, without spending a lot of effort or money.
Creative process
Before applying a drawing to a real product, you should make a sketch on paper, this will allow you to carefully consider all the details. On a scale of 1:1, draw an unfolded shoe pattern and draw a picture on it in all the details and shades to imagine what it will look like. If you don't like something in the sketch, you can easily correct it by using a regular pencil eraser.
Apply wide masking tape to those places that will not be decorated, the label and the edges of the heel, so that they are not accidentally stained with glue and paint during further work.
On the remaining open area, draw the pattern that you decided to depict on the soft shoes after you have finally thought through the sketch. The design is applied with the sharp edge of a soap remnant. It will be visible while you work and can be easily wiped off after finishing the process with a clean dry rag.
All work must be carried out at room temperature. You can apply the first layer of glue to the backdrop, which will only strengthen the working area so that the rhinestones and sparkles stick better. The bottom layer of glue will dry faster if you use a hairdryer. But, if you are not in a hurry, it is better to dry the glue in the open air.
Good to remember
To decorate your soft, felted boots, self-adhesive blanks with a precise pattern are sold. Part of your individual decor can be made from such a detail. From several small pieces of ready-made stickers, craftswomen create their own pattern, adding a couple of curls, petals, leaves to it with oil paints and a thin brush.
There are a wide variety of options for decorating shoes. You can simply scatter pebbles on your felt boots, as if raindrops had frozen in flight. You can weave embroidery floss into a pattern of rhinestones. A strong gypsy needle will be useful for this.
For example, flowers made from floss, decorated with cores of pebbles, look elegant and rich. Sequins, with a fool in the middle, can be strengthened with a knot of thread; such a detail looks wonderful and holds more firmly. Smaller ones look good around a large oval. If you alternate details of different colors and transparency, you get an amazing decor.
The border of the pattern along the top and bottom of the boot is sometimes decorated with a narrow strip of ready-made lace, harmoniously matched in color and mood.
Those who are not afraid to hit their fingers and know how to embroider from satin ribbons can add elements of these decorations to the pattern of shimmering stones. A large flower made of satin ribbon can be surrounded by sparkling stones and fit into the design in the most incredible way. For example, transparent pebbles can depict dew drops on rose petals. In this case, no one limits your imagination.
Text of the book “We decorate shoes ourselves: felt boots, boots, ugg boots, shoes, slippers”
Embroidery options for felt boots, ugg boots, slippers
Embroidery on shoes allows you to realize almost any of the decorating master's ideas.
The undoubted advantage of embroidery is that when it comes into contact with water (and this happens with outdoor shoes), the pattern will not try to spread, will not crack or be erased over time, as can happen with a pattern applied using textile paints. To embroider on felt boots, it is better to take blanks that have not yet gone through the final stage of processing, that is, embroider on loose felt caps. In this case, the material is better pierced by a needle, does not injure the embroidery thread and bends more easily. Ready-made factory felt boots can also be embroidered, but this will require a little more effort. It is better to choose plain slippers for embroidery, on the surface of which the pattern will not be lost. Faux suede Ugg boots are ideal shoes for embroidery as the needle will easily pass between the top decorative layer and the lining.
Felting is a technique for working with natural wool using special needles and a felting brush, thanks to which you can felt voluminous products (toys, jewelry) from wool, as well as decorate finished products with patterns made from natural wool.
To embroider on both black and light shoes, you need to use bright and contrasting threads, which will give an expressive effect, then the pattern will stand out noticeably and not get lost against the general background.
So, let's start decorating the first pair of shoes.
Light felt boots with embroidery with metallic thread.
This model of felt boots is suitable in style for adults, but at the same time a child can make such a pattern.
The design on the felt boots is simple, but thanks to the use of shiny metallic silver thread, medium and large blue beads with a silver tint and a blue-silver painted border ribbon, it looks great and elegant. Since the pattern is located high on the top of the boots, they can be equipped with transparent or white silicone galoshes and go for a walk in the snow and slush. The pattern does not take up much space; you can use both high felt boots and boots below the knee for decoration.
You will need
Felt boots made of light wool with removable silicone galoshes, silver metallic threads, a package of medium-sized blue beads with a silver tint, six sew-on blue rhinestones, a sew-on border with a blue-silver pattern, thin fishing line, colorless varnish or special wax, lead pencil, ruler , scissors, thimble, regular needle, embroidery needle with a very wide eye.
Progress
1. It is better for this work to choose felt boots of light cream or gray color, felted by hand. They are very comfortable and better adapt to the shape of the owner’s foot, unlike factory felt boots.
2. The initial stage will be marking the place where the colored border will be sewn and drawing the main pattern using a slate pencil or dark tailor's chalk.
3. Using a ruler, you need to step back a few millimeters from the edge of the felt boot, and then draw a line that will mark the upper border for sewing the border along it.
4. Then a border is applied to the finished line, and the lower border of its location is outlined with a pencil.
5. From the bottom border on the outer side of the felt boot (i.e., on the one that does not come into contact with another felt boot), you need to step back a couple of millimeters and put a point from which the twig-drawing will go. On the second felt boot, similar actions are performed.
6. The design is very simple - a branch with several curls. You need to try to ensure that the patterns on both felt boots match. By the way, you don’t need to make a branch that is too big or too small. The main thing is that the distance between the individual curls allows you to sew beads next to them.
7. After both designs have been drawn on the felt boots, you can begin embroidery. To work, you need to take a needle with a wide eye and a metallized thread. The wider the eye of the needle, the less chance of damaging the thread itself during work, and the less chance of fraying it. The length of the thread should be no more than 30–40 cm, otherwise at the end of the embroidery it may fray and lose its shine.
8. By the way, before threading the thread, you can treat its ends with colorless varnish or special wax, which will prevent them from unwinding. The thickness of metallized threads varies from manufacturer to manufacturer, so you can use two or three threads folded together to create a vibrant design.
9. You need to fasten the thread at the point from which the curls come, and not with a traditional knot, but with a loop. To make a loop, you need to insert both ends of the thread into the eye, leave the loop free, then move the needle down from the outside so that a small loop remains on the outside. Then, after a certain distance, which is equal to the length of the stitch, bring the needle out so as to grab the remaining loop and tighten it. The result is the first loop of the “chain” stitch (chain stitch), which will be used to embroider the composition.
10. From the first loop you need to continue stitching the “stem” seam. You need to try to make them the same size. It doesn’t matter which curl to make the main one in order to lead from it to other curls of the pattern. The main thing is that the principle of their location is identical on both felt boots, and the direction of the stitches is from top to bottom.
11. Working with metallic embroidery threads is somewhat more difficult than working with regular cotton or wool floss. If you have no experience in such work, and the craftswoman doubts that she can make neat embroidery only with metallic threads, you can try to combine the threads with floss of a suitable color (light gray, for example). The needle must be threaded into the felt carefully. While maintaining an even tension on the thread, you must ensure that it does not get tangled.
12. The thread must be secured in the traditional way from the inside. If you need to move from one part of the design to embroidering another, you can fasten the knot, but do not cut the thread, but simply draw it from the inside to the beginning of the desired element.
13. After the embroidery has been completed, you need to put the embroidery needle aside and pick up a regular one. At this stage, using a regular sharp needle and thin fishing line, you need to sew medium-sized blue beads along the contour of the embroidered curls.
14. The fishing line needs to be secured on the inside of the felt, and then brought out together with the needle to where the first bead will be located. The beads are not sewn one after another, but at small intervals, so after the first bead has been secured, you need to move the needle inside the felt and bring it out at the place where the second bead will be located. And so on until the entire embroidered design is accompanied by a beaded thread trim. The upper parts of the curls are decorated with beads on both sides, but further from the base the beads need to be sewn only on one side of the branches - the outer one.
15. When medium-sized beads have been sewn on both felt boots from a pair, it is necessary to sew one large blue rhinestone to be sewn on the ends of the patterns. Rhinestones can have any shape, the main thing is that it matches the design of the main pattern.
16. When large rhinestones have been sewn on, you need to begin one of the most difficult decorative operations - sewing a multi-colored border onto the tops of felt boots (the operation is simplified if you have a sewing machine that can sew material of such thickness). By the way, before purchasing canvas, it is best to calculate the required length. To do this, you need to measure the circumference of the boot boot, multiply the resulting number by two and add a couple of centimeters to this for allowances.
17. If you decide to sew the border manually, then use a sharp needle, thin fishing line or a strong synthetic thread that matches the color. Using a simple line stitch, the border is sewn to the felt boot along the upper and lower border. It is necessary to ensure that the border lies flat and is enough to cover the entire circumference of the felt boot.
18. In addition to threads, other methods can be used to attach the border to the felt. For example, glue it to adhesive backing paper, which is sold in sewing stores. To do this, a narrow ribbon is cut out of paper, equal in length and width to the border. The adhesive paper is attached to the border, and the border is attached to the place on the felt that is drawn with a pencil, after which the border on the felt is ironed with a hot iron for 1-2 minutes in the “Wool” mode. It is better to put thick fabric between the iron and the border so that the canvas is not damaged by the temperature, so the border will be securely attached to the felt without the use of threads or fishing line. This operation must be repeated on the second felt boot.
19. By the way, the indicated colors of beads, rhinestones and borders can be chosen depending on the personal taste of the craftswoman. As a rule, first you buy a beautiful colored border, and then you buy beads and rhinestones for it, which, due to the huge assortment, are much easier to choose.
20. So, the felt boots for going outside are ready. If blanks for felt boots - caps - were used for finishing, then they need to be washed for final shrinkage and taking the desired shape. After washing, the felt must be dried away from heating devices, otherwise the felt boots may become deformed.
Felt boots have a significant difference from all other shoes. The new models do not have left and right felt boots, as well as size. The wearable shape is only adopted during wearing. The size of felt boots is determined in centimeters, and when purchasing, you need to measure the length of your own foot and add 2 cm to it “for shrinkage.”
If there are pencil marks on the felt boots that are difficult to remove with a cloth, the felt boots also need to be washed by hand at a temperature of about 40 °C without bleaching agents. When going outside, you should wear galoshes over your felt boots (Fig. 18).
Figure 18. Light felt boots with metallic thread embroidery
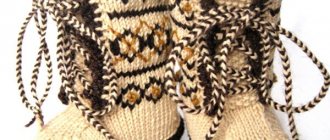
Gray ugg boots with two-color “Tangerine Branch” cross stitch embroidery
This pair of gray ugg boots is decorated with two-color simple cross stitch embroidery. The embroidery is very simple, consists of a certain number of repeats and requires the purchase of two skeins of cotton or wool floss in green and tangerine colors. Of course, if the skill and imagination of the needlewoman allows, then you can diversify the embroidery in any available way, for example, add volume to the embroidery pattern by using threads of lighter and darker shades (they can make a shadow on the leaves and gloss on the sides of tangerines).
You will need
Ugg boots, patch canvas, two skeins of cotton or wool non-fading floss in bright green, dark green, bright orange and pale orange, contrasting synthetic threads, a spray bottle of water, tailor's chalk, a ruler, scissors, a thimble, a regular needle with a sharp end, embroidery needle.
Progress
1. Before starting to embroider this pattern, you should check the purchased threads for resistance to moisture; to do this, you need to dip a piece of floss in hot water and hold it in it for several minutes. Then remove the thread and wring it out, wrapping it in a light piece of fabric. If a cloud of paint does not appear around it, and there are no traces left on the fabric, you can embroider with such threads without fear that the dye will simply flow under the influence of moisture on the street, thereby ruining the embroidery.
2. After checking, you need to start marking the tops on which the embroidery will be located. Take a ruler and light tailor's chalk, measure the required distance from the edge of the boot and draw the upper border of the embroidery. Then you need to step back a certain distance from the border and draw a second straight line along which the lower part of the canvas will be sewn.
3. When both boots are marked, it is necessary to prepare a canvas of such length that it can wrap around the bootleg, and such width that it protrudes beyond the edge of the embroidered pattern by about one centimeter.
4. When two long strips of canvas have been prepared, you should use a sharp needle and synthetic contrasting threads to sew on the canvas, focusing on the two drawn lines; it is best to do this with a simple basting stitch at a short distance so that the canvas fits tightly on the felt and does not move when embroidering .
5. After the outline has been sewn, you can begin to embroider. As already mentioned, the pattern goes along the circle of the boot (inexperienced craftswomen can be advised to embroider only the outer side of the felt boot). The pattern is repeated in certain repeats, and you need to make sure that when closing the pattern there is no overlap. It is enough to count the number of cells in the repeat and the number of cells in the canvas applied to the felt. If the number does not match, it’s okay, you can leave a small gap of felt empty and do not embroider on it.
6. If there are beautiful appliqués or large rhinestones, then the gap can be left on the outside of the felt boot and a decorative element can be sewn onto it. If there is nothing to decorate the gap in the embroidery with, then it is better to leave it on the inside of the boot, where it will not be conspicuous. If qualifications allow, then the internal rapports can be extended by several cells, thereby completing the pattern.
7. So, using a needle with a large eye and several threads from a bright green skein (it’s better to take three threads) about 50 cm long, you can start cross stitching using the counted method on a canvas sewn to the felt.
8. You need to look carefully at the existing drawing diagram (Fig. 19), transferring it with a cross onto the canvas. The diagram is simple and consistent, so you can simply move along the picture, first transferring green branches with leaves.
Figure 19. Embroidery pattern “Tangerine branch”
9. A simple cross, as already mentioned, can be applied in several ways: first, fill a certain area of the pattern with half-crosses, and then walk along them in the opposite direction, completing the crosses, or you can immediately place a full cross.
10. To get the necessary shadows, you need to leave some cells in the form of a half-cross. Then you can take a darker green thread and finish this cross on top of the light thread, getting a three-dimensional pattern.
11. When the thread runs out, it must be securely fastened from the inside, not sparing the length, since it will be very difficult to thread it if the knot eventually unravels.
12. When the green ornament is ready on the first of the boots, it is necessary to carry out a similar operation with the second boot, without forgetting about the changes in the design of the first that were made (by increasing the length of the repeat, for example).
13. After the green part of the design has been completed, you can begin decorating the tangerines using a bright orange thread. For them, you also take three threads from a skein 40–50 cm long.
14. The pattern repeats with a high frequency, so there is no point in cutting the thread after one element has been completed, it is better to simply transfer the thread to the next part of the pattern.
15. In order to get highlights on tangerines, you can leave the same half-crosses as on the leaves, then stitch them with a lighter thread. Thus, you need to embroider both felt boots.
16. After finishing the embroidery, all that remains is to remove the canvas. You can use a spray bottle of water or a wet sponge. The canvas along with the embroidery is moistened, and the starch is removed from the material. The fabric becomes softer and more pliable (by the way, it is better to pull out the threads that are sewn along the edges of the canvas in advance before they get wet).
17. Then you need to carefully pull out the canvas from under the embroidered design using scissors and fingers. The main thing is not to pull the thread too much so that the embroidery does not become deformed and the knots do not unravel.
18. After the embroidery has dried, the ugg boots can be put on and go for a walk (Fig. 20).
Figure 20. Gray ugg boots with two-color cross stitch “Tangerine Branch”
Black felt boots with floral satin stitch embroidery
For those who like contrasting colors, you can suggest decorating black high felt boots using thick woolen threads or melange threads in several folds. This pair is made using satin stitches: a “stalk” simple satin stitch and a “buttonhole” stitch.
The design is not at all complex, but very elegant and eye-catching.
You will need
Black felt boots with removable silicone galoshes, two types of contrasting threads, white embroidery threads, a piece of white tailor's chalk, a ruler, scissors, a thimble, an awl, a darning needle, an embroidery needle with a wide eye.
Progress
1. You need to take tailor’s chalk, a ruler and
draw the tops of felt boots along the axes, as described earlier. The result should be 16 approximately equal squares.
2. Thanks to the presence of a coordinate grid on the felt boots, the design will be very easy to transfer from one felt boot to another. The main thing is to make the patterns as symmetrical as possible relative to the boot and sole.
3. When the design (three opened and two unopened flowers, stems and leaves) is drawn on both felt boots, you can start embroidering.
4. For it, you can take melange floss threads, or you can use bright woolen ones for knitting, which are strong enough to withstand embroidery through thick felt.
5. One felt boot is put aside, and the second goes to work. For embroidery you need a bright green thread (you can take, for example, a light and bright mint-colored thread) floss or strong knitting wool thread.
6. Since embroidery begins with thin stems, you need to take a thread thinner than for the rest of the pattern (if floss is used, 3 threads from a skein will be enough, if a woolen thread, you can divide it into two parts and embroider with one of them) and a regular one embroidery needle. The length of the thread can be 30–50 cm.
7. Using a “stem” seam, you need to embroider four stems diverging upward. A “stalk” stitch is a slanted stitch that partially overlaps each other. The thread must be securely fastened to the inside of the felt boot, then brought to the top and begin to embroider, and after finishing the embroidery, fasten it from the inside.
8. When the thin stems have been completely embroidered on both felt boots, you can put the thin thread aside. All further elements of the patterns must be embroidered either with a whole skein (6 threads of floss) or with a single woolen thread. To contrast with the black felt and mint color of the foliage, you can use a light and bright lilac color to decorate the flowers, which will harmonize perfectly with the shade of the foliage.
9. If embroidery is done with woolen thread, if the felt is thick and dense, the thread may not pass through it. You can use an awl for preliminary punctures. Naturally, the diameter of the awl tip should be slightly larger than the needle.
10. After the stems have been embroidered, you need to embroider three large open flowers, they will become the fulcrum for the arrangement of the leaves. So, embroidery needs to be done using a “stitched loop” stitch; it is very similar in design to the “chain” stitch (chain stitch). Separate seam stitches are often used to embroider individual parts of a pattern. In this case, the flower petals and leaves located around them are made up of single stitch loops.
It takes three days to make a pair of felt boots. Sheep wool is cleaned of impurities and broken down until soft and fluffy. Then they are dumped into sheets in special drums and wrapped in a cone. Felt boots are soaked in boiling water and sulfuric acid, beaten and dried. The block is removed and ground, after which it takes the desired shape. This is followed by final dyeing and washing. The felt boots are ready!
11. Embroidery should begin from the circle that marks the center of the flower - its core; for this, the thread is secured from the inside and brought to the point where the first petal will come from. Then, from left to right, a large loop is formed with thread, at this moment the needle goes under the felt and comes out to the surface at a distance of 2–2.5 cm from the original point. The loop is hooked with a needle, the thread is stretched, and the needle goes to the wrong side of the felt; on the surface, a small stitch remains to hold the top point of the loop.
12. The center of each of the three open colors is sewn in this way. There may be 11–12 petals extending from each center. The cores themselves should be embroidered in simple satin stitch using white floss threads after the petals have fallen into place.
13. When the flowers on the second felt boot are finished, you can start decorating the leaves. You need to take a thick green thread (mint in this version) and use a “lock-and-loop” stitch to place 12–15 leaves of different sizes on the stems and around the flowers.
14. Then, taking three threads from the skein, embroider buds of unopened flowers. Using a thin lilac thread (also separating three threads from the skein), sew five small petals onto the buds using a “tucked loop” stitch.
15. A similar procedure must be done with the second felt boot. After the embroidery is ready, all that remains is to wipe off traces of tailor's chalk with a damp cloth. If this is difficult to do, you can wash the felt boots by hand in warm water without bleach. It is better to dry felt products away from heating devices, otherwise they may become deformed and shrink several sizes. You can’t wear felt boots without galoshes outside, otherwise the felt will get wet; it’s better to stock up on these silicone products and feel free to walk even in slushy weather (Fig. 21).
Figure 21. Black felt boots with floral satin embroidery
Don't rush outside!
To prevent the glued parts from falling off faster than expected, do not rush to wear decorated shoes outside immediately after finishing the work. Wait for the glue to dry completely, a day, preferably two. After complete drying, remove the masking tape from the shoes, from the parts that were still covered.
How to decorate ugg boots with rhinestones with your own hands is easy for skilled craftswomen to understand after reading our article. Today, haberdashery boutiques sell sets of beads, sparkling stones, beads of various shapes and colors, ribbons, satin, silver, and gold. There are strips collected in a row of sparkles, pieces of decor from which exquisite patterns are laid out. You should not stick identical rhinestones in a continuous sheet. It looks a little heavy and clumsy.
When wearing patterned UGG boots and felt boots, do not decorate the rest of your clothes with sparkles to look stylish and tasteful. Jewelry loves splendid isolation. Perhaps, on the mittens and scarf, do similar embroidery, but matte, without shimmer. A large rose in the same style or a different pattern will make the image complete, fresh, and unique.
How to sew homemade ugg boots?
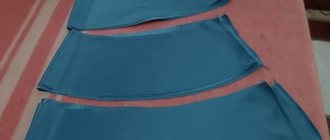
To sew boots with your own hands for home, you will need:
- pattern;
- material for the top (faux or natural fur);
- tools for sewing.
A simple pattern for sewing ugg boots.
The work is done as follows:
- Individual measurements are taken, according to which the pattern is adjusted.
- Parts are cut out of the material in pairs (shaft, sole, upper).
- The parts are sewn together in pairs with the right side inward.
- Turn it inside out and the boots are ready.
If these are homemade UGG boots, then you can use oilcloth, leather or other dense material as the sole.
To make the boots look exclusive, you can add original decor.
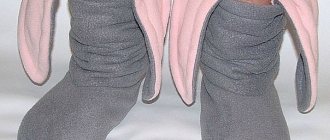
Soft pink ugg boots with rhinestones
Fashion trends
Soft ugg boots, embroidered with rhinestones, look solemn, elegant and impressive. Many manufacturers make ugg boots using bright and shiny decorations.
Sheepskin boots come in a huge variety. Designers do not limit the flight of their imagination, satisfying the wishes of the fair sex. Using rhinestones and beads, they create real works of art.
Today, models decorated with patterns of geometric shapes are in trend. Ethnic ornaments look beautiful. Many girls prefer uggs with animal designs made from bright crystals. Fantasy flowers look fashionable and impressive.
Women's ugg boots today are represented by a wide range of models. Designers create stunning designs using a variety of rhinestones. Manufacturers create not only winter options, but also shoes for the spring-autumn period.
Over the past two seasons, short models embroidered with rhinestones have become extremely popular. They look beautiful and fashionable. They are purchased by young people and older women. The short model can be combined with different wardrobe elements. Short-length UGGs have an insulated heel and a durable sole with a textured pattern that prevents slipping.
This season, designers are offering beautiful models with decorations in the form of rivets or metal figures, since this material is at the peak of popularity today. Ugg boots embroidered with Swarovski stones look very bright and impressive.
For harsh winters, tall Ugg boots are a great choice as they provide better warmth. Such models often have decoration on the tops. To show others the beauty of high-top UGG boots, you should wear tight-fitting skirts or trousers.
Modern UGG models are made from different materials - suede, leather or other durable and warm fabrics. The only thing that remains unchanged is the warm and durable sole.
Girls choose Ugg boots with fur and rhinestones for cold weather. Fur is often used not only as insulation, but also as a decoration for shoes. Fur pompoms or cuffs look romantic and feminine.
Exclusive models are made to order by famous designers. If the buyer wishes, craftsmen use real precious stones to decorate the uggs. Such shoes will be very expensive, but famous personalities can afford it.
Materials
Modern UGG models are made from different materials - suede, leather or other durable and warm fabrics. The only thing that remains unchanged is the warm and durable sole.
Girls choose Ugg boots with fur and rhinestones for cold weather. Fur is often used not only as insulation, but also as a decoration for shoes. Fur pompoms or cuffs look romantic and feminine.
Exclusive models are made to order by famous designers. If the buyer wishes, craftsmen use real precious stones to decorate the uggs. Such shoes will be very expensive, but famous personalities can afford it.
Color solutions
Today, designers often offer unique models of Ugg boots with rhinestones, using a variety of colors and shades.
The classic color scheme is black. Black Ugg boots are often the choice of modern fashionistas, as they are ideal for implementing an everyday look or creating a sophisticated evening look.
For every day, it is better to choose a model with a minimal amount of decor. For example, rhinestones can decorate only the lapel of boots or be used to create a small print on the top.
But the festive look requires brightness and unusualness. The best solution would be black ugg boots, which are completely embroidered with rhinestones.
Many fashionistas prefer snow-white UGG boots. The rhinestones sparkle very beautifully on a white background. You can safely go to a festive event in these shoes. This color scheme is impractical for every day; it is better to buy UGG boots in a beige shade with small decorations.
Multi-colored ugg boots with rhinestones look very beautiful and impressive. In such shoes you can cheer up not only yourself, but also those around you. This color scheme is chosen by bold, bright personalities who want to surprise others and always be the center of attention. These shoes look harmonious with casual clothing.
Pink Uggs will create a romantic, sweet look. Patterns made of rhinestones several shades darker than the color of the fabric look interesting. It could be several hearts or a cute kitten, which will add tenderness and uniqueness to the image.
Brown UGG boots are in great demand among modern fashionistas due to the practicality of this color. Ethnic patterns made from dark brown or white stones look beautiful.
Blue models with rhinestones add even more femininity and coquetry to the look. White or blue stones look beautiful on them. Rhinestones can decorate the entire shoe or be used to decorate the top.
Variety of options
How to choose the right women's ugg boots with rhinestones? At the first stage, you should study your wardrobe and decide what you will wear with the new model. This will help determine the choice of model and color of boots.
Style
First you need to decide on the style of boots.
There are three boot options:
- high – to knee level;
- medium - to mid-calf;
- shortened, barely covering the ankle.
When choosing an option, be guided not only by your own taste, but also by the shape of your legs.
Fashionistas with full calves are more suited to tall varieties of boots, but girls with skinny legs are better off purchasing short Ugg boots with rhinestones. In long boots, a thin leg will look like a “pencil in a glass.”