Learn how to sew warm ugg boots for babies up to one year old with your own hands
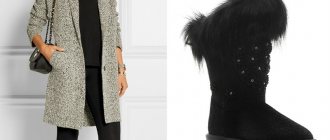
Ugg boots are warm and comfortable boots made of sheep fur with low soles, which are perfect for everyday wear. Australia is considered their homeland. UGG boots are unique in that, due to their structure, they maintain a constant body temperature when worn. These are one of the few boots that can be worn without socks, even in cold weather. Initially, these were shoes for farmers and livestock breeders living in extreme cold conditions. But, at the end of the 20th century, Uggs became a popular fashion trend in America, and were worn by many celebrities in the film industry. These boots have gained popularity not only among adults; many parents are happy to dress their children in such boots in winter. They are soft, comfortable, warm and easy to clean. There are several criteria by which you need to choose children's ugg boots:
- choose the original, the officially registered UGG brand belongs to the American company Deckers Outdoor Corporation. Original shoes are always a guarantee of quality;
- attention to details. All seams must be carefully stitched and taped. Otherwise, the boots may get wet and quickly tear;
- natural materials. Sheepskin and leather must be real;
- The original sole has a grooved surface. These boots will not slip on ice;
- documentation. Pay attention to the accompanying documents: warranty card, quality certificate.
But original ugg boots cost a lot of money, and for small children whose legs grow very quickly, such a purchase is not always advisable. Today we invite you to try to create ugg boots with your own hands.
Little children will be very comfortable and warm in the boots you sew. It's not difficult, you just have to follow the instructions carefully.
To create boots we will need:
- a piece of sheepskin (fabric from an old sheepskin coat is perfect);
- pattern;
- soap or disappearing marker;
- sharp scissors;
- awl;
- sewing machine;
- fasteners;
- duct tape;
- felt;
- glue gun;
- threads and yarn.
The most crucial moment is coming. We begin to sew the parts of the boot starting from point A.
The black dotted line in the figures marks the place of stitching.
You can sew with decorative stitches that will be visible. To do this you will need an awl and a wide matching thread. With an awl you need to make holes in the material through which it will be easier for the needle to pass. You need to be very careful when making holes in the fabric. so that the distance between the stitches is approximately the same. If you want the stitches to be hidden, it is better to use a sewing machine. But, for this you need to have experience working with such fabrics.
We decorate the boot clasp. It is best to make it with Velcro, this will make it much more convenient to put UGG boots on a child. Velcro can be sewn or glued.
Children's ugg boots are ready. Now your feet will be warm.
UGG boots for kids
As soon as the cold weather sets in, parents' heads are filled with thoughts about what shoes to choose for their children. Children's winter shoes should be durable and warm, made from natural materials. The baby should be comfortable and comfortable to run in it. Recently, fashionable UGG boots have flooded store shelves.
Ugg boots are small boots or ankle boots with sheepskin and rubber soles. Thanks to their softness and ability to retain heat for a long time, Uggs have become popular children's shoes in the winter.
Uggs for babies have a number of advantages compared to other children's shoes:
- The natural fur from which UGG boots for babies are made retains heat perfectly.
Children's uggs absorb moisture perfectly, but at the same time, their feet “breathe”. Even a child up to one year old will not freeze in such shoes, even if he is walking in a stroller and does not move. The feet of an active baby who does not sit still for a second will not sweat or freeze, even if you wear a thin sock. - Sheepskin undergoes special treatment and perfectly repels moisture. Children's feet will not get wet if the child runs in the snow.
- The grooved and lightweight sole of children's ugg boots has excellent grip on the surface, so your child will not slip on slippery ice.
- The reinforced heel holds the little leg in the correct position and prevents it from twisting.
- Children's uggs have a wide toe, so the child's feet are not constrained and blood circulation is not impaired.
Parents want the best for their child. And shoes are no exception. How to choose the right ugg boots in which your baby will be warm and comfortable, how not to make a mistake and distinguish a fake? When choosing children's ugg boots you should pay attention to:
- Natural fur. Real UGG boots are made from natural fur - sheepskin. This is dense, fluffy fur. The natural color of sheepskin is cream. Faux fur is faded in color or has an unnatural shine. It crumbles if you pull the lint.
- Neat seams. There should be no protruding threads or protruding edges.
- Thick soft sole. The sole of the UGG for babies should be fully flexible, despite the fact that its thickness should be about 13 mm. Low-quality children's ugg boots have a thin sole (5 - 6 mm), rigid and does not bend.
- High-quality ugg boots for kids should have a smooth transition from heel to sole. On a fake you will see a clear transition line.
- The pattern on the sole of children's Ugg boots resembles a herringbone. Fake models have a smooth logo in the center of the sole.
- UGG insoles for babies are made of fur or thick fleece.
Manufacturers of children's Ugg boots have taken care of children of different ages. Ugg booties with fur for newborns are on sale. This line of children's ugg boots is designed specifically for children under one year old. They are soft, easy to put on, and do not squeeze the baby’s tiny leg anywhere.
For cool weather, you can buy knitted booties for your baby. Knitted ugg boots for newborns should be made of natural material - cotton or wool. In such shoes, your baby will look irresistible, but at the same time, his feet will remain warm for a very long time.
Manufacturers have taken care of various models and colors of ugg boots for kids. You can buy UGG boots for girls, boys or a classic model. Children's ugg boots can be high or low.
Ugg boots began to be produced in Australia. Therefore, ugg boots for babies developed by UGG Australia are considered to be of the highest quality; they are produced in compliance with all the traditions of making such shoes.
Ugg boots will be excellent shoes for newborn babies lying in a stroller, and for older children who prefer active games and do not sit still. Uggs for babies are light and warm. The baby will feel comfortable and comfortable in them.
Source: https://wlooks.ru/sapogi/uggi-dlya-malyshej/
Let's try to create stylish ugg boots for kids, knitted with knitting needles
Boots knitted with knitting needles are also an excellent shoe option for kids. Knitting will not take you much time.
The size of knitted ugg boots depends on the age of the baby and the length of the foot. To create these boots you will need:
- yarn (it is advisable to take pure wool, the color depends on your desire and imagination);
- stocking needles No. 2;
- crochet hook No. 2.5.
Ugg boots are knitted gradually from several separate parts, and then sewn together with thread.
The sole is crocheted. Consists of two layers. The knitting pattern is given below.
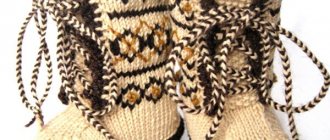
The toe and boot must be knitted. Having created the base, you need to step back, make a gap and knit the tongue together with the boot. Boots can be decorated with embroidery. For this, it is better to use yarn in contrasting shades; they can also be used to cover the tongue and top of the ugg boots.
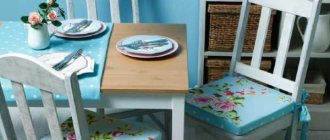
Cute and comfortable
Many of us have an old sheepskin coat lying around unnecessarily at home, which has long gone out of fashion. Or a piece of good sheepskin that hasn't been touched by moths. It's time to give these unnecessary things a second life. To sew shoes for a baby, even a small piece will do. It’s not at all difficult to sew such boots with your own hands, the main thing is to be patient and have all the materials necessary for the work.
Tip: If possible, try to choose sheepskin that is not very rough. Such material will be heavy and too warm for a child’s small feet.
So, let's start preparing to create the boots. To work we need the following things:
- a piece of sheepskin (preferably soft and light);
- pattern of the future product;
- a small piece of soap or chalk for a drawing;
- strong, sharp scissors;
- sewing machine;
- awl;
- duct tape;
- yarn and threads;
- accessories (fasteners/buttons);
- glue gun;
- felt.
Beginning of work
The first thing we need to do is a pattern, which will consist of three different parts. The pattern can be purchased in advance at the store, or you can save money and draw it yourself on plain paper. The size of our product will be standard, for a child up to one year old. If your baby's foot is larger or smaller, adjust the pattern.
Our patterns are ready, now we apply them to the material and outline them with soap or chalk. You can also take a disappearing marker, it’s even more convenient to work with. Next we make a one-centimeter advance and cut out the part from the material. The dotted line on the pattern shows the allowance for adjusting the material during sewing.
Half the battle is done, now we need to form beautiful and comfortable shoes from the cut out pieces. We will start sewing the parts together from the point marked with the letter “A”. The dotted line on our pattern shows the fragment that needs to be sewn.
If you have thick, strong and beautiful threads at your disposal, the seam can be made decorative. That is, one that will be visible. The main thing is that the thread matches the tone of the material.
We take an awl and begin to make small holes in the material. This is necessary so that the needle can then enter the material more easily. It is necessary to pierce the fabric very carefully. Make sure that the distance between the holes is the same. Otherwise, the appearance of the shoes will not look as presentable as you would like. If you want to sew ugg boots with a closed seam, it is better to sew using a sewing machine. But it's not that simple. You need to have experience working with durable materials such as sheepskin. In addition, not every sewing machine can handle such a thickness of fabric.
How to sew ugg boots
Traditionally, the industry uses natural sheepskin to make these shoes, but you can also sew ugg boots with your own hands from a tired old sheepskin coat, faux fur, felt, drape or felt.
Also for the work you will need strong threads, soles from old shoes, and decorative elements. When choosing a sole, you need to focus on the intended purpose of the shoe: outdoor boots need durable, non-slip material; home ugg boots can have a textile base, and soles from rubber slippers or slates are also quite suitable for them.
To pattern the boots you will need several sheets of plain A4 paper and tailor's pins. The paper is wrapped around the heel and the required height of future boots is measured along the shin. Using safety pins, the sheet is secured to the sole, creating the back of the boot.
In the same way, a pattern for the toe of a shoe is constructed. The paper is carefully secured with pins along the perimeter of the sole, and the protruding edges of the sheet are cut off. The pattern is completed by constructing a part for the front part of the boot, outlining the line of connection of both parts with a smooth contour. A correct UGG pattern should consist of three parts and a sole.
If you want to sew ugg boots with a fastener, you need to take this into account when forming the pattern for the front part of the boot and construct the part in such a way that you can subsequently sew a Velcro fastener or a large button to it.
The paper parts are pinned to the fabric and traced with chalk exactly along the contour, but when cutting it is necessary to add another 2-2.5 cm of seam allowance. If the work uses an old sheepskin coat or fur, then the cutting is done on the wrong side so that the pile is inside the finished product.
It is necessary to take into account the fact that when using very dense fabrics, a home sewing machine may not be able to handle them; in this case, sewing the ugg boots will have to be done manually, using the “over the edge” outer seam technique.
The sock part is carefully sewn to the top of the ugg boots, after which the side seams are made and the sole is sewn on if it is made of the same fabric as the rest of the parts. For the street version of the boots, you will need insoles cut from leather. The insoles are sewn to the finished upper of the product, after which they are glued to the sole made of polyurethane or rubber.
The junction of the sole with the parts of the toe and boot is edged with thick decorative braid.
Advice
To ensure that your hand-sewn Ugg boots fit well on your feet, it is recommended to use an awl to make small holes in the top of the boot and thread a leather lace through them.
Velcro or buttons are sewn to the product in the area of the valve for fastening; finished ugg boots are decorated with pompoms, embroidery, fur, leather or felt appliqué.
Source: https://www.kakprosto.ru/kak-919624-kak-sshit-uggi
Knitting with knitting needles
Knitting ugg boots for small children is very easy.
To do this we need to take:
- yarn (best from pure wool);
- needles for stockings with a diameter of 2.5 mm;
- crochet hook number 2.
The details of knitted ugg boots are sewn together in the same way as the details of fur ugg boots. For stitching, you can use regular thread or thread made from fine yarn.
In the image we see a knitting pattern for the sole. It should be made in two layers and crocheted.
We knit the toe and shin with knitting needles. Next, after creating our base, we step back, make a gap and knit the tongue of the boot together with the boot.
Tip: when decorating UGG boots, it is better not to use small decorative parts that could come off and fall into the hands of a child. An excellent solution would be to embroider or decorate the shoes with soft pom-poms.
DIY UGG boots
The country of origin of this shoe was Australia. About 100 years ago, Australian agricultural workers invented shoes. Since they worked in the cold and damp, they could not do without warm shoes. Usually they made ugg boots from scrap materials.
After tens of years, UGGs acquired a different look and became necessary shoes in the winter season. It was believed that they would be fashion for one season. But fashionistas not only fell in love with Ugg boots, but also turned them into house shoes.
Sewing UGG boots yourself is easy. The process takes a little time, and the finished product produces an original model of a warm boot.
Pattern
The most important thing in sewing is the pattern. It can be done in two ways. In the first method, wrap your foot with thick paper and draw along the contour with a pencil; this will be the top of the boot. For seams, retreat one and a half centimeters. For the sole, trace the foot of the left and right foot on cardboard.
In the second method, all parts are made separately. The pattern consists of:
- the upper part of the toe of the boot;
- boots;
- insoles.
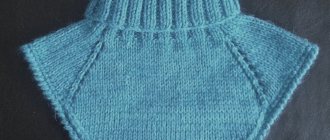
LiveInternetLiveInternet
Fur boots for a child up to one year old
Fur boots for a child up to one year old, and to be precise, this size is suitable for children from 7-8 months. I made the pattern for a foot with a warm woolen sock.
Finally, winter has arrived here, a little snow fell, and with it the air temperature changed from plus to minus. There was an urgent need to sew warm shoes for my grandson, because the child’s feet in the purchased (seemingly very warm winter shoes) were always cold after a walk, and this was at above-zero temperatures, but what would happen next.
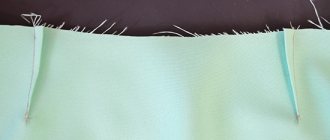
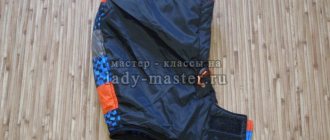
I sewed from what was at hand. The hood from the sheepskin coat was used, the piping was cut out of thick checkered fabric, and the loops for the laces were cut from leather with a figured knife. But first I made the patterns. All of the pattern diagrams below already have seam allowances, so cut according to them as is.
Fur boots for a child up to one year old patterns, photo No. 1
I cut out the fur boots patterns with small sharp scissors, trying not to damage the fur. To make it more convenient to do this, you need to put the fur fabric with the pile down, outline all the details on it with chalk, you can do this with a fountain pen.
It is important to cut out the details of the sole and the top of the toe part in a mirror image, otherwise the boots will be on one foot.
The direction of the pile should be from top to bottom, i.e. from outside to inside.
If you want the heel part of the boots to be more vertical (at a right angle), then the lower part of the tops should be cut out simply in a straight line, without making a 0.3 cm notch.
Fur boots for a child up to one year photo No. 2
My tongues turned out to be upside down, I wanted to make a fur trim, but after looking I changed my mind and trimmed them, like the boots, with piping.
After you have cut out all the parts, you need to fold the tops and tongues in half and round off their edges, i.e. Carefully lightly cut off the corners of the top of the parts.
Then cut off the fur of all cut pieces along the edge by 0.5 -0.6 cm to make it more convenient to sew and to make the seam thinner and neater.
Fur boots for a child up to one year photo No. 3
We have prepared all the details and first we sew piping along the edge of the boot and the tongues. To do this, cut strips of fabric 4.5 cm wide along the bias (angle 45%) and sew them first on the wrong side and, carefully tucking them onto the front side, stitch along it in large steps. Try to sew so that the fur does not get under the needle.
After this, we sew loops for the laces on the tops. Strips of genuine leather (it is stronger) measuring 5.0 * 1.5 cm, 3 pieces on each side, retreating from the edge by 0.5 - 0.7 cm. A total of 12 such blanks are needed.
Now we overlap the upper toe part of the boots.
Fur boots for a child up to one year photo No. 4
After that we sew the tongue inside.
Fur boots for a child up to one year photo No. 5
Fur boots for a child up to one year photo No. 6
Now you can sew the sole, aligning the back parts of the boot and sole and the front part of the sole with the toe box strictly in the center.
After this, we close the resulting seam with piping; to do this, we cut out the bias tape a little wider than for the boot tops. Its width is 5 cm. We start sewing from the inside of the boot and first lay the seam along the sole, and then, carefully tucking the trim, we lay a stitch along the upper part of the seam of the sole.
We put on the laces and the fur children's boots are ready. See photo above.