With the onset of winter, the risk of catching a cold increases. This is especially true for young children who have not yet learned to take care of themselves. A child’s exposed neck, blown by a frosty wind, is a direct path to acute respiratory infections, sore throat, and flu. One of the ways to prevent these diseases in children is to knit a shirtfront for the child with your own hands.
Why is this practical?
Even before the cold season sets in, the question arises - how to make a shirtfront yourself? How is this wardrobe item better than the usual everyone’s favorite scarf?
There are many advantages. The shirt front does not slip, it does not need to be adjusted, and most importantly, it fits perfectly to the neck and prevents cold air from damaging the little person’s throat.
Despite the apparent complexity and unknowns that knitting needles and needlework conceal, everyone can cope with such a task!
Note!
- Knitted raglan - step-by-step instructions, patterns, recommendations. Photo review of the best works and new products from craftswomen
Knitting a shawl - step-by-step instructions for making a shawl with your own hands. Tips for beginners on knitting + photo reviews
Amigurumi ring ⭕: features of the amigurumi technique. Step-by-step DIY master class with simple knitting patterns + 180 photos
What's good about her?
Knitting is an interesting, useful activity, each item is individually unique, there are a huge number of varieties - with yokes, with clasps, with bows - fantasize without limits, a novice knittress can handle it with success. The collar-neck is mainly made with an elastic band, it holds its shape and does not allow it to roll up, which is welcome during the cold season; the increase is due to raglan or adding loops in certain places.
Let's see how to knit a shirtfront step by step for a 5-year-old child.
What are the advantages of a shirtfront?
Dickies, like any other wardrobe item, have their own positive features. Here are the main ones:
- The collar, also known as a golf collar, ensures a tight fit;
- The wide part allows you to cover not only the neck, but also the baby’s chest and shoulders;
- Does not slip or change its position even with active movements of the child;
You can knit such a wardrobe item with both circular and straight knitting needles. At the same time, circular ones are necessary for seamless knitting with raglan - a variation for experienced needlewomen. But even if you're just starting out on your DIY journey, this setup shouldn't be intimidating.
The main difficulty can only arise in calculations, which are not so difficult to overcome. This shirt-front does not need to be sewn and can be used immediately after finishing the work.
If you still don’t want to get such an experience, knit on simple knitting needles. This method produces a two-piece product, which will have a front part and a back part.
Options
There are two main ways to produce such a product useful for children:
- crochet baby shirt;
- children's shirtfront with knitting needles.
This is interesting: Pattern Cute headbands for girls
What will you need for work?
Before you start creating the perfect scarf for your child, check that you have all the materials and tools:
Note!
- Knitted braids: simple patterns and the best master class for creating patterns with knitting needles. How to knit braids with your own hands + photo reviews
Knitting booties for newborns: detailed patterns for knitting booties for beginners + 150 photo reviews of the best products
- Mittens - TOP 100 photos of the best creation ideas. Description of the technique + instructions for knitting mitts with your own hands for beginners
Yarn
Before starting work, choose yarn. You can choose any color or combination, make patterns. Choose shades for a reason, but focus on outerwear and the general color scheme of your baby’s wardrobe. This will make the item really beautiful and easy to combine with existing items.
It is best not to skimp on yarn and choose only natural ingredients. Wool that contains merino or alpaca fibers is ideal. This wool has excellent warming properties and will not prick the baby’s neck. Another best option is to use a combination that contains a percentage of acrylic.
Advice: do not make a shirtfront from 100% acrylic; it warms you up very poorly outdoors, increasing sweating indoors. As a result, the baby will not be comfortable, and there will be no health benefits at all.
Knitting a shirt front for a child, descriptions and patterns from kru4ok.ru
Dickey for a girl, description from Maria
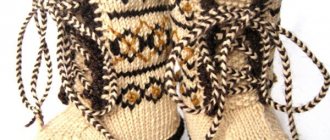
Good day to all! The children's shirtfront is made of Children's New yarn, 100% acrylic, in one skein of 200 meters per 50g. The work was done with crochet number 3. It took 1 skein of yarn to make a baby shirt.
Dickey for girls, description
We start knitting with an elastic band according to pattern 1 (single crochet behind the back half loop) and then move on to the main pattern according to pattern 2.
The elastic band does not stretch out and the baby shirt holds its shape well if you follow all the rules for caring for knitted items.
Knitting patterns for shirtfronts for children
Crochet baby hat and bib
Set: baby hat and crochet shirtfront. Knitted from wool blend yarn, 400 m thick, per 100 g, crocheted No. 1.75 for a 6-year-old girl. I knitted without a pattern, guided by the pattern of a finished bag I liked, found on the Internet.
Read more…
Knitted shirt front for girls, from Maria Vanina
Good afternoon My next baby shirt, knitted for a 5 year old girl. Yarn 100% acrylic SUFLE (Semyonovskaya yarn), 100g/292m, 1 skein was used. A diagram of a children's shirt front and a flower are attached. Knitting pattern for a shirt front for a girl
Read more…
Children's bib, work of Maria
The shirt front for children is crocheted No. 3 from acrylic yarn, it took less than 0.5 skeins. There are 200 meters in 1 skein. A shirt front is an irreplaceable thing, it is convenient to use. It will also perfectly cover the back and chest of the child. We begin to knit the shirtfront from the top, with
Read more…
Sample
Having selected all the necessary tools and materials, make an experimental version. To do this, cast on about thirty stitches on the knitting needles and make the intended pattern. Do the work until the product sample reaches ten centimeters in length.
Having completed the work, close all the loops and wash the sample product. After drying, measure the workpiece with a centimeter. The task of such a sample is to calculate the number of loops and rows in one centimeter.
What needs to be done before starting work?
Take measurements. This is the second step after checking all the required materials. When preparing, it is important to understand that the neck should easily pass through the head, but also fit snugly to the neck. We measure the circumference of the head, and also do not forget about the circumference of the chest.
Carry out calculations. Using measurements, we multiply the result by the number of loops in one centimeter and as a result we have the required number of loops for the neck. We calculate the number of rows depending on the desired length of the future product.
For children
Your child at the age of 5 years old has a head size of 48 – 53 cm.
The principle of knitting is exactly the same for both children and adults, the difference is in the amount of stitches cast on. It’s not difficult to choose the right product for yourself; watch video tutorials on the Internet; the range provided will not leave you indifferent.
For your princess, we cast on 60 stitches, knit the neckline in a circle using a classic 14 cm elastic band, and make extensions. To ensure that the product fits well on your shoulders, we divide the entire fabric into 8 wedges, mark the additives, and switch to circular knitting needles.
- Row one: edge, *purl, 2 sts from stretch, k6*, repeat repeat until the end of the row, remove edge, purl.
- The circle is closed, knit a row according to the figure, it turns out * 4 purl. and 6 persons*, as in Fig. to the end of the row, increase every 6th row.
- We knit 13 cm, gradually expanding the fabric; if desired, the lower rows are done in a different color. Finish with a crochet stitch and double crochets.
- Treat the top with a contrasting color, and insert decorative crafts into the side seams.
To emphasize the individuality of your fashionista, rhinestones, ribbons, flowers, and all kinds of beads are sewn on.
Making such masterpieces will not be difficult for inexperienced knitters, with the help of a detailed description.
Step-by-step instruction
Let's start the knitting process using the example of an ordinary women's shirtfront. We follow the entire sequence of steps.
We make a sample according to the previously stated principle. We cast on the required number of loops. In this case it is 84. We divide them into four double needles. This makes twenty-one loops for each. You can also work with circular knitting needles.
We make the necessary elastic band, consisting of two front and two back blocks. In the example, this will take 13 centimeters. We use circular knitting needles and use markers to mark the beginning of the raglan. This line will consist of two loops. The result is the following picture: 19 loops, then a marker, then two loops and again 19 loops and so on in a circle until the next marker.
Making the front beautiful part. Each time we add one loop before and after our raglan line in every second row. In the example it will take twelve centimeters.
The last two rows of the product are made using garter stitch. This will allow the edges to curl up. Then close all the loops.
We wash and dry the product so that it no longer shrinks, then steam it, and now the shirtfront can be used for its intended purpose.
Product description.
Hello, my dear! Welcome to the page of the “Irena Handmade” website!
Here comes 2021. Grandiose plans lie ahead of us. We will continue to comprehend the secrets of knitting art, from simple to more complex.
The first master class of this year, in terms of its degree of difficulty, is designed more for beginner needlewomen. Today I will tell you how to make such a basic model of a children's shirtfront with a sprout. It is very comfortable, knitted together with the hat with ears from the previous master class.
I again used “Children’s Whim” yarn, which is excellent in composition and, according to my personal feelings. As you may have noticed, this model with a golf collar is very convenient for kids; the neck will always be reliably protected from the treacherous wind.
Using this product as an example, I will share my knowledge of how to distribute the loops for knitting raglan and sprout. We will again need the ability to work with shortened rows.
Once again, this is the base model. Don’t worry, my dears, everything will definitely work out.
I’m always ready to answer your questions in the comments to the “Irena Handmade” website, as well as in the VKontakte group “Irena Handmade - knitting and crocheting.”
If you're ready, let's get started.
Instructions for a child aged five years
If you lack experience and knowledge, you can look at the exact instructions for the child’s age. It is worth remembering that each child is individual and sizes may vary, check this at the initial stage of preparation.
Children's shirtfronts for beginners will not be difficult for real needlewomen, even if they have not tried to work with knitting needles.
Model Variations
The choice of patterns, patterns and methods of knitting collars is huge. Interesting options can be found not only for experienced knitters, but also for those completely new to creativity.
Making this charming and useful thing will take a couple of hours of free time, provided that you follow the description and instructions.
Videos from craftswomen will help you understand how to create more complex models of children's shirtfronts. Usually they go over in some detail, at a slow pace, how to deal with this or that element. In addition, common questions and problems that arise during the process are addressed.
Now try to knit a baby shirt according to the description of the pattern for the model with a button.
What knitting do we use?
- We use garter stitch on the front and back sides.
- Knit stitch also knit and purl rows.
- For a 2*2 elastic band, we alternately use 2 knit and 2 purl rows;
- For an elastic band 2*1 - alternately 2 purl and one knit.
In this case, we use a knitting density at the rate of 15 stitches per 22 rows, equal to 10 * 10 centimeters.
If in doubt, you can read the description of step-by-step actions for each size and age. It all depends on the measurements and size of the child. The smaller the baby, the faster you can make a shirtfront with your own hands. This wardrobe item can easily be worn until school age. This will perfectly and reliably protect the child from unnecessary colds and cold winds.
Today you can find a huge number of useful offers on the Internet. For example, find a master class, a children's shirtfront - this will allow you to create a wardrobe item under the guidance of real craftswomen.
A baby shirt for a year can be an excellent gift, and the process of knitting baby shirts is not a bad way to distract yourself and relax in silence. This kind of work perfectly relaxes, adds creativity and makes the world more beautiful!
When choosing a shirtfront, you don’t have to limit yourself to just the scarf itself. It would be ideal to knit a kit that includes a hat. A more extensive version of the set may also include a warm jacket.
A single style solution and one pattern repeated on all items of clothing will become a stylish solution that pleases the eye of the family and instills a sense of beauty in the child.
The shirt-front can be made by both the child’s mother and other relatives - grandmothers, aunts and cousins. This is truly the thing that will not remain lying at the bottom of the chest of drawers, but will delight the eye during all winter walks, and most importantly, give warmth and care.
Create with pleasure, be inspired by beautiful pictures and create only those things that you would be happy to keep for yourself. Remember the evenness of lines and rows, and may there be enough creative inspiration for many wardrobe items for your own kids!
How to choose materials
An important point before starting knitting a baby shirt will be the choice of working material, namely threads. They must have certain characteristics so that the child feels as comfortable as possible and his skin does not become irritated.
A good choice would be natural wool, as well as acrylic and wool blend yarn.
As for appearance, design and color, it is much simpler. You can choose the palette yourself, if you wish. Same as knitting pattern. You can create several options for different occasions.
- Knitting needles. When choosing, pay attention to the size of the tools, which is usually indicated on the packaging or on the knitting needles themselves. Whether they will be straight or circular depends on the knitting technique chosen.
- Markers. Sold in sets and needed to mark the beginning of a row or for other designations.
- To calculate the length of the product and calculate the parameters, you will need a measuring tape.