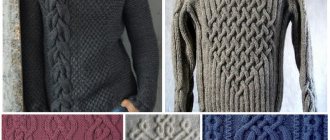
Broomstick is a knitting technique using elongated loops. She is originally from Peru. Overseas Peruvian technology has taken root here too. The fabric made in this style turns out to be lace, light and unusual. You can knit and crochet. At first glance, it seems that this is a complex pattern that requires skill, but this method of knitting is very easy to master. Due to the fact that knitted rows alternate with elongated loops, brumstick fabric can be knitted 2 times faster than usual.
Features of the technology
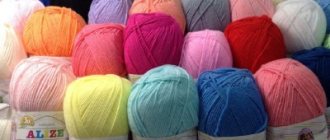
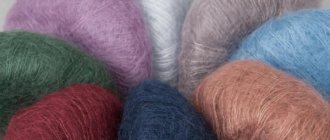
Knitting using the broomstick technique appeared in Peru, for this reason it is often called Peruvian. Here, not only women, but also men were engaged in this type of needlework. When working, the craftsmen used mainly alpaca yarn. This animal has soft fur, the number of natural shades of which reaches 50 pieces. Today, different technologies are used when working with thread. This includes painting in bright colors and adding acrylic inclusions.
This technique acquired its name thanks to an auxiliary tool - a brumstick, which the craftsmen used when knitting. Literally its meaning is translated as “broom handle.”
The main difference between this knitting is that it contains elongated loops. During the knitting process they are often combined into groups. The result is a loose, voluminous fabric.
What you need for knitting
Before you start mastering Peruvian brumstick knitting, you should prepare all the necessary materials and tools. The master will need:
- yarn;
- suitable size hook;
- fork for Peruvian knitting.
If you don’t have a fork at hand or you couldn’t find this tool in a specialized store for needlewomen, you can replace it with another item, for example, a stationery ruler. Plastic products are best suited for this purpose. When choosing, you should pay attention to the width of the ruler, since this indicator affects the height of the elongated loops. There are also special thick knitting needles for knitting using the Peruvian technique.
Knitting using the broomstick technique for beginners
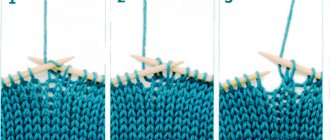
The work begins by crocheting a chain consisting of air loops. Their number should correspond to the number of loops in the pattern. After this, proceed as follows.
- The last air loop is pulled out and put on a fork or ruler.
- The hook is inserted into the next chain stitch and a single crochet is worked. The resulting loop is pulled out and put on a ruler.
- A similar scheme of work is used to knit all chain stitches.
- The knitting is turned over, the hook is inserted under the first 5 elongated loops and removed from the ruler.
- The loops are twisted from right to left and tied with 5 single crochets.
- The hook is inserted into the next 5 loops on the ruler, removed again and twisted from right to left. After tying with 5 single crochets, move on to the next loops.
- When all the loops are removed from the ruler and tied, the fabric is turned over and the next row of elongated loops is cast on the ruler. They do this according to the same scheme as the previous time.
Broomstick video lessons
Master class from Elena Kozhukhar
Let me show you, dear needlewomen, another pattern from the brumstick series. This is a very simplified version on which you can learn to knit a broomstick. The loops are pulled out from only three stitches and no double crochets. So to speak - a broomstick for beginners. And I’ll add in conclusion that it is knitted without the help of a thick knitting needle.
The video should load here, please wait or refresh the page.
Broomsticks border
The Brumstick border is suitable for finishing the edge of almost any product. The number of elongated loops and the number of stitches may be more or less than what I show in the video.
The video should load here, please wait or refresh the page.
Knitting patterns
In addition to the described classic knitting pattern using the broomstick technique, there are several more variations. Their use in work allows you to diversify products and make them unique.
- Fastening elongated loops. This is the simplest and easiest option for performing the technique, however, the appearance of the canvas will be slightly different from the classic one. In this case, the elongated loops are not grouped into 5 pieces, but are tied with single crochets (for each elongated loop there is 1 single crochet).
- Fastening with 3, 4, 5 loops. The technique in this case is similar to the classic version. Only the number of loops combined in the group changes.
- A pattern of 5 loops with single crochet stitches. After completing the main pattern, 2 sc are followed, after which a number of elongated loops are cast on again.
Openwork blouse
Sizes: 38-40; 44-46.
We need to prepare:
- yarn, consisting of 85% cotton, 15% silk, 50g per 100m – 450; 550g;
- knitting needles No. 5.5;
- hook No. 4.5.
Patterns:
- pattern No1: the initial number of stitches is a multiple of 12 stitches plus 2 chrome. p. We knit the pattern cx. 1, repeating the rapport between the edges. n. We knit once with 1 p. 18 rubles each, then repeat from 3 rubles. 18 rubles each;
- pattern No2: the initial number of stitches is a multiple of 6 stitches plus 1 stitch plus 2 chrome. n. We carry out the drawing cx. 2. We start with 1 chrome. p., then loops to repeat, then repeat repeat, complete the row with loops after repeat and 1 edge. p. Repeat vertically from 1 p. 8 rubles each;
- pattern No.3: performed according to diagram. 3, repeating between edges. n. rapport. We knit once vertically with 1 r. 6 rubles each;
- pattern No4: the original number of stitches is a multiple of 6 stitches plus 1 stitch plus 2 chrome. n. We carry out the drawing cx. 4. We start with 1 chrome. p., then loops to repeat, then repeat repeat, complete the row with loops after repeat and 1 edge. p. We knit vertically once with 1 r. 6 rubles each, then repeat from 3 rubles. 6 rubles each;
- persons stitch: in k/r - k/p, in purl/r - p/p.
Density: on pattern No. 1 18 p. by 25.5 r. equal to 10cm by 10cm; on pattern No. 2 18 p. for 18 r. equal to 10cm by 10cm; on pattern No. 3 6 r. equal to 2.5 cm; on pattern No. 4 18 p. for 14 r. equal to 10 cm by 10 cm.
Description
Back
We dial 86; 98 sts and tie a knot. No1. After 13.5 cm (= 34 rubles) from the initial row we move to the knot. No2, adding in the 1st p. 1 pet. We have 87 in operation; 99 pet.
Having reached 13.5 cm (= 24 rubles) in the height of the second pattern, we perform 2 rows. (=0.5cm) persons. satin stitch Next we do 6 p. (=2.5cm) with pattern No.3.
We continue to knit the back, switching to a knot. No4. We knit 18 r. (= 13 cm), without making a yarn over in the last purl and for size 44-46 we close after 10 cm (= 14 r.) from changing the pattern for the armholes on both sides, 8 sts each. We have 87 left; 83 pet.
Next we tie the knot. No4. At the same time, for solution 38-40 we close it after 2 rubles. (=1cm) from changing the pattern for the armholes on both sides, 8 stitches each. That leaves us with 71; 83 pet.
After 6 r. (=2.5 cm) from changing the pattern we complete the knot detail. No1, decreasing in the 1st r. 1 pet. and distributing the pattern from the center. We have 70; 82 pet. Having knitted 15 cm (= 38 r.) from the change of pattern, close all the loops. The distribution of loops is as follows - the central 34 loops form the rollout, the outer 18; 24 pet. on both sides - shoulders.
Before
We follow the description of the back, the difference is in the pattern of knitting the neck. To roll out in this part, close it after 12 rubles. (=4.5 cm) from the last change in the pattern, central 2 stitches. and we finish each part separately. To round the rollout, close along the inner edge in every second row. four times 2 stitches. and 8 times 1 pet. At the height of the back, we close the remaining 18 on each side; 24 pet. for the shoulders.
Sleeves
We dial 50; 62 pet. and knit a knot. No1. At the same time from the first p. add for expansion on both sides in every sixth row. five times 1 stitch each; alternately in every 4th and 6th r. six times 1 st. We include the added loops in the pattern. Having knitted 42 r. (=16.5 cm) from the first row, close off all the loops.
Assembly
We make shoulder seams. We crochet the edge of the neckline, performing 1 p. single crochet and 1 r. crayfish step. We sew in the sleeves, perform side and sleeve seams.
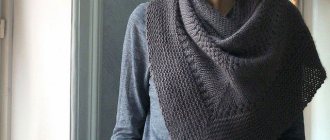
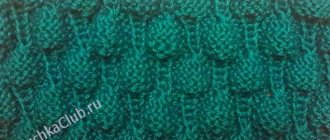
Peruvian chain knitting
There is knitting using the broomstick technique, which is made from chains of air loops. This knitted fabric has a high density and is suitable for making warm winter clothes. These could be sweaters, hats, scarves, blankets. To prevent knitting from looking coarse and too heavy, you should choose a thin thread.
The work is carried out according to the following scheme.
- Knit a chain of air loops.
- 1st row - tying loops with single crochets.
- The 2nd row begins to be knitted as follows: a chain of 16 air loops is performed. This quantity is responsible for the size of the elongated loops, so the number can be varied at your discretion.
- The chain is secured to the loop of the 1st row. There should be one brumstick for each loop.
- After all the broomsticks of the 2nd row have been knitted, they are grouped into 3, 4, 5 or 6 pieces and tied with single crochets. It should be taken into account that the number of air loops must be a multiple of the number of loops in one group.
Ideas from the Internet, broomstick knitting
The Peruvian technique is diverse; it can be alternated with regular stitches, or decorated with cuffs and collar of the product.
Openwork cardigan broomstick
Description given for sizes: XS, S, M, L.
You will need: 360-600 g of 100% wool yarn 153m/40g blue, Tunisian crochet hook No. 5.5, knitting needle 25 mm, 4 buttons.
Scarf crocheted on a ruler, master class!
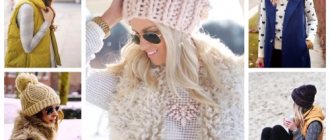
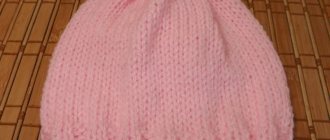
Broomstick hat and scarf
The scarf is knitted in a straight line on a ruler. You need to cast on a chain of 35 chain stitches and knit the first row with single crochets. Knit the second and subsequent rows up to 96 on a ruler, catching 5 loops.
Rows 97-98 - according to the diagram. Make tassels for the scarf.
It is more difficult to knit a hat using the brumtik technique, because... we need to calculate the decreases correctly. The diagram shows how to make decreases by decreasing the stitches that you put on the ruler (5 at first, and 2 at the end). Sew the hat along the side seam. Tie with posts with nak. + pico.
Online tutorial on knitting a Lalo type cardigan using the broomstick technique
Brumstick can be crocheted or knitted.
Handbag in broomstick technique, master class
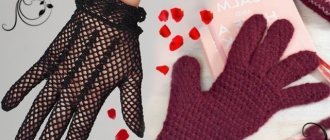
Brumstick (Peruvian knitting) is a technique that uses a hook, any thick knitting needle or a smooth large-section stick, or a ruler. The fabric is openwork and requires less yarn than Tunisian knitting. The patterns are very decorative and look great in both thin and very thick yarn.
The size of the hook depends on the thickness of the yarn, but a stick or ruler determines the size of the openwork holes and the height of the row. Knitting is double-sided - the front and back sides are different from each other.
For the handbag you will need: “Denim” yarn (55% cotton, 45% PAK, 160 m/50g) - 120 g terracotta color, ready-made handles, lining fabric, hook No. 4.5.
Step-by-step master class
Broomstick pattern on knitting needles
Classic Peruvian knitting is done using a crochet hook. However, needlewomen can use a similar knitting pattern with elongated loops on the knitting needles.
- Loops are cast on the knitting needles. Their number should be a multiple of 5 + 2 edge loops.
- Rows 1, 2, 3 and 4 are knitted in stockinette stitch.
- The 5th row is knitted as follows: 1 loop - knit, then yarn over (twice the thread around the knitting needle). After each knit stitch, make 1 yarn over.
- When moving to the 6th row, 5 loops are transferred to the right knitting needle. In this case, all yarn overs must be lowered. After this, they are transferred to the left knitting needle and knitted through 5 loops. In the same way, repeat the action with all the remaining loops in the row.
- Row 7 is a repeat of Row No. 1.
We knit a women's blouse with an original pattern
The Peruvian knitting technique is performed both by knitting and crocheting.
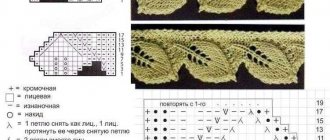
To make broomstick patterns with your own hands, you need to follow the steps that will be described in a small master class. The first two rows in the fabric are knitted. p. In the new lane, alternate faces. loop with crochet. In the 4th r. discard the long loops formed. After this, tie the links alternating faces. p. and yarn over again. In the fifth row, start repeating the rapport again. This is the simplest version of the broomstick pattern. It can be made more complicated. Change the number of yarn overs, and then the links will be much longer. To change the density of the product, you should knit a different number of buttonholes. If you replace the stripes of faces. etc. to other ornaments, then the main pattern will change right before your eyes. There is a little trick for experienced needlewomen: to visually change the brumstick, simply change the size of the knitting needles and yarn. In the photo you can see what the finished top will look like, knitted using technical Peruvian knitting. The pattern diagram will also be published in this lesson.
The dash, which is depicted vertically, means one front loop. The number two in the center of the circle represents persons. p. and two yarn overs. The sign of five above the dash means that you need to remove the yarn overs, and then knit 5 elongated buttonholes together. Knit knit 1. p., then yarn over, knit again. p. with a double crochet, finishing this pattern with 1 person. p. To form two parts of the product, knit 2 rectangular fabrics. For each of the fabrics, you should cast on 45 stitches and knit with knitting needles based on this pattern, a pattern of 54 cm. Upon completion of knitting, make 2 stitches. persons etc., and then close all the links of the last strip. Sew the fabrics on the sides and shoulders. Cast on 58 stitches along the armhole line and knit 3 rows. persons n. After this, all remaining buttonholes should be closed.
Read
Luxurious patterns for openwork knitted stoles
Equipment without additional devices
In addition to the execution methods described above, there is another option for how to knit elongated loops. It does not require additional equipment, however, knitting even loops in this case will be somewhat more difficult.
- First, prepare a chain of air loops. Their number should be equal to the number of broomsticks + 4 lifting loops.
- The hook is inserted into the 5th air loop and the thread is pulled through it to the level of the lifting 4 air loops.
- The resulting loops are not removed from the hook. Pass the hook into the next chain stitch and pull it through.
- In this way, the number of loops required to form a group of brumsticks is put on the hook.
- Use a hook to grab the thread and pull it through all the elongated loops.
- The next step is to knit another single crochet. This is followed by 5 more single crochets.
- According to the intended pattern, other brumsticks with strapping are knitted.
This master class on crocheting and knitting can be used to make large items such as sweaters, shawls, scarves, hats, dresses, tunics and much more. In addition, the Peruvian technique is excellent for finishing the bottom of products. Thanks to this hem, the clothes take on a finished, elegant look.
Origin of the name of the technique
The Broomstick knitting style appeared in South America, beginning its existence in the state of Peru. The culture of Peru has absorbed the traditions of the Indians and Spaniards - the aborigines and conquerors. Most Peruvians are good at knitting and use rainbow patterns of various textures for their everyday clothing. Broomstick knitting is based on the technique of throwing a loop on a simple stick, hence the name, which is translated from English as “broomstick”.
Crochet options for the Broomstick pattern:
- Classic version (using a ruler)
This knitting option is very popular among needlewomen. The products are light and delicate and do not deform when worn. Yarn consumption is relatively small.
Knitting is suitable for light blouses, stylish bracelets and handbags.
- Knitting, without using any equipment (except a hook)
In this knitting option, unlike the previous one, loops are not pulled out, but chains of air loops are knitted. Then, the connected chains are tied with columns into “broomsticks”. A product made using this technique becomes durable and fluffy, which compares favorably with the previous version. However, more yarn is also consumed.
This knitting option is ideal for warm, dense items: sweaters, hats and scarves.
It is important to note that any craftswoman, once she gets used to it, can quickly learn how to knit unique items in the “Broomstick” style.