[google_nativ]
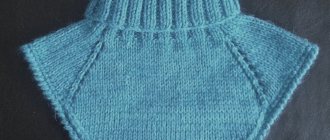
Friends, I finally got my act together and crocheted a hat using connecting posts in shortened rows - this will be a men's crochet beanie hat.
Those of you who follow my work know how long ago I was planning to do this... And then a miracle happened! The result of my efforts is before your eyes!
And, naturally, today we will talk about how to knit such a hat...
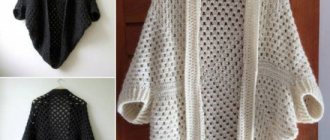
The hat will not be knitted as usual, but crosswise, i.e. This product is cross knitted. And the pattern will be transverse “Real crochet elastic”, consisting entirely of connecting posts. You can see how to knit connecting posts here >>>
In addition, we will use a technique called partial knitting.
Materials:
- Yarn “Svetlana” from Semenovskaya factory – 100 g/250 m. 50% wool, 50% acrylic;
- Hook No. 5
What is a beanie hat?
The beanie style is a knitted product that fits tightly to the head without ties. Stocking hat, cap-cap – these are the most common names for this type of headwear.
The beanie hat, which has different variations, is very popular today
"Bean" is an English word that refers to a simple round shape with no additional elements. However, today you can find various versions of beanie models, including those that are decorated with additional decorative elements (for example, stripes or pompoms).
Models may differ from each other in other details:
- the presence and absence of a lapel;
- knitting thickness;
- type of pattern;
- long (in addition to the usual models that correspond to the size of the head or slightly exceed it, there are elongated beanie models).
A crocheted beanie hat (the diagram and description will be presented below) retains heat well and is suitable for wearing in winter and during the off-season.
Also, this style of headdress is comfortable and practical. The hat is put on your head with one movement of the hand - you can do it even without a mirror.
Features of the headdress
A beanie hat is a form-fitting headpiece without ties. Nevertheless, the product is quite loose and, as a rule, long. If you wish, you can find a model that is in close contact with the crown. The crochet beanie hat design is quite modest. This is the highlight.
Initially, beanies were worn only by people in working professions; the headdress was comfortable and warmed well. Gradually the hat became popular among students. This was explained by the convenience of attaching the emblem of the educational institution.
The beanie hat is universal. It will fit into many directions. It is worn mainly with casual and sports styles. The beanie goes well with winter down jackets, short fur coats, parkas, sweaters, and cardigans. The length of the hair does not really matter; owners of both short and long hair will look great in this hat.
How to choose threads for a beanie hat
To make your beanie hat warm and stylish, you need to choose the right threads before starting knitting. To do this, you can use the tips and recommendations of experienced needlewomen.
How to choose threads for a beanie hat:
| Selection criterion | Features of choice |
| Type of knitting (large or small) | The choice of thread depends on the chosen type of knitting: if you need a large knitted hat, then the threads should be thicker, and vice versa. The thicker the yarn chosen, the more voluminous the pattern will be and the fewer folds there will be on the top. |
| Wearing season (winter or off-season) | To be worn during off-season periods, the hat should be knitted from thin wool or acrylic. Cotton yarn with acrylic or bamboo in the composition is also suitable. For winter models, it is recommended to choose dense yarn: wool, angora, mohair, cashmere and others. Warm hats can also be knitted in 2 threads. |
| Cap detail (main or internal) | Hats designed for cold off-season or winter require a second layer. The first (outer) layer is made of thick threads. The second (inner) layer is made of the same or thinner ones. Because a single-layer hat made of dense yarn is not able to protect the head from strong winds or frost. You can knit a second layer of thread of the same density, but with a smaller hook - this will make the layer denser. |
| Color | The color of the yarn is chosen depending on the knitting pattern and the personal preferences of the needlewoman. There are patterns that look better on threads of warm or cool shades. Also, the color of the headdress should be in harmony with the color of the woman’s outer clothing. |
How to knit a beanie hat correctly
A crochet beanie hat (the diagram and description of each model are presented below) is knitted in the form of a long fabric, the ends of which are connected into a pipe at the end of the work.
The knitting is directed across the product, the columns of the new row are connected to the previous one at the back wall of the loop. One end of the resulting pipe is the base, and the other is the top: it should be tied together with thread.
In order for the product to be attractive in appearance and have a beautiful shape, certain rules must be followed during knitting.
How to knit a beanie hat correctly:
- The top will turn out neat if the shape of wedges is knitted from one edge of the fabric. This is done by shortening the rows. The result is a canvas consisting of 4-6 sections.
- Each section of the fabric must consist of a certain number of shortened and full rows. The number of shortened rows is usually indicated in the knitting pattern. The number of complete rows depends on the thickness of the yarn and is calculated individually.
- The number of air loops in the chain should be greater than the number of stitches in the first row - this will help the product look beautiful and be without holes.
- The shortened rows follow each other in ascending order. Each next row increases by 1 column.
- Knitting descending and ascending rows has its own differences. Therefore, you should remember that the hat is knitted from top to bottom, and the first row will be descending.
Beanie hat is knitted from top to bottom
- The descending row contains the same number of loops as the previous one, and 1 lifting loop. In the ascending row, the number of loops should be 1 more than in the previous one, and 1 half-column and 1 lifting loop are added.
- The descending row should start from the zero row - therefore, at the end of the previous row, a half-column is made in the zero row, after which the descending row is knitted.
- Counting rows should begin from the zero row - this will allow you to avoid getting confused in the calculations.
- Each section must begin with a short row and end with a long row. This will help make the top of the product a neat spherical shape.
Some beanie hat patterns are knitted in the round, starting from the crown. This greatly simplifies the manufacturing process, but also changes the appearance of the product.
Measurements
To knit a hat, the girl’s head must first be measured. The first size is head circumference. Place the measuring tape along the forehead and back to the occipital protuberances.
A crocheted product stretches and therefore you should immediately subtract 2 cm if the hat is knitted in the round, without a seam. The second size is the depth of the cap. Measure the length from the lobe of one ear to the second, respectively, through the crown. But this size must be divided in half and not decreased, as in the previous one, but increased. It is worth adding according to the model of the cap.
For beanies, the caps are added by 5 cm. This creates such a tall and cool product, the ears are covered and overall very, very cute.
The simplest crochet beanie hat
The simplest model of a beanie hat is knitted in the round, starting from the crown , with a simple pattern reminiscent of small honeycombs.
Tips for knitting such a hat:
- It is better to take acrylic yarn, because it is not too dense - the pattern will lie beautifully.
- You will need more than 100 g of yarn - the volume depends on the density of the knitting of a particular needlewoman. It is better to choose a yarn density of 170 g per 288 m, but a little less or more is possible.
- You need to take hook No. 5 - it will be most convenient to knit with this yarn.
- You can choose absolutely any color: red, blue, gray and others.
- The recommended knitting density is 13 half double crochets = 10 cm. In order to maintain a certain knitting density, before starting to make the product you need to practice knitting a sample.
- The size of the hat, subject to the knitting density and knitting pattern, is 51-52 cm in girth, the depth of the hat is calculated individually during the knitting process.
- Knitting a hat must begin with 4 air loops closed in a circle. The first row is knitted in the middle of the circle, and not in each of its loops.
- During the knitting process, you must remember that each row begins with 2 lifting air loops. Each row ends with a connecting column knitted into the initial loop. This will ensure an even transition from one row to the next.
- In order not to get confused with the beginning and end of the row, you need to make a mark with a knitting marker. This is a special plastic clothespin that can be replaced with a regular pin. Each time you finish a row, you need to mark its end with a marker.
- It is necessary to knit the pattern according to the pattern over 11 rows, not forgetting to observe the features of the pattern in each row (air loops, 2 stitches in 1 loop, 2 stitches in 1 loop, etc.).
- Figure 11 of the row must be knitted several times - the number of repetitions of the row depends on how long the hat is needed.
Sample
Before working on the model, you need to knit a sample.
It is knitted according to the same pattern as the model itself. You will need about 10 cm wide and 10 cm high. Set of first crochet stitches
Set of the first crochet chain
Then, using a ruler, determine how many loops there are per 10 cm horizontally and how many vertically. These two indicators reflect the density of the knit.
You can combine yarn of several shades.
Important! The knitting density is always different, so you should not rely on the density of another craftsman, even if the same yarns are taken.
Model with elastic band pattern
A crochet beanie hat (the pattern and description of the knitting features of which are shown below), knitted with an elastic pattern, is considered the most popular model of such a hat.
How to correctly knit a model with an elastic band pattern:
- The yarn is taken thicker - this is necessary to form a dense pattern that will not be subject to deformation during the knitting process.
- You will need approximately 120 g of yarn with a density of 125 m per 100 g. In terms of composition, it is better to choose one-component or two-component yarn - the more natural it is, the warmer the hat will be.
- The hook needs to be prepared under number 4 or 5 - this way the knitting will be provided with greater density.
- Any yarn color is suitable: from pale to dark or bright.
- The approximate size of the hat is 56-60 cm, height 28-30 cm.
- You should knit in short rows across the product. During the knitting process, 4 wedges are formed, which are then connected by a row of half-columns. The diagram indicates and describes the pattern for 1 wedge - it must be repeated 4 times.
- Knitting begins with a chain chain of 45 loops, then a lifting loop is performed. After this, 35 single crochets and 1 similar half-crochet are knitted - a total of 36 loops in the row. According to this principle, only with a different number of loops, even rows are formed.
- The next row starts with 1 lifting loop and consists of 37 regular stitches. Odd rows are formed using this principle.
- The posts should be knitted behind the back wall of the loop of the previous row. When finishing each row, the knitting must be turned over.
- Each new row must be increased by 1 stitch, not forgetting to finish the even rows with a half-stitch at the base of the knitting (it is included in the total number of stitches).
- Having knitted 14 rows, you need to make 2 more complete rows - and the wedge is ready. You should start the next row not with the air chain, but with the description of the 2nd row.
Baths with elastic band 2x2
The elastic band pattern is considered universal. Products made using this technique always look stylish and original. The canvas looks embossed, voluminous, but at the same time it takes the shape of the head well and, after stretching, returns to its original form.
Any warm yarn is suitable for work; a mohair beanie looks especially good. The process is similar to knitting in stockinette stitch on circular needles. The only difference is that you need to alternate purl and knit stitches, knitting two of each. The fabric is woven to the desired height, then the loops are reduced. The scheme according to which you need to connect the decreases:
Knitting is divided into 4 stocking needles.
- At the beginning of each knitting needle, the first two and last two loops are knitted together.
- Decrements are made until there are three loops on each needle.
- The remaining loops are pulled together with a needle or crochet, a knot is made, the thread is cut off and the tip is hidden.
Fashionable beanie for youth
The modern youth beanie model looks more free. It looks like a cap with a consistent narrowing, the crown of which does not go into a corner, but remains quite wide. The knitting technique of the hat is similar to the previous model, but it is knitted without shortened rows.
Recommendations for making the product:
- The yarn must be taken with a density of 55 m per 50 g - it must be thick so that the pattern lies beautifully and evenly.
- In total you will need 150 g of dark yarn and 75 g of colored yarn.
- High density yarn requires a large hook - it is better to take No. 8.
- Thread colors are chosen depending on personal preferences. It’s better if it’s not 2, but 4 colors - this way the product will look more elegant and modern. It is good to combine dark yarn with bright ones, for example, take yellow, pink and orange for gray.
- The size of the hat is 50-52 cm, its height depends on the desire of the needlewoman and is controlled during the knitting process.
- The headdress is knitted with single crochet stitches; at the beginning of each row it is necessary to make a lifting loop instead of the first stitch.
- The sequence of color stripes should be as follows: 4 rows main color – 2 rows orange – 6 rows main – 2 rows yellow – 6 rows main – 2 rows pink – 2 rows main, and so on from the beginning.
- The recommended knitting density is as follows: 10 regular stitches = 10 cm.
- To start knitting a hat, cast on 36 chain stitches. Then you need to make a lifting loop, and then start knitting single crochets.
- In each even row of 4 loops, 2 stitches are knitted, and the penultimate loop in the same row must be skipped. This is necessary so that the number of loops is maintained throughout the knitting, and the strips fit into the pattern with an angle.
- Having knitted a fabric approximately 50-52 cm long, you need to fold it from the wrong side with opposite ends facing each other. Then you need to secure the outer rows with connecting posts.
- To form the top of the hat, you need to pull the thread through all the loops from one edge, then pull it tightly and tie it into a knot. You can sew a pompom on the top of your head.
Stylish knitted beanie with crochet pattern
A crochet beanie hat (the pattern and description of which are given below), knitted with a pattern that resembles flower petals called marigold, turns out stylish and modern.
A beanie hat with an elastic pattern is knitted in the round from bottom to top and can be of any length.
Tips for knitting a stylish beanie with a pattern:
- The yarn must be chosen as a two-component one, and it should contain more acrylic than the natural component
- The yarn density should be approximately 85 m per 153 g, since the pattern of the sheath is not too dense, and the hat will be a loose fit.
- To work with yarn of the specified density, you will need a hook number 5 or 5.5.
- You can take any color of thread, and the elastic band and the main part of the product can be of different shades.
- The recommended knitting density is 18 stitches with a length of 10 cm.
- The pattern of the product allows it to stretch well, so the size of the hat varies from 56 to 60 cm. The height depends on the preferences of the needlewoman and is controlled in the process of knitting the top (the part above the elastic band).
- You need to start knitting with an elastic band: to do this, you need to cast on 10 loops of the air chain and knit the elastic in a long rectangle.
- The pattern is knitted as follows: the first row consists of 9 single crochets, starting from the 2nd loop of the chain; the second row and subsequent ones begin with a lifting loop and consist of ordinary columns according to the number of loops of the previous row.
- When the length of the rectangle reaches 56 cm, you need to leave a long thread and knit the main part of the hat from the upper edge of the elastic in a circle.
- The pattern of the main part is knitted as follows: you need to make 3 lifting loops and knit them in the same loop several times: 1 double crochet, 2 lifting loops, a regular stitch. Then 2 loops should be skipped and 2 double crochets, 2 lifting loops and 1 regular stitch should be knitted into the next loop, and so on. After this, make a connecting post.
- When approximately 27 cm or more is knitted from the beginning (the height of the hat can be made to any height), you need to gather together and tighten all the loops of the last row. Then they need to be secured on the wrong side and the seam sewn with an elastic band.
Knitting Tips
The beanie style headdress features neatly knitted fabric. It follows that stocking needles are not suitable for creating the main part of the hat. Beginner knitters take them for work, thereby making a mistake.
In the finished product, transitions from one knitting needle to another are noticeable on the canvas, disrupting the harmony of the hat. Experienced craftswomen on handicraft resources on the Internet give simple recommendations for working on a stylish headdress:
- use circular knitting needles, with stocking needles - only knit decreases;
- take yarn of the color and texture that the person for whom the hat is being knitted likes;
- if your knitting skills are not very well developed, then before starting work, watch training videos on making beanies;
- knit a test sample from the selected yarn to calculate the number of loops for the desired size of the product;
- Don’t be afraid if it doesn’t work out the first time and you have to unravel the product, with each new time your hand gets “stuffed” and one day the hat will turn out perfect.
Women's hat with pompom
A model of a women's beanie hat with a pompom, where the elastic band goes into a loose, wide main part, is also called a beret.
How to tie a beret correctly:
- It is better to take yarn with a density of 50 g per 90 m, so that the columns fit close to each other and the pattern lays out beautifully.
- You will need 150 g of yarn to ultimately get a headdress measuring 52-56 cm.
- To knit with high-density yarn, use hook No. 7.
- It is better to take a dark color of thread for a beret: black, brown or gray. Among brighter shades, you can choose dark blue or burgundy. The knitting pattern looks more beautiful on the rich shades of the beret.
- The beret is knitted with embossed stitches for a certain wall of the loop. The direction of knitting is in the circle. First you need to form the elastic band, then the main part of the product.
- First, you need to cast on 60 loops of the air chain and use a connecting column to close the chain into a ring. After this, you need to make 2 lifting loops, knitting them with a regular stitch in the first loop.
- The first row should be passed with raised single crochets over the near half of the loops, ending with a connecting loop. Thus, starting from the rise and ending with the connection, knit 4 more relief rows with double crochets.
- Knitting the main part of the hat starts from the 6th row and is done behind the far half of the loops using relief stitches. After the connecting column at the end of each row, you need to cast on 2 air loops for a beautiful transition.
- Rows 6-18 are knitted using regular stitches, with 2 stitches made in every fourth stitch of the previous row. As a result, each of these rows contains 75 columns.
- From the 19th row to the end of knitting there is a gradual decrease in loops. Rows 19, 21 and 22, every 4 and 5 stitches are knitted in one row. In the 23rd row, each 3rd and 4th stitch should be knitted with one loop. Rows 20 and 24 are formed according to the principle of basic knitting. From 25 to 28 rows, every 1 and 2 stitches are knitted in 1 row - as a result, the last row consists of 9 loops, which should be pulled together and closed with a pompom.
- The opposite edge - the base of the hat - must be tied with 2 rows of regular columns with dark yarn.
LiveInternetLiveInternet
These hats are actually crocheted and not knitted.
Before you start knitting hats, I suggest you take a closer look at the pattern. Simple but cute, very reminiscent of 1x1 rib knitting, that's why I call it that
Elastic band 1x1 crochet The main elements of the pattern are air loops and connecting posts. Other names for the connecting column are “blind” or “tight” loop, half-column, half-single crochet, auxiliary loop. In English – slip stitch. Hence the name of this knitting technique - slip stitch crochet, i.e. knitting with connecting stitches. Important - in this pattern, all connecting posts are knitted behind the back/far loop of the previous row.
The first few rows are the hardest, then knitting is easier.
Be careful. Insert the hook exactly into the back/far loop of the loop, otherwise the pattern will turn out different, not a 1x1 elastic band. Periodically count the number of stitches in a row so as not to lose stitches or add extra ones. Try to knit all the loops and stitches evenly, especially along the edges, so that there are no stretched areas or sagging threads in the fabric. Watch which direction you turn the knitting when moving from row to row, the appearance of the edge depends on this. Since the connecting column is the lowest in height of all the columns, the increment of the fabric is slower than with regular knitting. In addition, the speed is slowed by the habit of knitting the connecting stitch in two steps. To increase speed, you need to choose the optimal position of your hands and learn how to knit a connecting post in one step. Partial knitting The hats are knitted crosswise in sectors/wedges. The crown is formed according to the principle of partial knitting, i.e. knitting in short rows. The first method of partial knitting
Forming a “ladder” of the first sector and knitting the initial row of the next sector. 1 - the first sector is knitted, it turns out to be a “ladder” 2 - we begin to knit the first row of the next sector 3, 4, 5 - we knit the cloves sequentially, here we need to work extremely carefully to knit the same number of loops as in the first row of the sector 6 - the first row the second sector is knitted 7, 8, 9 - we turn the work and knit the next row of the second sector, then we knit in exactly the same way as we knitted the first sector, according to the same pattern, so that we get exactly the same “ladder” 10 - again we do not knit the row until end to get the first step of the “ladder” of the second sector 11 - all the steps of the second sector are knitted 12 - repeating steps 2-6, close the steps of the second sector and get the first row of the third sector The second method of partial knitting
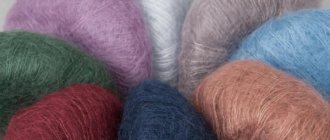
Recommendations for choosing yarn and selecting a hook. The yarn is selected depending on the season. For winter and autumn/spring, wool, acrylic or mixed fiber yarn are suitable.
In the photo from left to right YarnArt Wool (80% wool 30% polyamide, 100g 340m) hook 2.5mm Alize Baby Wool (40% wool 40% acrylic 20% bamboo, 50g 175m) hook 3mm YarnArt Crazy Color (35% wool 65% acrylic, 100g 260m) hook 3.5mm
And this is a sample made from double thread Alize Baby Wool Batik Design (40% wool 40% acrylic 20% bamboo, 50g 175m) 4mm hook In addition, you will need scissors, a tapestry needle (with a blunt end), and a measuring tape. Knitting markers, a notebook, pen, and pencil for calculations may also be useful.
Sample and calculation For calculation, a “head circumference” measurement is required. The height of the hat is dictated by the style. For head-fitting hats, you can use the table data when calculating
Table from here https://www.stranamam.ru/post/2350439/ We knit a sample to determine the knitting density. It is advisable to wash it according to the recommendations on the label, then dry it without stretching it. Then, on a slightly stretched sample, we count the number of loops/stitches horizontally and the number of scars vertically (1 scar = 2 rows). Let's do the calculation. The direction of knitting the hat is along the circumference of the head. For example, horizontally 5cm=17 stitches, which means for a hat height of 22cm the cast-on chain will be 75 stitches, and vertically 5cm=10 stitches, which means 55cm (head circumference) will be 110 stitches. Since the hat is knitted in sectors/wedges, it is necessary to distribute the resulting number of hems among the sectors. I selected the ratio of 11 sectors of 10 rubles = 110 rubles. Errors in determining the number of sectors. The number of sectors can be reduced or increased. The more sectors there are, the easier it is to correct the knitting if an error has crept into the preliminary calculations. It will be enough to tie or loosen one or two sectors so that the hat fits the circumference of the head.
Errors in determining the length of the cast-on chain At first, especially when working with unfamiliar yarn, errors occur in determining the length of the cast-on chain. If the dial chain is short, the height of the hat is insufficient. If the typesetting chain is long, the height, on the contrary, turns out to be excessive. What to do in such cases? If you don’t want to bandage your hat, if the height is not enough, you can tie a strip of the required width at the bottom
If there is excess height, you can turn the excess outward or turn it inside out. If these options are not suitable, you will have to undo the hat and bandage it. Making a seam
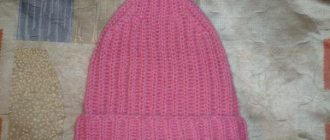
Just a hat Suitable for children and adults. Fits well on the head and covers the ears.
Hat height is approximately 20-22cm
Yarn Alize Superwash (75% wool 25% polyamide, 50g 210 m or 100g 420 m) or YarnArt Wool (80% wool 30% polyamide, 100 g 340 m) Hooks 2.5 or 3 mm.
We collect a chain of 75 air. loops + 1 air. lifting loop and knit the “ladder” of the first wedge using partial knitting using the first method according to the algorithm
1 rib - leave 1 loop unknitted 2-7 rib - leave 2 loops unknitted 8 rib - leave 4 loops unknitted 9 rib - leave 5 loops unknitted 10 rib - leave 6 loops unknitted In total, you need to knit 11 such wedges/sectors. At the end of knitting, carefully pull the loops at the top of the head, sew the edges and tuck the tails into the fabric. The yarn consumption is about 2/3 of a 100g skein.
To knit from other yarns, you need to make your own calculations. Examples of hats Using the same principle, you can knit a variety of hats. Classic Stocking Cap design Nancy Nehring
For the lapel it is necessary to increase the number of loops of the cast-on chain. You can choose a different pattern for the lapel. Rib Stitch Cap design Nancy Nehring
Corkscrew Tassel Cap design Nancy Nehring
Spiral diagram
Hats that cover ears These hats differ from simple ones only in the shaped bottom and the presence of ears. The technique of knitting with connecting stitches allows you to create a figured edge.
KEITAS
source
Warm crochet beanie
A beanie hat knitted with a 3-D pattern reminiscent of snowflakes is very warm and beautiful. The pattern and description of crocheting this pattern is quite simple - even a novice needlewoman will understand it.
Recommendations for knitting a warm beanie:
- The yarn must be taken natural, single-component. It is better if it is merino or other wool, because the hat should be warm.
- The recommended thread density is 50 g per 120 m. The yarn should be warm, but not too dense. This is necessary so that the pattern in 3-D format fits beautifully.
- For threads of the specified density, you will need a No. 3 hook.
- It is better to make the product in one of the cold shades, because it is intended for winter wear. It will look beautiful if the chosen yarn is not monochromatic, but with rare splashes of a different color.
- The approximate size of the headdress is 50-54 cm. The height is made according to the size of the head or a little more - in this case, the top of the hat will have a slight turn.
- Knitting is done along the product, in the round.
- To start knitting, you need to cast on a chain of 60 loops. Odd rows begin with a lifting loop and a regular single crochet and end with a regular single crochet. At the beginning and at the end of even rows, 3 air loops are made.
- All other actions in the knitting process to form a pattern are performed in accordance with the diagram.
- When the number of stitches corresponding to the desired length of the hat has been knitted, you should tighten the loops at the top of the head.
- The lower end of the hat must be tied with two rows of regular single crochets.
Such a necessary thing during the cold season, like a beanie hat, can be crocheted yourself using a crochet hook. To do this, it is enough to use knitting patterns and a description of the manufacturing process of a specific model.
Author: Anastasia Kostylina (anna-master)
Article design: Natalie Podolskaya
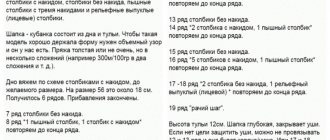
Crochet pattern for one wedge hat
And then we knit the second wedge in exactly the same way - 12 rows of the pattern
We try on the products on the client’s head and knit exactly as many wedges as required for the size. In my case - 11 wedges.
Then we sew the cap and tighten the crown with a needle.
All that remains is to tie the product along the bottom edge, thereby depicting a kind of binding that will fit the product on the head.