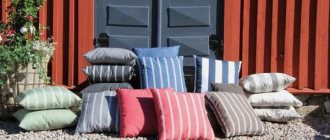
You can create coziness in your home with the help of decor such as cross-stitched sofa cushions. After a hard day at work, it’s nice to sit on them and relax.
They must be combined with the color of furniture, accessories and surrounding textiles. This cross-stitched pillow will attract the attention of guests and will also become an unexpected gift for loved ones.
Types of pillow embroidery: a brief overview
When it comes to embroidered pillows, most people's imaginations picture small square or rectangular pillows embroidered with a cross. Such thought pillows fit perfectly into any interior, emphasizing its individuality and style. Cross-embroidered pillows are universal - they can be used both as decorative elements and as sleeping pillows. However, it is wrong to think that embroidered pillows are limited to cross stitch only.
A fairly popular type of needlework is embroidering pillows with satin ribbons. Pillows made using this technique look very impressive and noble. Pillows embroidered with beads look very unusual. The shine and shimmer of the beads create a bright and voluminous picture that seems to come to life when the sun's rays hit it. Pillows made using these techniques are very beautiful, but it is not recommended to use them for their intended purpose; they serve exclusively for decorative purposes.
In addition to cross stitch, universal pillows include products made using carpet techniques, as well as those embroidered with decorative stitches. All these techniques do not require careful preparation; anyone can master them.
Assembly secrets
Embroidering a pillow according to the diagram also implies its assembly. First, you need to buy the back side, a kind of pillowcase with a zipper.
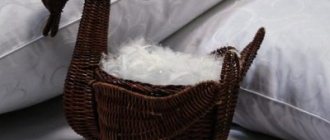
You can sew an inner pillowcase with your own hands from any light fabric. We make marks on the border and sew it on a machine. After that, take any synthetic stuffing material and put it in a pillowcase.
To connect the bottom side with the front side, on which the embroidery of the pillow is located, you need to attach them to each other and sew them up with threads. Unzip and turn the material inside out. Place the stuffed pillowcase inside.
So we figured out the secrets that pillow embroidery conceals. Next, you will look at detailed diagrams on the basis of which pillow embroidery can be made.
Cross stitch pillows
The popularity of cross stitch is explained not only by the magnificent appearance of the finished products, but also by the simplicity of the technique itself. The essence of cross stitch is to apply two cross stitches to the base fabric in a certain sequence, forming a pattern or ornament.
Despite the simplicity of the technique, the result invariably pleases and gives an incentive to create again.
To embroider a pillow with a cross, no special preparation is required, and the materials and tools needed are the simplest.
First of all, you need to select the base fabric for embroidering the pattern. We recommend choosing a material with clearly visible thread weaves, such as cotton, calico or linen. Even more convenient is a special canvas for embroidery, which is used as Stramin or the equally popular Aida.
Stramin is a canvas made of cotton, treated in a special way, giving it special rigidity. In appearance, stramine is a thread mesh with fairly large cells. The drawing is applied to the canvas in advance, so even inexperienced needlewomen can easily work with it. Pillows embroidered on stramine canvas have texture and volume.
Aida is also a natural cotton backing for cross stitch. Its peculiarity lies in the special interweaving of threads that form holes, which are the corners of the squares - a needle is inserted into them during embroidery. Crosses made on Aida canvas turn out neat and of the same size.
When selecting Aida canvas, you should pay attention to such an indicator as count (the number of cells per inch). The smaller the canvas number, the larger the cell and, accordingly, the larger the cross. Experienced craftswomen advise starting with Aida-14, the cross will be large enough, the embroidery process will not strain your eyesight and will not tire you.
Cross stitch allows the use of a wide variety of threads: from ordinary cotton floss to melange. The appearance of the finished product depends on the choice of threads. The use of wool threads makes the product textured, and silk floss gives the image a realistic appearance. When embroidering the design of the front part of the pillow, be sure to leave about two to three centimeters on each edge for attaching the back part of the pillow.
Most often, the finished pillow is sewn on three sides, turned inside out, stuffed, and the fourth side is hand-sewn so that it can be easily ripped apart if necessary. Another option is to use a zipper, which can be located either on one side of the pillow or in the middle of the back of the product.
Thus, cross-stitching pillows is a fascinating activity, accessible even to novice needlewomen.
Ready-made kits for embroidering pillows
Cross stitch techniques
There are several ways to apply crosses to fabric.
The first method is to embroider the entire cross. Using this method, crosses are applied both vertically and horizontally. Let's get acquainted with the vertical execution of the stitch.
Vertical stitch method
- The procedure begins by inserting a needle and thread into the upper right hole.
- Next it is stitched diagonally to the lower left point.
- We climb up from the inside out.
- We descend diagonally into the lower right hole.
- After one point we go up.
- The thread passes diagonally into the lower left hole of the next square.
- The following steps are repeated.
On the wrong side of the work, you get two even straight lines parallel to each other.
Horizontal stitch method
Crosses are embroidered horizontally in the following steps:
- The stitching starts from the top right to the bottom left hole.
- From the lower left corner it goes to the upper left point.
- Next, the needle and thread are inserted into the lower right hole.
- The needle comes out diagonally at the top right point.
- The procedure is repeated again.
While working, we observe the direction of the stitches - they should lie in one direction, then you will get an aesthetically beautiful and correct pattern. The reverse side of horizontal embroidery is distinguished by oblique lines.
Step-by-step execution of oblique stripes in one direction, then in the other. This method is performed in the following steps:
- As in the technique described above, work begins from the right-left hole, descending diagonally into the lower left hole.
- We go up along the wrong side.
- All manipulations are repeated until the end of the row.
- The same is done in the opposite direction.
The reverse side of this embroidery is distinguished by small stitches.
Having learned how to make cross stitches, we begin to embroider wonderful sofa accessories. Cross-stitched items look original in any room of a residential building. Cushions are chosen to match the furniture, wallpaper or curtains and represent a bright accent that attracts attention.
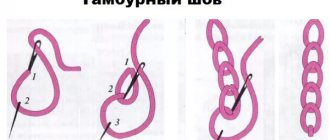
Sofa cushions are decorated with a variety of ornaments chosen by the needlewoman. Often craftswomen use a pattern of embroidered chains closed together. It is in this product that the main, central area of the pattern is combined with a border on the side. The embroiderers also depict flowers in the center, and the edges are decorated with border patterns. The combination of various images looks quite good and attractive.
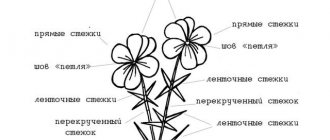
Embroidering pillows with decorative stitches
Even a child can master embroidering pillows with decorative stitches. This technique is distinguished by the fact that a fairly large number of types of seams are used, which makes the embroidery process not boring. Due to the fact that in this technique the pattern occupies only part of the front fabric of the pillow, the time spent on work is significantly reduced. The work requires standard tools and materials (base fabric, needle, thread, hoop).
The finished pillow is smooth and pleasant to lie down on and relax. The appearance is distinguished by its sophistication and ornate patterns. The choice of embroidery pattern is limited solely by the imagination of the craftswoman.
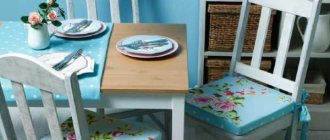
About sizes, materials and subjects for embroidery
If you are planning to sew a pillow with embroidery, then, of course, the first thing you need to do is decide on the plot. I initially planned to make pillows with a marine theme, so my embroidery is appropriate:
If you have not yet had experience in sewing pillowcases with embroidery onto a finished pillow, then I will share a few tips:
- First, measure the pillow itself
- Based on the size of the pillow, select an embroidery design of a suitable size
- Based on the color scheme of the embroidery, select the fabric for the pillowcase
My pillow size: 35 x 35 cm. Embroidery size: 17.5 x 17.5 cm. Finished pillowcase size: 38.5 x 38.5 cm.
A little about how I embroidered this wonderful sampler from Lanarte. The basis was taken from a uniform weave Lugana fabric from Zweigart (Lugana 3835/100, ct. 25) in white. Since the white color is quite easily soiled, I decided to tint the canvas the color of sea sand, making it beige with streaks (tinted with strong brewed black tea).
YOU WILL NEED IT
In this useful article, in addition to photos of embroidery processes, I share my secrets when choosing a needle, show in which cases I secure the thread with a small, small knot, when I embroider with two (!) needles at once, as well as what floss threads I used in my work and why.
I really like patchwork, especially when the perfectly combined fabrics also highlight the embroidery. That's why I decided to sew pillows using the Patchwork technique.
I sewed from Peppy fabrics. I have already sewn from them, I liked how they worked and were quite affordable. I ordered from the Leonardo online store. I would like to note that I made the right decision with the colors of the fabrics: they arrived in exactly the shades that I needed, even though I looked at them not in person, but on the monitor screen. I consider this a huge plus in Peppy’s karma!)
PEPPY 4520 art. 802 (50×55 cm) 100% cotton
The same fabric was used for the back of the pillow, so 2 scraps were needed:
PEPPY 4702 art. 662 (50×55 cm) 100% cotton
This is the fabric I used for the bias tape:
PEPPY BELLA SUEDE art. BELL 189M (50×55 cm) 100% cotton
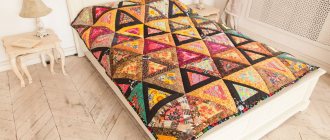
Carpet pillow embroidery technique
The carpet technique of embroidering pillows allows you to get a very impressive product, while it is easy to master and does not require a large amount of materials and tools.
The essence of the technique is to create fluffy pile or terry loops of any required length. If, when cross-stitching or decorative stitches, we get a smooth product, then the pillow using the carpet technique will be voluminous, very soft and fluffy, which children will appreciate. Manufacturers offer a wide range of carpet embroidery kits specifically for children.
Thick acrylic threads are used for embroidery in carpet technology; they are durable and retain their original appearance for a long time. The base is Stramin or linen. To create a pattern, a special needle or hook with a lock is used.
The only drawback of this technique is that creating a pillow will take quite a long time. At the same time, even this disadvantage can be considered as an advantage: embroidery using carpet technology allows you to develop perseverance and patience.
A little history
From history it can be understood that fabric-based products were used in ancient times by the Chinese and Egyptians. They were beautifully decorated , as they were considered a luxury item, but only wealthy people could afford them. It was customary to use gold chains and precious stones to decorate such things.
Rome and Greece became trendsetters in the use of beautiful and unusual bed pillows. During the Middle Ages in Europe, the need for luxury household items increased. The European nobility was ready to buy fashionable embroidered items for absolutely any money, which were necessarily considered an indispensable paraphernalia for secular boudoirs. At this time, a large number of girls from poor classes mastered various types of embroidery; ultimately, this craft became for them additional income and an opportunity to improve their lives.
But even in the territory of rich houses, the ladies of the court tried to learn the art of embroidery. Elegant and well-groomed hands were constantly busy with some kind of work, in most cases these were small pillows that served as a real decoration for the whole house and were used as gifts.
It is worth noting that our ancestors had a peculiar cult of embroidery . From childhood, the girl had to learn the art of embroidery, and by adolescence she already had her own set, consisting of everything dowry. It included both clothing and various bedding, which were decorated with embroidered patterns. For any girl, items embroidered on her own were considered a valuable part of her dowry.
Currently, not every woman has such skill. Embroidery made by hand is still in demand and valuable to this day, so its cost is also overpriced. In order to master such a skill, you need to have a certain desire, make the maximum amount of effort and find a lot of free time.
It is worth noting that if you are limited in time, or when handicrafts are just beginning to be studied, you can use ready-made kits for embroidering products that are sold in special sewing stores. Such a set will include: two complete blanks for a pillow - the front and bottom parts of the entire pattern, threads and additional needles.
Embroidery of pillows with ribbons
Ribbon embroidery is a very beautiful type of needlework that allows you to create exclusive products. At first glance, embroidery with satin ribbons seems quite complicated, but you just need to practice a little, and this technique will completely stop intimidating, you will gain confidence in your abilities and the desire to create beautiful pillows with a variety of plant or animal subjects.
To start working in this technique, you need a standard set of tools and materials: a sharp needle with an elongated eye, mesh fabric, satin ribbons and a hoop.
To create a pattern, a variety of seams are used: stem stitch, needle stitch, chain stitch, eyelets, etc. With their help, various three-dimensional figures are created - flowers, insects, animals.
Another advantage of pillows embroidered with ribbons, in addition to their mesmerizing beauty, is that for the base you can use not only the usual canvas, but also other materials, for example, velvet or silk. Creative experiments with base materials allow you to create a truly unique product.
How to create a pillow
To create a unique pillow with original patterns, we immediately make a pillow, and then sew an embroidered pillowcase on it.
Sewing the pillow itself is easy. Let's look at detailed step-by-step instructions for the creative process.
Step 1
We take a dense material, cut out two lengths of our product with seam allowances.
Step 2
We sew three and a half sides of the future product using a sewing machine.
Step 3
Cut out the padding polyester to the required size.
Step 4
We place the artificial filler in a sewn pillowcase.
Step 5
Sew up the remaining hole using a blind stitch.
The interior item is almost ready. All that remains is to decorate it with a delightful pillowcase embroidered with a cross.
Before decorating the product, we think about what fabric we will use. You can use the same fabric for the entire pillowcase, perhaps reproduce the ornament on the canvas, and decorate the back part with a different material structure. Everything depends only on the wishes and creative fantasies of the needlewoman.
Let's start cross stitching the pillow
The schematic drawing on paper is divided into squares ten by ten cells. To make the ornament perfect, use a special marker to draw the same squares on the canvas as in the chosen pattern. We mark the center of the pattern by folding the canvas in half twice and begin embroidering from the mark we made.
Applying all the above recommendations, you will embroider an exclusive and warm item.
Back side of the pillowcase
Place the back side of the pillowcase over the front side and trim it. Then along the lower edge of the back side we make a hem of 1 cm, fixing it with an iron:
Then we make a hem of 1 cm again, again fixing it with an iron:
The hem can be glued with a web or sewn with a hidden seam:
Fashionable cross stitch patterns
The most popular pattern on pillows is flowers and plants. Sometimes a geometric pattern is used; it emphasizes the interior of the living room well.
Attention! Sometimes you can add ribbons and lace or beads to the embroidery. The size of decorative pillows is usually 30×30
The embroidery should be in the same style as the room itself.
Richelieu idea
Even a novice seamstress can cross-stitch pillowcases, but it is advisable to buy ready-made kits. Such crafts will look great in the living room or bedroom, and for a children's room you can make bright drawings of animals or fairy tale characters. Before you start embroidering, you need to remember that the canvas and fabric must be washed to avoid shrinkage. If, nevertheless, a person is not confident in the success of the work, then it is better to contact the masters in the studio.
Curtains with embroidery
Curtains and tulle with embroidery will decorate any room in the house. Light curtains with floral patterns have been popular for a long time. They come in gold, white, cream and multi-colored. If the window is large, then tulle with a large pattern is suitable for it, for small ones - with a small ornament.
For classic interiors, curtains made from natural materials, decorated with colored embroidery, are suitable.
Thick curtains made of natural material with bright embroidery will look impressive. For an Indian interior, curtains embroidered with gold are suitable, for rooms in a rustic style - linen curtains with small crosses, for an apartment in the Provence style - curtains with lemons, lavender, and small roses stitched on them.
Embroidery in the kitchen interior
To create a special mood, you can use old embroidery in a modern interior. Such “riches” are sometimes stored in grandmothers’ chests. There you can find beautiful old curtains, which, after cleaning, will become a magnificent interior decoration.
New Year's embroidery for a festive interior
Paintings with embroidery in home interiors
Embroidered paintings look stylish and impressive in the interior of an apartment. Among the huge variety of plots, you can always find the perfect one for a specific project. Landscapes, hunting scenes, and ancient castles are suitable for a classic living room.
Embroidery on the tablecloth
In the kitchen, you can hang bright panels on the walls depicting vegetables, fruits, flowers or scenes from village life. For the bedroom, images made in calmer colors are appropriate.
The painting should be noticeable in the room, so it should be placed on a plain wall. Embroidery will not look good against wallpaper with a floral or geometric pattern. It is also important to choose the right frame. A gilded baguette is suitable for classic interiors, and a wooden frame is suitable for loft, Provence, country, shabby chic. In techno and minimalist styles, products are framed in glass or metal.
Diamond embroidery in the interior