In this article we will talk about how to embroider a chain stitch correctly.
Handicraft is an entire art. To create beautiful things you need to develop certain skills and gain a lot of experience, and this takes time. So products that are made by hand are much more expensive. Hand embroidery is most valued. To make a real painting, you need to master certain techniques. The most popular of all is the chain stitch. Let's find out how to make it.
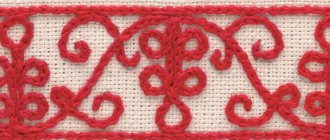
Chain stitch pattern
The chain stitch is very recognizable. On the front side the stitches form a chain, and on the back side there is an even and neat stitch. Scheme:
Very often the chain stitch is called “chain”. Less known, but very interesting names: “mouse trail”, “pigtail”, “loop”, “braided”.
For reference. The tambour seam is over 2 thousand years old.
Previously, it was performed with a special tambour needle, very similar to a thin and long crochet hook. With it, the chains always turned out smooth and continuous. Today such hook needles are also sold. But more often, a simple needle and floss thread are used for embroidery.
Application
For someone who is not into embroidery, knowing the basics of how to make a chain stitch will help when repairing clothes. This technique can successfully imitate a machine chain stitch. With some practice, a high degree of similarity can be achieved.
You can sew patches with chain stitches if your goal is to highlight this detail against the general background. This seam is also used when it is necessary to make a series of loops to transition from knitwear to knitting technique.
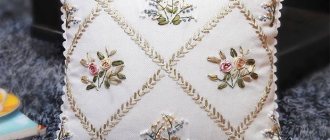
But still, the main purpose of chain stitches is decorative embroidery with a pattern or satin stitch. This technique makes it possible to trim the fabric with a strict chain pattern along the contour, and to fill parts of the composition completely to form various types of patterns: stems, flowers, petals, leaves and other elements.
How to learn to embroider with chain stitch?
First you need to select materials for embroidery.
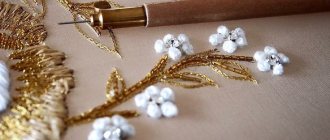
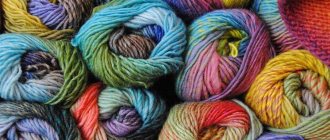
- Threads. For classic tambour embroidery, floss threads are used. The chain stitch can also be made with knitting threads, metal threads, decorative cord, and thin ribbons.
- Needle or hook. It is recommended to embroider with an embroidery needle. It differs from the usual sewing one by the larger width of the eyelet. In addition, some embroidery needles have a blunt tip, which is very convenient when embroidering on canvas. If you plan to embroider on mesh or fabric, you can use a thin hook: Luneville, Indian or other.
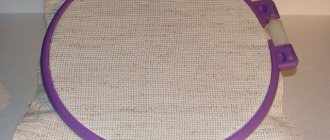
- Hoop. Allows you to stretch and secure the material. It is more convenient to embroider on a hoop, and the work is more accurate.
- Pattern (drawing). Chain stitch is usually used to embroider according to a sketch. You can use carbon paper. Place the carbon copy on the fabric, attach the printed design on top and trace along the outline. To prevent the design from moving, pin it in a circle.
You can choose embroidery patterns from a selection of coloring pages. For example:
You can transfer the design onto the fabric with a water-soluble marker. A “sandwich” made from a template and fabric is attached to the window. Then all the lines are outlined with a marker.
Handicraft stores also sell special embroidery templates on thermal paper. Thermal paper is placed on the fabric with the rough side down, and a hot iron is passed on top.
For reference. The name of the chain stitch comes from the round hoop on which it was made in ancient times. They looked like a large drum - a “tambour”.
Step-by-step instruction
Children and adults who have never embroidered before should be shown how to perform a chain stitch step by step. There are training videos for beginners:
Embroidery begins on the left side, smoothly moving to the right.
Detailed instructions:
- First you need to make a tack and bring the needle and thread to the front side.
- We insert the needle into the same hole from which the thread comes out.
- Lightly tighten, leaving a 3-5 mm loop on the outside.
- We insert the needle (from the inside) inside the loop at a distance of 1-3 mm from the first puncture.
- Carefully tighten the loop.
- We insert the needle again into the point from which the thread comes out.
- Pull the thread, leaving a small loop.
- We insert the needle inside it. We tighten the thread. You will get a chain of two links.
- Then they embroider according to the same principle, observing the rule: each loop must come out of the previous one.
- At the end of the embroidery, the last loop is secured with a mini stitch.
Important! If any loop-link of the “chain” is missing (not fastened), the chain stitch will unravel.
Types of chain stitch
“Chain” is the basis of the chain stitch, and its simplest variety. When the initial technique is mastered, you can learn more complex and beautiful embroidery:
- With fastening. Make a large loop and secure it with a small stitch. Place a flower out of the loops. Loops can be of different sizes.
- Wide loops. To obtain pronounced links of the “chain,” when forming a loop, the needle is inserted not into the hole where the needle comes out, but nearby (a few millimeters below).
- Alternating loops of different sizes. You can diversify the seam by alternating small loops with large ones.
- Wrap seam. After finishing the embroidery, wrap the chain with thread of the same or a different color. The thread can be laid in different ways, resulting in a beautiful and voluminous seam:
- Zigzag. To perform it, loops are formed not on a horizontal line, but above and below it (every 1-3 loops).
- With overlapping loops. Quite a difficult seam. The first loop stitch is secured with a fastener. The element of the second loop is performed under it. All subsequent loops are attached to the base of the loop located 2 higher.
There are about 20 varieties of chain stitch: weighted, double, rope, rosette, herringbone, lace and many others. Each of them is interesting in its own way. Tambour embroidery is often combined with other techniques. A striking example is protective embroidery with a cross and a chain stitch:
Tambour embroidery:
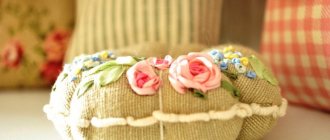
Suzane
The popularity of tambour embroidery is supported by the original traditional embroidery of eastern countries. Tajikistan, Uzbekistan, Iran have preserved their truly ancient traditions in tambour embroidery and use them in the production of hand and machine embroidery, adored by tourists from Europe.
Tajik embroidery - table runner Click to enlarge
Click to enlarge
Craftsmen sell their suzanis, bedspreads, table runners, bags, panels, pillows and bolsters at craft fairs held several times a year in Asian cities.
International Crafts Fair, Almaty, 2021 Click to enlarge
Suzane is translated as “embroidered with a needle.” Which sends us back to the distant past, when embroidery looked like a series of chain stitch loops. Now suzani can be purchased in handmade online stores and at exhibitions and fairs.
Sellers at the craft fair speak fluent English to buyers from different countries, explaining how the work is made.
A napkin purchased at a fair in Almaty. Click to enlarge
For example, this small napkin that I bought at such an exhibition is a work from Tajikistan. It is hand-woven and hand-embroidered. Every line, curl or pattern is a symbol of something. Although, I chose a napkin with a pomegranate, not because it is a symbol of fertility, but because I simply like embroidered pomegranates - they are very beautiful.
It must be said that the threads are also dyed by hand. And they don't shed. Sellers claim that the colors are obtained naturally from pomegranate peels, basma, and walnut shells. I want to believe in it, just as many foreign tourists believe in it. Or maybe this is so, because the craftswoman confidently lists how and from what to get this or that shade.
Be that as it may, this purchase of mine has been lying on my windowsill in the direct rays of the sun for 5 years now, and the colors have remained the same as on the day of purchase
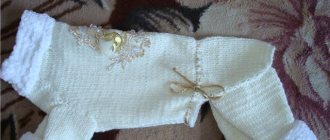
Small cushion cushion, handmade. Click to enlarge
This is a tiny sofa cushion, with a diameter of 10 cm and a length of 29 cm. When I asked the craftswoman what it was for, she simply brought it to her cheek and rested her head on it. Here in Russia it would be a small pillow called “dumka.”
Of course, along with handmade works, you can also find machine embroidered ones using the same chain stitch. It is very easy to distinguish them. From the inside out, these embroideries look completely different.
Machine tambour embroidery Click to enlarge
Machine tambour embroidery - reverse side Click to enlarge
Hand tambour embroidery - reverse side Click to enlarge
How is a chain stitch crocheted?
Using a hook, they embroider “chain” mainly on knitted items. The seam is performed in the following order:
- We fasten the thread at the beginning of the embroidery.
- Insert a hook under several knitting threads.
- Grab the embroidery thread.
- We stretch it out. A loop is formed on the hook.
- Insert the hook under the knitting threads again (next stitch in the direction of embroidery).
- We hook up the embroidery thread.
- Pull the loop through the knitting threads and the first loop.
- We tighten the thread.
- Repeat steps 5-8.
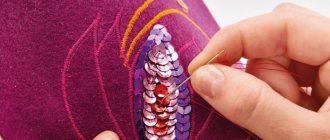
Luneville embroidery
A very popular type of embroidery, which is based on the chain stitch. Luneville embroidery came to us from France (17th century). Its peculiarity is the use of beads, sequins and bugles. It is most often performed on a mesh using a special Luneville crochet hook.
The chain stitch in this technique is performed slightly differently:
- The Luneville hook must be held strictly vertically. The screw should be directed towards the embroidery.
- The hook is inserted into the mesh, and a thread is placed on it from the bottom of the mesh.
- Then the hook is rotated 180 degrees around its axis. The thread must rotate 360 degrees.
- The hook and thread are brought out to the front side.
- Return it to its original position.
- Perform the next stitch.
Step-by-step execution of a chain stitch in Luneville embroidery is shown in the video:
Material
Photos of chain stitch on finished products are always distinguished by the clarity of the lines. Embroidery looks good on any type of fabric, the main thing is to choose a combination of working thread and the color of the main material. For cotton, linen and jeans, it is better to choose floss.
Silk, chiffon and other thin fabrics are best finished with viscose or silk threads. For wool you need to sew with the same material. Chain stitch in bright colors looks best on plain fabrics without a pattern.
Colored threads are more suitable for dense material. Batiste, muslin, tulle or voile can be decorated with white embroidery with metallic inclusions to create special effects.
Questions and answers
How to embroider with a chain stitch beautifully and accurately?
Tambour embroidery has its own secrets. You need to make small stitches of the same length, stretch the fabric well and place the loops on the same line. At the same time, do not tighten the thread too much, otherwise wrinkles will form on the fabric. If the loop lies unevenly, correct it correctly with a needle.
Where can chain stitch come in handy?
In finishing clothes, decorative pillows, napkins, interior items. Using a chain stitch, you can sew knitted parts, strengthen the shelves and the neckline (from the inside out). It is also used for tying knitted items (protects against deformation and stretching).
Embroidery is an entirely creative process. To fully immerse yourself in it, you need to hone your technique. A few lessons on a rough piece of fabric, and you will be able to embroider without thinking about where to insert the needle (hook) or how tightly to tighten the thread.
What has made this technique so popular?
The chain stitch appeared quite a long time ago, almost 2 thousand years ago, presumably in Ancient Greece, Rome and the countries of the Middle East. Later this technique became popular in ancient Rus'.
For convenience, when embroidering with a chain stitch, they began to use a wooden hoop; the fabric was pulled over a wooden ring, thereby resembling the membrane of a drum, which in French sounded like a “tambour.”
That is why embroidery in this way is called chain stitch. On fabric it looks like a braid consisting of identical links continuous with each other. Thanks to its chain-like structure, this seam can easily create complex patterns and smooth color transitions.
The chain stitch can be done either with a needle or with a crochet hook, but the first method has gained the most popularity. The technique of chain stitching with a needle has many variations, and therefore by very slightly changing the position of the thread on the fabric, you can modify the pattern.