This embroidery is done along a free contour with a single seam. Patterns can be independent or complemented using various techniques: satin stitch, stitching, etc. The technique became widespread in the 18th–19th centuries.
A little history
Tambour embroidery may have appeared simultaneously in different parts of the world. In any case, it was not possible to accurately determine one country that would be the only homeland of this technology. Most likely, at one time, needlewomen in different countries simultaneously invented this type of hand stitch for themselves. Thus, tambour embroidery appeared in the countries of the Middle East, in Ancient Rome, and Greece. The first examples of this type of needlework were discovered two thousand years ago.
And in ancient Rus', needlewomen decorated clothes, wool toys, tablecloths and curtains, and woven tapestries in this way.
Sample of Old Russian tambour embroidery Click to enlarge
Museums in many countries have collections that provide insight into the development of this art form. The State Hermitage collection carefully cares for works of applied art from different European countries: from clothing decorations to room decor of the 16th-20th centuries.
The State Hermitage Museum organizes exhibitions to showcase magnificent examples of embroidered clothing worn by royalty and court nobles, as well as palace decor that dates back 200 years.
These specimens are displayed through thick glass and removed from their storage boxes in a "4-handed" manner, taking special care not to damage the antique fabric.
Exhibit from the State Hermitage collection Click to enlarge
Click to enlarge
Click to enlarge
I would like to say a few words about the title. It is believed that it comes from the word “tambourine” - a small drum. This is exactly what the canvas, tightly tucked into an embroidery hoop, seemed to resemble.
Types of chain stitch
“Chain” is the basis of the chain stitch, and its simplest variety. When the initial technique is mastered, you can learn more complex and beautiful embroidery:
- With fastening. Make a large loop and secure it with a small stitch. Place a flower out of the loops. Loops can be of different sizes.
- Wide loops. To obtain pronounced links of the “chain,” when forming a loop, the needle is inserted not into the hole where the needle comes out, but nearby (a few millimeters below).
- Alternating loops of different sizes. You can diversify the seam by alternating small loops with large ones.
- Wrap seam. After finishing the embroidery, wrap the chain with thread of the same or a different color. The thread can be laid in different ways, resulting in a beautiful and voluminous seam:
- Zigzag. To perform it, loops are formed not on a horizontal line, but above and below it (every 1-3 loops).
- With overlapping loops. Quite a difficult seam. The first loop stitch is secured with a fastener. The element of the second loop is performed under it. All subsequent loops are attached to the base of the loop located 2 higher.
Scope of application of tambour embroidery
Despite its long history of two thousand years, the chain stitch has not lost its popularity today. This is easily explained: it is performed extremely simply and even a novice needlewoman can master it in just a few attempts.
Ease and accessibility of execution
You don’t need any specific patterns - you can embroider patterns of any complexity using chain stitch. The stitch length can be adjusted at your discretion; it does not have to be the same throughout the entire fabric. Thanks to this, you can get complex, bright patterns.
Special equipment is also not required - just an embroidery needle or crochet hook and, of course, a hoop. You can make a chain stitch on any fabric and any type of thread. And most importantly, these chain stitches look very nice and modern.
Where can you find chain stitch?
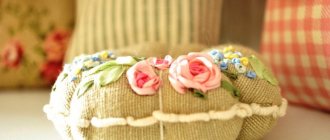
Today the chain stitch has a very wide application. It can be found in the decor of pillows and bedspreads, on clothes and accessories, decorative rugs, panels, tapestries, and in the decoration of toys. They are used to both design contours in other types of embroidery, as well as complete satin stitch, filling the entire canvas with chain stitches only. It is used to secure edges in products, and in counted seams, and in openwork embroidery.
Pillowcase for decorative pillow (Uzbekistan) Click to enlarge
What materials are used for embroidery using this technique?
Chain stitch, as a universal method of embroidery and fastening colored threads on the surface of fabric in the form of chains, involves the use of various materials.
It could be:
- cotton fabric;
- silk fabric;
- suede and leather;
- felt wool materials;
- jeans, corduroy;
- knitwear
The choice of threads also does not have strict restrictions.
Their thickness and texture depend on the chosen fabric and should be in harmony with it. For example, floss gives a more voluminous effect than simple twisted yarn. For dense, thick fabrics, bulky threads are chosen, and for thin materials, threads of a smaller diameter are used. When choosing material and threads, you should pay attention to the following:
- The materials used should not fade. Before embroidery, threads should be rinsed in water until the color disappears. To fix the dye, they can be rinsed with a vinegar solution.
- When embroidering, it is important to consider the possibility of materials shrinking when wet.
- Embroidery threads should have uniform thickness and twist.
Suzane
The popularity of tambour embroidery is supported by the original traditional embroidery of eastern countries. Tajikistan, Uzbekistan, Iran have preserved their truly ancient traditions in tambour embroidery and use them in the production of hand and machine embroidery, adored by tourists from Europe.
Tajik embroidery - table runner Click to enlarge
Click to enlarge
Craftsmen sell their suzanis, bedspreads, table runners, bags, panels, pillows and bolsters at craft fairs held several times a year in Asian cities.
International Crafts Fair, Almaty, 2021 Click to enlarge
Suzane is translated as “embroidered with a needle.” Which sends us back to the distant past, when embroidery looked like a series of chain stitch loops. Now suzani can be purchased in handmade online stores and at exhibitions and fairs.
Sellers at the craft fair speak fluent English to buyers from different countries, explaining how the work is made.
A napkin purchased at a fair in Almaty. Click to enlarge
For example, this small napkin that I bought at such an exhibition is a work from Tajikistan. It is hand-woven and hand-embroidered. Every line, curl or pattern is a symbol of something. Although, I chose a napkin with a pomegranate, not because it is a symbol of fertility, but because I simply like embroidered pomegranates - they are very beautiful.
It must be said that the threads are also dyed by hand. And they don't shed. Sellers claim that the colors are obtained naturally from pomegranate peels, basma, and walnut shells. I want to believe in it, just as many foreign tourists believe in it. Or maybe this is so, because the craftswoman confidently lists how and from what to get this or that shade.
Be that as it may, this purchase of mine has been lying on my windowsill in the direct rays of the sun for 5 years now, and the colors have remained the same as on the day of purchase
Small cushion cushion, handmade. Click to enlarge
This is a tiny sofa cushion, with a diameter of 10 cm and a length of 29 cm. When I asked the craftswoman what it was for, she simply brought it to her cheek and rested her head on it. Here in Russia it would be a small pillow called “dumka.”
Of course, along with handmade works, you can also find machine embroidered ones using the same chain stitch. It is very easy to distinguish them. From the inside out, these embroideries look completely different.
Machine tambour embroidery Click to enlarge
Machine tambour embroidery - reverse side Click to enlarge
Hand tambour embroidery - reverse side Click to enlarge
Materials and tools
This type is very common and simple; it does not require special tools. However, to make it easier to work, you still need to have the necessary set of tools. This inventory includes:
- hoop. If in the old days there were only round and large hoops, now their variety is amazing.
- textile. Absolutely any fabric is suitable for this type of embroidery: dark material, silk and velvet. But for beginner craftswomen, it is better to hone their silk organza skills.
- hook and needle. Any needle is suitable for tambour embroidery, but it is better to choose a special hook.
- threads You need to choose the thickness and composition of the threads based on the work that will be performed. You can use silk, cotton and even wool threads. Basic requirements for thread are imposed when you work with crochet. They need to be strong and easy to tie knots.
- tambour embroidery is most often used to decorate fabrics, so there is no way to do without decorative elements. Such materials include: rhinestones, sequins, beads and stones. In general, you can use any decorating materials that you like.
Interesting! Currently, the chain stitch is used for decorating bedspreads, pillows, clothing, accessories, panels, as well as for finishing toys.
Tambour embroidery on a dress from Coco Chanel
1922
This chain stitch dress by Coco Chanel dates back to 1922. It is curious that in the fall of 1921, Grand Duchess Maria Pavlovna Romanova, fleeing poverty, came to Coco Chanel with an offer to do embroidery for her models. Of course, she was not “poor” in the usual sense, she was simply looking for options to have a means of subsistence.
After completing machine embroidery courses, hiring girls embroiderers (at first she hired only compatriots), she created her own Enterprise “Kitmir”, with which she agreed on cooperation with the owner of the fashion studio Coco Chanel.
It is possible that the embroiderers of the Kitmir house embroidered this splendor.
Tambour embroidery on a dress from Coco Chanel, fragment Click to enlarge
Chain stitch pattern
The chain stitch is very recognizable. On the front side the stitches form a chain, and on the back side there is an even and neat stitch. Scheme:
Very often the chain stitch is called “chain”. Less known, but very interesting names: “mouse trail”, “pigtail”, “loop”, “braided”.
For reference. The tambour seam is over 2 thousand years old.
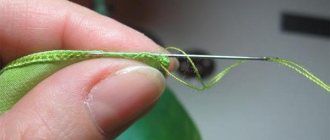
Previously, it was performed with a special tambour needle, very similar to a thin and long crochet hook. With it, the chains always turned out smooth and continuous. Today such hook needles are also sold. But more often, a simple needle and floss thread are used for embroidery.
Tambour needle embroidery
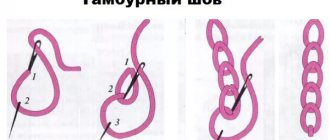
There are two main ways to make a chain stitch using a needle. A prerequisite for both is the canvas stretched tightly in the hoop. You can embroider from top to bottom or from left to right, depending on the chosen pattern. To simplify the work, it is better to first transfer the desired ornament onto the canvas.
So, method one
We bring the needle to the front side (in the figure this is point 1). Next, we insert it back into the same point (as you can see, points 1 and 2 in the figure coincide), but the thread is not fully tightened, holding the formed loop with your finger. We bring the needle back onto the face, this time at point 3, thereby pressing the top of the link, and tighten the thread. The first link is ready! The rest are performed in the same way.
Method two
In this case, the embroidery process begins with a regular stitch from point 1 to point 2. Next, we bring the needle from the wrong side to the front side at point 3. We pass the needle and thread under stitch 1-2 and again stitch into point 3. The stitch will hold the chain link at tightening the thread.
In further links, you need to pass the needle not under the stitch, but under the previous link of the chain.
For both methods of execution there are two important rules:
- The stitches should not tighten the main fabric. This is why you need to pull the fabric onto the hoop as tightly as possible.
- At the end of the embroidery, make a locking stitch, otherwise the whole chain will unravel.
Modifications of chain stitch embroidery
The two methods described above are the technique of performing the classic chain stitch. But during its existence, needlewomen managed to invent many options for its modification. Let's look at some of them.
Interlaced seam
A very beautiful finishing seam can be obtained if you initially lay several standard chain stitches side by side, and then, using a contrasting thread, intertwine them together (see diagram).
A tighter seam
In cases where a tighter seam is required, the following techniques can be used:
Place one chain stitch on top of the second (this is pattern No. 6)
Try to “double” the loops by first attaching a small link and then a large one (patterns No. 7 and 8).
To get a “spikelet” ornament in chain embroidery, make the initial attachment not in the form of a stitch, but in the form of a corner, and then make the chain itself upside down, i.e. the top of the link is up.
An ornament in the form of barbed wire is made in a similar way, however, the initial attachment here is made in the shape of a cross, the loop is made with the top of the link facing upward, and its ends are spread in different directions, rather than coming out from one point.
In the form of a twig
A complex ornament in the form of branches with leaves is made by combining open and closed links in embroidery.
Technique in the hoop
A hoop is a device for tensioning fabric during embroidery. They can have different shapes and sizes. There are handmade round or oval models, or hoops on a stand. The chain stitch, as a method of embroidery, is best laid over stretched fabric. In this case, it is easier to adjust the length of the stitches and the tension of the threads.
Technique for making a chain stitch with a needle in a hoop
To secure the fabric in the hoop, do the following:
- Place a larger diameter ring with a loosened tension screw in front of you.
- Place embroidery fabric on top.
- Place the smaller ring on the fabric and press it together with the fabric into the larger ring.
- Turn the hoop over, tighten the tension screw a little and gradually tighten the fabric. Tighten the screw again.
To embroider knit fabric, it must be hoopped along with a non-stretch backing. If you need to embroider a border along the edge, the fabric for embroidery is sewn on a sewing machine with auxiliary material and the design is secured in a hoop.
To perform a chain stitch with a needle, you need to learn the basic technique, a step-by-step description of which is presented in this article. Knowing the basics of embroidery, you can learn how to create original interior items and decorate clothes.
Tambour embroidery with Luneville crochet
You can embroider chains not only with a needle, but also with a crochet hook. In part, this method is even simpler, especially if you arm yourself with a hook with a sharp head. But there are also some subtleties. For example, you can only crochet basic chain stitches; complex modifications cannot be achieved this way.
The rules about pulling the fabric tightly and the absence of ties” remain relevant for both the hook and the needle.
Luneville embroidery technique
The technique of making a crochet seam is quite simple. Bring the hook out from the front side, hook it on the working thread, pull it out to the wrong side - you have a loop. Insert the hook into the fabric again, hook the thread, and pull it to the wrong side, but through the loop on the hook. Continue embroidery in the same way according to the selected pattern.
The Luneville hook is a special hook for embroidery using French technique. It is named after the place where beads and glass beads were first used in embroidery using a regular chain stitch. This was the city of Lunéville, the residence of the Dukes of Lorraine.
This technique became known as Luneville embroidery and is now used in decorating high fashion models, wedding clothes and evening dresses.
Watch a magical video about the creation of a Haut Couture dress, Christian Dior
Here is a very short demonstration of how to work with the Luneville crochet and how the sequins are delicately fed from the underside of the fabric.
The Luneville hook has a thin hook needle and a handle with a screw that protrudes slightly from the side. This screw secures the needle-hook in the handle, because the hook itself can be changed by choosing the size of the tool. And the protruding screw is on the same side as the “bit” on the hook.
This design helps the embroiderer navigate where the “beard” of the hook is and where to bring the thread to the hook under the stretched fabric.
Click to enlarge
Luneville embroidery is performed on thin, transparent fabrics and the craftswoman sees only the wrong side - the chain stitch itself.
And all the beauty with beads and sequins remains under the stretched fabric and the embroiderer sees it through the thin fabric.
Click to enlarge
Click to enlarge
Click to enlarge
Click to enlarge
Luneville crochet is also used to embroider using the du point de Beauvais (Beauvais point) technique. Here everything is more natural, the embroiderer sees her work right on the top side of the fabric. The difference from the Eastern techniques is in the thickness of the hook, the head of which is equal to the width of the sewing needle. Embroidered on thick fabrics with silk threads.
Tambour embroidery (Beauvais point) -linen
Tambour embroidery (Beauvais point) - chair upholstery
Tambour embroidery (Beauvais point) - chair upholstery - fragment
I took the three previous photos from Sarthe Michel Esquiol's documentary about the workshop in Bourg-le-Roi. In Bourg-le-Roi there is a museum of embroidery using the Point de Beauvais technique, where they also teach embroidery. Three experienced embroiderers take turns training Yvette Berto, Ginette Besnard and Lucien Mondion. The cost of classes is 95 euros for 9 hours.
You can watch this movie too:
film by Sarthe Michel Esquiol about the workshop in Bourg-le-Roi
Two-color and zigzag chain stitch
You have already noticed that sewing with a chain stitch is quite simple. But in order to slightly diversify and decorate our work, we can use not only the usual chain stitch, but also convex, zigzag and even two-color.
If you want to start sewing with a two-color chain stitch, then you first need to choose thread colors that go well with each other. Then you will have to thread two different colored threads into the needle and start working directly.
You perform the first stitch with a thread of only one color at the same time you need to hold the other thread over the tip of the needle. After this, you pull both threads and thereby complete the first stitch. You will need to make the second stitch with a thread of a different color. In this simple way you can embroider a two-color chain stitch.
In order to embroider a pattern with a zigzag chain stitch, you need to mark two parallel lines on a selected area of fabric. It is best to start working from the top point of the left line.
First you must pierce the fabric with a needle so that its tip comes out at a certain point located on the opposite line. Next you will need to pull out the thread and make a chain stitch.
After this, you can make a second stitch, which should also be inclined. But it is worth noting that it will need to be performed in the opposite direction.
By doing this you will get a zigzag chain stitch.
Tatar embroidery
You cannot embrace the immensity, as Kuzma Prutkov used to say. It is also impossible to imagine in one article how the chain stitch lived and developed in the traditions of all peoples.
Tatarstan, Bashkiria, Russia decorated their clothes and home textiles with patterned embroidery, giving importance to every detail.
Everything that the embroiderer saw around her - lilies, cornflowers, tulips, everything was transferred to the fabric, embodying the beauty of nature in silk threads. And each motive hid its own code or symbol. So, for example, a circle is the sun, a wavy line is water, a tree and birds are fertility. Traditional ornaments give us amazing discoveries.
Tambour embroidery, Russian clothing Click to enlarge
Tambour embroidery - Tatar boots Click to enlarge
Instructions on how to make a seam correctly
In order for the seam to turn out correctly, you do not need to have any special skills, you just need to follow certain instructions:
- you need to pierce the fabric so that the knots remain on the inside;
- while sewing, press the thread well with your thumb;
- continuing to hold the thread, the needle is inserted into the puncture;
- thus, the needle turns out to be on the wrong side, and the thread is pinched with your finger;
- now you need to tighten the thread, and after that you will get a loop;
- Thus, you need to make as many seams as needed to cover the design.
It should be remembered that the loops must be the same size and run along the same line. The figure should show that each loop comes out of the other. With different sizes, the drawing may not turn out beautiful.
Needle option
Tambour embroidery by Yumiko Higuchi
Perhaps it would be unfair to talk only about national, traditional embroideries characteristic of a particular area. I think everything is interesting in development, in dynamics.
Yumiko Higuchi is a Japanese embroiderer, designer, born in 1975, graduated from the University of Arts, lives in Tokyo.
She embroiders in many techniques and has the amazing ability to skillfully mix various techniques and create the most beautiful, laconic, elegant designs in which Yumiko’s authorship can be discerned. However, many find that she has an obvious penchant for chain stitch.
These are modern embroidery and modern designs that have won the hearts of embroidery lovers all over the world. Yumiko has published several books in which she offers prints and master classes.