In this article, the curtain designers of the OKey Design salon will share their professional secrets.
Each fabric used for sewing curtains has its own set of seams. They are used primarily for processing the edges of the finished product, as well as for stitching multi-layer draperies.
We decided to tell you about the neatest and most elegant of them. “Moscow seam”, “American”, “Leningrad rib”, “narrow rib”, “French seam”, all these are different variations of its name, which in most cases indicate the same type of seam, and only sometimes imply some variations .
Tips for working with thin fabrics
It is recommended to iron the fabric before starting work. For basting, it is better to use thin yarn. When stitching, it is advisable to use a thin overlock needle, the main thing is that the point is not deformed. Carry out the stitching only with small stitches.
What does an American seam look like?
Lines of parts and all marks on a paper sketch must be transferred to the canvas using copy stitches, not carbon paper (otherwise all the lines may appear). To do this, place the details of the paper template on a fabric laid out in several layers and stitch the needle forward, making the contours of the details of the paper template.
Attention! Make straight contours with a larger stitch; in places of roundings and corners, the stitches should be shorter.
Process of working with chiffon
When all the stitches are ready, you need to cut each 3 cm high loop in the center and remove the paper template. Then push the layers of material apart and carefully trim the threads between them.
To cut thin fabrics, it is recommended to place cotton on the table, otherwise the fabric will slip.
Scissors should be special for thin materials, or simply sharpened. You can put something heavy on top of the pattern to prevent it from fidgeting.
Properties of chiffon material:
- Beautiful, slightly embossed structure with various visual effects: shine, shimmer or matte surface;
- Rare drapery - the canvas has airy folds;
- Softness and comfort - this is the most pleasant material to touch;
- Hygienic features - chiffon circulates air well and is also hypoallergenic.
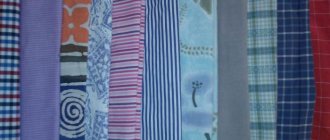
Thin fabrics
It is usually used to make summer T-shirts, sundresses and dresses, evening and formal suits, as well as stoles and beautiful scarves. Decorations for things are made from it. The material needs good care because it is very capricious. Before working with chiffon, be sure to wash your hands or wipe with wet wipes. Because you can easily leave a greasy stain on the fabric. It is also advisable to remember to use stabilizers.
Stabilizers are fabrics that are used to stabilize the product during operation. They prevent the fabric from getting wrinkled and getting stuck under the machine foot. Stabilizers are used mainly when working with thin transparent materials or with embroidery. You can buy them at any textile store.
You might be interested in DIY methods for hemming jeans without a sewing machine
Hand Zigzag
It is recommended to wash chiffon items carefully. Give preference only to hand washing, at a temperature not exceeding 30 degrees. Use only liquid laundry detergents. Try not to use friction during the process, as many creases or folds may form. Once completed, do not wring or twist the fabric too much. You need to place it in a dry terry towel and let it dry. When the product dries a little, it is advisable to spread it on the surface and let it dry completely. Ironing must be done at a temperature not exceeding 100 degrees and only using gauze.
Machine zigzag
Classification of machine seams
We must move on to the classification of machine seams, and this is where an ambush awaits us!
Linen seam allowance. how to make a closed seam on a sewing machine
There are two types of classification of thread seams: according to GOST and according to purpose.
We read:
But there is no such classification in GOST! And there is a classification consisting of 8 classes in accordance with the international classification, which places all the seams not according to their intended purpose, but based on the location of the layers of materials being joined. And in these classes, all the seams known to us are not located at all in the order in which we were taught, we taught and are still teaching our children and grandchildren. (Textbook of technology for girls, edited by Simonenko § 22, “Machine seams”).
seam designations technology grade 5
machine stitch patterns for comparison
I wrote this article almost a week ago. I have known the material for more than thirty years, I removed a roller along the connecting seams, and prepared another one along the remaining machine seams. Everything is fine. As a teacher, I have a technology manual on this topic: a serious article “Machine thread seams and their application” in the professional magazine “School and Production” with reference to GOST 12807-79 “Sewing products. Classification of stitches, lines and seams." The article says (verbatim):
I personally have never seen an official document - a real GOST, in addition, during all the time I have been working, I have never seen any of my colleagues have anything different from what I know and what is written here. Also, the entire space of the “sewing” Internet contains the same information. That is, everyone gives the same classification of seams - according to their intended purpose.
Without a face: processing seams and cuts in products made from two-layer fabric
Since I would like to maintain my website at a high enough level so that subscribers and visitors can trust me, I decided to correct the GOST date, thinking that there had already been a reissue over the years. I found GOST on the official standardization website and was shocked.
Already in 1988, there was a reissue of GOST, in which classes appear and there is not a word about the three categories of seams according to their intended purpose. In 2003, a new edition of GOST was published and there were the same classes and again not a word about the three groups of seams for their intended purpose. GOST for 1979 has already been deleted and I can’t find out now what was written there? Where did this classification by purpose come from, who came up with these three categories? The worst thing is that the seams that are indicated in the classes do not at all coincide with the types of seams found in the groups. And what is truer, what is more correct, what is more legal? In accordance with what regulatory document should seams be divided according to their intended purpose?
In the old GOST it is written both “by purpose” and by “location” of the seams. In the new GOST we read:
And the most interesting thing is that all the seams in the GOST classification (and there are more than two hundred of them) are called “stitched”, when, according to the accepted division into three groups, only four seams are classified as stitched!
Table 2.1 of GOST 12807-, 2003... is called “Classification of stitched seams”
table 2.1 GOST
In GoST there are different seams: edging, overhead, finishing and so on, but note that they are not talking about machine seams, but about stitched seams. ????
For two days after this unpleasant discovery, I was simply sick and could not do anything. Then I began to study, analyze, trying to understand the logic of the unification. It’s not for nothing that they say: teaching a scientist only spoils him. The revolution is not only in the brain, but also in the understanding that what I was confident in for so many years has collapsed. There are more than two hundred seams in total, including seams that were not considered before. And now, having gathered my thoughts, I am writing the article again. I’m still in a trance state, but already with an established scheme for seeing the problem.
Description of all types of seams for hand and machine sewing
Why such passions, you say? What difference does it make what seams are located where? Once upon a time in the sixties, in the sewing circles of the Houses of Culture, “grandmothers” carried out cutting according to measurements: POT, POB, and so on. This is how measurements were once designated. When I came to study, we already had designations: St., Sat. and so on. The sites are run by all my peers - students of those distant sixties - now also grandmothers. And the textbooks are not only written by “grandmothers”, but also not sewing specialists at all (judging by various signs). The teachers are also the same “grandmothers” - all my peers, only still working. Some kind of “general society of grandmothers” who are stuck in the past and are in no hurry to catch up with time, or rather, do not correspond.
Of course, you can sew the same dresses with both POT and ST. And in this topic, if you close your eyes to GOST, then you can simply sew something, call something somehow. And everything will work out. You can not speak at all and sew well too. But people search on the Internet for “types of machine seams”, “classification of machine seams”, some even using the old concepts of “connecting seams” - people want to know! And there are also about 160 requests from the State Standard for sewing seams.” Therefore, I can no longer speak as before. I will have to speak not only in the old way, but also in the new way. You have the right to choose.
Stage two: cutting the fabric
Now you need to do the internal processing of the fabric. Using scissors, cut off the outer part of the material from the edge to the stitching right next to each other.
Overlock stitch pattern
Make a small gap, about 1 mm. The finished result turns out more beautiful if you wrap the stitched edge in a semicircle around the working finger of your left hand, and cut the fabric with your right hand. The main thing here is not to overdo it, because you can ruin the seam line. Carrying out a Moscow seam is quite difficult; you need to have a good hand and eye.
Main types of hand stitches
They are used to connect parts of a future product. The most common hand seam intended for fastening parts is a seam made using the basting technique. It is intended to temporarily connect the parts of the product and outline its future appearance. Most often, cotton threads of different thicknesses are used to make this seam. The “over the edge” technology is also popular. With its help, parts are sewn together so that the resulting fragment of the product can be turned inside out.
The buttonhole stitch is more often used for decorative finishing - this is how the edges of a hand-embroidered napkin are processed. A back stitch looks just like a machine stitch. Therefore, it is used in cases where it is necessary to hem the hem of a skirt, for example. But in order to shorten the product, hemming seams were invented. They come in two types: simple and secret. It's not difficult to master them. A blind stitch comes in handy when you don't want anyone to see the thread stitches on the finished product. It is used often. The French seam is not a manual fabric processing technique, although it may seem like it was made by a person and not by a machine.
Stage three: second stitching
The edge must be folded approximately 3 mm, so that the first line is in the center. Make a needle-to-needle stitch on a machine, indenting 2 mm to the left. The material should not be stretched or distorted. The width of the finished scar will depend on how the first seam is positioned towards the edge of the product.
Zigzag on chiffon
For a good result, there must be a high-quality preparation. With the help of these seams you can beautifully finish products without having a professional tool.
Designation on typewriters
The designation of each of the stitching modes on any machine is so simple and clear that even a beginner will get used to its control after studying the theory and trying to sew something with his own hands, turning his knowledge into practical skills.
For example, zigzag stitches appear as fine-tooth markings. But a zigzag should be distinguished from edge seam markers, which vaguely resemble a mathematical square root icon with a raised mustache. A simple seam is a dotted line. The number of such lines indicates the multiplicity of the stitch (double, triple, multiple - depends on the number of needles working simultaneously).
The selected stitching mode will immediately be translated into practice from the designation on the machine selector into exactly the same execution of a real seam.
Processing chiffon with Moscow seam and zig zag seam
The American seam for chiffon is made in three variations. Below is a detailed description of the processing methods.
You might be interested in this: The procedure for sewing a hanging organizer yourself
First method
Here, before starting work, you need to make an allowance of 2 cm.
The stitching must be done at a distance of 1mm from the fold. It is important to lay it very evenly. Iron the product well and trim the seam allowance. Next, an allowance of 2 mm is again made on the inside and sewn along the first seam.
Washing chiffon
To make the Moscow seam beautiful, the stitching must be even. After this, you need to run a steam iron over the fabric thoroughly. This type of seam is used in clothes sewn on the bias, for example, a flared skirt. But the cut itself will be wavy, because the material is elastic. This cut looks beautiful on light fabrics. There are other methods for processing chiffon.
Second method
It is mainly used for processing cuts in clothes sewn on the bias, but when wavy edges are not needed. To work, you need an adhesive filler, and the allowances should be approximately 2 cm.
The classic width of the lobe is 2 cm, so you need to trim the lobe to a size of 8 mm.
How to iron chiffon
From the inside of the product, make an allowance for the processed cut with a dolevik; this is done so that the fabric does not begin to stretch. Now make an allowance of 2 mm on the same side and stitch, indenting from the folds by a couple of mm. Next, everything is ironed well and the allowance is cut closer to the line.
Now an allowance of 2 mm is made and a stitch is made along the first seam.
This method has one drawback - due to the hem, the hem will be very tight, so it cannot be used for light fabrics. It will look very rough.
Third method
This version of the work is the most complex and is used for processing the edges of clothes sewn on the bias from light but dense materials. You need to make an allowance of 1 cm. An auxiliary stitch is required on the allowance of the cut that will be processed; the distance from the edge should be about 3mm. Thanks to this stitching, there will be no stretching of the fabric.
Curtains made of thin materials
Attention! For stitching, threads are used exclusively in the tone of the product.
On the inside you need to make an allowance along the auxiliary seam and make the first line at a distance of 2mm from the fold. This is very difficult to do, so you can’t rush at this stage. Everything is ironed and the allowance is trimmed, leaving 2 mm. Next, an allowance of 2 mm is made on the wrong side and the seam is sewn along the first line. The Moscow seam on chiffon is ready.
You might be interested in this: The procedure for sewing a dress for an overweight woman with your own hands
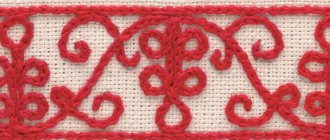
How to make a narrow (Moscow) seam on very capricious fabrics
01/18/2021 Lina Frolova
The narrow (Moscow) seam looks very beautiful and noble. No matter how beautiful the rolled seam on your overlocker is, it still cannot be compared in nobility and beauty with a narrow seam. And, in my opinion, a rolled seam immediately “reduces the cost” of a product and puts it on the level of mass-produced items. This, of course, is my subjective opinion, but it is what it is...
There are several ways to make a narrow seam. I have already shown two of them to you in one of the videos in the collection of master classes “Sewing Mosaic”
However, there are fabrics with which we have to invent new ways of doing it. And these fabrics can completely unexpectedly “throw out the trick”)) You don’t seem to expect that there will be any difficulties, but they just appear. The consolation is that this happens rarely))
So I came across a fabric that could not be processed using the usual traditional narrow seam method. The blouse was made from natural Roccobarocco silk with stretch. The blouse is cut at the waist with a fluffy peplum, made in a “double sun” cut.
Moreover, the entire blouse was completely processed without the use of an overlock, using a double seam. Even the sleeve was sewn in with this double reverse seam. There were no problems. But when it came to processing the bottom edge of the peplum with a narrow seam, something unimaginable began...
The shape did not hold at all, the stitching fit very poorly, the entire edge was stretched and deformed so that it was scary to just look at))
And then I remembered that once upon a time on one of the sewing forums I saw advice on narrow seams on thin, capricious fabrics. Then I didn’t like this method, because I don’t like using tracing paper in sewing. But this time I decided to use it because other methods did not work at all. In the end, I was very pleased with the result.
This method is quite labor-intensive and not fast. But on difficult fabrics it will help you out perfectly.
- Therefore, I consider it necessary to show it to you))
- Don't forget to leave your comments, share your viewing impressions and, of course, your experience.
Source: https://armaliniblog.ru/kak-sdelat-moskovskij-shov/
Useful information about sewing machine feet
A variety of accessories allows you to perform various operations, minimizing manual labor. In order to avoid pulling, you need a foot with a perfectly smooth surface. This property is provided by the Teflon coating. The paws glide well even on non-woven materials: leather, suede, varnished raincoat fabric.
When sewing thin fabrics, it is important to prevent the edges from curling. In this case, stitching is done using an overlock foot.
Its design feature is a guide, which serves to form a stitch. The accessory is suitable for most household sewing machines.
Reliefs
There are stitched ones and with a cord.
Progressive reliefs
We outline the location line of the relief on the front side of the part. We bend the part along the marked line with the wrong side inward and stitch it at a distance of 1-3 mm from the fold.
Reliefs with cord
To make the seam, we cut out an additional strip of fabric, the width of which is equal to the thickness of the cord + 10-15 mm. On the front side of the part we mark the location of the relief with 2 lines, the distance between which is equal to the thickness of the cord. Next, we transfer the lines to the wrong side. Then, on the wrong side of the part, we apply a strip of fabric so that the sections of the strip extend beyond the marked lines at the same distance (5-7 mm).
We chop off the strip and the part in several places with pins. We adjust the part to the strip, laying finishing lines on the front side of the part along the marked lines. We thread the cord with a pin between the two lines.
Hem - hem
The easiest way to process the bottom of a product is to process it with a hem seam.
Fold the edge of the product inside out once, then again. The first time we bend it by 0.5 - 1 cm, the second time by 1 - 4 cm, the width of the hem depends on the type of product and the properties of the material.
Secure the hem using pins, hand stitches, or directly with a machine stitch.
Whether or not to temporarily secure hems with pins or hand stitches depends on your ability to handle the fabric.
It will not be possible to carefully iron a hem 5-10mm wide without experience. It is much faster to pin or sweep.
Better yet, learn to do without hand stitching. Buy fabrics for kitchen towels and practice. The benefit is double: you’ll gain a skill and new towels for the kitchen.
The line is laid near the fold itself.
Kitchen towel fabric is rewarding and very easy to work with. So while I was writing a post and cutting up the towels.
By the way, do you know that in Russian the word podrubit ь means to shorten. Indeed, my towels have become shorter by as much as 4 cm. Therefore, never forget to leave extra fabric for hems.
We bend the edge of the ruffle to the wrong side by 5 mm and lay a stitch so that the right needle stroke hits the right of the fold, and the left one hits the fabric.
We process both sides of the ruffle; by stretching the oblique cut, the edges acquire a beautiful wave-like shape.
Next, carefully use scissors to cut the hem of the fabric close to the stitching.
We adjust the ruffle with the formation of gathers.
I made the gathers without auxiliary stitches, simply feeding the ruffle under the foot with some slack and putting in small folds. If it’s so difficult for you, you can pre-lay auxiliary lines to form gathers.
The width and length of the ruffle when cutting depends on the type of material and the length of the area where the ruffle is being sewn. Thin fabrics require more gathers, thick fabrics require less. The length of the ruffles cut along the bias may be less than the length of the ruffles cut along the transverse thread. And so on. Therefore, it is unrealistic to say unambiguously how much fabric will be needed for the ruffle. One can only guess based on the following data.
The length of the ruffle should be 1.5 -2 - 3 times greater than the length of the stitching area.
Attaching a hidden zipper
When the first “Burda Moden” magazines appeared in our country, I was delighted. Of course, the magazine not only contains high-quality patterns for all sizes, but also sewing technology. But after carefully reading the technology, I was disappointed.
The technology in the magazine is presented in a formulaic manner without taking into account the specific features of the model; the processing methods offered are far from the most rational.
The American or Moscow seam is used to finish the bottom edge of thin fabric items, such as skirts and trousers. As a result, the edge is flexible and thin. It looks neat both from the front side and from the back.
To perform it, you need to trim the bottom of the product evenly, bend the edge of the fabric to a width of no more than 3-4 millimeters. For convenience, you can iron the fold.
Using a machine stitch, we secure the fold, stepping back 1-2 millimeters from the edge and ironing it.
We fold the resulting fold again towards the wrong side. If the fabric is easy to iron, you can iron each fold. This will simplify the work and speed up the process. We sew the resulting bend again with an even stitch. This time we retreat from the edge by three millimeters.
As a result of the work performed, we get a neat edge of the product that does not fray and does not weigh down the fabric. On thin fabrics, it is recommended to fold as little as possible, which will make the edge especially elastic. On dense and highly stretchable fabrics, you can bend 5-6 millimeters.
Smoothing the tulle
Before the main decisive steps, it is recommended to smooth out the edges of the fabric; very often they look wrinkled.
It’s good when you buy tulle and cut it straight, but what if not? If the fabric was torn off, then its edges were uneven. They need to be leveled before hemming. Sometimes the cut edges also have irregularities. Be careful! Before sewing, the edges of the fabric must have clear, even edges. How to achieve this?
First, iron the edges. Afterwards the situation will become clearer. You will see whether the edges of your canvas are smooth or not.
You will have to cut the organza using a ruler, because you won’t be able to pull out the thread for guidance from such a delicate fabric.
Flat
To sew flat stitches you will most likely need a flat stitcher. This is a sewing machine that has flat line overlay modes. The flat stitch comes in a completely different variety than most of the simpler and more common types used by beginning tailors. Compared to overlock seams, it is laid in a completely different way. The number of needles is 2 or 3, resulting in a double and triple line, respectively. From the inside it is completely intertwined, from the outside it looks like a simple seam with equal stitches, sewn with one thread on each of the lines. The use of flat stitching began with knitwear, but today any fabric is suitable: the delicacy and precision of the “flat” sewing technology has been honed to perfection. An example is a flat seam on sweatpants, shorts, a T-shirt, overalls or a sweatshirt.
For sewing with a flat seam at home, bobbins with one side are used, and at the factory bobbins that resemble an inverted bucket are used. A “flat stitch” thread should be thin, but strong enough and slightly stretchable. A multi-needle machine must be carefully adjusted: a sudden change in the tension of one of the threads will lead to the fact that their weaving together will deteriorate, and the productivity and quality of your work will immediately decrease sharply.
Overlay machine stitch
There are two types of machine overlay seam: with an open cut (for joining parts of gaskets in order to reduce the overall thickness of the seam) and with a closed cut (for attaching yokes, patch pockets and other patch parts).
In the first case, parts of the parts are placed one on top of the other with a cut offset of 1.5-2 cm and connected with a straight or zigzag stitch.
In the second case, the cut of the invoice (upper) part is folded inward to the required amount, ironed, placed along the marked lines on the main (lower) part, basted and adjusted. The width of the seam depends on the model of clothing.
A - overlay seam with an open cut. B - overlay seam with a closed cut.
No. 67 Connecting seams that I use
- joining stitches
first . - The name speaks for itself:
- They connect both parts together into a whole product, and parts of parts.
- With their help they perform:
- middle, side, shoulder, relief cuts, parts of the neckline, connect the bodice with the skirt.
- Therefore, I will start with them.
* Connection with thin overlock (wrapping)
I use this stitch on transparent fabrics.
For such a seam you need to have an overlocker with a special stitch - wrapping
(or roller seam). You can also customize a subtle zigzag
on a household machine.
If everything is done correctly, then such a line will not “spread”
neither during wearing nor during washing.
- Fold the top and bottom fabric right sides inward
. If there is a drawing, we combine it; - set the machine to a stitch width of 1-1.5 mm, sew close to the edge;
then we go to overlock. We make the second line so as to close the first;
iron the stitch in the direction we need (see article No. 61).
* Pressed seam
The width of such a seam, depending on the purpose, is 0.5-2.0 cm (see table in article No. 43).
fold the two parts with the right sides inward, align the cuts and machine stitch them;
we overlock or zigzag both layers of fabric together;
It is important!
3- and 4-thread overlock stitches have a front and back side.
The front side should be on top.
iron the allowances in the direction we need. To make the seam flat, press it with an ironing foot;
If the seam is printed on the front side, iron it carefully under the seam allowance.
The pressed seam is most often used in thick fabrics.
(cloth, drape, woolen dress and suit fabrics).
1 way
We sew two parts separately: the front side of the stitch on the front side of the fabric.
- Using needles, we chop off the parts with the front side inward ,
aligning the cuts. We sew a line on a typewriter; - To make it even, we move the foot along the edge of
the overlock stitch.
- spread the seam in both directions and iron from the inside out. To make the seam flat, press it with an ironing foot;
- If the seam is printed on the front side, iron it additionally under the allowances.
Method 2
If the product has already been creamed
after trying on or need to adjust the pattern
, then I first grind down the edges and then overcast the edges.
- in case of adjusting the pattern, first combine it on the front side
; - from this line
we measure the necessary allowances;
fold the pieces right side inward. To more accurately align the pattern, follow the transverse lines;
- sew on a machine;
- if necessary, sew each cut separately;
iron the cuts in different directions.
* Covering seam
- A closed seam is a linen
seam, so it was previously used for making underwear and bed linen. - I use this seam in curtains and tulles, because when exposed to light
it looks neater than the one processed with an overlocker. - Done in two lines.
- fold the parts right side inward;
- lower allowance - 1 cm, upper allowance - 0.5 cm;
- connect on a typewriter;
iron the allowances towards the larger side;
- we bend
a wide allowance around a narrow one; - make a line 1 mm from the edge;
stretch the line and steam it.
* French seam
The French seam is used for processing thin fabrics: the seam allowance is sewn inward
, which gives a very neat look.
- We fold the parts inside out!!!
and sew a seam width of 0.3-0.5 cm; - straighten the seam with an iron;
cut allowance close to the stitching, leaving 2-3 mm;
- iron the seam allowance in one direction;
- fold the parts right side inward
; - iron the seam “on the edge
”;
we lay the second line at a distance of 0.5-0.7 cm from the fold;
We iron the seam onto one of the parts.
* Knit stitch
- Many who have tried to sew knitwear on a regular sewing
machine have noticed that the machine often refuses to make a beautiful and even stitch: - Gaps form, the lower thread loops, and sometimes breaks.
- And in use, a straight stitch
turns out to be inextensible and cannot withstand a large tensile load. - Therefore, to join knitted parts, I use a four-thread overlocker
and
a special needle
- jersey, stretch and superstretch.
To make this line look flat
the inside out first
, and then iron the seam allowance in the direction I need.
Decorative
Decorative stitches include their more original varieties. More often they do not sew fabrics together, but serve as embroidery, like repeating fragments in the shape of a herringbone, spikelet, flower, leaves, etc.
Sewing decorative seams requires high-quality synthetic threads. If you use, for example, cotton threads, the stitched seams will quickly wear out, begin to tear, and the material sewn with any of these seams (or a single layer of fabric stitched in the form of a pattern) will lose its original appearance
It is important that the machine is set up optimally - skipping stitches is absolutely unacceptable here, as well as distortions. A factory item of clothing or accessory made on equipment that is not fully configured or out of tune will simply be returned by the buyer to the seller as defective
A decorative seam is applied mainly to the excess edge of the fabric one or several centimeters wide, turning it into a fashionable attribute. A well-made and neatly executed seam can make a masterpiece even from roughly cut and torn material. An example of such a design is a pocket sewn on the outside, a bow sewn in, or some kind of pattern in a visible place. An alternative is to embroider letters, initials, inscriptions, for example, on the back of a sweatshirt or windbreaker. An example of such a seam is the butt variety, which is in demand on knitwear. This variety is based on a zigzag stitch.