You don't need to be an experienced seamstress to customize clothes. Here are three simple ways to change a product that any beginner can do.
We've all been in this situation: we've just found the perfect dress of our dreams for an important event, only to find that it's...
A. either not our size;
B. either simply does not suit our figure.
This problem applies not only to dresses, but to all types of clothing!
But let's face it: no two bodies are the same, and what suits one person perfectly may not fit well on another and ruin the whole look.
This is where the magic of sewing comes into play... You don't need to be a professional seamstress to make clothes fit your body.
In fact, most of these fitting skills can be adapted to different garments. And we are going to show you three basic ways:
Causes of problems
It happens that clothes change size when washed. Cotton and wool often become smaller. Why did the dress shrink? This trouble is caused by two reasons:
- Poor quality processing, defects. The item shrinks if the fabrics were not pre-treated before cutting or low-quality materials were used.
- Care instructions were not followed. For example, the label indicated that washing is allowed at 30 degrees, but the item was washed at 60.
What you need for work
To correct this situation, you need to prepare special sewing supplies. The process of altering a finished product is often associated with patience, because the basis for altering a dress is ripping the seams.
What you will need:
- Sharp tailor's scissors and small nail scissors. Scissors are necessary for ripping seams, making cuts and cuts.
- Needles and pins. Necessary for chipping or connecting different parts of the product when sweeping parts is planned.
- Centimeter, ruler. Necessary for drawing straight lines so that the parts of the product are symmetrical relative to each other.
- Chalk or a piece of soap. With the help of these objects, marks are left on the fabric, lines are drawn along which a seam must be made in the future.
- Threads of different colors. They select threads that match the main color of the product, and also use colored threads to highlight an area on the dress.
- Sewing machine. Needed for sewing seams.
Reference! To rip small seams, it is recommended to use razors or stationery knives.
How to stretch a dress correctly
If the item has not shrunk catastrophically, but has become only a little tight, then it is quite possible to stretch it. It is important to take your time and act carefully and carefully.
Dresses made of simple cut and natural fabrics
After washing:
- Soak shrunken clothes in cool water for half an hour.
- Then wash on the “delicate wash” setting.
- Take out the dress, carefully stretch it with your hands, first in width, and then (if necessary) in length.
- Dry on hangers, straightening out well.
After ironing:
- Treat the item with a steam generator.
- Stretch the still warm one with your hands.
Another option with ironing is to iron the dress through damp gauze, gently stretching the fabric with your hands.
Knitwear
To stretch a shrunken knit dress:
- Soak the shrunken knitwear in cool water with the addition of vinegar (50 ml per 8 liters of water).
- Directly in the basin, carefully stretch the item in width, trying to do it as evenly as possible along the entire length.
- Spread the towels on a flat surface, lay out the dress that has been wrung out from the water and stretch it to give the desired shape, secure with light stitches of thread or pins.
- When the item is almost dry, put it on and wear it until the dress is completely dry.
Subsequently, the item must be washed on a delicate cycle in cool water, otherwise it will shrink again.
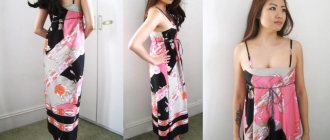
Altering a large top or dress
This is a great alteration idea to try if you've recently lost weight or have an item that's too big for you. This change works best with fabrics that have a bit of stretch, such as jersey or polyester.
Method:
Start by turning your dress/top inside out and putting it on. Pinch each side with your finger to see how much you can reduce and secure with pins. Use a ruler to measure whether you cleaned equally on both sides.
Remove the top/dress and, from the inside out, draw an even, smooth line with chalk along the contour through the pinned areas.
If there are parts that need to be aligned on the sides (stripes, belt, pattern), align them and pin them together. If you don't do this, your interference will be noticeable.
Sew a straight stitch from the armhole to the waistline. Secure the edge with a backstitch at the beginning and end of the stitching.
Turn the product right side out and enjoy the new, tighter fit!
Perhaps, with the help of our article, you will determine the bright future of some things that have long been unnecessary in your wardrobe.
As always, I look forward to your wishes and comments under this article. Have fun creating!
DIY dress alteration
If the dress is 2 sizes or more small, then all that remains is to alter the model, expanding it on the sides with your own hands. Altering clothes is not difficult, but you still need to have some skills.
Using seam allowances
This method is suitable if the clothes are very small. Modern manufacturers do not leave large seam allowances. At best, you will be able to win 1 size.
How to proceed:
- The model is carefully ripped out along the side seams, on the back, and in relief.
- All threads are carefully removed and the seams are ironed.
- The seams are sewn again, stepping back from the previous line to the edge of the part.
- New seams are processed and ironed.
Using inserts
Increasing the size of clothing using inserts is a more serious job. The easiest way to solve the problem is if the dress is too small in one specific area, for example, too tight in the chest or sleeves. The most difficult thing is to increase the size if the model is narrow at the waist, you will have to almost completely alter the outfit.
The fabric for the inserts must be chosen carefully. The right choice is half the success:
- It is better to select fabric of the same thickness and density as the original fabric;
- the fabric for inserts should not fade;
- You can use lace for inserts, but on the sides and chest - only on top of the “background” material, in this case it is especially important to take into account the overall thickness.
You can choose the color of the fabric to your taste, the main thing is that it matches well with the main material. Before cutting, the new material must be wetted, dried and ironed so that it does not shrink when washed.
Depending on the location of the problem, inserts are cut out taking into account seam allowances:
- Dress, narrow on the sides. This is a simple option: the model is ripped out along the side seams and inserts in the form of wedges or even strips are sewn in. In the latter case, similar inserts will need to be made in the seams of the sleeves.
- Clothing is too tight in the chest. Here the insert options depend on the style. If the model has darts, they need to be opened and made less deep. Or make inserts that allow you to expand the dress in the bust area. The third option is to cut out the shirt front and sew in a wider one, you will get a dress with a yoke.
- Straight-cut clothing can be increased in size by inserting seam inserts along the center front and back seams.
- The easiest way is to increase the length of the dress. To do this, just sew a frill at the bottom or make an insert-belt at the waist.
Lacing
An original way to slightly increase the size of a tight-fitting dress or blouse is to make lacing. But this is a rather complicated method that requires a special tool:
- The product is ripped out along the seam where the lacing will be, and the edges are processed.
- Holes are punched and metal blocks are installed - special parts secured to the fabric with a collet tool.
- Then the lace is threaded and tightened to the desired width, like a corset. The result is an outfit with an original cut. To make the item less revealing, under the lacing you should make an insert of translucent chiffon, lace or other fabric.
So, don't rush to throw away your dress if it gets a little tight. It can be remade into a new, original outfit.
Adding sleeves
Many of us are embarrassed to wear sleeveless items. This can make it difficult to choose clothes for summer. But once you learn how to sew sleeves onto a dress or top, your options are no longer limited.
There are different sleeve styles that can be added to dresses and tops. For example, flared, straight, lanterns, etc. Below we'll show you how to add a simple cap sleeve to a sleeveless dress.
We will need:
- Fabric pins;
- Sleeve fabric;
- Sewing machine and threads;
- Fabric scissors;
- Ruler
Method:
We recommend choosing a fabric that is identical or very close to the color of your top/dress, or a color/pattern with obvious contrast. Anything in between will make our intervention obvious.
To find out the sleeve length, wear a dress/top with a sleeve. Measure the length of the sleeve or simply the distance from the end of the shoulder to the protruding round bone of the wrist. Next, lay out your sleeveless clothing on a piece of kraft paper or tracing paper. Outline the armhole from shoulder to armpit.
Starting at the shoulder where the line ends, draw a line going outward in the opposite direction of the shoulder. Mark the sleeve length along this line. Do the same with your armpit. Connect the lines together to create the outline of the sleeve.
Outline the sleeve, adding a 1.5cm seam allowance around it.
Cut out the pattern and place it on the fabric folded in half. Cut out two sleeve parts one by one.
Lay out the fabric and fold the bottom edge. Sew along the bottom edge with a straight stitch. Place the two sleeve halves with right sides facing each other and sew the open edges of the long sides with a straight stitch.
Turn the sleeveless garment inside out and pin the edge of the sleeve to the armhole. Make sure the sleeve is turned right side out!
Sew the sleeve to the armhole with a straight stitch, securing the stitch at the beginning and end. Sew a zigzag stitch along the edge of the straight stitch to secure the edges.
Now the product has sleeves!
Basic Rules
In order for remade items to look good, the work must be done very carefully. All expansions are carried out along the structural seams of the products, and the joints should not have holes or abrasions. The material for insert parts can be very diverse:
- fabric in tone or vice versa, contrasting;
- decorative braid;
- lace;
- satin ribbon, etc.
At the same time, you need to remember that fabrics of different densities and textures, firstly, can become distorted when sewing, and secondly, behave differently after washing. The easiest way to achieve a good fit is to use elastic materials, the choice of which is now very large.
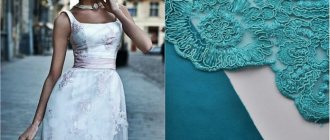
Selecting material for alteration
Much of the success when altering a finished product using a different fabric depends on the selection of material. Experienced seamstresses advise following the basic rules when looking for a good alternative:
- to model the yoke in the upper part of the dress, mesh, lace, and guipure are used;
- on the sides and hips it is customary to use inserts made of guipure, rigid lace, and satin;
- for inserts on the sides, it is necessary to select a fabric so that when sewing in parts it does not fray, create creases or pull the fabric;
- For the insert, over which lacing is made, thick knitwear is used, which holds its shape so that the lacing does not pull the edges of the insert towards the center.
One of the criteria is the choice of color. Stylists advise using combinations that are similar in color scheme or resorting to the contrast method. For example, for a white and black dress model, red or bright blue inserts would be appropriate, while milky beige or cream shades will make the outfit unclear.
Increasing skirt and trouser sizes
With a uniform increase in the volume of the body, inserts on the skirt or trousers are made along their entire length in the places of longitudinal seams, most often side ones. The main problem with this is the fit of the belt. The simplest solution is to cut the belt and extend the flaring piece to the very top
If the belt is long enough, it is torn off, inserts are made, then sewn back on. The photo shows a redesign of a low-slung denim skirt by moving the waistband higher on the figure. The resulting reduction in the length of the skirt is compensated by the protruding corners of the bias-cut side inserts.
A simple but very original solution is to widen a skirt or trousers using an elastic band, shown in the photo.
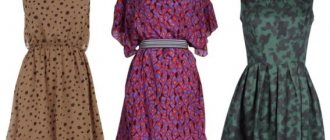
Expanding the bodice
The bodice needs to be made up of pieces, but so that the additions do not look like patches. Make sure that the longitudinal and transverse threads of the fabrics match.
If you do not follow the direction, then in this case the seam most often lies poorly. And this happens due to the fact that the fabric does not stretch along the lobar thread, but does stretch along the transverse thread. In addition, the transverse and longitudinal directions of the threads of matter often differ in color.
The slightest deviation in the direction of the threads leads to considerable “trouble”: the darts are deformed, which means the part will fit poorly, stretch or wrinkle.
In the picture you see a variety of bodices assembled from several parts.
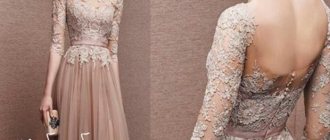
Yoke
Suppose the bodice of a dress or blouse is short , in this case the most suitable option is a yoke; it can be placed both in front on the shelf and at the back along the back.
Required:
- Fabric that is as similar as possible to the material of the dress or in a contrasting color.
- Scissors.
- Edge for processing if you want to emphasize the line of the yoke.
This technique is good for a one-piece shelf without reliefs.
Progress:
- We trace our item on paper to get a pattern.
- We note the detail of the future yoke.
- We outline folds and tucks, if necessary.
- We increase the length of the yoke by the amount necessary for the dress.
- We try on the paper version, it can be swept away.
- We cut out the yoke.
- Remove the top part of the shelf or back.
- We sew the yoke.
- Ironing.
Corsage belt
If you decide to lengthen the fitted bodice, then it is not necessary to make a yoke . It is best to treat the bottom of the bodice with a stitched corsage belt assembled from pieces .
The work is carried out similarly to the previous one , but in this case we work with the lower part of the bodice.
Inserts
When the bodice is tight , it is most convenient to make inserts in its middle or in its side parts (mod. 6,7).
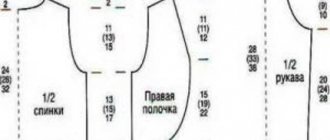
The pattern shows the locations of darts and gathers, the direction of the grain thread and the configuration of the cut of the parts that make up the bodice.