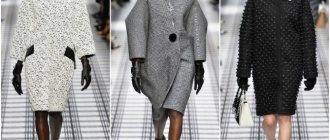
Sometimes, when you go to a store, you can’t find the right thing for yourself, either the size doesn’t fit, or the color or style doesn’t suit you. In this case, you can sew something for yourself. For example, you can make a great raincoat with a hood if you strictly follow all the instructions.
The hood will be a great addition to any outerwear. It will look great on a raincoat, jacket, sports jacket and sweatshirt, as well as many natural fur coats, have a beautiful hood, and how to sew a raincoat will be discussed below.
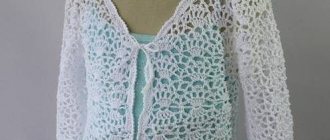
What does a hood for a raincoat look like?
Cloak-cape with a hood: pattern, step-by-step sewing recommendations, video tutorials
The cloak-cape has a simple, loose cut; it is quite often used in creating children's New Year's costumes (prince, musketeer, Koshchei the Immortal, and many others). In addition, this model is great for sewing raincoats, as well as festive capes and overlins. You can not only buy such a wardrobe item, but also sew it yourself. In this article you will find a simple pattern for creating a cape, which is made with a hood, as well as detailed recommendations for sewing it.
What will you need for work?
Having decided on the cut, the first thing to do is choose the appropriate material. Here is where to roam:
- polyethylene - a DIY raincoat made of polyethylene will be an excellent option for walks in the forest or in the park. It is distinguished by its lightness; dense polyethylene is easy to work with. The material can be taken from ordinary thick bags;
- rubberized material - a universal option for outdoor activities, fishing, city walks;
- bologna - lightweight windbreakers, raincoats and raincoats are made from bologna fabric. The material is durable and lightweight, but does not “breathe”;
- Vinyl is a durable material, does not allow moisture to pass through, and is resistant to mechanical damage. You can use it to make a raincoat of any model, color, in combination with or without lining;
- rubber - the material is quite dense and suitable for off-season use. Usually such raincoats are sewn with a lining. In rubber clothing you will be saved not only from the rain, but also from the wind;
- Nylon is a universal material for raincoats of different models and purposes. You can wear a nylon raincoat to pick mushrooms or to a business meeting;
- membrane - the material does not allow moisture to pass inside, but at the same time allows the body to “breathe”. These raincoats look stylish, have an unlimited range of colors and a variety of styles. Membrane fabric is especially suitable for children, because... babies are very active and it is important that there is good air exchange under clothes;
- silicone - a durable and moisture-resistant raincoat made of silicone has one drawback - it does not allow air to pass through. Therefore, if you sew clothes from such material, then only with a loose cut;
- varnished fabric - coats with varnish coating look fashionable and unusual. Suitable for girls who want to create a bright image.
Let's sew a practical raincoat yourself in a couple of hours
A raincoat can be not only part of a New Year's costume, but also a practical wardrobe item, for example, a raincoat. It is also easy to sew, but it will look much more interesting and impressive than a regular oilcloth raincoat. In addition, the product is so light and thin that it can easily fit even into a handbag.
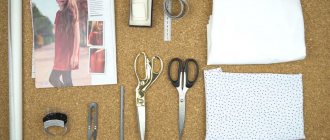
To sew it we will need:
- thin raincoat fabric of your favorite color - 2 m;
- ribbon or lace for ties;
- threads, needle, scissors;
- sewing machine.
You won’t need a separate pattern for it; it will work right away with the fabric.
- Fold the cut in half with the right side facing inward. We measure 100 cm, this is the length of the base of the raincoat. Cut along the line.
- We fold the resulting workpiece in half again. In the upper left corner, mark the neckline for the back with chalk. We set aside 18 cm from it at a slight slope along the shoulder line. From the upper right corner we set aside 25 cm for the armhole, draw a rounded line from the shoulder line to this point. Cut out the resulting pattern.
- We correct the shape of the neckline on the shelves; it needs to be made deeper than on the back.
- We make shoulder seams.
- For the sleeves, cut out two rectangles 60cm long and 50cm wide. We cut out the eyelets along the line of the armholes on the basis of the raincoat. We sew seams on the sleeves. We sew them to the armholes.
- To pattern the hood, you can also use the templates given above, or cut out two rectangles 60 cm long and 45 cm wide, slightly rounding the upper corner. We measure the length of the neckline and use it to adjust the bottom line of the hood. We sew together the parts, sew the hood to the neck of the cloak.
- We bend and hem the edges of the product (bottom, shelves).
- We sew ribbons for tying or a button with a loop to the neck line.
Materials:
- 4 meters of fabric (I have faux suede);
- 4 meters of satin lining fabric;
- 4 meters of insulation
- 2 buttons;
- pins;
- scissors;
- threads, sewing machine;
- 1 T-shirt or sweater to recreate the contours of clothing;
- 1 coat or jacket to re-contour the sleeves.
Making patterns and sewing hoods for raincoats and raincoats
Sometimes, when you go to a store, you can’t find the right thing for yourself, either the size doesn’t fit, or the color or style doesn’t suit you. In this case, you can sew something for yourself. For example, you can make a great raincoat with a hood if you strictly follow all the instructions.
The hood will be a great addition to any outerwear. It will look great on a raincoat, jacket, sports jacket and sweatshirt, as well as many natural fur coats, have a beautiful hood, and how to sew a raincoat will be discussed below.
What does a hood for a raincoat look like?
Preparation: fabric and taking measurements
The pattern of a raincoat with a hood should begin with taking measurements. It is worth remembering that the hood is sewn exactly to the size of the head, so that later it does not fit on the forehead or, conversely, does not fall back.
Hood fabric
To make a pattern for a raincoat with a hood and then sew it, the first thing you need to do is prepare everything you need. The most common raincoat with a hood is the poncho. To sew it you will need:
Cutting elements
- Draw the cutting lines onto the fabric using a chalk or special marker.
- Fold the fabric in half and cut out a larger piece from one corner. Then cut out a smooth round neck (diameter 15-20 cm).
- Draw lines for the front pieces. Each piece is about half the size of a large piece, so you can use the previous pattern and fold it in half. Cut along the lines. You can cut two parts at once using the same pattern if the fabric is folded in half.
- Hood. From the same fabric, folded in half, cut out two rectangles according to the measurements taken. Using the pattern pieces, do the same for the lining.
How to sew a raincoat with a hood
To sew a raincoat with a hood, you should choose a material. Usually, paraffin or Teflon fabric, as well as membrane material, are used to sew a raincoat and cape. If you are planning to cut out an ordinary raincoat, then you can use not only windproof and water-repellent fabrics, but also leather, velvet, corduroy, suede, raincoat, cotton and others.
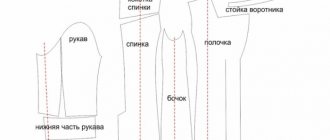
Pattern No. 1
Pattern and sewing of a raincoat
After preparing everything you need, you can start working. Many people wonder how to sew a hood on their own. All work on sewing a raincoat can be done in several stages:
- take measurements;
- transfer the pattern onto paper and then onto fabric;
- make individual fragments, sweep them, and sew them on a typewriter;
- sew all the parts into a single whole.
The women's poncho coat has several fragments. Its main parts include: front, back and neck. There are also sleeves, but they belong to the main part. In addition, finished models can be decorated.
First of all, the main part, front and back, are made, then the sleeves and hood are made. The next step will be processing the neck. And then you need to sew on the sleeves and sew in the hood.
The cloak and cape is sewn almost the same way, with the exception of some details.
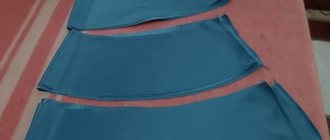
Lay the fabric on a flat surface and cut out a rectangular piece of the required size, the measurements of which are taken in advance. Don't forget to leave indents for seam allowances.
Attention! To give the cloak its shape, you need to trim the corners of the fabric, after folding it in half. Then the edges will be rounded.
Pattern and sewing of a hood
How to cut a hood so that it fits perfectly on your head. After all, in cold weather, a hood will be an excellent alternative to a hat.
Take any sewn hood and mark the middle front point on it. And from that point you need to draw a measuring tape around your face. When starting to pattern the hood, you will need to add 820 cm to the resulting value, depending on the style of the hood. To calculate the height of the front edge of the hood, you need to divide the resulting number in half. Then, on a paper pattern, draw the front part according to that measurement.
The width of the hood is also selected individually. To get a close-fitting hood, you need to measure the distance from ear to ear. To make the hood wide, measure the distance from the brow ridges on the outside. Then you need to add 510 cm per allowance and divide the resulting number in half.
Having made a preliminary pattern, you need to attach it to the neckline of the product to fit it to the neckline.
After taking measurements, you need to draw a pattern on paper or cardboard and cut it out. Then place the pattern on the fabric and trace. Don't forget to leave a few centimeters for seam allowance and seam allowance. Cut out the resulting fabric pattern.
When sewing a product with a hood, you need to remember the basic rules: when you sew in the hood, you need to carefully ensure that the shoulder seam of the pattern coincides with the shoulder seam of the product. And the middle of the back of the product should coincide with the back seam. Before sewing in the hood, you need to sew the shoulder seams first.
Interesting! If the product consists of 2 or 3 parts, you need to fold them right sides together and sew the seams. If the hood consists of one piece, it must be folded so that the front side is inside, and the back of the head must be sewn.
Protective cover-awning for a car - choosing materials and sewing + video
In this article we will look at how to make a protective cover for a car with your own hands, and whether this attribute is really necessary for your vehicle. After all, if you really love your “iron horse,” then you probably want it to always look its best. Then let's get to the fun part.
Prolonged exposure to direct sunlight can have a detrimental effect on the paintwork; in addition, the awning cover will serve as reliable protection from dust, dirt, moisture, as well as the harmful behavior of birds.
And if you don’t have the opportunity to hide your car in the garage, or you just went on vacation and the car is forced to sit in the open sun for several weeks, then a car awning, even hastily made with your own hands, will serve as a real lifesaver.
Basically, such covers are made from special fabrics that do not allow dust and dirt to pass through, but due to their excellent breathability, they can provide excellent air circulation, so moisture has no chance of accumulating under such a car cover. Some of the most popular awning fabrics are Oxford and Tarpaulin, they can provide excellent protection and will last for quite a long period.
These materials have either a polyvinyl chloride or polyurethane coating, which is applied to the reverse side.
The main advantages are lightness, excellent tensile strength, excellent operating temperature range, ease of maintenance, moisture resistance, excellent resistance to abrasion and contamination and fairly low susceptibility to ultraviolet radiation.
Car cover - how to sew?
Typically, such a cover consists of three parts: two side and one central, which runs along the roof, hood and trunk.
How to sew a hood with your own hands: patterns
A hood can complement not only a raincoat or coat, but also a jacket. To choose a hood for a jacket, you first need to understand what types there are. There are several types of hoods:
- low volume;
- volume;
- tight-fitting to the head;
- falling down the neck;
- There are also many models that combine several of the listed types.
The simplest version of a women's jacket with a hood is the hoodie model.
The pattern of such a jacket will include the following elements:
- back;
- shelf with a hood;
- pocket details;
- sleeve pattern.
To sew a hoodie model, you can use fleece, velsoft, footer and faux fur. You can also combine it with knitwear, which will give an imitation of hand knitting.
To determine the material consumption, you need to decide what the size of the jacket and the width of the fabric will be. For example, with a fabric width of 180 - 200 cm (footer and velsoft), you will need from 180 to 200 cm of material. The width of fleece and faux fur is 140 - 160 cm, 170 - 220 cm of material will be required. When buying fabric and making calculations, you need to add a few centimeters to align the cut, or if there is a defect.
Medieval hood: pattern for a cloak
A great addition to a carnival or fashion costume is a cape. This item of clothing has been used since ancient times to keep warm, to indicate one’s status, or simply for beauty.
What does a medieval cloak look like?
In general, the hood is also suitable for a jacket:
- The first step is to choose the fabric. Wool, satin, flannel and cotton are suitable for such a cape. It is necessary to purchase fabric in two shades. One for the outside, the other, lighter, for the lining.
- The next step is to measure your neck circumference and choose the length of the cape. The neck should be measured at the base. Then measure the distance from the shoulder to the expected desired length. Write down all measurements on a piece of paper. The length of the product may also depend on the style. The robe-like style is usually cut to the ankles or calves. The style, reminiscent of a cape, is made to the elbow or slightly lower.
- Then measure the circumference of the neck to calculate the radius. To calculate it correctly, the girth must be divided by two, then the resulting number divided by Pi. Round the resulting number up to a larger integer, and this will be the radius.
- Take the fabric and fold it into four layers. First, fold it in half crosswise, then in half again, you should get a square. Rotate the fabric so that the corner of the center point is in the upper left corner.
- Draw a neckline on the fabric. Take a piece of twine and pin it to the left corner of the folded material. Apply chalk to the other end, it should look like a compass. Draw an arc with this compass from the top to the left edge.
- Draw a bottom line. To the radius you need to add the length of the cape you need to obtain. If there is not enough string, you can lengthen it and draw another one, which will mark the bottom.
- Start cutting. You can start making a pattern by adding 1.5 cm for the seams. Once the pattern is ready, you can cut out the lining. You need to do the same thing as described above, only with the material prepared for the lining.
- A front cut is made on the cape. Unfold the part of the main and lining parts and place them on top of each other. Then fold them in half to make a semicircle. Cut fabrics along any fold. There is no need to touch the other fold. This creates a front cut.
- Fold and chop the material with the front side facing inward. The resulting semicircles need to be unfolded and one piece placed on top of the other so that the front side is inside. Carefully check that all the cuts are exactly aligned, and you can chop them.
- An allowance of 1.5 cm is laid around the entire perimeter. One of the straight sides does not need to be stitched to the end; leave space so that the part can be turned out later. As you stitch the material, you need to secure the thread at the beginning and at the end, so the product will be securely sewn.
- Turn the product inside out and iron it.
- Sew up the left hole. To do this, you can use a sewing machine or stitch by hand.
- For sewing, lay out the part with the wrong side facing you. They cut one side, just like they cut a cape.
- Fold and sew along the back seam. Fold again with the inside out. After the part is folded, the length of the hood should be 45 cm.
- To assemble the product, the top edge is sewn with two lines, so it can be assembled. Here you can also stitch either by hand or use a machine.
- How to sew a hood to a product. The hood and cape are fastened with the front side inward. You need to make sure that all cuts are laid evenly. Sew down the parts, not forgetting to leave room for allowance. You also need to secure the threads so that the seam does not come apart.
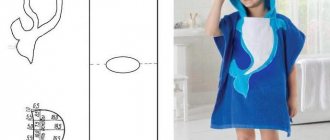
Raincoat for a child: step-by-step instructions
Cutting out the main details
- Place the laminated cotton and lining together and fold the fabric in half.
- Lay out the sweatshirt on the fabric so that the collar and shoulders are at the fold.
- Draw a semicircle on the fabric so that it is longer than the sweatshirt. How much - you can find out by putting it on the child and noting where he wants the raincoat to reach. It is worth keeping in mind that children grow quickly.
- Cut along the line. When we unfold the fabric, we should have two circles. But we’ll leave the unfolding for later.
- We lay the sweatshirt again so that its center coincides with the center line of our semicircle. Where the sweatshirt has a collar, cut out a collar of the same width on the top fold of the fabric.
- We measure the distance from the edge of the collar to the sleeves of the sweatshirt, retreat the same on each side from the edges of the collar on the fabric, make holes for the arms. Let them be slightly wider than the width of the sleeves of the sweatshirt. If you want to make a sleeveless raincoat, a real poncho, then you don’t have to cut out the holes for the arms. The child, however, will not be so comfortable; every time he wants to do something, the raincoat will swing open and ride up. And you won't be able to carry a backpack.
- You should have two conditional circles, each with three holes. It almost looks like a cloak. Now we cut both the upper fabric and the lining in the middle on one side, from the collar to the very bottom. This will be in front of the baby's raincoat.
Cut and sew the sleeves
If you want to make a sleeveless poncho, you won't need these pieces, so skip the current step. For those who have decided that they will master how to sew a raincoat for a child with sleeves, we continue.
- Place the sweatshirt on the folded fabric in the same manner as above (top fabric and lining together, fold in half) with the top edge of the sleeve towards the fold, draw a chalk line around the sleeve, making it slightly larger and not forgetting the seam allowance.
- If we want to roll up the cuff, we make the sleeve longer by the width of the same cuff.
- We cut it out to make two upper sleeves and two lining sleeves.
- We pin, baste and sew the sleeves together if desired. Only four pieces.
- We insert the sleeves into the holes for the arms, the lining into the lining raincoat, and the upper ones into the upper one. The sleeves should be facing the front of the coat. We pin and sew. It already looks like a finished raincoat.
Cut and sew the hood
The beauty of this instruction on how to sew a raincoat for a child is that we don’t even need a pattern for the hood.
- We take the same sweatshirt, or another one if the previous one does not have a hood. Place on folded fabric and trace. Make a good margin so that the hood is loose and fits on the hat, and is easy to take off and put on. You should end up with four parts: two halves from the outer fabric, two from the lining fabric.
- We sew the details. You should get two hoods.
- We apply the hoods with the lower edge to the collar lines, chop them off, and sew the outer cloak separately and the lining separately. Two raincoats for the child are already ready, both with sleeves and hoods. We're almost there! Now let's make one of them.
Sew a raincoat
1.
Fold the right sides of the top and lining raincoats, pin along the edges, and sew.
We leave the sleeves alone for now, sew only the bottom, the edges of the hood, the cut, leaving a gap at the bottom for turning inside out. 2.
Turn it inside out.
Carefully stitch the gap and iron the seams. Be sure to iron from the lining side and not with a hot iron! Otherwise, the laminated cotton may be damaged. 3.
Align the sleeves, turn up the cuffs so that the lining is shown, and the edge of the fabric is hidden inside.
We pin and sew. Since the machine foot will be running over the lining fabric, it will be easier to sew than on laminated cotton. Iron the seams. 4.
Sew a button at the collar, make a loop under it. The raincoat for the child is ready!
The hot and sunny summer will very soon transfer its rights to the golden and rainy season - autumn. And even if it’s drizzling outside and there are numerous puddles under your feet, a walk with your child should still take place.
We adults choose an umbrella as protection from the rain, but for small children this item is extremely inconvenient and ineffective. The baby is forced to hold it in his hand all the time, and this hampers his movements and prevents him from exploring such an interesting and wonderful world, playing games with peers, launching boats, or simply hitting a large puddle with a stick.
https://www.gismeteo.by/weather-minsk-4248/
children's raincoat
There are several types of children's raincoats.
How to sew a cape for a New Year's costume?
We fold a piece of fabric of the desired color and size on top so that a ribbon or thin rope passes through for tying, sew it on a machine or hem it by hand, thread the ribbon through with a pin and, in fact, that’s all. It is advisable to hem the bottom so that the threads do not fray. Decorate with any tinsel if desired.
A cape for a New Year's costume can be not only short, but also long. For the cape, you will need to choose the color of the fabric; take fabric with a reserve.
I suggest making a cape in the form of a long cloak.
We measure your length from neck to toes. If you want to make a cape to the floor, then you should add another 5 cm.
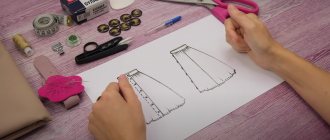
Next, we cut out the cape using the fabric using the diagram:
You can sew on a collar, or you can make ties, buttons or linden on the cloak, then the cape can be easily removed. We sew the edges of the cape. If you need something, for example an applique or a design, we sew it onto the cape. Such capes will suit many New Year's costumes.
To sew a cape for a New Year's costume in the form of a raincoat, you will need a fairly large piece of fabric. After all, it is often done in the form of a half-sun. But sewing it is very simple. It is enough to make a pattern and sew a ribbon along the neckline for tying. If the fabric does not fray. then you don’t have to overcast it.
The simplest pattern is this:
For those who know how to sew well and are used to making correct patterns, here is an example of a poncho. It will come in handy for New Year or any other holiday:
If desired, you can sew or glue snowflakes or stars onto such a cape - it all depends on what kind of character the child should be at the matinee. Capes made from two layers of fabric of different colors look very impressive: the bottom is white and the top is blue. Or the top is black and the bottom is red.
This is probably one of the easiest parts of New Year's costumes to make. Meanwhile, it is needed when sewing many of them, for example, for the costume of Little Red Riding Hood, Musketeer, or Puss in Boots. The pattern can be extremely simple, as for a half-sun skirt, that is, it is half a circle, with a hole cut inside for the neck. Here is the simplest pattern, don't forget about seam allowances:
We process the edges of the cape, either simply hem it or process it with piping; along the neck line you can sew a tie that will be tied.
The pattern may be a little more complicated, it won’t be quite a circle, but it’s also nothing complicated:
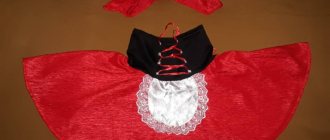
And here is a pattern for a cape with a hood, such a cape can be used, for example, for a Dracula costume, we sew the hood along the neck line:
Such a detail of a New Year's costume as a cape can give any costume recognition with a character, as well as originality.
Another huge advantage is that it is quite simple to make and does not require special sewing skills.
To make it look similar to the image, it is enough to choose the desired color and sew on decorative elements, for example, foil stars for the wizard and astrologer, paper snowflakes for the snowflake, and fur trim for the Snow Maiden.
Master class: car covers
If you're not very good with patterns, this cover will still be easy for you! After all, in order to sew it, you don’t need to make complex measurements and drawings - just find out the volume of the headrests.
Ready-made car seat covers in the form of capes will protect them from water, sand and dirt when you are going to the sea or to the river. All you need is a terry towel or sheet equal in width to the chair, and an oilcloth tablecloth. You will complete this lesson in just an hour!
Leave 8 inches from the top edge of the towel (10 inches in the photo) and make a mark.
At the same level, mark the center by measuring the width.
Divide the volume of the headrest by 2 and draw a horizontal line in the center equal to the found value.
Cut a hole along the line.
Place a towel on the tablecloth to measure the same piece and cut it out, adding a centimeter to the side for the indentations.
Place the tablecloth face down and the towel face up on top. Fold the indents on the bottom layer inward and pin both layers together with needles.
Sew the edges of both pieces.
Also stitch along the edges of the slit on the towel.
Cut the same hole in the tablecloth.
It's time to try your work on the chair!
If the edges of the cape cover hang down a little, don’t worry - this will only better protect the area from dirt.
Similar capes can be made for rear passenger seats if sewn according to their sizes.
Continue preparing for the summer season by choosing a car air conditioner - the article “Car air conditioner: rules for choosing” will help you with this.
As you can see, sewing car covers is not as difficult as it seems at first. Once you get the hang of making simple capes, you will move on to more complex and neat patterns.
>
We recommend watching:
- DIY car covers photo
- How to sew car covers with your own hands
- How to sew a car seat cover
- How to sew car covers with your own hands
- Do-it-yourself car interior reupholstery
- How to sew a chair cover
How to sew a cloak - cape with a hood?
Little Red Riding Hood or the Witch?
A cloak or cape with a hood is an attribute of many fairy-tale characters. With it you can try on the image of both a red riding hood and a sorceress, witch, or magician. After all, sometimes even adults want to dream like a child and find themselves in a fairy tale... Thanks to photographer Galina Karatsyube for a wonderful photo shoot in which I felt like a fairy-tale character transported to a winter fairy tale.