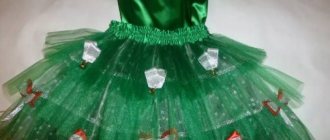
How to create an original and memorable image of a fairy-tale hero? This question is often asked by handicraftsmen who like to make their own costumes. An excellent example of an interesting image is Little Red Riding Hood, whose outfit is very recognizable and attractive.
A costume can be made from scrap materials, plus you can add creative and bright ideas to it. Now we will take a closer look at the step-by-step process of making a red riding hood costume with our own hands for an adult and a child.
Where to begin?
First you need to decide on a set of materials. To do this, you need to review your available wardrobe and think about whether it is possible to remake some ready-made outfit into Little Red Riding Hood’s attire, or whether you can completely remake the product for a new costume. Remaking is an excellent and budget option when there are no opportunities or options for purchasing material, plus remaking the product significantly saves time.
You should start with an idea. Typically, a Little Red Riding Hood costume may consist of:
- Jackets,
- Capes,
- Skirts,
- Cloak,
- Turtlenecks,
- Shtanov,
- Short.
Additional may be:
- Shoes,
- Gaiters,
- Basket,
- Cap,
- A cap,
- Kerchief,
- Handkerchief.
Accessories:
- Brooches,
- Basket,
- handbag,
- Headband for hair.
Fairy tale format
Therefore, from the available set, you can make a bright and memorable image of Little Red Riding Hood. Alternatively, you can split the image into two sections:
- A fairy tale in a new way,
- A classic fairy tale.
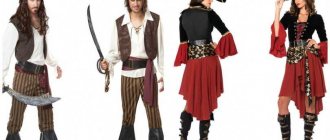
In the format of a fairy tale in a new way, a deviation from the canonical image is acceptable. That is, you can make a red jacket, a blazer cap or a bandana for Little Red Riding Hood, and additionally red shorts, trousers and leg warmers for her legs.
You can skip classic shoes in favor of red sneakers, which will add a modern look to your look. The only mandatory attribute of recognition should be a basket or cape, but deviations are possible in terms of a handbag or backpack.
For a classic fairy tale look, it's best to wear a long cape with a hood, choose cute shoes, and complete the look with a red dress.
Hat with clasp at the back of the head
Making such a headdress is even easier than the previous one. How to sew a cap for Little Red Riding Hood? The product pattern is attached above. It needs to be cut and adjusted to the child’s dimensions. This headdress is made without lining, so you need to immediately choose a thick fabric. But this only applies if you plan to make a hat for walking on the street. If the headdress is made for a one-time event for a matinee, you can choose a beautiful and thin material, for example, satin.
Printed out and cut out the Little Red Riding Hood pattern? Now you can start assembling the product. We sew a button to both sides of the workpiece, and then fasten them with threads or ribbons. Detailed instructions are given above.
A color scheme
The following color combinations will look harmonious and bright in the image of a red riding hood:
- Red,
- White,
- Black,
- Additional (to the image of a modern fairy tale)
Details and materials for creating the costume:
- Scissors,
- Threads,
- Needles,
- Pencil,
- Textile,
- Tinsel,
- Beads,
- Rhinestones.
Vest
You can use a blouse pattern as a basis. The black fabric should make two parts: the front and the back. Further:
- The front part is folded in half and a strip is cut out, this is necessary so that there is a gap between the sides and the lacing looks more impressive.
- A deep cut must be made on the front parts.
- Next, the side and shoulder seams of the two parts are sewn.
- All edges are processed, for this purpose they are folded and carefully stitched.
- Small holes are made along the edges at the front for lacing.
Cloak
To sew a Little Red Riding Hood costume, let’s take the simplest piece as a basis - a cloak. Measure the length of the cloak flaps and the depth of the hood. The workpiece itself is quite simple to do, and to smooth the seams you can use New Year's tinsel (rain) to add ambience to the cloak. It’s quite easy to make a Little Red Riding Hood costume for a girl with your own hands using this item of clothing.
Firstly, the cloak combines the classic image of an ordinary fairy tale heroine and combines 2 in 1, both a cape and a hood-hat, which can be thrown over the head if necessary.
Secondly, it is the low cost of materials. In the normal making of a suit, a lot of red fabric is needed, especially when working out the image in detail. This is the main advantage of the cloak, since this element of the image of the little red riding hood is considered the most recognizable and accessible in cut even to novice needleworkers.
Sewing a hat
The main detail in a Little Red Riding Hood costume for a girl is the cap. Before you begin, you need to prepare the following materials:
- red silk fabric (50 by 50 cm);
- white lace (width no more than two centimeters) and silk ribbon;
- threads (red);
- a piece of thin foam rubber.
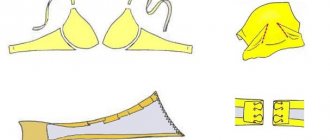
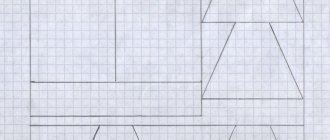
Description (how to make a pattern of a red riding hood for a costume, back of the head):
- Draw a rectangle on a sheet of white paper, where the length is 25 cm and the width is 16 cm.
- The angles of a geometric figure are designated by letters (A, B, C, D).
- From points A and D (to the inner part of the rectangle) measure 1.5 cm and are designated by the letters D and D1.
- Sides AB, BV and VG are divided in half, the resulting points are designated E, E1, E2.
- Angles B and C are also divided in half by a dotted line, the length of which does not exceed one centimeter. The new points represent O and O1.
- Begin to connect the points together with a smooth line (D, E, O, E1, O1, E2, D1, D).
- The finished pattern is applied to a piece of fabric, outlined with chalk and carefully cut out.
- For the shape, foam rubber is sewn to the back of the head; the crown should be three centimeters smaller.
Side part:
- A rectangle is again drawn on a piece of paper, where the length is 50 centimeters and the width is 10 cm.
- The finished pattern is applied to the fabric, outlined with chalk and carefully cut out.
Visor:
- Draw a triangle the same size as on the side of the hat. The angles are designated by the letters Zh, Z.I, K.
- Divide the sides in half (ZhK, ZhZ and ZI), the resulting points represent L, L1, L2.
- From points L1 and L2 inside the rectangle, draw a dotted line ten centimeters long. The resulting points are designated M1 and M2.
- A smooth line connects points K, M1, L, M2, I.
- The finished drawing is transferred to fabric and carefully cut out. You will need two of these parts.
We sew all the details:
- The two parts of the visor are sewn together so that the seams are hidden in the inside.
- The occipital and lateral parts are sewn together while connecting the parts in the crown area, making several folds (depth no more than one centimeter).
- A visor is sewn to the side of the hat.
- The rounded part of the visor is decorated with white lace.
- A silk ribbon is sewn to the bottom of the cap, leaving free ends on the sides.
How to wear an adult Little Red Riding Hood?
Making an adult Little Red Riding Hood costume with your own hands is no less time-consuming than assembling a children's costume. Sometimes it happens that you need to put together an adult costume for a children's production or theatrical performance. To select an image, we use the same principle as when working with a children's suit.
First you need to decide whether it will be a “fairy tale in a new way”, or whether it will be a “classic fairy tale”.
Since an adult costume usually implies a more serious connotation, we advise you to get by with a minimum of decorations and additional elements, but here again, it all depends on the theme.
Silk or satin fabric is perfect for preparing the look and making a raincoat. So pleasant to the touch and looks very impressive.
In terms of the cut format, the raincoat is no different from the children's size pattern, with the only difference being the size.
When sewing, be sure to make fastening ties and complement the surroundings of the image.
Character's entourage
When talking about the character's surroundings, one should not forget about additional accessories and ease of wearing. It is important that everything combines harmoniously and complements each other. The basket can be of various sizes, but it should not interfere with being on stage and should fulfill its function. For example, if during a performance a character must get some things from there.
Apron
If it is not possible to dilute it with other elements of clothing, then you can always use an apron as a basis for creating an image. This idea looks very interesting and allows you to complement the heroine.
For general information, you can take as a basis a separately sewn apron, which will be created directly for the image. As an additional element, you can use the same fabric as the main weave from the image. This will make the costume look more complete and pleasing to the eye.
Corset
An additional element of clothing can be a corset, which will emphasize the figure and make the image more expressive. We bring to your attention several collections of ideas where the combination of a corset, raincoat, skirt or dress combines very well with each other.
Blouse
A raincoat with a regular white blouse can be a very harmonious and interesting combination. The contrast of colors emphasizes the image and adds a certain charisma to the character. There are also many cutting options for a blouse, but if possible, you can opt for puffy sleeves and a wide neckline.
As you can see, to create a Little Red Riding Hood costume you can get by with quite simple and original ideas. Regardless of the technique used to make the costume, you can create amazing ideas and preparations for the finished image of the little red riding hood.
Here you can completely give free rein to your imagination and creativity, since the idea itself combines different elements of clothing that can be easily combined with each other. All these decorative elements will allow you to create a stunning fairy-tale image that will look great on holidays, photos and videos.