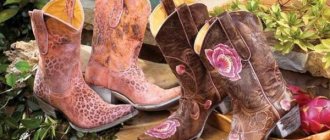
Many who are interested in sewing very often have to work with natural and artificial leather. Handmade bags, leather jewelry, various crafts and even leather paintings look very original and stylish. But most often, working with leather involves repairing leather clothing, replacing zippers, restoring torn areas, etc.
See how to repair a cut or tear in leather clothing. This is the easiest and most accessible way for everyone to repair leather clothing.
There are many books on teaching the technique of sewing natural leather by hand or using a sewing machine, which tell in detail about the purpose of certain tools for working with leather. I offer only a few basic recommendations that will be useful to anyone who decides to repair a bag, jacket, etc.
In this video you will see how easy it is to sew leather on an industrial sewing machine (or Podolsk type) by installing a Teflon foot on it.
Tools for working with leather
Working with leather has many of its “secrets” and little details that need to be known and taken into account. For example, when cutting out paired parts, you need to remember that leather stretches more in the transverse direction than in the longitudinal direction, so paired parts need to be cut in any direction, but only in the same direction.
Do not chip the skin with pins. Punctures leave marks on the leather, and if you change the zipper on a leather jacket or bag or jacket, you can easily see this.
Soft leather can be sewn on a sewing machine using a regular #80 or #90 needle. But for sewing rough leather or thickened areas, a special needle for working with leather is required. Even for hand sewing leather, the leather needle looks special, instead of a point it has a triangular tip. When sewing leather, the stitch length of a sewing machine should not be too small, since frequent punctures will cause the leather to tear at the joints.
You need to cut the leather with a special shoe knife on a plastic board or plexiglass. You can also use a wooden surface, but then the tip of the knife will cut into the wood. A shoe knife, rubber glue, adhesive seam enhancers, a thimble, strong synthetic threads and a small hammer with an awl - this is a must-have kit for any home furrier who decides to replace a zipper in a bag or repair a torn section of a leather jacket.
How to choose material for a tapered skirt
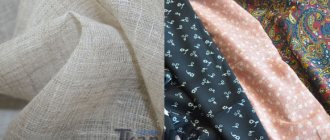
Before sewing a pencil skirt, you need to pay due attention to the choice of fabric. Correctly selected colors will help highlight the advantages and veil the flaws of the figure. Thus, overweight women are recommended to choose plain fabrics or with small patterns; soft, well-draped light or shiny fabrics are suitable only for young and slender girls.
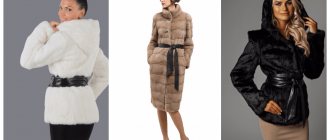
If a pencil skirt is intended for evening walks, going to restaurants, nightclubs or friendly parties, then denim, velvet or brocade fabrics, artificial or genuine leather would look quite appropriate. Beginning needlewomen are advised to pay attention to high-quality knitwear.
What kind of sewing machine can you use to sew leather?
Not every sewing machine can sew leather; treat your sewing machine with care and do not try to sew thick and rough fabrics, leather products, especially bags. As a last resort, you can use a Podolsk or Singer manual sewing machine, but not modern “seamstresses”, which cost 5 thousand rubles. To work with leather, special industrial sewing machines are provided or, as a last resort, the instructions should indicate that this machine can be used to sew leather clothes.
If you sew leather on a household sewing machine, be sure to buy special needles and a foot, with a wheel (as in the photo) or a roller. Then the skin under the foot will not “slip” and the machine will easily advance the product without forming a seat on the top layer of leather.
If you don’t have a foot or it doesn’t fit (Podolsk sewing machine), then in order to make the leather move easier under the foot, you can sew it through thin paper, which can then be easily removed.
Sewing machine threads need to be strong and elastic. But only nylon threads (as in this photo) are not intended for machine sewing. They are only used for manual leather work or industrial sewing machines.
How to sew a women's bag from genuine leather. Bag with lining and zip fastening. You will learn many useful tips on how to work with natural leather.
You need to cut the leather with a special shoe knife.
You can cut the leather with tailor's scissors, but it is still better to cut the leather with a special shoe or stationery knife, having first placed plastic or a wooden board under the layer of leather. If the machine sews the leather poorly and does not advance it or advances it, but a strong “fit” is formed, you can use thin paper cut into strips. Place the strips under the foot on the right side, on top of the skin. After laying the line, the remaining paper is removed. Some tailors, in order to increase the sliding of the skin under the foot, lubricate this area with soapy water or shampoo.
Technology of sewing genuine leather and suede
When sewing suede products, you need to take into account the direction of the pile, otherwise the parts will have a different shade. The leather is ironed from the wrong side with a low-heat iron without steam through a dry cloth. To prevent the top part from stretching relative to the other, purchase a special foot with a Teflon-coated sole, as in this photo. Teflon feet cost much less than special leather feet. The ends of the seam threads must be securely fixed with several knots, since machine stitches on leather products do not secure them and therefore they tend to unravel easily.
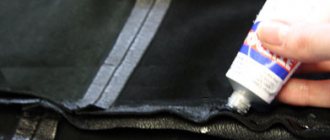
Working with leather is impossible without glue. The glue is applied with a brush onto a cleaned and degreased surface. Universal adhesives such as PVA and Moment, as well as rubber glue, are very effective. Repeat the procedure of applying glue several times to thoroughly saturate the skin. At the same time, make sure in advance that the glue is not too liquid, otherwise the skin will get wet. Set the parts treated with glue aside until the adhesive has dried “before casting”. After some time, connect the parts together. Place the glued parts under the press. You can even lightly tap these areas with a hammer. Using a cotton swab or rag, immediately remove excess adhesive solution so that it does not damage the front surface of the leather.
In this video you will see the technology of sewing a zipper into leather clothing. If you are interested in sewing leather goods, subscribe to our channel and you will learn a lot of useful tips.
Skater skirt pattern
Cut a square out of paper the size of the piece of fabric and fold it in four. To create a pattern, you need only two parameters: waist circumference and the desired length of the skirt. You'll have to remember your high school geometry course to calculate the radius from your waist circumference. However, the calculation is simple and is carried out according to the formula: (Ob + 5 cm) / 2 π (where π ≈ 3.14). Construct a circle with this radius with its center in the corner of the pattern, which is the center of the square.
Now that you have obtained the waist circumference, set aside the desired length of the skirt from the edge of the circle and build another one with a larger radius. All that remains is to cut out the pattern and transfer it to the fabric. When transferring, it is necessary to add seam allowances of 5 mm on each side.
It is not necessary to construct the entire paper pattern; 1/4 of a circle is enough, which can then be secured to a piece of fabric folded in four to cut out the circle skirt.
If you decide to complement your new thing with a petticoat, it can be cut either in the same way as the circle skirt itself, or according to the model of a pencil skirt.
The belt can be made either with elastic or hard. For a rigid belt, you will need a strip of fabric 5 cm wide and a length equal to the waist circumference with seam allowances. For this style you will also need to sew in a zipper, usually at the back.
If you want a circle skirt with a fashionable baby doll cut with an elastic belt, then, firstly, you will need more fabric, and secondly, you will need to add not five, but twenty or even twenty-five centimeters to your waist circumference.
Most fashionistas prefer a loose sun
with a lot of folds.
A girl in such an outfit looks very gentle and romantic. The loose style and medium length of the skirt makes this model very popular both for going to work and for evening walks. The pattern of such a skirt is very simple, and you can easily sew it yourself. True, such a skirt
will take quite a lot of fabric.
Instructions
A figure-hugging, tapered skirt never goes out of style. This style has no age restrictions, suits women with any type of figure, fits perfectly into both classic and romantic style of suit. It is also important that even a novice craftswoman who does not know how to make patterns can sew a pencil skirt without much difficulty.
How to install fittings on leather products
Any handmade leather item must be decorated with fittings. Large metal rivets and buttons, buttons, blocks, locks greatly decorate leather goods. Buttons are sewn to the skin only if there are buttons on the wrong side. Before punching holes for the buttons, they are strengthened either with pieces of leather or with thick adhesive fabric. Installing buttons requires a special tool. You can get by with homemade devices, but this installation method produces a lot of waste, then purchase more buttons than required. Before installing a zipper into a leather product, you should secure it. Instead of basting with thread, adhesive tapes or glue are used. Sometimes even ordinary paper clips can “help”. The edges of the cut skin areas are glued with special skin enhancers (tapes). On one side, a weak adhesive is applied to such a tape. The puncture with a needle leaves holes, so the seam is done only once. As a last resort, a seam is laid along the old holes.
In this video you will see how to install a denim metal button on leather items.
What you need to sew a skirt
Before you start, prepare everything you need to avoid distractions during the process.
- Material of the desired color with an area of 1–2 m². Exactly how much fabric will be needed depends on the parameters of the desired product.
- Threads in leatherette color.
- Small internal “invisible” zipper in the color of the future skirt.
- Sewing machine. It will be very difficult to lay perfectly even stitches by hand.
- Sharp scissors for cutting leatherette.
- Measuring tape, ruler.
- Pins for fixing individual parts.
- Soap, chalk or pencil for marking fabric. The main thing is that the mark is clearly visible on the material.
- Paper for making patterns.
- Hot-melt adhesive tape for seamless finishing of the top edge.
How to refresh the appearance of your skin
After finishing working with leather, the appearance of the product can be refreshed. You can remove marking lines with soap and water and ammonia, then wipe with a cloth moistened with petroleum jelly or glycerin. Heavily contaminated areas on the skin can be washed with warm, unboiled milk, rubbed with whipped egg white or half an onion. White skin is cleaned with a mixture of milk and beaten egg white. Patent leather should be wiped with a cloth soaked in glycerin or cleaned with a swab dipped in milk. Suede can be cleaned with sawdust soaked in gasoline (the remaining sawdust is cleaned off with a brush), or an ink eraser, as well as fine-grained abrasive paper. Stains from household grease are removed with gasoline or talc and a solution of oxalic acid. But be careful, you can remove the paint along with the stain.
Leather paint in aerosol packaging is very easy to use: it is sprayed by holding the can at a distance of about 20 cm from the skin and quickly moving it along the surface to be painted. After a ten-minute break, the next layer of paint is applied. This operation continues until the surface of the skin acquires an even and durable color.
How to join layers of leather using a zig-zag stitch.
Useful tips
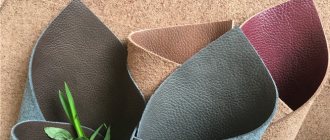
- When purchasing, be sure to check the quality of the material . Leatherette is very delicate, so any scratch or abrasion will stand out on the finished product and spoil its appearance.
- If you have never worked with this material, then first try to sew something small and insignificant. For example , a cosmetic bag or clutch. Hone all your work skills and only then start sewing bulky items.
- Do everything very carefully and carefully . If you rush and make a crooked stitch, there will be no chance of correction. All needle punctures will gape in the fabric and spoil the beauty of the skirt.
Denim skirt pattern
Winter skirt styles
Tips for sewing genuine leather products
Some tips on how to sew and cut clothing items made of leather or suede. 1. Select patterns that do not require planting. Complex shapes in this case are easier to create using construction seams than using darts. In the past, tailors tried to use as few stitch lines as possible on leather goods. Currently, leather production has become thinner and softer and leather products have more seams; often even leather clothing or accessories are sewn from small scraps of leather.
2. Kimono and raglan sleeves are easier to make when sewing leather clothes than set-in sleeves. If you are making a set-in sleeve, measure the increase in fit. It should be no more than 1.5 cm. It is better to make a sleeve cut like a shirt, as it has a looser armhole.
3. You must be sure that your patterns are correct. Therefore, it is good to use the pattern that you have already worked with. Or the prepared pattern should be checked on a mock-up made of non-woven material (non-woven fabric without glue) or inexpensive fabric, and only after that it should be marked on the skin and cut.
4. Before cutting the leather, mark holes and thin places on the wrong side of the leather so that you can avoid them when cutting. Carefully lay out the patterns, make sure that the paired parts (right and left shelves, right and left sleeves, etc.) are cut out in a mirror image. Mark contours, lines and marks on the underside of the skin with a ballpoint pen or soft pencil, or a special marking pen. Mark seam and hem allowances. Some marks can be made using notches or adhesive tape. The seam allowances should be the same width, which makes it easier to sew together the cut pieces.
5. Leather stretches in different directions in different ways, so when cutting it is necessary to maintain the same direction of paired and mating parts. When cutting suede, you must follow the direction of the pile. The pile should be directed from top to bottom.
6. The needle leaves puncture marks on the leather, so leather parts are not swept away and stitching seams are not ripped out. To pre-connect the parts, use adhesive tape or paper clips. There is also a special pencil for fixing seams. The pencil does not leave a mark on the sewing machine needle. By the way, glue is a certain problem when sewing. It clogs the eye of the needle, causing gaps in stitches and even thread breaks.
7. Use overstitched, overstitched or covered stitches. You cannot press or press seam allowances like you would on fabric. Instead, they can be glued with rubber glue or another, which remains elastic even after polymerization (drying). There are special adhesives, as well as NT 2 glue. If you don't have glue, machine stitch the seam allowances in position.
8. It is recommended to use a special interlining for leather LE 420 as a gasket, which is glued with an iron.
9. The fastener is made with a zipper, loops (stitched, overcast and hinged) and buttons. The buttons must be riveted. They are installed in hardware installation workshops.
10. If you do not have such a convenient tool as in this photo, then smooth the seams with the handles of scissors. First, place the seam allowances from the inside out using short taps and smooth them out. Then do the same on the front side with the seam groove.
11. Working with leather involves ironing the leather with a non-hot iron without steam through a dry cloth from the inside of the product. Before ironing the item, try it on a small piece of leather. Ironing leather is not recommended because the hot sole of the iron can cause the leather to change its properties, become stiff and shrink in size. But sometimes when working with leather it is necessary to put an adhesive pad. Then you need to iron very carefully and always only on the wrong side, placing an iron pad under the sole of the iron.
Sometimes genuine leather needs to be stitched using a furrier's machine. In this video you will see how the 10B furrier machine works.
Summarize
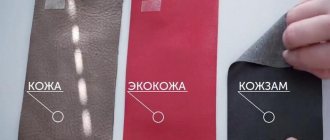
Today we looked at how to sew eco-leather and leatherette.
Main important points:
- properties of materials and difficulties when working with them;
- features and nuances of processing used when cutting and sewing items made of artificial leather.
Next time, you will find an overview of the processing methods used for high-quality sewing of items made of artificial leather, eco-leather and other substitutes.
Let's consider methods and devices that make work easier, as well as alternative options that I have personally tested. Stay tuned for project updates.
***
Did you like the article? Share with friends, send to your social media feed. networks to return to it at a convenient time.
I'm always glad to hear your comments.
Note:
Please note that some pictures of sewing accessories are clickable. By clicking on them, you will learn details about each tool.
With faith in your success and wishes of good luck, Elena Krasovskaya
How to sew a simple pencil skirt without a pattern
To sew a stylish and elegant skirt with your own hands without creating a pattern, you will need a piece of knitted fabric, a wide elastic band and any skirt that has a good fit.
The knitted fabric is folded in half, right side inward, and a skirt is placed on it, serving as a pattern sample. The skirt is outlined with chalk and cut out, leaving a small seam allowance. To make the model take the shape of a pencil, the skirt is slightly narrowed at the bottom so that the upper and lower sections of the fabric have almost the same width.
Fitting and completion of work
When trying on, you need to make sure that the skirt has a good fit, beautifully emphasizes the hips, but does not tighten the buttocks too much. In this case, it is recommended to make shallow darts on the back panel of the skirt. As a rule, darts are located in the hollows of the back, located on both sides of the spine.
The single seam is basted and sewn on a machine, if necessary, processing the fabric with an overlocker. A piece is measured from the elastic band equal to the tight circumference of the waist, after which the edges of the piece are connected with a machine seam.
The elastic ring is combined with the top seam of the pencil skirt, secured with several tailor's pins, basted and stitched on a sewing machine using a zigzag stitch. After this, the elastic is turned to the wrong side and pinned in several places.
Video on the topic