by Alexey | Crafts Vintage For Friends Gifts For Loved Ones Decor For Men For Women Workshop Cheap Accessories | Sunday, March 30, 2014
| Follow Make-Self.net on Facebook and be the first to read our articles. |
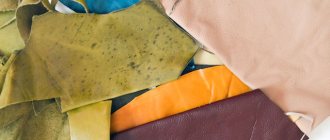
Leather is a rather interesting and elegant material. We have collected 15 original decor ideas using old leather. All of this can be done yourself, so if you have enough leather belts or leftover leather, you should consider creative remodeling: making a handbag, plant pots or door handles. It's pretty simple! Enjoy...
Leather bag
Interesting idea for a leather bag from Matt. Can be used to store second breakfast, cosmetics or other things.
Technology of sewing genuine leather and suede
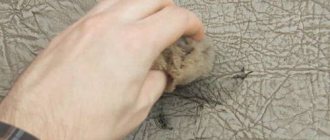
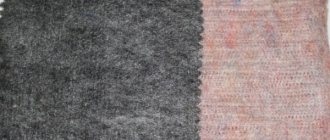
When sewing suede products, you need to take into account the direction of the pile, otherwise the parts will have a different shade. The leather is ironed from the wrong side with a low-heat iron without steam through a dry cloth. To prevent the top part from stretching relative to the other, purchase a special foot with a Teflon-coated sole, as in this photo. Teflon feet cost much less than special leather feet. The ends of the seam threads must be securely fixed with several knots, since machine stitches on leather products do not secure them and therefore they tend to unravel easily.
Working with leather is impossible without glue. The glue is applied with a brush onto a cleaned and degreased surface. Universal adhesives such as PVA and Moment, as well as rubber glue, are very effective. Repeat the procedure of applying glue several times to thoroughly saturate the skin. At the same time, make sure in advance that the glue is not too liquid, otherwise the skin will get wet. Set the parts treated with glue aside until the adhesive has dried “before casting”. After some time, connect the parts together. Place the glued parts under the press. You can even lightly tap these areas with a hammer. Using a cotton swab or rag, immediately remove excess adhesive solution so that it does not damage the front surface of the leather.
Leather plant pots
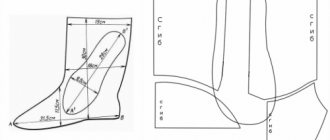
Designsponge told us how to make our own leather plant pots. Download the template and follow the steps shown in the photos.
What kind of sewing machine can you use to sew leather?
Not every sewing machine can sew leather; treat your sewing machine with care and do not try to sew thick and rough fabrics, leather products, especially bags. As a last resort, you can use a Podolsk or Singer manual sewing machine, but not modern “seamstresses”, which cost 5 thousand rubles. To work with leather, special industrial sewing machines are provided or, as a last resort, the instructions should indicate that this machine can be used to sew leather clothes.
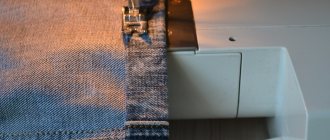
If you sew leather on a household sewing machine, be sure to buy special needles and a foot, with a wheel (as in the photo) or a roller. Then the skin under the foot will not “slip” and the machine will easily advance the product without forming a seat on the top layer of leather.
If you don’t have a foot or it doesn’t fit (Podolsk sewing machine), then in order to make the leather move easier under the foot, you can sew it through thin paper, which can then be easily removed.
Sewing machine threads need to be strong and elastic. But only nylon threads (as in this photo) are not intended for machine sewing. They are only used for manual leather work or industrial sewing machines.
Budget fittings. Leather handles
How to refresh the appearance of your skin
After finishing working with leather, the appearance of the product can be refreshed. You can remove marking lines with soap and water and ammonia, then wipe with a cloth moistened with petroleum jelly or glycerin. Heavily contaminated areas on the skin can be washed with warm, unboiled milk, rubbed with whipped egg white or half an onion. White skin is cleaned with a mixture of milk and beaten egg white. Patent leather should be wiped with a cloth soaked in glycerin or cleaned with a swab dipped in milk. Suede can be cleaned with sawdust soaked in gasoline (the remaining sawdust is cleaned off with a brush), or an ink eraser, as well as fine-grained abrasive paper. Stains from household grease are removed with gasoline or talc and a solution of oxalic acid.
But be careful, you can remove the paint along with the stain.
Leather paint in aerosol packaging is very easy to use: it is sprayed by holding the can at a distance of about 20 cm from the skin and quickly moving it along the surface to be painted. After a ten-minute break, the next layer of paint is applied. This operation continues until the surface of the skin acquires an even and durable color.
Leather bracelets
Master Class
Master Class
Master Class
Master Class
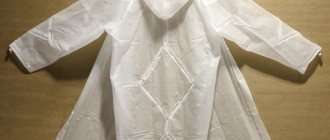
How to transform a leather raincoat into a fashionable one
Re-altering old types of clothing is always a job that requires a special approach, special technology, and special calculations of materials.
No matter how large the proposed material may seem, one must always make allowance for the fact that when cutting there will be a significant amount of waste.
Moreover, the more parts an old product consists of, the more waste there will be.
Over the years of working on altering old products, I have developed a formula according to which the product proposed for alteration will remain this material minus the sleeves.
The customer brought a raincoat to the studio for alterations with a request to change it into a jacket.
Turning a leather coat into a jacket. Atelier of Irina Berzina.
The raincoat brought seemed quite large and long, but its size was 46, and the jacket should be size 50+.
Turning a leather coat into a jacket. Atelier of Irina Berzina.
In addition, in some places of the cloak there were tears in the skin, which should go into inter-pattern attacks when the product is recut.
If you would like to learn more about the technology of converting this raincoat into a jacket, watch our video on You Tube.
The color of the coat's leather is very interesting: a burgundy color peeks through the brown background, and we decided to use this fact to trim the jacket with burgundy leather.
Reshaping old clothes presents a certain difficulty because they need to be dismantled, and the skin itself must first be put in order.
By tidying up I mean such operations as washing the skin, coating it with Vaseline (in mass production this operation is called “greasing”), ironing, and sometimes painting (in this case this operation was not needed).
And only after all these operations does the leather become suitable for cutting, unlike new leathers, which are cut immediately.
Turning a leather coat into a jacket. Atelier of Irina Berzina.
As a result of the alteration, we got this jacket, which is much larger in size than the raincoat from which it was made.
The silhouette of the jacket is slightly fitted.
Turning a leather coat into a jacket. Atelier of Irina Berzina.
This jacket style is good because it is successfully remade from old items and suits everyone, regardless of age and body type.
Turning a leather coat into a jacket. Atelier of Irina Berzina.
Turning a leather coat into a jacket. Atelier of Irina Berzina.
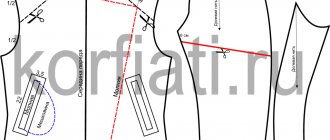
The front and back are made on a yoke, but both yokes have places where pieces of leather have been added to ensure they are the right size.
Turning a leather coat into a jacket. Atelier of Irina Berzina.
This is clearly visible in the photograph: on the back there is added leather in size corresponding to the facing of the neckline, and on the shelves it looks like the second part of the yoke.
These additives ensured the required dimensions for the yokes of the shelves and back. All these parts are carefully stitched.
Turning a leather coat into a jacket. Atelier of Irina Berzina.
The stand-up collar is made of new burgundy leather.
Turning a leather coat into a jacket. Atelier of Irina Berzina.
The clasp of the jacket is made with a spiral zipper in burgundy color, matching the main material.
Turning a leather coat into a jacket. Atelier of Irina Berzina.
Turning a leather coat into a jacket. Atelier of Irina Berzina.
Framed side pockets with zip fastening.
Turning a leather coat into a jacket. Atelier of Irina Berzina.
Turning a leather coat into a jacket. Atelier of Irina Berzina.
The sleeves of the jacket end with cuffs with burgundy facings.
Turning a leather coat into a jacket. Atelier of Irina Berzina.
Turning a leather coat into a jacket. Atelier of Irina Berzina.
The rims are leather. The lining is made of stretch satin, it is sewn to the hem facing with a slouch.
I briefly introduced you to the interesting work of converting a leather raincoat into a jacket.
For this kind of work, we have a detailed master class that I developed, which you can use if you wish.
This master class describes in detail and shows the most complex process of altering leather products, namely, the process of reshaping an old product into a new one.
If you like my ideas and you also want to learn how to work with leather - Welcome to my Courses - they are video recordings and you can take training in any mode convenient for you.
To do this, contact me:
My number:
+7 – Viber, WhatsApp.
Decorating
If it is not possible to alter the product, the defects are very noticeable, you can try to bring life back with the help of clothing decor. There are a huge number of options on how to remake a leather jacket with your own hands, so we will consider only the most common ones.
Dye
If your clothes can still be restored to their previous appearance, do not rush to use them on small accessories. Perhaps it will be enough to paint the scuffs and creases with a special paint for leather:
- The first step is to purchase a special paint for natural leather at a shoe or outerwear store.
- Next, degrease the paint surface and let it dry for about three hours.
- Afterwards, carefully apply the paint on one layer with a brush, wait for it to dry completely and paint with a second layer.
- After this procedure, the jacket must be left to dry overnight. Only after the product has completely dried can you apply a special fixer to it - glossy or matte, depending on your jacket.
Aerosol paints are also available for sale. There is less work to do with them, since they just need to be sprayed onto the painting surface and wait for it to dry.
Important! This is a more convenient method, but you should be well prepared so as not to stain yourself and everything around the jacket. Work with aerosol only with gloves, and place a layer of newspapers under the product to be painted.
There is another very simple option for changing the color of natural leather. To do this, the product must be immersed in bleach for some time. This jacket can be combined with Boho style elements and a light summer dress.
Patches
If the paint does not cope with the defect, you can emboss or patch the jacket. If you choose the right materials, you can easily turn an old leather jacket into a fashionable designer item.
Materials that work well with genuine leather include:
- suede leather;
- drape;
- fur;
- knitwear;
- leatherette and other materials that can be selected depending on the color and texture of your product.
Decor elements
It’s easy to decorate the jacket using bright accessories. Take a colored zipper or buttons, sew on an applique or make seams from contrasting threads - get creative and you will definitely get a bright result! A jacket with a combination of different elements can look truly stylish.
Decor details:
- buttons;
- sequins;
- rivets;
- rhinestones;
- embroidery;
- drawing;
- stripes;
- beads;
- lace;
- stones;
- chains.
Important! Most of the accessories can be purchased at fabric stores. If we talk about stripes, you can always find ready-made options on sale, or you can make them yourself, for example, from a picture from old clothes.
Depending on the elements, you can easily create a product in different styles and easily update your wardrobe.
How to create a new one
To cut old fabric, you need to have not just the desire to create a new product, but specific patterns. They must be drawn on paper. They must be cut with scissors with allowance for the next seams. The task is quite realistic:
- cut out parts from fabric;
- sew them.
Sometimes the problem is that the size of the jacket is not unlimited, and it is not enough for something larger, for example, for a bag.
Advice! To avoid such problems, you need to carefully calculate the dimensions of the product strictly in centimeters.
It is better to rip out an old item at the seams. This saves wasted space and allows you to make the bag a couple of centimeters wider. The new seam can follow the tracks of the old one. Seamstresses advise lubricating the sewing machine needle with oil so that the stitches lie smoother and sliding is less difficult.
One easy alteration idea is to cut with a sleeve. The jacket can be turned into a new vest. The edge can be left raw, so it will look like a fringe with hanging threads.