Many famous designers use berets, panama hats and caps in their collections. They have never gone out of fashion and never will. This is verified information, completely accurate. “A beret is like a T-shirt in your wardrobe,” says Stephen Jones, the coolest hat maker. His hats conquer the catwalks of all famous Fashion Houses and the hearts of fashionistas - you can trust him. Take a look for yourself - trendy ones from Dior.
Extravagantly sporty from Burberry.
Sultry and functional from Lanvin.
All of them are and will be in the wardrobe of each of us, and there can never be too many of them! One of my friends, by my count, has ten, or even more, summer Panama hats. Panama hats only, not including hats and caps, they are all beautiful and each has its own acquisition history.
By the way, what comes to your mind when you hear the word take? I immediately picture the image of a young Parisian woman with a baguette in her hand, a polka dot dress, a bicycle, the Eiffel Tower... Stereotypical? Maybe, but it’s bright, classic, recognizable and very romantic.
What to wear with a Breton cap without looking old-fashioned? There are options. With a trench coat (for example, like the one on our website - a trench coat pattern, preferably in natural colors, muted colors, classic prints - stripes, checks, glenchecks, argyle.
The Panama hat in the spring-summer 2021 season requires the closest attention. The most inveterate fashionistas expect that Panama hats will break all popularity records. Therefore, we have already purchased this accessory and are waiting for spring.
Well, we’ll try to sew it! Let's start with the beret.
How to sew a double-sided Panama hat (women's or men's)
Depending on the color of the fabric, this Panama hat can be suitable for both men and women. The style itself is universal.
Double-sided Panama hat
Print the PDF pattern at 100% scale. To make sure that the pattern is printed correctly, measure the test squares (3*3 cm and 10*10 cm). Glue the sheets together and cut out the parts. Seam allowances - 1 cm, included in the pattern.
Pattern sheets
We measure a test square to check
Glue the sheets together and cut out the parts
pattern for head circumference 53-54, 55-56 and 57-58 cm:
Cutting out the details
If you have leftover fabric, it may well be suitable for sewing a Panama hat. If you buy fabric for a Panama hat, you will need 35 cm of main fabric and 35 cm of lining. Place the fabric right side up. Fold in the right edge of the hem to place the piece (crown) on the fold. Cut out two pieces.
Cutting out the details
Details of faces. sides and linings
Cut off the scraps of fabric left over from the crown. Tuck the fabric and cut out the brim of the panama hat in the same way - 2 parts. Then cut out the bottom - 1 piece. Cut out the details of the panama hat from the main fabric in the same way.
Tulya
Fold the pieces and sew along the sides. You can try the crown on your head to make adjustments: make it looser or tighter by adjusting the seam allowance.
Sew the details of the crown and brim on the sides
Turn right side out and stitch along both sides of the side seams. The photo above shows how it should turn out.
Sew the bottom
The bottom has a slightly oval shape. Make 4 marks on it at equal distances. Pin the crown. The elongated edges of the bottom are front and back. Flattened - lateral edges. Align the side seams on the crown with the side marks on the bottom and sew. Notch seam allowances and press. Turn right side out and stitch close to the seam.
Sew the bottom
Fields
Fold the details of the face fields. sides together and sew along the sides. Press seam allowances. Place the brim and bottom edge of the crown, right sides together. Make sure that the side seams match.
Sew on the fields
Sew the pieces together, then press the seam allowance upward towards the crown. Turn right side out and stitch close to the seam.
Connect with lining
Repeat all steps above for the lining.
Connecting the lining and the front side
Sew up the open area
Now you need to connect the two parts of the panama hat; to do this, place one part over the other with right sides together. Align the margins around the entire circumference. Sew the pieces together, leaving a small area open to turn inside out.
Field finishing
Turn out the panama hat. Hand stitch the open area. Make several machine stitches on the brim of the panama hat at equal distances from each other. Panama hat is ready!
Sew a few lines on the margins
The double-sided Panama hat is ready!
This is interesting: Pattern Panama (p. 56-64)
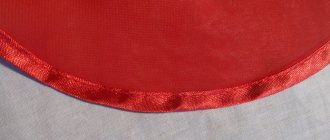
Finishing stitch along the edge of the hat
To ensure that the seam is laid out neatly and evenly, be sure to secure it with oblique stitches after turning the hat inside out, as shown in the photo.
Iron along the contour of the Panama hat, making sure that the seam runs exactly along the edge.
The hole through which you turned the hat inside out also needs to be ironed, with the same allowance.
You will have to sew up the hole manually, using neat, invisible stitches.
After this, all you have to do is make one or two finishing lines along the outline of the panama hat.
Place the finishing stitch along the edge of the panama hat on the wrong side, retreating 2 mm from the edge. If you are only going to do one line, you can back off a little more.
It seems to me that the edge of the panama hat, processed with two finishing lines, will be more beautiful.
Constructing a Panama hat pattern
Features of the pattern
- The first feature of this simple pattern is the opportunity to see the approximate proportions of the future headdress. By changing the dimensional characteristics in the shape, the miniature of the Panama hat changes and you can design a Panama hat to your liking. With the proportions of the headdress that suit you.
- The second feature is that the construction radii are additionally indicated.
How to draw a large radius arc using a pencil and measuring tape.
Construction method
The technique for constructing a Panama hat pattern is a solution to the geometric problem of constructing the development of a truncated cone. Or rather, two truncated cones (the crown and the brim of a Panama hat).
To do this, I had to turn again to the school geometry course. (And at school I thought that I would never need it.)
Master class on sewing a Panama hat (short)
The crown and brim can be cut from several parts.
- Sew the crown
- We sew the bottom to the crown (although it would be correct: “sew on the lid”). While doing the stitching, you can at the same time finish the seams with bias tape.
- We sew the fields.
When sewing two parts of the fields, the seams can be shifted to avoid thickening.
- We sew off the margins with decorative stitching. This stitch gives the brim extra stiffness.
- Installing eyelets for ventilation
- We sew the brim to the crown, attaching bias tape to the seam.
- We sew a decorative strip to the crown and secure the bias tape from the inside with a seam along the top of the decorative strip.
List of literature used in the work
- Vue SVG. The butt of a living parametric armchair
- Analytic geometry. How to find the coordinates of a point
- SVG plotting curves
- PHP SVG how to find intersection points of curves
Panama hat details
There are 5 parts to a traditional headdress:
- bottom;
- field (2 pcs.);
- crown (2 pcs.).
You can use this pattern for sewing.
A Panama hat for a child will require approximately 0.5 m of suitable material.
Advice! For a product for adults, take a piece of this size: 0.3 m long and 1.5 m wide.
We will also need:
- finishing tape (just in case, buy a meter, the leftovers can be used to sew another product);
- scissors;
- sewing machine;
- needle;
- safety pins and thread.
Sewing a Panama hat
In order for the work to please you with its result, you need to carefully perform several sequential actions.
- Cut out the parts, sew the seams of the brim and iron them in different directions.
- Connect the fields right sides together and stitch.
- Notch the seam allowance and press the seam.
- Turn the brim right side out and iron.
- Baste the inner edge of the brim and stitch.
- Sew a seam at the back at the bottom of the crown, press and overlock the seams.
- Connect the parts of the crown with a basting seam, slightly seating the lower half. Sew, overlock the edges, and turn back the seam allowances.
- Sew the crown with the bottom.
- Connect the crown to the inner edge of the brim and stitch.
- Sew finishing tape at the junction of the crown and brim.
- Turn it out and try it on.
Important! Before using finishing tape, all work is carried out from the wrong side.
Sewing on finishing tape is not the only way to decorate
connecting line.
You should definitely not resort to this option if the machine stitching turns out to be imperfectly even. If you have doubts about your own skills, design the ribbon like a belt. To do this, you will have to make loops, preferably from the same ribbon, so that there is no interruption in color. The ribbon will be threaded into them.
Loops are formed between paragraphs 4 and 5 of the job description. At this stage they are only pinned with safety pins. And they are stitched at the moment of processing the inner cut of the fields.
The number of loops is not limited, but models with 6 are more common. This number allows you to notice an unusual detail, but at the same time it does not repeat itself too often.
Important! To determine the size of the loops, use the formula: length of the loop base = width of the ribbon from which the loop is made + 2 cm.
If during fitting it turns out that the Panama hat does not hold its shape, this defect can be corrected. To do this, cut out inserts from thin flexible cardboard. Then open the headpiece, glue the inserts and sew the seams again.
You can avoid unnecessary work if you choose the material responsibly. Pay attention to suiting fabric, denim and corduroy. Well, a lightweight walking panama will be given shape by dublerin.
How to crochet a mohair hat
What to wear with platform boots
Did you like it?
"Afghan" - "experimental"
Events in Afghanistan brought many new realities into the life of the Soviet Union, which people who had not known war for several decades did not even suspect. And one of the most recognizable signs of that war is the new uniform. It was supplied, first of all, to the troops located in Afghanistan, so in the Union this uniform was nicknamed “Afghan”, and in Afghanistan itself - “experimental”.
The main complaints about the old uniform were expressed regarding the officer and general field uniform of the 1969-1973 model. A thick jacket was poorly suited to the hot mountainous climate of Afghanistan; the dark khaki color and cap made officers a convenient target for snipers. It was because of this that experienced “Afghan” officers tried to refuse officer’s jackets, preferring cotton soldiers’ uniforms, equipped with appropriate insignia.
The uniform of sergeants and privates also proved to be extremely inconvenient during military clashes, mainly because it restricted movement. There were other drawbacks, for example, the inconvenient location of the pockets.
Some problems were resolved right there on the spot. For example, colored buttonholes, shoulder straps, badges and cockades were removed from their uniforms by both officers and privates, as a rule, immediately upon arrival in the DRA, or after the first combat encounter. In general, it quickly became obvious that the form required reworking. We remembered the experimental samples of the new form, which appeared back in 1978.
Measurements
You won’t be able to sew a Panama hat for a woman, man or child with your own hands if you don’t take the correct measurements. The entire process takes about 5-7 minutes, but requires care and precision. All data must be written down immediately so as not to forget the numbers.
The correct and at the same time standard scheme for taking measurements for sewing a summer headdress:
The principle of taking measurements from the head
To sew this type of criminal attire you need to know only 2 parameters:
- Head circumference. It is necessary to measure the maximum circumference of the head - the measurement is taken along the frontal part above the eyebrows and along the most convex occipital part. In this case, you need to pull the measuring tape tightly.
- Cap depth. Distance from the beginning of the earlobe to the middle of the crown. Thanks to these measurements, the size is determined in accordance with standard standards.
This is interesting: Pattern Panama r 44-54
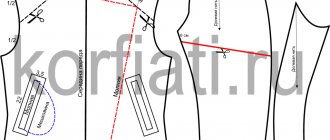
Beret pattern
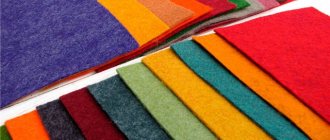
Patterning a beret is not a tricky business, but sewing it will require great care from you. The choice of material must also be approached with full responsibility. The beret can be sewn from leather, suede, artificial or natural, knitwear, loden, coat fabric, bouclé... I would advise you to make a trial version from an unnecessary piece of fabric before sewing in order to determine the volume and adjust the shape.
So, let's begin. The selected beret model consists of:
- beret bottom,
- beret side,
- band.
First, draw a circle with a diameter equal to 1/2 the circumference of the head. The head circumference is measured horizontally across the forehead, above the eyebrows, into the circumference of the head, closing the measuring tape at the back of the head.
Now, inside the resulting circle we draw another one, with a smaller diameter. Its diameter can be easily calculated using the school formula L = 2Pr, where L is the circumference of the head plus a small allowance for the thickness of the seams (about 1-2 cm, depending on the properties of the fabric).
Look at the picture, we have the sides of the beret, the bottom of the beret, and the band is a straight strip of fabric, folded in half (therefore its width is 5-6 cm), with a length equal to the circumference of the head plus a seam allowance.
War dictates fashion
In the Afghan mountains and gorges, soldiers had to constantly walk through terrain where no equipment could pass, and carry all the necessary equipment - food rations, water, clothing, sleeping bags, equipment and ammunition.
At one time, the Americans found themselves in a similar situation in Vietnam. Their military department then quickly took action, and the equipment was quickly adapted to the Vietnamese jungle. The American army now has very successful boots for moving in the bush, tropical uniforms, nylon equipment that is not afraid of humid heat, large backpacks and much more.
And now a similar task - to adapt military uniforms to new conditions - faced the Soviet military department.
Algorithm for sewing a Panama hat
When the Panama hat pattern has been selected and fully prepared, it is time to start sewing the head piece. To understand how to sew a Panama hat, you should use a step-by-step and fairly detailed algorithm.
Sewing
The following tools and materials are usually used for work:
- 1/2 m of base fabric;
- 1/2 m of fabric for the inside;
- 1/2 m of lining fabric;
- sharp scissors;
- paper, chalk and pencil for patterns;
- threads to match the fabric;
- awl;
- sewing supplies;
- sewing machine.
Finish stage
A universal master class on sewing any model of Panama hat:
- Cut out the details of the product from paper after the pattern has been prepared.
- Attach the paper parts to the main, lining and rigid fabric.
- Trace around with tailor's chalk and carefully cut out all the parts along the outline.
- You need to take 2 side parts from the main fabric and stitch them along the sides. Leave a small space on the sides. Glue the lining fabric in the middle. Cut the bottom and top edges of the sides. Repeat with other side pieces.
- Sew top and sides. Take the central circle for the top of the panama hat and attach it from the wrong side to the side parts. Glue lining fabric onto the circle. Carefully stitch along the top edges of the top and side pieces.
- Take the details for the fields from the main fabric. Fold them with their short sides together and stitch them on a typewriter. Glue the lining fabric in the middle of the wrong side. Trim the top and bottom edges of the brim. Attach to the wrong side of the hat and side parts of the brim, stitch along the bottom edge using a sewing machine. Turn right side out.
- After the 2 parts of the hat are sewn, you need to place them right sides together, sew along each edge and leave a small hole. Turn the Panama hat out through the hole. Iron and sew with a double seam along the bottom edge of the panama hat.
The final stage will be finishing, which is done at the discretion of the needlewoman. Usually, ribbons, laces, appliqués, and basic accessories are used - here the imagination of the needlewoman, unlike the sewing algorithm, should have no limits.
Panama hat on a person
During the hot season, you must wear a hat to avoid sunstroke. A universal option is Panama. There are many options that can be used for sewing men's, women's and children's products. If you make something yourself, you can create a truly unique design. It is important to choose the right fabric that is ideal for this type of design. Both the child and the husband will be happy with such a gift.
Technology of sewing children's summer panama hat
It’s not at all difficult to sew this panama hat with your own hands; just cut out two identical parts of the hat from the same material or combine them as in my master class. Then pin them together, or baste them, placing both pieces right sides together.
Stitch these parts on a sewing machine along the winding contour of the Panama hat, with an allowance of 1 cm, as shown in the photo. Be sure to leave a small area unsewn, within 5-7 cm.
To make the Panama hat look neat when finished, be sure to notch the areas concave inward, as shown in this photo. Score carefully so as not to cut the seam thread.
Convex areas, on the contrary, need to be cut off. In this case, these curved areas will be laid out well.
Panama hat pattern
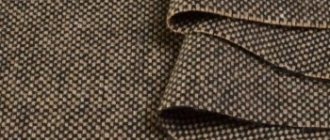
We will sew a Panama hat from fabric that is soft, but still holds its shape. For example, corduroy, faux fur (short pile), boiled knitwear, loden. Choose your option, and don’t forget to make a preliminary sample. A hat is a delicate matter, all proportions must be clearly adjusted and suit you.
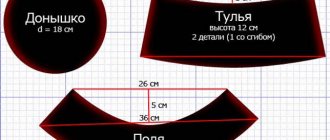
The pattern is not complicated. Let's go step by step:
- The bottom - its circumference is slightly less than the circumference of the head, to which an allowance of 1-2 cm has been added (I suggest making the bottom circumference 4 cm smaller).
- The crown is 9-12 cm high. Form in accordance with the diagram.
- The brim of the Panama hat is cut out into 4 pieces, as they are processed in double pieces.