Modern gloves come in many different types. They say a lot about a person - his lifestyle, financial situation, personal preferences, etc. It is believed that the pattern of fingers and hands is even transferred to the gloves, and that it can be seen under a microscope. This accessory has always attracted attention, and therefore needs to be given special attention. Today we will tell you how to sew gloves with your own hands and look at the process of creating a pattern. Well, let's sew gloves!
How to sew gloves with your own hands
Varieties
Unlike mittens or mittens, gloves have sections for each finger.
This helps to partially preserve their mobility and motor skills. These products are made from a huge number of materials: leather, latex, rubber, fabric, etc. Do-it-yourself gloves
_
Important! The history of these clothing accessories dates back to very distant times. Even in Ancient Egypt, you could meet a person with this kind of clothing on his hands. This always commanded respect and showed his position in society.
Glove materials are varied
There are many types of gloves. If we do not consider boxing, medical, gloves for repairs and various types of work, then women's and men's accessories are divided by purpose, width and length, and by the material from which they are made . The purpose can be completely different - for everyday wear, for social events and going to the theater, for sports and physical exercise. The length can also be different: short, long, fingerless or fingerless. There's no need to talk about the material. Gloves are made from leather, knitwear, suede, fleece, textiles and are knitted on special machines.
Sewing gloves with your own hands is quite easy
Lace gloves
Lace mitts are also common. Experienced people from the fashion world recommend wearing them with dresses and sundresses that are above the knee. They will suit jackets or wedding or evening dresses, ball gowns.
Lace gloves are made in the same way for all products, but usually have a much longer length. They are great for recreating the vampire look. To do this, choose lace gloves, a long dress and high-heeled shoes. You can complete the look with a lace necklace on a ribbon. It is also possible to use them in a sports environment. True, the style will be different.
Lace gloves look feminine
How to calculate dimensions
Before you start sewing gloves, you must make their patterns. And for this, in turn, it is necessary to correctly calculate the dimensions of the gloves and the drawing. How the calculation is performed :
- the pads of the gloves should be 3 cm wider than the hand;
- The width of the thumb section should be 2.5 times larger than the thumb itself. There will be difficulties with removing gloves if the department is narrower;
- As for the width of all fingers, it should be increased by 2 times for each of them.
Calculation of glove pattern sizes
_
On a note! All types of gloves have their own characteristics, not only for wearing, but also for sewing. The difference lies both in the pattern construction technology and in the choice of materials. Below we will look at how to sew different types of gloves, analyze patterns and provide step-by-step instructions with photos.
Option number 6. Short leather cycling gloves
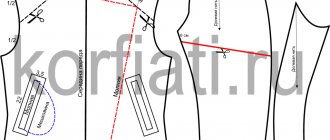
Step 1 . You should start with a pattern. Find one ready-made on the Internet or make it yourself. Here is an example of a finished pattern for fingerless gloves (there are also parts that will be sewn between the fingers, but we’ll talk about them later).
Bicycle gloves pattern
In our example, the palm circumference is 18 cm (that is, size S). When creating a pattern, be sure to consider the size ratio!
Left and right parts
Step 2 . When calculating the size of the pattern, adhere to the following rules:
- along the line of the pads, the width of the glove should exceed the width of the hand by 3 cm;
- the width of the thumb hole should be 2.5 times greater than its width (otherwise it will be difficult to remove the glove);
- Each “finger” of the glove should be twice as wide as the finger of the hand.
It is important to correctly calculate the size of the pattern
Step 3 . Take an A4 sheet of paper, fold it in half and cut out a pattern from it.
Leaf folded in half
To determine the size, you can measure the circumference of your palm (see photo).
The circumference of the palm is measured
The resulting value must be checked against the size table below.
Glove size chart
Step 4 . Prepare everything you need for work:
- skin;
- handle;
- buttons, as well as a button installer;
- ruler;
- needle, thread;
- scissors (you can also use a stationery knife);
- awl;
- hole puncher;
- marker
Tools and materials
Leather, buttons, button installer
The thickness of the skin should be 0.8-2 mm, and it itself should be quite elastic. The paint or outer covering must be durable (otherwise the leather will rub off on the steering wheel) and not slippery. Our example uses 1.5mm leather.
Leather thickness – 1.5 mm
Step 5 . Try on the paper pattern to make sure the measurements are correct. It is important that the seam meets along the line of the index finger and thumb.
Trying on a pattern
Make sure the dimensions are correct
Step 6 . Everything is fine? Start transferring the pattern onto the leather. Remember that you are making 2 gloves, so trace both pieces.
Lay out the pattern to its full width and trace around the wrong side of the leather with a pen. Try to ensure that the material does not fold at this time and lies flat.
The template is outlined with a pen
Step 7 . Cut out future gloves, fold them, check that nothing protrudes anywhere and that all the lines meet correctly.
Future gloves are being cut out
Step 8 . Mark 3 more parts - they will be sewn between the fingers. All parts must have different lengths:
- 1 – 20x50 mm, between the index and middle;
- 2 – 20x45 mm, between middle and nameless;
- 3 – 20x47 mm, between the ring and little fingers.
Parts that will be sewn between the fingers
Step 9 . Cut out all these parts - 2 pieces each.
There should be 2 pieces of each part.
The photo below shows all the pieces needed for the gloves.
Set of blanks for gloves
Step 10 . Mark lines and holes for subsequent sewing of seams. It’s great if you have a sewing machine that can sew on leather—this will make the work much easier. In this case, simply stitch the necessary parts together.
Hole marking
Step 11 . Start by marking out the rectangular pieces. Make holes in increments of 3-4 mm, departing 2-3 mm from the edge. Use a marking wheel for this and then an awl. If you don't have a suitable tool, you can use a regular ruler.
Marker wheel
Step 12 . Mark the holes in the gloves themselves. The workpieces should not move or move apart.
Marking holes on gloves
Holes are created
Step 13 . Once you have finished marking, start stitching the parts. You can sew the leather from the wrong side if it is thin and soft. But if the thickness of the material is more than 1 mm, it is better to sew directly from the front side - this way the seams will not protrude, press or interfere with your fingers.
Start sewing from the bottom, from the thumb. First, secure the thread from the inside.
The thread is attached from the wrong side
Step 14 . Start flashing. Try not to make unnecessary gaps between the holes, stretch the thread well. The parts should not move or wrinkle.
Firmware
The thread should be well stretched
Step 15 . Go to the end of the line, secure the thread and go back. That is, the needle goes through the holes in a “dotted line”, after which it returns back, closing the gaps.
Reach the end of the line
The thread needs to be secured
More photos of the process
Step 16 . Having reached the beginning, fasten the thread, bring it to the inside, trim and carefully glue the tip so that it does not stick out. Then stitch the area between your index finger and thumb.
The part between the thumb and index finger
If you try, the seam will turn out neat and even.
Smooth and neat seam
Step 17 . Try on the stitched part. Check whether it is comfortable for your fingers and whether you have marked everything correctly.
Step 18 . Sew the rest of the product. Take a rectangle (1), bend it in half with the outer surface inward, insert it between your middle and index fingers. As a result, a “triangle” should form on the index finger.
Sew on a rectangle
Sewing process
Sew all the parts if nothing protrudes anywhere (and if it protrudes, first trim off the excess).
All parts need to be sewn
Cutout at the top of the glove
Step 19 . Sew the seam (in both directions, as before), secure the thread, trim off the excess. Then sew on the other side.
Cutout at the top of the glove
Stitched on the other side
Stitched on the other side
Step 20 . Sew the remaining 2 parts in the same way. When finished, try on the finished gloves. Do your fingers bend, the seams don’t get in the way, does your hand feel comfortable? So that's great! After some time, the skin will stretch a little and the gloves will take the shape of your hands.
Gloves are being tried on
Fingers should bend freely
Seams should not interfere
Step 21 . Mark where the button will be located, cut a strip of material at the top. The width of the strip is 10 mm (in accordance with the size of the button).
Cut a round hole for ventilation 2-3 cm below the knuckles (with a clenched fist), retreating 1.5-2 cm on the sides.
Hole for better ventilation
Step 22 . Put on a glove, tighten and mark the location of the button.
Next, take care of the button
Step 23 . Use a hole punch to make 2 holes for the button parts. Secure the buttons using a special installer or, for example, a hammer with a pin.
Attaching the buttons
Inside view
Alternately connect the elements of the upper and lower parts of the button. Secure with button installer.
Button installer
Using the installer
Pinned button
Bottom of the button
Attaching the bottom of the button
Finished bottom part
Step 24 . Place the button parts on top of each other and check if everything works. Open and close the button several times in a row.
The functionality of the button needs to be checked
Step 25 . To provide additional ventilation, make a semi-circle perforation above the cut hole. Use a hole punch. The pitch between the holes is 1-1.5 cm.
Holes are made with a hole punch
Additional perforation on the glove
Do the same with the second glove.
Sew the second glove in the same way
Homemade cycling glove
It turned out stylish and comfortable
That's it, the cycling gloves are ready! But remember that if you like to ride in the sun for a long time, then be prepared that such a “bicycle” tan will soon appear on your hands.
You may get a “bicycle” tan on your hands.
Length standards
When determining the length of gloves, the number of loops/buttons of the fastener matters. Although loop and button closures on gloves have almost completely fallen into oblivion due to the widespread use of elastic materials, the classic “button length” still defines the norm for glove length . The length standard corresponds to the measured distance between the seam of the thumb piece and the top edge of the glove. The unit of measurement for the uncovered part of the hand is the "French inch".
Let's start with the shortest gloves:
Two buttons: These gloves traditionally have an overall length of 20-23 cm and end at the middle of the wrist, revealing the beauty of the forearm and hugging the hand. The hole on the inside of the wrist serves as an eye catcher on one side, and on the other hand makes it easier to put on the glove. So-called palm-length gloves of this type can be worn all year round.
Four buttons : a glove 25-28 cm long, covering most of the wrist. A good compromise for a woman who wants to declare her elegance. These gloves look especially good under jacket cuffs.
Six buttons: another compromise, quite exciting. It's less extravagant than the eight-button option, but it's an attractive length that will allow the wearer to even glance at the watch - even if that's sometimes difficult! These gloves should be worn with bare hands or under a jacket.
Eight buttons: the glove reaches to the middle of the forearm. These are traditional three-quarter gloves that cover the forearm by 14-15 inches. While the glove's comeback may not be as obvious as other styles, it's a length that exudes Jackie Onassis-style charm.
Twelve buttons: the so-called queen of gloves, which reaches to the elbow. Such gloves were worn by Audrey Hepburn and a whole horde of fashion trendsetters.
Sixteen Buttons: A classic 24-inch-long opera glove that ends exactly midway between the elbow and shoulder. The basic rule for opera gloves is: the shorter the sleeve, the longer the glove. Therefore, opera gloves should be worn with sleeveless, short-sleeved, strapless or strapless dresses, as well as evening dresses with short sleeves.
Preparation of material
To improve the quality of leather, you need to soak it, stretch it, and let it dry. After this, repeat the procedure several more times until it becomes sufficiently elastic. Important aspect! With each subsequent time you should stretch the material less and less. Otherwise, its characteristics will deteriorate too much and working with it will become too problematic.
“We are still friends”: Derevianko commented on the breakup with his wife
Smooth and fresh skin: dermaplaning, or why a woman needs to shave her face
Why French children behave well: eight ways to raise them
Sock mitts
Step 1 . Find suitable socks, ideally these should be knee socks. Choose some interesting pattern that will look nice on your gloves. For example, stripes like this.
Prepare knee socks with an interesting pattern
Step 2 . Cut the entire foot of the sock in a straight line (right above the heel). Set the bottom part aside; you won't need it.
Cut off the foot of the sock
Step 3 . Place your hand on the sock trim (as in the photo below), mark where your thumb is located (usually about 5 cm from the top edge of the glove).
Trimming by hand
Step 4 . Armed with scissors, make a slot for the thumb (13 mm is enough).
A vertical cut is created
Step 5 . Try on the future glove by inserting your thumb into the slot. If you need to enlarge the slot, you can do it at this stage. Also, give it an oval shape.
Trying on a glove
Step 6 . Fold the cut edge of the glove inward by about 1 cm. Using tailor's pins, secure the hem, then sew with a zigzag or knit stitch. Or do it by hand using running stitches.
The hem of the glove is sewn
Step 7 . Hem the edges of the thumb hole. Tuck them inside by about 0.5 cm, and hem the resulting hem with running stitches.
Cut the slots for the thumb
Step 8 . Make the second glove in the same way. During production, try on the mitts from time to time so that they turn out identical.
Ready-made mitts from socks
From old gloves
As you know, it is very common for women's gloves to have their fingertips rubbed or torn. If you have such an injured pair, then feel free to use it to produce mittens.
Advice! You can easily make bicycle mitts from old thick leather gloves. For ventilation, we additionally make perforations.
Required:
- Leather, suede or fabric gloves. Knitted ones are perfect.
- Scissors.
- Threads to match.
- Chalk or soap.
- Ruler.
Progress:
- We determine at what distance we will cut off the fingertips.
- We measure and draw lines. We make sure that the left and right blanks are symmetrical.
- Cut off the excess 0.5 cm above the drawn lines. These are our seam allowances. If you do not plan to process them, you can cut them strictly according to the marks.
- Gloves with lining - we wrap the main part and the lining on the fingers so that the cuts are not visible.
- Let's make a line.
- Leather or suede products without lining - just leave the cuts as is, they will not crumble.
- Knitwear, the loops of which may unravel , you need to tuck all the fingers and overcast it by hand to secure it.
Advice! Try on the product often to avoid getting your fingers caught when sewing.
We decorate, make perforations if necessary, and try them on.
Option #1. DIY fleece gloves
These lightweight gloves will be relevant during the off-season. Fleece is an affordable and easy-to-process material, making it perfect for beginners.
Step 1 . First, select a pattern of suitable sizes or, alternatively, trace your palm on a sheet of paper previously folded in half (the fold should be near the index finger). Additionally, you will have to make a thumb. If you are making a pattern for the first time, it should be longer. After all, the length, if necessary, can be easily removed, but there will be problems with extensions.
Fleece gloves pattern
Pay special attention to the intermediate parts of the fingers: they differ in shape and length. In our example, the same letters are used on the main and intermediate parts - this way you can easily determine what to sew where. The point, of course, is conditional, because gloves can have only one intermediate part for all fingers.
Step 2 . Lay out the paper patterns you made earlier on the fabric.
Cut gloves onto fabric
Step 3 . Cut out all the necessary parts.
Pattern details for future gloves
Step 4 . Fold the thumb piece in half (along the fold line), then baste it.
Thumb detail
Step 5 . Using a sewing machine, sew along the basting line on both pieces. Remove the basting.
Thumb part being sewn down
Step 6 . Take the intermediate parts, apply them one by one to the main one, trying to follow the sequence prescribed by the pattern.
The intermediate part breaks off
Step 7 . Pin together the pieces (see photo below).
Intermediate finger parts
Another photo of the process
Step 8 . And then sweep away.
Glove parts are basted
Step 9 . Follow similar steps for both gloves. Quite labor-intensive work, but the result is worth it.
The procedure must be done with both gloves.
Step 10 . Place a line along the basting: first on one part, then on the other.
A line is being laid
Step 11 . Now the intermediate elements are stitched on only one side, and therefore the gloves seem to be open. And it is at this stage that it is better to start sewing in the thumb part. Having attached it to the main parts of the gloves, baste and sew on a sewing machine.
We pin the thumb part to the main part of the gloves.
We sew the thumb part with the main part of the glove
Step 12 . Having sharpened your thumb, fold the main part along the fold line (it, as noted above, is located near the index finger). Baste the side seam, finger details, doing this all the way to the wrist. Baste and machine stitch. You can sew an elastic band along the wrist line or make a drawstring - this way the gloves will not slip off or bulge. After all, fleece itself does not hold its shape well.
Finished fleece gloves
Homemade fleece gloves
It turned out quite nice
Articles on the topic
TOP 8 ways to make a plague doctor mask
DIY sleep mask in a few steps
Made from knitwear
Reusable protective knitted gloves.
Manufacturing:
We will take two fabrics of different colors for the palms and the back, so that you can see it better. You will also need a piece of paper. We will need any stretchy fabric - an old T-shirt will work great! You can sew thin gloves from cotton or knitwear.
Step 1
Place your palm on a piece of paper, spread your fingers out as far as possible and trace your hand.
Remove your hand and draw a second stroke with an indent of 0.5 - 0.7 cm.
Step 2
Take the first piece of fabric, attach a sheet of paper to it and iron it. This will soften the paper and bond it more firmly to the fabric. Cut to the required size.
We place a second piece of fabric face to face from below. After both pieces of fabric are folded together, we fasten them with pins and trim off the excess.
Step 3
We sew directly on the paper, following the contour of the second line. We pass especially carefully and smoothly along the fingertips.
We maintain sharp corners in the corners between the fingers, unrolling the workpiece without cutting the thread. It turns out this is the stitched outline.
Step 4
We peel off the paper and trim off the excess fabric, leaving a gap of 0.3 mm.
Carefully cut the fabric between your fingers. Don't damage the seam!
Step 5
At the bottom we fold and stitch the fabric.
Turn them inside out and the gloves are ready! Use it for your health.
Option number 4. DIY suede gloves
An old suede jacket can easily be transformed into beautiful, comfortable and soft gloves. But the most important thing is that no one else will have such gloves!
On a note! To begin with, we advise you to practice by trying to make a glove from muslin or cotton.
To make such a stylish accessory with your own hands, you will need:
- suede leather;
- sewing machine;
- pattern paper;
- a simple pencil;
- threads of a suitable color;
- scissors.
Step 1 . Fold a piece of paper in half, place your hand on it so that your thumb remains outside the rectangle (see photo). There should be a small space between the edge of the sheet and your index finger. Spreading your fingers slightly, outline your palm with a pencil, leaving about 3 mm on the side of the little finger and above the tips. Try to keep parallel lines between your fingers.
Trace your palm with a pencil
Step 2 . Mark the location of the thumb (for us these are points B and C). Next, draw a line vertically from point A, and horizontal lines along B and C. All that remains is to draw an oval - the location of the future hole.
Preparing the pattern
Step 3 . Cut out the pattern according to the markings.
Cut out pattern
Step 4 . Prepare the pattern for the gusset as follows. Place each finger (except the thumb) on the edge of the paper, trace and cut out.
Each finger needs to be circled
On a note! You can emphasize the color of the gloves using threads of contrasting colors. You can decorate the accessory with embroidery and bows.
Step 5 . Connect your fingers to the gussets (little finger to ring finger, ring finger to middle finger, etc.). Trace each pair with a pencil. Mark each of your fingers.
Connect the corresponding fingers to the gussets
Step 6 . Draw a curve at the bottom of each insert, then start cutting out the pattern. This is where 3 gussets should look like.
A curve is drawn at the bottom of each insert.
Step 7 . Proceed with the pattern for the thumb. Attach it to the paper, circle it, and draw a “wing” to the right in the middle. This is only half of the pattern. After adding a little seam allowance at the tip (this finger doesn't have a gusset), fold the paper in half and draw the outline of what you just drew.
Thumb Pattern
Step 8 . Before you start working with leather, practice - make a glove, say, from cotton and check if the pattern is correct. Moreover, it is advisable to use threads of a contrasting color - it is more convenient.
Step 9 . If everything is fine with the pattern, pin it to the skin on the back side. Trim and sew with a broken stitch, leaving approximately 3 mm from the edge. Adjust the shape of the fingers if necessary.
Pattern pinned to leather
When finished sewing, turn the glove inside out and try it on.
Inverted Glove
Step 10 . Fold the thumb pieces in half (lengthwise), then sew them together. Don't touch the bottom. Turn the part inside out, having previously trimmed the corner.
Step 11 . Pin the piece to the glove, aligning the seam with the seam of the index finger. Try on the product and adjust if necessary. After this, sew on the thumb. Finally, sew the sides and hem the bottom.
From guipure
The glove should fit your hand, but not squeeze it. Therefore, the material should be selected as elastic.
It is important to determine not only the size, but also the length of the hand and fingers. The size itself is the circumference of the base, expressed in inches. If you only have a measuring tape, then the resulting figure should be divided by 2.54.
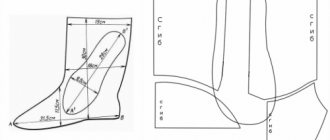
Guipure gloves pattern. Where can I get it? You can undo old satin or any thin models. Or redraw one of the drawings suggested below. The first of them (1 square = 2 cm) is given for size 6. That is, the length of the base of the palm is 6 inches or 15.24 cm. The second one must be scaled to your measurements.
- Transfer the pattern to the fabric.
- Cut taking into account allowances.
- Make slits on the parts according to the markings.
- The wide part is the thumb. For ease of sewing, numbers indicate the places of alignment.
- The narrow and long part is the remaining fingers. You need six of these parts for each hand. They can be cut with a fold. Then you will need three double elements.
- Sew the thumb element to the main one. Start from the slot, matching the areas marked with numbers.
- Sew the pieces for the other fingers at the base in pairs if you did not cut them out with a fold.
- Sew the “fingers” to the top of the main element.
- Then do the same with the bottom part.
- Now you can make the external seams.
- Fold open edge and hem.
If the gloves need to be long, run an elastic band or a hat elastic along the outer edge.
As you can see, sewing guipure gloves with your own hands is quite simple.
Option #3. DIY knitted gloves
The next option we'll look at are these cute knitted gloves.
Knitted gloves pattern.pdf
The pattern of such gloves looks like this.
What does the pattern of such gloves look like?
The outer lines are 4 mm wide (these are allowances). The lines that align on the glove and thumb are highlighted equally or have the same color.
In our example, an overlock type sewing machine was used; the author sewed with one needle, removing the thread extender. Thanks to this, the overlock stitch turned out to be quite narrow. The material used is two-thread Loop footer.
Step 1 . First, attach your thumb to the glove. Connect the section highlighted in green on the pattern.
The slice highlighted in green is connected
The base of the finger is sewn
Step 2 . After this, sew the base of the finger to the glove.
Step 3 . Connect your finger as in the photo below.
Thumb connects
Finger connection
Step 4 . Bring your top fingers together. Cut out a strip of 2x55 cm along the grain thread.
- The thickness of the strip can be increased if the fabric is thick. But in our example, the knitwear is relatively thin.
- You can make a strip from pieces of fabric, but in this case the seams should be in the places of the membranes.
Take the strip and start connecting your fingers with it, starting from the top of the index finger and ending with the top of the little finger. Sew at the base of the fingers the entire width (that is, 2 cm), tapering towards the top. In the photo you can see that at the base the strip is flush with the cut, and at the tops it protrudes beyond the edges.
Fingers are connected by a strip
Protruding edges trimmed
Step 5 . Do the fitting. If everything is fine, trim the protruding edges of the strip.
Step 6 . Machine stitch one side to join the strip to the pattern. On each membrane, bend the next finger (this will create a straight line) and sew a line.
The stitching is done on a machine
Opposite sections are collected with needles
Step 7 . Gather the opposite sections with needles so that when laying a stitch, you don’t catch anything unnecessary on the tops.
Step 8 . Go around the other side in the same way.
The other side does the same
The seams should hold the parts together well.
Step 9 . Check the security of the seams. If the stitching is done poorly and holes appear somewhere, lay another stitch on top to eliminate the defect.
Step 10 . Fold the bottom of each glove twice, then sew a straight machine stitch.
The bottom of the gloves is turned up
Another photo of the finished gloves
Step 11 . If the knitted gloves were made as a gift, package them beautifully.
Looks good on the hand
Nicely packaged gloves
Video - An easy way to sew fabric gloves
Warm
If you sew fleece winter gloves, you will have to make them double.
Two sets of parts are cut out - for the top and inner layers. You will get two pieces per hand. When cutting out the outer glove, make allowances slightly larger than on the lining. Ultimately, the inner part will be slightly smaller, so it will fit organically into the outer one. Then put one semi-finished product into another, the seams will be between the parts. After this, proceed to sewing the cuff, or process the cut with a hem.
Bringing back the shine
After the restoration, I want to get shiny gloves that are very similar to those that were purchased once. You can make them like this again! If the pair becomes dirty, you must first clean the product (with soap solution, shampoo, or sometimes with a cloth soaked in an alcohol solution.
To restore shine, a leather glove is rubbed with a special wax or cream.
By showing imagination and patience, you can extend the life of your favorite accessory and keep the product looking attractive. And decorating gloves with improvised materials will give them uniqueness and originality.
“Roses”
You will have to sketch out the diagrams for this work yourself, since the size of the mittens and the thickness of the yarn may differ significantly from those presented. In addition to wool and two needles with a large eye, you will also need a piece of leather or leatherette the size of a mitten. This is necessary so as not to accidentally sew on both sides of the mitten. We place them on the skin and trace them. Then he cuts out what happened.
The embroidery process can be simplified if marks are applied to the front side of the product, by which you can easily determine where the elements will be located and what boundaries cannot be crossed.
We begin the work by embroidering the top bud. In order for the roses to be the same size on both mittens, it is necessary to count the number of turns on the needle and observe these restrictions throughout the entire work. This way you need to embroider all the buds. Then we move on to roses. The principle of working on them is the same as on buds, the only difference is that you should move clockwise. After the work on the roses is completed, the thread should be cut and secured. Now you can move on to the second mitten.
When both mittens are ready, change the threads from pink to green. We attach it to three rosebuds and embroider greenery. We surround the open roses on all sides with leaves and distribute them evenly over all surfaces of the product. It is not necessary to use one shade of green; you can add lighter tones to the composition. We will do exactly the same work with the second mitten. Please note that the patterns played virtually no role in the embroidery process. As a result, our old mittens were radically transformed.
In the same miraculous way, they will influence our mood in bad weather and change it for the better. The same technique can be used to embroider snowflakes, flower bouquets, etc.
Spectacular decor
Large knitting in itself is decorative, bright patterns too, but smooth gloves can decorate:
- Decorative stitches made on a sewing machine or by hand. You can also add a stitch here.
- Embroidery with colored threads.
- Crocheted lace will decorate strict plain gloves in one evening.
- Thread strands , including silk, forming complex patterns will add decorativeness.
- Appliques , including those made of fur or felted wool.
- Leather or quilted medallions . Goes well with embroidery with beads, beads, and bugles.
- Bows - ties . The best options are silk, satin, suede.
- On sports models - rivets, perforations, chevrons.
Even without special sewing skills, even a novice seamstress can sew the simplest models of gloves without a pattern. This is an exciting activity, so believe me, these will definitely not be your last gloves that you sew yourself.
How to insulate
Sometimes ordinary winter mittens are not as warm as we would like. If you sew fleece into mittens, the problem will be solved.
In order for the lining piece to fit perfectly, it is advisable to create a pattern yourself based on the finished mitten.
- Trace the palm and thumb.
- The resulting patterns were like this.
- Cut out the necessary parts and cut them out.
- Sew the elements of the future lining.
- Place the lining inside the product. Sew connecting stitches by hand.
- To prevent the inside from turning inside out when removed, the crowns are secured with several hand stitches.
Products are decorated as desired, for example, funny animal faces.
Chanterelle mittens
A funny decor - a fox's face - will be a wonderful decoration. For appliqué elements, base material or felt is used.
The parts are pre-glued with a “cobweb” or fixed with running stitches. Then machine stitch the top.
Skin stretching
After an hour or two, remove the skin from the damp cloth and continue to stretch it along the edge of the table. This process must be thorough and requires a little effort. While allowing more and more leather to hang over the edge of the table, pull it evenly, firmly, towards the floor. Do this stretch several times, but only in the longitudinal direction. Do not stretch the leather across its entire width.
Most people like liners for winter gloves, in which case it is better to choose a heavier type of leather than that used for unlined summer gloves. Previously, you could buy special fleecy stocking material for lining gloves. A knit or regular wool stocking is the most suitable substitute, as it will stretch as you move your arm. You can also knit your own linings, using the glove template as a guide, and sew them on just like you would sew a material lining. One of the benefits of this is that you can get perfectly even seams since you don't have any raw edges to worry about.
A thin dress of fine quality wool can also be used and should be cut on the bias for maximum elasticity. Silk jersey may appeal to people who don't like the feel of wool. Fur lined gloves are delightful to wear and not particularly difficult to make. The main thing to remember is that fur will take up a lot of space in the glove and leather
From a sweater
We will need:
- 2 sweaters
- Some fabric for lining (fleece preferred)
- Buttons
- Pattern templates
- Pins, thread, needles and meter tape. Patterns for mittens
1. Cut off the sleeve to use for the top of the mitten.
2. Attach template No. 3, as shown in the photo. If you are the happy owner of a striped sweater, then you should make sure that all the stripes match.
3. Cut off the cuffs and 2-3 centimeters of the sleeves of the second sweater, as in the photo.
4. Cut out template No. 1 and No. 2, we get 4 parts. 5. Take the time to lay out the freshly cut parts in such a way as to make sure that you have a right and left hand. 6. Place your palms together, as in the photo. Sew together from the base of the thumb to the base of the little finger.
7. Unfold the shreds as shown in the photo. 8. We sew together pieces of palms with a striped top, leaving the bottom unstitched.
9. We repeat all this with the lining fabric. 10. Turn the lining right side out and put the cuff on it. Sew the cuffs to the lining.
11. Turn the cuffs away from the lining.
12. Let's try it on!
13. We put a face mitten on our hands and turn up the cuffs.
14. Secure the raw edge of the mitten using a button on the cuff. Now you have a wonderful, inexpensive, homemade gift - a pair of warm, cute mittens!
Option No. 8. Waterproof gloves from a bag
These gloves will come in handy for doing some dirty work. They can be made from any package.
Step 1 . Prepare everything you need - thick film (for example, a garbage bag), a stationery knife, an electric soldering iron and a marker.
Step 2 . In our example, we use a regular garbage bag.
Using a trash bag
Step 3 . This bag is already two-layer, so there is no need to fold it in half.
The package is placed on a flat surface
Step 4 . Place the bag on a flat surface, place your palm on it, fingers spread. Trace your hand with a marker, retreating about 5-7 mm from it.
The hand is outlined with a marker
Step 5 . Trace the outline with the tip of a heated soldering iron. This way you will burn through the film and connect both layers in parallel. Don't forget to place cardboard under the film first.
The circuit is traced with a hot soldering iron
Step 6 . Circle everything except the bottom - cut a line there with a stationery knife. The finished glove can be easily removed from the film.
The line is cut from below with a knife
On a note! Instead of a soldering iron, you can use an old knife, heating its tip over the fire. You can make as many of these gloves as you like at one time.
Trying on a finished glove
Make the cuffs long enough to protect the sleeves from splashes.
Women's with edge
An anatomically shaped product that will fit very comfortably will be perfect for a woman’s hand. The pattern of the thumb of this model consists of one piece, the inserts between the fingers are pointed at the ends. Which will give the creation a more elegant form.
The principle of assembling the parts is the same as in the photo above. A significant difference is that the interdigital inserts are not a common tape, but individual ones. The tops of the inserts and fingers are combined at one point.
After finishing the work, decorate the edge with a strip of fur, sewing it manually with hidden stitches.
Simple open finger mitts
In this model, the dorsal and palmar surfaces are closed, and the phalanges are partially covered. This type of wardrobe item without a top is very easy to make yourself. When constructing a pattern, the palm is outlined on paper.
You can make a regular vertical cut between the fingers, not a V-shaped one. The excess fabric will go to the seams; this width will be enough for the phalanges.
The details are sewn on the sides and between the fingers.
This simple method allows you to keep your hands warm without interrupting your work.
This video will clearly show and tell you how to easily and quickly sew mittens with your own hands.
Winter children's
To make them you will need very thick knitwear. If you need warmer gloves, you will also need fleece. In our example, gloves are made for not very cold winters and off-seasons.
Children's glove made of thick knitwear
First of all, prepare a pattern according to the size of the child’s hand. Mark where your thumb will be located and measure its length. Mark the depth of each finger in turn, connecting the upper and lower marks. Here is an example of the finished pattern.
Pattern of children's winter gloves
Place the fabric on the edge of the little finger (fold), trace the pattern. In the example, the bend location is marked with a dotted line. Cut an oval hole and sew a pre-prepared thumb element to it. When sewing in a finger, start with the mark in the middle, aligning the mark with the seam of the thumb.
Sewn thumb How to sew a thumb
If you are planning any applique, sew it on now. Next, sew a lace (a strip of fleece is a good option) around the perimeter of all the fingers. The example uses a flat shoelace. Sew with a thick thread - first on one side, then on the other.
The photo shows the front and back of the glove.
Front side of the glove Back of the glove
After this, turn the glove inside out. If the child's fingers are small, it will be quite difficult to twist them - in this case, use the blunt side of a pencil or something similar.
You can make cuffs like on a jacket - this way the gloves will hold on better. To make a cuff, cut a narrow strip of fabric, sew it into rings, fold it in half and sew it to the product.
The finished gloves turned out warm
_
Important point! The end of the lace needs to go somewhere. If it is not fixed and processed, then, of course, it will fall apart. On the other hand, the treated tip will be prickly, so you should not leave it. You can, as in our example, sew on a small applique.
How to hide the tip of a red lace More photos of the inside of the glove
Option #2. Leather gloves with asymmetric pattern
To make it, you will need elastic and thin leather (you can use glove leather or suitable clothing leather). In addition, you will need:
- threads;
- hand needle;
- gel pen;
- scissors;
- tailor's copier
The gloves in the example are size XS and are asymmetrical. To be more precise, the arm circumference in this case is 17 cm.
Step 1 . We start with the drawing. This is what the left glove will look like.
Pattern of the left glove
Step 2 . Detail of the thumb, as well as selection of suitable leather.
Template for the thumb (parts for the thumb)
Step 3 . This is already the right glove.
Pattern of the right glove
The design is quite unusual: there are no traditional arrows, as in the version above.
Step 4 . Remove the patterns from the drawing and then cut them out of leather. Below are the details of the right glove.
Right hand parts cut out
Step 5 . Left hand glove.
Parts for left glove
Step 6 . Sew the gloves, starting with, say, the left one. Sew together the 2 pieces of “girl hair” that go into the fingers. For this:
- coat with glue;
- dry;
- glue the parts;
- mark the holes with a copier;
- sew the details.
Use rubber glue: it cleans up well and sticks the skin together well. The applied glue should dry for about 5 minutes, then you can begin gluing. Coat the edges by about 1-1.5 mm.
The parts of the “girl’s hair” are connected
Step 7 . Make marks along the edges of the parts, but not all over at once (the marks disappear). Before sewing according to the bastings, make holes with a needle. But not with an awl - it leaves too large holes.
Markings are made along the edges
Step 8 . Sew the parts together using a bias overlock stitch (see photo) along the holes.
The parts are sewn together according to the holes
Slant overlock stitch
Step 9 . So sew on the third “girl hair”.
The third part of the “girl’s hair” is sewn on
Step 10 . Glue the “hair” parts onto the face. Make a 5mm allowance on the “face” (this has already been taken into account) to glue the “hair”.
“Hair” parts are glued on
Step 11 . Next, the “hair” must be sewn to the “face”. This seam resembles a bias stitch, but it comes out flat.
This seam is flat
Step 12 . Outline the "face". To make the “eyes”, use a punch and paint the rest with acrylic paint. Mark along the drawn hole and sew.
How a “face” is created
Step 13 . Sew in the thumb. To do this, take turns aligning the corresponding points on the parts (see photo below). Start from point A.
Thumb sewing pattern
Step 14 . First, glue it down.
First the part needs to be glued
Gluing the thumb part
Step 15 . After that, mark the holes and sew.
Main stages of firmware
Step 16 . Sew the product along the side seam.
The glove is sewn along the side seam
What happened in the end
Step 17 . Glue and then sew the “head” to the base. As a result, some of the “hair” will extend onto the inside of the arm.
Next you need to glue and sew on the “head”
Step 18 . Cut out berries and leaves using colorful pieces of leather, form them into a wreath and sew on them. You can decorate with beads.
A beautiful wreath is formed
The wreath is already ready
Step 19 . Start collecting your fingers. Coat their edges with glue.
The edges are coated with glue
You need to lubricate all your fingers
Step 20 . Glue the parts of each finger together, make marks and sew all 4 with a single stitch (so you should use a longer thread). Start sewing with either the blue or red dot.
Where to start flashing
All fingers are stitched
Step 21 . Sew the right glove in the same way (almost).
Sew in the napalok.
Napalok is sewn in
Step 22 . Connect the parts of the back of the hand to each other.
Connecting the parts of the back of the hand
Details are sewn
Step 23 . On the glove, which has not yet been sewn with a side seam, sew beads and leaves.
Sewn on leaves and beads
Step 24 . After this, connect the product on the back side using the third seam (aka the last one). There are no side seams on the right hand, only 3 on the back side.
There are no side seams on the glove
Step 25 . Sew the fingers on the glove (the same way as on the left).
The fingers of the right glove are stitched
Step 26 . All that remains is to process the edges. To minimize the deformation of the gloves when wearing them, reinforce the edges with cotton tape and then fold them in. Fix the tape and the folded edge with the same rubber glue.
Processing the edges of gloves
Step 27 . After that, flash everything.
The edges are stitched
What finished leather gloves look like
It turned out original and stylish
Homemade gloves with an asymmetrical pattern
That's it, the original leather gloves are ready! They look really cool!
For babies
Before starting work, you need to make a template of a child’s hand - this can be done by placing your palm on a sheet of thick paper or cardboard.
You should not make the pattern too wide or narrow, as the mittens will either fit loosely on the hand or squeeze it too much. In this case, the girth in the area of the hand can be free and slightly elongated - this will allow you to hem the bottom and insert an elastic band for better fixation of the fleece mitten.
The pattern is made as follows: take a piece of fabric and fold it in half, transfer the mitten template along the contour lines, leaving a small distance for the side cuts. To do this, you can use soap if the fabric is dark, or a special marker that will disappear after washing.
Machine stitch along the contours of the parts, making sure to secure the stitching in the cuff to avoid tearing of the stitching and delamination of the parts in the future.
A few words about the quality of the material
To make quality gloves that are comfortable to wear, it is very important to choose the right type of leather. It is best to use thin varieties with a smooth surface and small grain size. They are highly durable and comfortable to wear.
Once you decide on a specific type, check the stretchability of the leather. It should be elastic. Pull it a little and if it returns to its original position, then no preparation is required. If the material sags, you will have to work with it a little. How you can control the degree of tension and prevent sagging skin will be discussed below. Thanks to simple manipulations, you can improve its quality and extend its service life.
Sheepskin
The pattern of workers' mittens is quite easy to construct, but when making it, it is necessary to take into account the material from which they will be sewn. They are often made from sheepskin. This is a good material, warm, soft and durable. And in order for your hands to be comfortable in sheepskin mittens, their pattern should take into account the thickness of the fabric, which means that another centimeter and a half should be added along the contour of the template. However, mittens are made from sheepskin not only for work, but also for the winter, they are very warm and elegant. They can be embroidered or trimmed with fur. Such mittens are cut and sewn according to a similar pattern, but then there is no need to increase the freedom of fit so that they fit well on the hand.
What fabrics are suitable for fingerless gloves?
To sew any type of mitts, materials of varying degrees of elasticity are required. The smaller the thickness of the product, the thinner and more elastic the fabric.
Suitable for rough sports mitts:
- genuine leather, suede, nubuck;
- artificial leather, suede;
- dense nylon;
- vinyl.
Women's gloves for special occasions are sewn:
- made of bi-elastic mesh;
- elastic guipure and lace;
- knitted fabrics;
- thin perforated suede;
- likes.
In addition, chunky knitwear is used to make cozy mitts. Even sleeves from an old sweater are suitable for this purpose.
In several layers
Sometimes you need double mittens, they are warmer, they don’t get wet quickly and are quite thick. The pattern in this case will be the same for all the parts. However, if the internal material is voluminous, then the template of the outer part should be slightly wider than the inner one. To do this, you can remove half a centimeter for a loose fit when cutting the inner part of the mittens or, conversely, add another half a centimeter along the contour for the outer part. It all depends on the specific situation. This simple pattern is very easy to make.
Selecting an accessory to match your look
It's not just white models that are popular. It all depends on what image you need to create.
- Products in white, pink and its shades, ivory or ecru will match the romantic style.
- Black, gray, dark blue colors will appeal to teenagers and adults.
- For more daring women, bright colors are suitable. But children's ones can also be made in the same color.
You can appreciate the beauty of guipure and the variety of its shades and choose the fabric to your taste in the Textiles store.
How to learn to knit using knitting needles
First of all, you must have yarn from high-quality material, this also applies to knitting needles. Skilled needlewomen choose metal knitting needles. They are very strong, provide the necessary glide and are comfortable to hold in your hands.
Perhaps the most important advantage is that metal knitting needles will not be able to catch the yarn.
The entire further knitting process will depend on the choice of high-quality yarn. Explain to the seller that this will be your first time knitting and then they will select special yarn for beginners. It differs from professional ones in its lightness and elasticity.
Most likely, you will choose wool blend threads; they are quite easy to work with and hold their shape well.
Decide in advance on the technique that you will use while knitting. We recommend starting with the very basics: knit and purl stitches.
The hinges you use also play an important role. They should be done carefully; to do this, look at the photo of mittens made with your own hands using the most ordinary loops.
Making patterns and sewing gloves yourself
Modern gloves come in many types. They can say a lot about their owner: his wealth, habits, lifestyle, preferences, and so on. Some claim that even the patterns of the hands and fingers are transferred to the gloves and can be seen under a microscope. This element of clothing has always attracted attention, and today it has become an integral attribute. If it is made with your own hands, all other advantages are added to the high quality of the product and originality. This material will tell you how to sew gloves, how to create a pattern for leather gloves and what types of gloves exist. So, we sew the gloves ourselves.
Cross stitch embroidery on mittens
It is most convenient to do cross-stitch embroidery on mittens on lining canvas .
If the product is not knitted, but fleece or felt, this method will allow you to embroider even crosses and create a beautiful pattern. You need to prepare :
- mittens made of felt or fleece;
- canvas , from which it is convenient to pull out threads, is very rare (it is better not to use water-soluble ones, especially on felt products);
- needles;
- embroidery thread - floss is best.
Operating procedure:
- Tack canvas to fleece using small stitches.
- The pattern will have to calculate by cells.
- When you need to cut threads of the same color , you need to make sure that they do not go to the wrong side, but are inside the fabric.
- When the pattern is ready, you can start pull out outline one thread at a time. Start with the transverse ones.
- Then pull out the longitudinal ones .
any embroidery pattern you like. The operating principle and procedure are the same.
Bullfinch embroidery pattern
The manufacturer of this pattern recommends using it as a postcard, which in no way interferes with using it for embroidering mittens. To “move” this wonderful winter bird onto your mittens you will need only five shades of thread: red, orange, blue-gray, white and black. The manufacturer recommends embroidering with wool threads. But you select the number of folds according to your yarn from which the mittens are made. The center is marked on the diagram with black arrows. All embroidery has a size of forty-one crosses in width and sixty crosses in length. For greater beauty, you can add primitive snowflakes here and there, depicting them using French knots.
Preparation of blanks
So, when the skin becomes elastic enough, you can move on to the next stage. You need to cut out the parts according to the template you made. To do this, you need to use sharp scissors to ensure even edges. You also need to immediately cut a hole for the fingers. It is important to make sure that all lines run parallel to the fingers. Otherwise, the skin will not stretch well when they are bent, as a result of which the gloves will not provide the required level of comfort. Also remember that leather is highly resistant to wear and tear, so you don't need to hem the edges or use specialized adhesives to increase its strength.
Cut out two parts at a time. This way you will have everything you need to sew two gloves at once, identical in size. The front and back are identical to each other, so you don't have to worry about it.
It’s good to wash often: myths about shampoo and hair care that only harm
Rare shot: Viktoria Isakova showed her grown-up daughter from Yuri Moroz (new photo)
The money tree pleases with lush flowering: my secret is in caring for the leaves