How to learn to sew a dress with an open back
Learning to sew a dress with an open back is very easy - just two seams. This dress is high waisted. Any soft fabric is suitable whose front and back sides are the same or almost the same. I would like to draw your attention to the fact that we will not need a pattern as such, but only a diagram drawn on a checkered sheet from a school notebook at a scale of 1:10.
How to draw a drawing of a dress with an open back
Required amount of fabric: distance from the level under the bust plus 35cm. with a standard fabric width of 150cm.
Here is a drawing of your piece of fabric.
And this is a drawing of your fabric folded in half. At the same time, we do the same with the fabric, that is, we fold the fabric in half.
How to learn to sew a dress with an open back. Drawing.
We draw a pattern diagram on paper: the upper rectangle is a skirt folded in half.
The red line marks the location of the future single seam on the skirt. Measure from the upper left corner (the fold of the fabric) horizontally a distance equal to half the circle under the chest plus 3 cm. This will be the position of the upper end of the red line. The triangle in the upper right part of the drawing is the future shuttlecock. We draw a curved hem line freehand.
The lower part of the picture is a blank for the bodice.
How to learn to sew a dress with an open back. Drawing.
Now we draw the same thing in life size on a double folded fabric with a piece of soap or chalk. This will require a large table. Cut along the black line.
How to learn to sew a dress with an open back. Drawing.
The skirt is unfolded.
How to learn to sew a dress with an open back. Drawing.
Mermaid
We can say that the mermaid is the most interesting style for designers. The fitted silhouette and flared skirt remain unchanged, but what the bodice and tail will look like depends on your imagination.
We present to your attention a simple model with straps and a light drapery on the bodice, which will give a small volume to the chest and focus attention on the neckline area; a wide belt will further contribute to this.
Front modeling
- Add the length of the skirt you need on the basic pattern and flare it out. The splendor of the “tail” depends on the width of the flare.
- Draw the neckline and armhole. Close the dart.
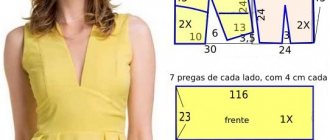
- The bodice is cut off, so set aside 15-16 cm from the neckline and model a belt 8-9 cm high (see pattern).
- The belt is ready, we will cut it.
Bodice modeling
Cut the front of the bodice along the lines and widen it by two cm (see picture). The distance between parts can be increased to 3 cm if you want the number of assemblies to be large.
Back modeling
Model the back in the same way as the front of the dress.
This outfit should be very tight-fitting to the silhouette, which means that minimal increases in freedom of fit are made.
Decoration of the belt and bow
- To drape the belt, you need a rectangle with a width equal to the width of the front part of the belt (detail 2). Its height is 2 times greater.
- Sew the rectangle along the sides, carefully pull it evenly to the width of the front waistband. Baste them together and stitch them together. Then baste the drapery along the top and bottom edges. Then sew as a single-layer piece.
- For the bow, also cut out two rectangles. Their finished width should be equal to the width of the front part of the belt, and their length should be 75 cm.
- Sew all the details of the dress. Sew the finished bow elements into the sides of the mermaid and tie with a bow.
This is interesting: Bust pattern + sewing instructions
How to sew a dress with an open back
Sew this seam along the red line.
We process the edge along the entire perimeter of the skirt - along the top edge, along the flounce and along the hem - for this you need to turn it twice approximately 4 mm, baste and stitch.
How to learn to sew a dress with an open back.
Front view of the skirt.
And this is a rectangle from which we will make the bodice for our dress. We process the long sides of the rectangle: for this you need to turn it twice approximately 4mm, baste and stitch.
How to learn to sew a dress with an open back.
Now let's assemble the dress. The figure shows a side view. To do this, hang this rectangle like a scarf around your neck, put on a skirt, raise it to the level under the chest, make two vertical folds on the scarf under the chest on each side, pin the skirt to the bodice on both sides. Now you need to remove the dress, baste and sew the seam connecting the bodice to the skirt. We cut off the excess ends of the scarf from the inside and process the edge with a zigzag. At the back along the upper edge of the skirt, sew a stitch with a rubber thread several times at a distance of 1 - 1.5 cm. This gives a good fit and prevents the back from sagging. See below for how to do this.
A rubber thread is a thin elastic band with a thread braid. Sold in sewing stores. To sew with such an elastic band, you need to tuck it into the shuttle and insert it into the sewing machine. This will be the bottom thread. The top thread will be an ordinary thread matching the color of the fabric. Sew on the right side. It makes for a great build. This works very well on any sewing machine. But first practice on a piece of scrap paper. You simply sew slowly, stretching the already stitched part of the seam a little, as it immediately begins to gather. Set your machine for medium to large stitches.
How to learn to sew a dress with an open back.
How to learn to sew a dress with an open back.
Side view of the dress.
If desired, we manually hem the cups from the inside so that you can wear the dress without a bra.
How to learn to sew a dress with an open back.
The dress is ready.
You will see that learning how to sew a dress with an open back is very easy.
Half couture
At one of the shows, Elie Saab presented a red chiffon dress with the illusion of nudity.
The cut of the model is quite complex, so we will consider the sewing stages in detail.
Required for work:
- lining fabric to match the skin tone;
- Chantilly lace;
- chiffon:
- lightning.
Constructing a pattern
Please note that there are 2 options for creating an evening dress pattern with your own hands:
- draw on graph paper and then cut out;
- use the RedCafe program.
The program has a convenient function that divides lines by color, so you can see the location of all the lines.
Note that modeling a skirt is quite simple and you can immediately do it on fabric.
Cutting out the lining
The modeling stage is over, let's start working with the fabric.
- Print out the pattern and fold it into a single piece, matching the corners.
- Then transfer the pattern to the lining fabric and trace the lines with soap or a piece of chalk. You can use a disappearing marker.
Sew darts and side seams on a machine without backtack and with a wide stitch width. This basting is necessary to check the desired fit of the bodice on the mannequin.
Since the model is difficult to sew, check the fit frequently. This way you will be more successful in achieving the desired results.
Working with lace
Cut out the lace fabric according to the pattern of the lining fabric. Fasten it on the sides and sew the darts, after cutting off the excess lace along all the cuts.
Sew the darts at the waist and press them towards the center. Make sure that they are not visible on the lace from the front side.
Stitching raised lines
At this stage, the sequence of stitching the embossed binding is important. The pattern should be beautiful, without overlapping lines. To understand which line will come first, make a sample. For contour lines, use knit bias tape. It is shine-free and easy to work with.
Processing slices
Use knitted tape to trim the edges of the armhole and neckline. Finish the neckline, which turns into a slit on the back, with tape stitched into a spread.
Cut out your skirts
The half-sun skirt consists of a thick lining and transparent chiffon.
First you need to calculate the radius of the waist circumference (From). The radius formula will help you with this: R = (Otx2) / (2x3.14).
Make the bottom radius the desired width.
Working with large cuts has its own characteristics:
- Make sure there are no defects, stains, or stitches on the fabric;
- Try to buy the material in stock, so you won’t overpay.
- Keep in mind that chiffon with natural threads can shrink, so carry out a damp-heat treatment on a sample of the material.
Get rid of the edge. After making a cut, tear it off along the bottom and top edges of the fabric.
To assemble the skirt along the waist line, lay 2 lines 1 cm apart and carefully pull to the desired width. It is better to take reinforced threads, they are resistant to strong tension.
Sew a lined chiffon skirt. Process the cuts using an overlocker. Attach the resulting hem to the bodice of the dress on the mannequin. Correct any discrepancies if necessary.
Next, cut out the belt. Its finished width should be 3 cm.
Sew the zipper into the middle seam of the skirt.
At the final stage, connect all the parts. Sew the belt to the skirt with frills along the bottom edge, and then to the top of the dress.
Types of cutouts
Dresses with a cutout at the back are divided into 3 groups:
- Cutout at the back above the waistline. This type is suitable for girls with narrow hips and a protruding belly, as well as if there is no curve from the waist to the hip. A peculiarity in tailoring is cutting off the upper part of the groove when deepening the neckline. During fitting, extra centimeters are noticeable. There is no need to remove them either to the sides or to the center of the back, since the fit at chest level will be disrupted. Thus, everything unnecessary needs to be removed into the rear reliefs, that is, hidden in the recesses on the back.
- Cut to the waistline. Suitable for girls without a protruding belly and with a good drop from waist to hip. When creating a pattern, it must be taken into account that the entire dart is cut off, and the bend in the back is not taken into account. If the back is not covered with lace, it is necessary to insert an inclined dart. Its depth should be 1 cm towards the cutout. It is better to model the shape of the cutout on a model. It is worth noting that the mesh plays an important role in the fit of the back. When using it, you can take into account the presence of a groove. Also, if the dress is fastened with buttons, then when designing the middle section it is necessary to take into account the convexity of the shoulder blades and the degree of bending of the back.
- Cut below the waistline . In this model, the requirements for the figure are very strict: a beautiful back shape, well-groomed skin and a pronounced waist, as well as moderate curvature of the figure, since it is quite difficult to achieve a close fit of the neckline to the back. If your back is kinky, you can insert mesh or lace. It will also hide imperfections on the skin. When making a pattern, you should take into account the recesses at the junction of the dress and the lace at the level of the inflection of the figure.
With a deep neckline
Another versatile and practical dress with a number of advantages is the A-line evening dress. It should be an essential part of your wardrobe, especially a stunning red dress like Kim Kardashian's.
Bodice modeling
Armed with the basic base of the dress that suits your size, we begin modeling. The model consists of 2 parts, so the top and bottom will be modeled separately.
First you need to make a belt. Set aside 7 cm along the back and front sections, then connect the dots with a line. Cut off the belt with the skirt.
The result is a back and 2 shelves. Now we move the shoulder darts down
Make the straps 2-2.5 cm wide. 4 cm were added along the bottom of the bodice, since the darts were transferred. Fold them into folds.
Belt modeling
The width of the belt should be 7 cm. And the length is determined by the formula:
- for the top cut - 2x + 2 y, that is, the length of each part of the bodice along the bottom cut is summed up. Don't forget to add extra space around the side seams.
- for the bottom cut - a + b, the length which is equal to the waist circumference.
Skirt modeling
- Remove darts at the waist.
- Make a spread on the skirt. You should draw cut lines (they are shown in red in the figure) on both panels of the skirt.
- Expand the resulting elements to the desired amount.
Along the upper edge of the skirt being sewn to the waistband, you need to set the gathering. To do this, spread 8 cm along the waist line.
The modeling of the skirt ends with the design of the waist and sections of the skirt in a smooth line. We also set the desired length.
Uncover
It's time to put down the pencil and cut out the details. Cut out 2 pieces for the bodice, 1 belt and 1 panel for the skirt.
If the fabric is not dense and the bodice is see-through, then make it two-layer.
Don't forget about 1 cm allowance and hem at the bottom. Sew a hidden zipper into the side section.
When preparing the article, photos of patterns from the korfiati website were used. ru
Sewing a dress
The dress assembly sequence is standard.
Immediately after cutting, secure the neckline and armhole sections with a narrow strip of thin interlining.
Baste the main details of the dress and try on the dress. Make adjustments if necessary. And only after you are sure that the dress fits well on your figure, start sewing.
After sewing, all seams are overcast and ironed.
Strengthen the bodice facings with adhesive interlining.
Sew darts on the front of the bodice. Assemble the bodice (stitch the side and shoulder sections), finish the neckline and armholes with a facing.
Sew the side sections of the skirt. Then connect the bodice and skirt together at the waistline.
Finish the zipper in the middle back seam.
Hem the bottom of the dress.
In short - that's all. The dress is ready! In reality, this will take a little longer than it might seem, but the dress model is not burdened with complex structural elements, so even an inexperienced dressmaker can take on sewing it.
This is interesting: Evening / wedding dress pattern