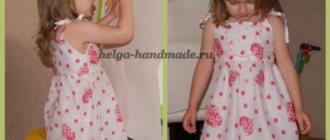
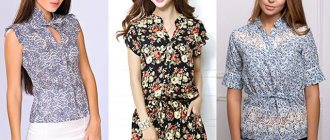
Variety of velvet dresses
The most popular models of dresses made from this material:
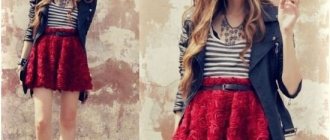
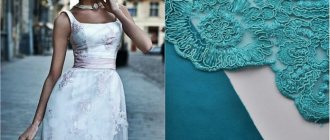
- evening: these are usually long dresses. They are decorated with sparkles, embroidery, and sequins. Skirts in such models are made to fit at the hips and flow downwards, with a train. For young people, designers offer cocktail dresses with a deep neckline and open shoulders. The combination dress looks very modern. It uses a combination of velvet and lace to lighten the heavy velvet;
- dresses for daily wear: made of moderate length and with a fitted silhouette. Skirts are usually made wide;
- business dresses: this style emphasizes independence, self-sufficiency and taste. The combination of a classic style and luxurious material will always attract the admiring glances of colleagues.
Tablecloths
Velvet tablecloths, seemingly outdated, will fit well into a modern interior as decoration or functional decor. See how the bright orange velvet tablecloth is paired with white trim and trendy black tableware in the bottom photo.
Photo:
Silk velvet
RUB 2,400*
*Price may change
Features of working with velvet
It is not recommended to store the cuts folded to prevent creases from forming. It is better to use hangers with clothespins.
When working with velvet, you should use only proven patterns. If you are in doubt about the cut, it is advisable to cut the product from waste fabric and baste it. Try it on and make adjustments. And only then start cutting the velvet. The fact is that you cannot redo the seam on this material; traces of the previous stitch will always remain.
As with all other pile fabrics on velvet, you need to take into account the direction of the pile. The color of the fabric along and against the pile is rich in saturation.
After cutting, it is advisable to immediately process the cuts with an overlocker, since the fabric frays very much.
To prevent the fibers from getting wrinkled when ironing, you need to pass the iron along the wrong side, and place a terry towel under the front side. This fabric should only be ironed with steam at low temperature.
If, after all, the lint “lays down”, you can try to correct the situation by holding the cloth over a boiling kettle and then combing the lint with a toothbrush.
You need to work with velvet with thin needles and thin threads.
When performing machine stitching, in order to avoid displacement of the layers of fabric, it is advisable to make basting stitches on both sides of the stitching. After completing the stitching, the basting is immediately removed so as not to crush the fibers.
Chairs
Chairs with velvet upholstery are also in fashion. They can be placed in the dining room or even in the kitchen, adding a little charm and elegance to the interior. The design of the room does not have to be classic - velvet also fits into a modern interior. If the background is light, choose bright colors for the chairs to serve as accents.
Photo: kraftandcarat.com
Blue velvet chair MYSTERE CC0855J25
RUB 14,990*
Buy
*Price may change
In the dining area you can put a whole group of chairs with velvet upholstery. And combine them with minimalist wooden decor and a rich chandelier to get a contrasting eclectic interior - as in the photo below.
Photo:
Chair LISSY dark green
RUB 11,990*
Buy
*Price may change
You can even use velvet interior items in a black and white modern living room - again to create colorful accents. For example, place chairs in pink velvet covers in such a room: they will add brightness without making the atmosphere too eccentric.
Photo:
Chair MARTIN pink velvet + brass
RUB 15,500*
Buy
*Price may change
Knitted panvelvet dress
Knitted panvelvet was used to sew this model.
Pattern modeling
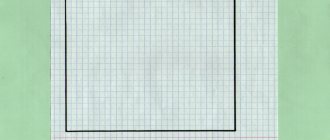
The pattern of a straight dress is used as a basis. You can create such a pattern yourself or download it for free on the Internet. Since knitted material is very elastic and stretchy, there is no need to include allowances for a loose fit when creating a pattern.
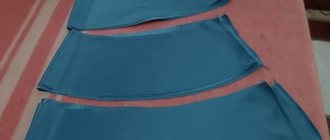
On the pattern for the front of the dress, we remove the dart at the waist, reducing the size at this level by this amount. Setting aside 12 cm along the side seam from the bottom point of the armhole, draw a horizontal line. Extend the line of the bust dart downwards. Cut off the bodice - see the red lines in the drawing. Closing the chest dart.
We retake the bodice onto a new sheet of tracing paper. From the bottom point of the shoulder we set aside 1 cm, then we measure the length of the shoulder - 10 cm. Along the center line we set aside 4 cm from the bottom, draw a horizontal line. We measure 2 cm along it to the left. We connect this point with the top point of the shoulder. We decorate the lower section of the bodice with a smooth line. All constructions are shown with a red dotted line in the drawing below.
On the back pattern, remove the waist dart, reducing the size along the waist line by this amount. We measure 1 cm from the bottom point of the shoulder, then set aside the length of the shoulder (= 10 cm). Let's draw a new rollout profile.
Cutting and sewing tips
For this model, we provide minimum seam allowances of 5 mm. We make an allowance of 4 cm along the bottom edge of the dress.
On knitwear, loops can unravel, so after cutting the parts, all cuts on them need to be processed with an overlocker or a zigzag stitch (stitch length 3-4 mm, width 2 mm).
It is better to sew such fabric with an overlock or a narrow zigzag seam. If this is not possible, then we perform a regular stitch, but sew with special long-fiber polyester threads.
To prevent the needle from piercing the knitted fabric, we use a special needle with a rounded tip for knitwear. She will gently push the threads apart without injuring them.
The fabric can stretch along the armholes and neckline. To prevent this, we sew the edges of the allowances with a machine seam with a stitch length of 2.5-3.0 mm. The second method is to glue the allowances with an adhesive pad cut on the bias.
Cotton tape is inserted into the shoulder seams to prevent stretching.
We sew the bottom edge of the dress with a double seam. For it we use a double needle and three threads (two upper, one lower). As a result, we get two lines on the front side with an interval of 4-5 cm, and on the back side we get a zigzag line.
Types, technologies, advantages
Velvet is a dense, soft fabric with short, thick pile on the front side. In the old days, only silk served as its basis, today the material includes wool, viscose and cotton, and artificial velvet is also made from chemical fibers. Velvet fabrics often include such fabrics as:
- ivy, which has a longer pile;
- velor, once made from wool, and now from cotton and synthetics;
- stretch - velor, from which tracksuits are made;
- corduroy - cotton velvet with ribbed pile;
- panvelvet is a smooth, thin fabric with a velvety convex pattern, which is obtained after pressing and special combing.
Velvet production is not an easy process. It consists of many stages. › Firstly, from weaving - a complex weave of 5 different thread systems. As a result, two layers of fabric are formed, bonded with pile. At a certain moment, the weaving screw, towards which these fabrics are moving, cuts them into two independent parts with a pile on one of the sides. › Secondly, the threads that form the basis of the material and hold the lint are intertwined: the higher they are laid, the more securely the lint is held. Velvet velvet is very similar, but somewhat simpler to make. If velvet with patterns is produced, then printing or pressing, pile breaking, etching and other tricks follow.
Velvet is dyed in small batches, after which it is given additional qualities by treating it with various means. This is how, for example, waterproof, heat-resistant velvet and its other modern modifications are obtained.
Natural velvet has a number of advantages:
- it is hygroscopic;
- does not attract insects;
- hypoallergenic;
- does not deform when cleaning, does not wrinkle;
- holds heat well, but at the same time allows air to pass through;
- Finally, velvet is aesthetic: the reflection created by the fibers, the glide of light and shadow are mesmerizing, as if the reflections of a precious stone.
Thanks to such commendable properties, velvet is used to create high-quality clothing (velvet evening dresses and jackets do not go out of fashion), as well as for home decoration, sewing curtains and drapes, covers and pillows, linings and decorative trims for a wide variety of items.
From China to Italy
The birthplace of velvet is called Italy, where in the 13th century a guild of its producers already existed. But this point of view is not entirely fair. After all, velvet was originally made from silk strands, which means it could have appeared in China. Perhaps the first pieces of velvet, thanks to the caravans of Arab merchants, arrived in Venice, Florence and Genoa from there? In any case, the Chinese claim that it was they who invented velvet fabric in the 3rd century BC.
There is no complete clarity as to how the name of the fabric came about. Some argue that the word “velvet” has German roots, others that it is Arabic, and still others insist on Italian origin. Well, Italy really played one of the key roles in the “velvet” story. Venice, where the first “trade union” of velvet weavers arose in 1247, long had a monopoly on the production of this fluffy, shimmering fabric.
Velvet received a special fate, “life” in royal residences, palaces and chambers. The insinuating softness and noble glow of the fabric was loved by the crowned people - now they dressed in velvet robes, dresses and uniforms, sat on thrones and in armchairs, and rode in carriages covered with velvet.
The high labor intensity of production, the use of expensive silk fiber, to which threads of gold and silver were often added, the high cost of dyes - all this made velvet a fabric for the elite. It has become not just an exclusive attribute, but a way of life. Aristocrats passed on pieces of velvet as an inheritance and included it in their wills along with locks and diamonds; Rich merchants promised velvet to their daughters as a dowry. We can say that for a long time fabric was the equivalent of money - on a par with gold and silver. Take a closer look at reproductions of ancient paintings and you will certainly see velvet in the interior of throne rooms and bedchambers, on altars, in the clothes of nobles and royal favorites.
Velvet received a special status during the reign of Napoleon, becoming one of the symbols of the Empire style - an era of unprecedented greatness and even fanfare. By that time, technologies had already appeared that made the velvet production process both simpler and cheaper. The fabric became less rigid, thinner and more elastic, which Napoleon took advantage of.
Weaving was then the basis of the economy in many European cities, and the French Emperor, wishing to demonstrate the superiority of Lyon weavers, ordered that uniforms henceforth be made of velvet. All mayors, prefects and judges were also dressed in velvet. And Bonaparte himself in one of the portraits poses in a scarlet velvet frock coat and the same trousers, against the backdrop of a blue velvet curtain and a chair upholstered in velvet.
From Italy to Russia
In Russia, the “velvet season” began at the end of the 15th century. This is evidenced by letters - inventories of property that belonged to the boyars and princes. Especially prized were velvet coats with sable, ermine, and lynx fur, embroidered with gold cords and pearls. Such a “sheepskin coat” was worth a fortune, which is why velvet appeared on the lists of family heirlooms.
A document has also been preserved, from which it follows that Prince Vasily Glinsky (father of Elena Glinskaya, mother of Ivan the Terrible) gave a velvet fur coat to the monks of the Trinity-Sergius Lavra - so that they would pray for him when he fell asleep. The fur coat, as an emergency reserve, was kept in the monastery for 15 years, after which the monks sold it at a profit.
They didn’t really know about the origin of velvet in Russia: the fabric was called either Florentine, Turkish, or Venetian linen, depending on which merchants brought it from where. Most often, axamite, a red or purple velvet with gold ornaments, was used to sew elegant, ornately decorated clothes. Wearing a caftan made of Aksamite was, of course, an honor, but not easy: 5 meters of fabric, and about the same amount required for an ancient jacket, weighed a pound - 16 kilograms. And such an outfit cost accordingly: from 1 to 3 rubles, the same as a good trotter. It is known that Ivan the Great, giving one of his daughters in marriage, ordered that 10 rolls of velvet - Turkish and Venetian - be placed in her wedding baggage. Ivan the Terrible and his sons also sported opashnyas (outerwear with tapered sleeves) made of Venetian velvet on a silk base. No wonder the “dress from the royal shoulder” was considered a luxurious gift. However, Fyodor Ivanovich, the last of the Rurikovichs, went the furthest in his love for the Aksamites, who ordered caftans for the guards to be made not from brocade, as was before, but from white velvet.
By the way, the sources contain not only the word “Aksamite”, but also, for example, “dug velvet”. This is a fluffy fabric with embossed patterns, from which bishop's vestments were and are still sewn. You can also read about suits made of sisel - the so-called dug velvet brought from France. This fabric was distinguished by a large and bright floral pattern.
In 1687, the Velvet Book appeared - a genealogical catalogue, where the most notable noble families were entered - the Rurikids, the Gediminids, and others. The book was indeed bound in velvet, which once again connected this material with the world of power and aristocracy. The high cost of velvet forced even rich people to treat it with care and respect. All the scraps remaining after sewing the outfit were collected and used. They were used to make jewelry (remember velvets - ribbons worn around the neck), made covers and bookmarks for books, and upholstery for boxes.
From palaces to streets
In the 17th century, velvet began to be produced in Russia. True, at first only foreigners worked in the velvet yard, which was opened in Moscow. But from the beginning of the next, 18th century, truly Russian velvet appeared, woven in the first silk manufactories.
No, Aksamit did not become a national fabric, although its price has dropped significantly. But the fabric ceased to be the prerogative of the nobility and came into use among merchant and wealthy families. Velvet clothing and accessories became part of wedding rituals: the newlyweds were seated on velvet pillows, and scrolls of velvet were presented as gifts. At the same time, velvet began to be used for decorating temples, decorating military equipment, and also in the interior.
Velvet in the interior
In the last century, velvet either hid in the shadows of new, more fashionable fabrics, then again came to the fore. Velvet dresses, vests and ties, skirts and trousers were very popular in the 30s of the last century, as well as in the mid-60s. The image of velvet as a status fabric did not shake even after corduroy, “velvet for the poor,” became widespread. For example, Princess Diana was a big fan of velvet dresses. And now viscose velvet based on crepe is especially popular among fashionistas. It was loved by many couturiers due to its extraordinary softness and mysterious, deep tints. Not only jackets and dresses are made from this viscose velvet, but even down jackets and swimsuits.
Wrap dress
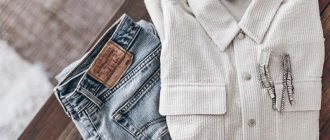
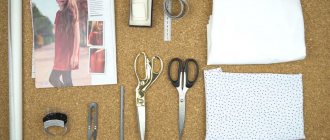
To sew a model you need:
- pile fabric – velvet, velor – 2 m;
- doublerin;
- hidden zipper;
- belt cord;
- threads to match the color of the fabric, sewing tools.
Pattern modeling
We begin modeling by constructing a dress pattern with a semi-fitting silhouette. If you don't want to spend time on this, you can find basic dress patterns for any size on the Internet. All you have to do is print it in full size.
In addition, we will need a sleeve pattern with one seam with the same allowances for a loose fit as the dress silhouette.
Let's transfer the patterns onto a new sheet of paper, noting the levels of the chest, waist, hips, and control points of the armhole.
Let's draw a new waist line - one and a half cm higher than the base one. Let's cut the pattern along this line.
Let's get some details.
Next, let's work on the back bodice.
Let's reduce the shoulder dart opening to 1 cm, move it to the center of the back to 0.6 cm, the rest goes into the armhole line.
We draw new contours of the pattern along the shoulder and armhole.
Since our shoulder line has increased by 1 cm, and we don’t need this, we will reduce its length by this amount. In addition, taking into account the shift of the center line of the back by 6 mm, we shift the shoulder line by the same amount. Draw a new neckline.
Let's remove the dart at the waist, reducing the size in the side cut by this amount. Let's expand and deepen the rollout by 1-2 cm and 0.5-1 cm, respectively.
The result is a pattern - see drawing.
We will temporarily stop working on it and work on the bodice of the shelf.
Draw a circle from the center of the chest. Its radius is equal to the radius of the chest.
Then we build darts:
- No1 – prevent “decolletage lag”;
- No4 – fit under the bust;
- No5 – taking into account the concavity of the chest.
Draw a line for the yoke at the level you determine.
We cut a pattern along it.
Along the lower part (yoke) we connect all the darts, forming a solid pattern.
We align the upper cut of the yoke, shaping it with a concave (deflection up to 5 mm) line.
Considering that on the back bodice we expanded the armhole by part of the dart, then on the front bodice pattern we expand the armhole by the same amount. From the top of the chest dart we draw a straight line to the armhole 1-2 cm above the reference point. Along this line we cut the pattern and spread it by an amount that coincides with the amount of magnification on the back armhole. The rest of the value, like darts No. 1 and No. 5, will be transferred to the waist line.
Let's create a new armhole line with a smooth curve. To match the rollout of the front with the rollout of the back, set aside 1-2 cm from the top point and connect this point with a point on the center line of the front of the bodice. The rollout in this case will have a V-shape.
Draw a straight line parallel to the shoulder line at a distance of 3-5 cm. Cut the pattern.
From the center of the chest we draw a line parallel to the rollout to the line of the shelf.
We cut the pattern along it and close the dart, moving it upward.
Since in our model the darts are replaced by folds, we will not make darts. We make even cuts on the shelf at the top and bottom.
You can optionally decorate the lower cut with a convex line of 3-5 mm. This will give a slight overlap for the shelf.
Another option for this detail is to increase the volume across the chest. It can be created by making several cuts along parallel lines and moving the parts of the pattern apart by equal amounts.
Important Note
When modeling, especially when transferring darts, you can lose the direction of the grain thread. To prevent this from happening, focus on the lower part of the armhole profile. It remains unchanged and can serve as a guide.
Let's return to modeling the back bodice.
Let's attach the cut-off part of the front bodice flap to its shoulder line.
The back bodice pattern is ready. It is imperative to show the natural shoulder line - the line of connection of the parts.
Let's draw the contours of the facings for processing the neck. To do this, we repeat its outline after 3-5 cm on the patterns of the back and front.
Let's connect them into one piece, joining the shoulder sections. At the same time, indicate the direction of the grain thread.
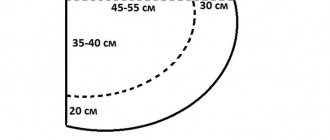
Let's start modeling the skirt of a velvet dress. Since our skirt will be flared, we remove the additional dart at the waist. We transfer its solution to the side seam - 1⁄2 for each part. Draw new lines for the side seams. If you don’t have an additional waist dart on your basic pattern, then you skip this modeling point.
From the lower points of the darts we draw perpendiculars to the lower section of the skirt. We cut the patterns along these straight lines.
We close the darts at the waist, forming a flare at the bottom of the skirt panels. Since the dart on the back piece is smaller, the expansion of the back panel will also be smaller. This needs to be corrected by artificially increasing the flare of the rear panel by an equal amount to the front.
If, taking into account the characteristics of your figure, you want to reduce the extension of the skirt at the bottom, then you need to cut it by half or two-thirds from the side seams.
This completes the modeling of the back panel of the skirt. Don't forget to indicate the direction of the grain thread.
To model the front part of a wrap skirt, we complete the symmetrical part of the panel.
Arbitrarily, at our own discretion, we draw the outline of the smell. We start it from the lower side point and bring it to the desired level.
We check the correspondence of the lengths of the side cuts on the front and back panels, and if necessary, make adjustments. Be sure to mark the middle line on the pattern. This completes the modeling of the front panel.
Let's draw the contours of the facing to process the lower edge of the skirt. To do this, repeat its outline after 3-5 cm on the pattern.
Next, let's start modeling the sleeve.
Let's determine the required height for it and draw a line at this level.
We draw several parallel lines on the pattern. The area for constructing these lines on the upper contour of the part is limited by control points so that the lower part of the bevel does not change the profile. Let's make cuts and move the pattern apart to the required amount, expanding it.
Raise the upper contour by 1-2 cm, draw the lower cut with a smooth line.
The modeling is completed, we have received patterns of all the necessary parts.
Material characteristics
This textile is associated with luxury, jewelry and royal boudoir. This idea was formed due to the royal history of use and manufacture. Velvet material is a unique fabric that has a lot of positive characteristics. But there are also disadvantages.
Appearance
The advantages of this type of material are the following characteristics:
- The most expensive types are made from natural materials. This type is considered completely hypoallergenic.
- High-quality canvas has an aesthetically attractive, elegant and expensive appearance.
- You can embroider on the canvas with ribbons, beads, and silk threads, which will further improve the appearance.
- Each lint will be placed in a dense layer of soft coating, which is pleasant to the touch and has a glossy shine.
- The fabric is not electrified. Does not stick to the body. Therefore, it does not cause irritation or allergic reactions.
- Retains an attractive appearance for a long time, wear-resistant textiles.
Variety of textures and colors
Please note ! Many people classify velor, suede, plush and other similar fabrics as this type, but this is a completely different type of material. Even corduroy is a “distant relative” of this material.
The disadvantages of this type of textile are:
- The machine-made version of the fabric does not differ in quality, does not last long and is bad for the skin.
- The canvas strongly absorbs odors, collects dust, threads and small debris stick to it.
- To improve the density, it is imperative to use lining fabric to form an attractive product.
- It is difficult to work with, so sewing at home can only be done by an experienced craftswoman.
Properties
Luxurious fabric with delicate noble tints, has good drape, softness and a rich appearance.
- pleasant to tactile sensations;
- density varies from 300 to 600 g;
- natural is hygroscopic, allows moisture to pass through and does not become electrified;
- beautiful and aesthetic appearance;
- durability in use;
- with its natural composition it does not cause allergies;
- sewn products fit well to the figure, do not deform or stretch during wear.
- color changes when exposed to direct sunlight;
- The density of the fabric does not allow it to dry quickly;
- the pile quickly becomes dirty and clogged with dust;
- Requires gentle ironing.