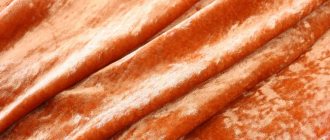
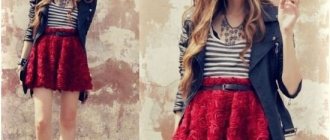
Variety of velvet dresses
The most popular models of dresses made from this material:
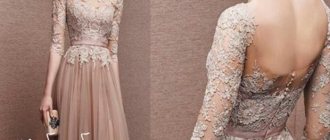
- evening: these are usually long dresses. They are decorated with sparkles, embroidery, and sequins. Skirts in such models are made to fit at the hips and flow downwards, with a train. For young people, designers offer cocktail dresses with a deep neckline and open shoulders. The combination dress looks very modern. It uses a combination of velvet and lace to lighten the heavy velvet;
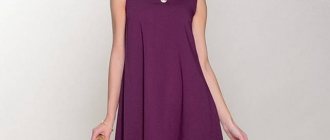
- dresses for daily wear: made of moderate length and with a fitted silhouette. Skirts are usually made wide;
- business dresses: this style emphasizes independence, self-sufficiency and taste. The combination of a classic style and luxurious material will always attract the admiring glances of colleagues.
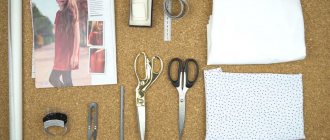
Features of working with velvet
It is not recommended to store the cuts folded to prevent creases from forming. It is better to use hangers with clothespins.
When working with velvet, you should use only proven patterns. If you are in doubt about the cut, it is advisable to cut the product from waste fabric and baste it. Try it on and make adjustments. And only then start cutting the velvet. The fact is that you cannot redo the seam on this material; traces of the previous stitch will always remain.
As with all other pile fabrics on velvet, you need to take into account the direction of the pile. The color of the fabric along and against the pile is rich in saturation.
After cutting, it is advisable to immediately process the cuts with an overlocker, since the fabric frays very much.
To prevent the fibers from getting wrinkled when ironing, you need to pass the iron along the wrong side, and place a terry towel under the front side. This fabric should only be ironed with steam at low temperature.
If, after all, the lint “lays down”, you can try to correct the situation by holding the cloth over a boiling kettle and then combing the lint with a toothbrush.
You need to work with velvet with thin needles and thin threads.
When performing machine stitching, in order to avoid displacement of the layers of fabric, it is advisable to make basting stitches on both sides of the stitching. After completing the stitching, the basting is immediately removed so as not to crush the fibers.
How to complement a velvet dress for a girl
The following can be used as decorations for a velvet trapeze dress:
- lace;
- braid;
- leather or denim inserts;
- satin stitch embroidered appliqués;
- a scattering of pearl beads or rhinestones.
In addition, a hair tie or soft headband sewn from leftover fabric will help complete the look. They can be decorated in the same way as a dress - with beads or lace.
DIY cat carrier bag
DIY chiffon skirt for girls
Knitted panvelvet dress
Knitted panvelvet was used to sew this model.
Pattern modeling
The pattern of a straight dress is used as a basis. You can create such a pattern yourself or download it for free on the Internet. Since knitted material is very elastic and stretchy, there is no need to include allowances for a loose fit when creating a pattern.
On the pattern for the front of the dress, we remove the dart at the waist, reducing the size at this level by this amount. Setting aside 12 cm along the side seam from the bottom point of the armhole, draw a horizontal line. Extend the line of the bust dart downwards. Cut off the bodice - see the red lines in the drawing. Closing the chest dart.
We retake the bodice onto a new sheet of tracing paper. From the bottom point of the shoulder we set aside 1 cm, then we measure the length of the shoulder - 10 cm. Along the center line we set aside 4 cm from the bottom, draw a horizontal line. We measure 2 cm along it to the left. We connect this point with the top point of the shoulder. We decorate the lower section of the bodice with a smooth line. All constructions are shown with a red dotted line in the drawing below.
On the back pattern, remove the waist dart, reducing the size along the waist line by this amount. We measure 1 cm from the bottom point of the shoulder, then set aside the length of the shoulder (= 10 cm). Let's draw a new rollout profile.
Cutting and sewing tips
For this model, we provide minimum seam allowances of 5 mm. We make an allowance of 4 cm along the bottom edge of the dress.
On knitwear, loops can unravel, so after cutting the parts, all cuts on them need to be processed with an overlocker or a zigzag stitch (stitch length 3-4 mm, width 2 mm).
It is better to sew such fabric with an overlock or a narrow zigzag seam. If this is not possible, then we perform a regular stitch, but sew with special long-fiber polyester threads.
To prevent the needle from piercing the knitted fabric, we use a special needle with a rounded tip for knitwear. She will gently push the threads apart without injuring them.
The fabric can stretch along the armholes and neckline. To prevent this, we sew the edges of the allowances with a machine seam with a stitch length of 2.5-3.0 mm. The second method is to glue the allowances with an adhesive pad cut on the bias.
Cotton tape is inserted into the shoulder seams to prevent stretching.
We sew the bottom edge of the dress with a double seam. For it we use a double needle and three threads (two upper, one lower). As a result, we get two lines on the front side with an interval of 4-5 cm, and on the back side we get a zigzag line.
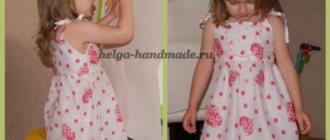
How to sew a velvet dress for a girl with your own hands
It’s better to start getting acquainted with velvet with a trapeze dress. This model has no darts, which makes the sewing process much easier and faster. For pomp, you can add a tulle petticoat or leave the dress in its original state.
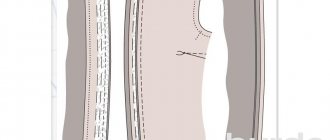
We take measurements and make a pattern
To create a pattern, you need to know the volume of the child’s chest and the desired length of the product. Cutting is carried out based on the pattern diagram below, taking into account that:
- It is better to cut out the back part with a central seam, which will allow you to cover the neck fastener;
- allowances of 1.5-2 cm should be added to the pattern;
- in order to avoid damage to the fabric, the patterns need to be checked several times;
- before cutting, the material must be thoroughly ironed on the reverse side;
- paired cut details need to be turned in a mirror image;
- the details are swept away with oblique stitches;
- If the product is unlined, the side seams need to be finished with a zigzag stitch or with an overlocker.
Sew a velvet dress step by step
Having prepared the pattern and cut out the parts, you can begin the sewing process. Let's describe it step by step:
- Connect and press the shoulder seams, pressing the allowances back.
- The center back seam is sewn up to the mark. The allowances are ironed.
- If the product is unlined, the sections of the shoulder and central seams are processed with an overlocker.
- Parts of the neck are processed.
- The side seams are basted and the allowances are pressed, processing the cuts using an overlocker.
- The bottom hem is sewn with a hand-blind stitch.
- A hand-made loop is sewn to the back, along with a button selected to match the material.
Wrap dress
To sew a model you need:
- pile fabric – velvet, velor – 2 m;
- doublerin;
- hidden zipper;
- belt cord;
- threads to match the color of the fabric, sewing tools.
Pattern modeling
We begin modeling by constructing a dress pattern with a semi-fitting silhouette. If you don't want to spend time on this, you can find basic dress patterns for any size on the Internet. All you have to do is print it in full size.
In addition, we will need a sleeve pattern with one seam with the same allowances for a loose fit as the dress silhouette.
Let's transfer the patterns onto a new sheet of paper, noting the levels of the chest, waist, hips, and control points of the armhole.
Let's draw a new waist line - one and a half cm higher than the base one. Let's cut the pattern along this line.
Let's get some details.
Next, let's work on the back bodice.
Let's reduce the shoulder dart opening to 1 cm, move it to the center of the back to 0.6 cm, the rest goes into the armhole line.
We draw new contours of the pattern along the shoulder and armhole.
Since our shoulder line has increased by 1 cm, and we don’t need this, we will reduce its length by this amount. In addition, taking into account the shift of the center line of the back by 6 mm, we shift the shoulder line by the same amount. Draw a new neckline.
Let's remove the dart at the waist, reducing the size in the side cut by this amount. Let's expand and deepen the rollout by 1-2 cm and 0.5-1 cm, respectively.
The result is a pattern - see drawing.
We will temporarily stop working on it and work on the bodice of the shelf.
Draw a circle from the center of the chest. Its radius is equal to the radius of the chest.
Then we build darts:
- No1 – prevent “decolletage lag”;
- No4 – fit under the bust;
- No5 – taking into account the concavity of the chest.
Draw a line for the yoke at the level you determine.
We cut a pattern along it.
Along the lower part (yoke) we connect all the darts, forming a solid pattern.
We align the upper cut of the yoke, shaping it with a concave (deflection up to 5 mm) line.
Considering that on the back bodice we expanded the armhole by part of the dart, then on the front bodice pattern we expand the armhole by the same amount. From the top of the chest dart we draw a straight line to the armhole 1-2 cm above the reference point. Along this line we cut the pattern and spread it by an amount that coincides with the amount of magnification on the back armhole. The rest of the value, like darts No. 1 and No. 5, will be transferred to the waist line.
Let's create a new armhole line with a smooth curve. To match the rollout of the front with the rollout of the back, set aside 1-2 cm from the top point and connect this point with a point on the center line of the front of the bodice. The rollout in this case will have a V-shape.
Draw a straight line parallel to the shoulder line at a distance of 3-5 cm. Cut the pattern.
From the center of the chest we draw a line parallel to the rollout to the line of the shelf.
We cut the pattern along it and close the dart, moving it upward.
Since in our model the darts are replaced by folds, we will not make darts. We make even cuts on the shelf at the top and bottom.
You can optionally decorate the lower cut with a convex line of 3-5 mm. This will give a slight overlap for the shelf.
Another option for this detail is to increase the volume across the chest. It can be created by making several cuts along parallel lines and moving the parts of the pattern apart by equal amounts.
Important Note
When modeling, especially when transferring darts, you can lose the direction of the grain thread. To prevent this from happening, focus on the lower part of the armhole profile. It remains unchanged and can serve as a guide.
Let's return to modeling the back bodice.
Let's attach the cut-off part of the front bodice flap to its shoulder line.
The back bodice pattern is ready. It is imperative to show the natural shoulder line - the line of connection of the parts.
Let's draw the contours of the facings for processing the neck. To do this, we repeat its outline after 3-5 cm on the patterns of the back and front.
Let's connect them into one piece, joining the shoulder sections. At the same time, indicate the direction of the grain thread.
Let's start modeling the skirt of a velvet dress. Since our skirt will be flared, we remove the additional dart at the waist. We transfer its solution to the side seam - 1⁄2 for each part. Draw new lines for the side seams. If you don’t have an additional waist dart on your basic pattern, then you skip this modeling point.
From the lower points of the darts we draw perpendiculars to the lower section of the skirt. We cut the patterns along these straight lines.
We close the darts at the waist, forming a flare at the bottom of the skirt panels. Since the dart on the back piece is smaller, the expansion of the back panel will also be smaller. This needs to be corrected by artificially increasing the flare of the rear panel by an equal amount to the front.
If, taking into account the characteristics of your figure, you want to reduce the extension of the skirt at the bottom, then you need to cut it by half or two-thirds from the side seams.
This completes the modeling of the back panel of the skirt. Don't forget to indicate the direction of the grain thread.
To model the front part of a wrap skirt, we complete the symmetrical part of the panel.
Arbitrarily, at our own discretion, we draw the outline of the smell. We start it from the lower side point and bring it to the desired level.
We check the correspondence of the lengths of the side cuts on the front and back panels, and if necessary, make adjustments. Be sure to mark the middle line on the pattern. This completes the modeling of the front panel.
Let's draw the contours of the facing to process the lower edge of the skirt. To do this, repeat its outline after 3-5 cm on the pattern.
Next, let's start modeling the sleeve.
Let's determine the required height for it and draw a line at this level.
We draw several parallel lines on the pattern. The area for constructing these lines on the upper contour of the part is limited by control points so that the lower part of the bevel does not change the profile. Let's make cuts and move the pattern apart to the required amount, expanding it.
Raise the upper contour by 1-2 cm, draw the lower cut with a smooth line.
The modeling is completed, we have received patterns of all the necessary parts.