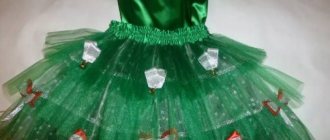
Sundresses for girls - 11 patterns
My daughter doesn't like pants or shorts. Every time I try to get her to wear fancy jeans, she tells me with tears in her eyes that she is not a boy. In her understanding, girls should wear only skirts, dresses, sundresses.
To be honest, I prefer shorts and pants. But the daughter’s wishes have to be taken into account. I buy her skirts and dresses, and in the summer I sew sundresses.
For sewing, I try to choose light fabrics, preferably natural ones. They are more pleasant to the body than synthetics. In addition, such fabrics absorb moisture better, which is especially important in the summer heat.
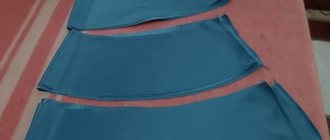
Sometimes I don’t buy fabric on purpose, but rather rip out old things and sew from them. For example, I recently sewed a sundress for my daughter from my floor-length skirt. I wore it quite a bit. A few years ago, such skirts were at the peak of popularity. I bought this skirt, but this style did not suit me. So she lay idle, taking up space in the closet.
My daughter liked the bright floral colors. It turned out to be a beautiful sundress, which I decorated the front with a large flower, and the fabric was left over for a Panama hat and a dress for the doll. My daughter is very happy, and for me this is the most important thing!
Do your girls enjoy wearing sundresses in the summer?
To receive the best articles, subscribe to Alimero's pages on Yandex Zen, VKontakte, Odnoklassniki, Facebook and Pinterest!
Summer model for 2 years: master class for beginners
A mother who has an hour of free time can sew a cute sundress with straps for her daughter. Even a beginner can cope with sewing such a model. In addition, the measurements for the pattern are also minimal: you need the bust circumference and desired length.
Cutting details
The pattern is designed for a 2 year old girl. Having measured the circumference of the chest, add a small allowance for loose fitting, then divide the result by 2. The length of the bodice depends on preference. The approximate figure is 30 cm.
The top of the sundress will be double. Cut from fabric:
- 4 rectangles 16 x 30 cm (bodice), then the upper corners are beveled in a straight line by 5 - 7 cm, forming armholes.
- For the skirt, cut out 2 rectangles measuring 33 x 50.
- The straps are cut out 3 cm wide, the length depends on the individual child.
When cutting, it is worth considering a small nuance: without an allowance for a loose fit, putting on a sundress can cause difficulties.
Sewing technology
It's pretty simple:
- first prepare the straps by sewing them on a machine;
- The bodice parts are connected in pairs with right sides facing inward;
- Having outlined the correct position of the straps (at the very top corner of the armholes), they are placed between the paired parts of the bodice;
- the top blanks are stitched on three sides without touching the bottom cut, then turned right side out and ironed;
- the skirt parts are folded with the right sides inward, sewn down on the sides and the seams are processed using an overlocker;
- A narrow lace ribbon is sewn to the bottom edge, then the allowance is overcast and secured with a finishing stitch.
- Having aligned the skirt with the side seams, find the centers of the front and back;
- folds are laid from the centers of the skirt, distributing them symmetrically on both sides (for convenience, it is better to pin together the centers of the parts and the side seams of the top and bottom);
- the skirt is connected to the bodice, the edge is overcast (if desired, you can fold the seam allowance to the side of the bodice and secure it with a stitch).
The straps are tied when putting on the product. If the model seems rustic, you can decorate it with a small flower along the line where the bodice and skirt meet.
This is interesting: Sundress pattern for girls (size 2-5 years)
How to sew a sundress for a girl yourself
A sundress is one of the most comfortable, practical outfits for girls. Summer, flared, double-sided, school, with a pleated skirt, warm, combined with openwork inserts, for babies and almost adult girls - there are a lot of model options. Sewing a sundress allows you to show your imagination and does not require deep knowledge, modeling and sewing experience. The patterns for these products are usually very simple. And sometimes you can do without them altogether. Now we will look at how to sew a sundress for a girl.
Current colors
Women's corduroy sundresses came into fashion back in the 70s, and remain stylish today. Only the styles and shades change. The table below describes the fabric colors that will be relevant this year.
| Color or what | The shade can be worn depending on the time of year |
| peach, pink, coral | The beginning of spring |
| Blue, azure, mint | End of spring |
| Raspberry, lime, orange-pastel | Early summer |
| Bright red, lavender, yellow | End of summer |
| Burgundy, purple, Beginning | brown autumn |
| Blue, gray, copper | Autumn End |
| Cobalt blue, walnut, gold | Winter Beginning |
| Dark grey, black, light end | brown winter |
A material containing a high percentage of synthetics will shine more, it is important to take this into account when purchasing fabric in metallic shades. Golden or silver corduroy - suitable gloss for concert and evening wear
A sundress made from such fabric for everyday wear will attract too much attention.
Pattern of a sundress for a girl
You can quickly and easily sew a simple summer sundress for a girl. Moreover, we will help you make a pattern for the model.
It is better to sew summer sundresses for children from natural fabrics - satin, poplin, cambric.
Let's start with the necessary measurements. The pattern for a children's sundress is made according to measurements for size 28, i.e. for a 3-year-old child:
- back length to waist (DST) – 26 cm;
- chest semicircumference (CHS) – 28 cm;
- semi-circumference of the waist (SW) – 28 cm;
- skirt length (DN) – 24 cm.
Let's start building a sundress pattern for girls with a bodice. It is more convenient to draw on graph paper format.
In the upper left corner we mark point (∙) A. From it to the right along a horizontal straight line we set aside a value equal to POT + 2 cm for a loose fit. The amount of increase (= 2cm) for all children's dresses is the same. Setting aside 30 cm, mark (∙) B. From the obtained points, draw vertical straight lines down, measuring on them the length of the back to the waist. It is equal to 26 cm. We mark (∙) C and (∙) D. The result is a rectangle ABCD.
Fashionable styles
Depending on the purpose (everyday, holiday or school), a sundress can have a different cut.
The following models are relevant for daily visits to kindergarten:
- Spacious trapezoidal styles with a detachable top and wide straps with fasteners. They may vary in length.
- Sundress dresses with a one-piece yoke and flounces at the bottom of the skirt.
- Simple one-piece styles with or without a zipper, made from thick or thin fabrics, depending on the season.
Elegant sundresses often have a separately tailored skirt:
- Model on a yoke with a sun or semi-sun skirt.
- A sundress with straps or thin ties with a skirt trimmed with flounces. The shuttlecock can have different widths and volumes.
School models of sundresses are distinguished by their severity:
- A sundress of dark colors with a fitted top and a flared skirt of medium length.
- One-piece model made of corduroy in dark tones with straps with clasps.
- Style with a separately tailored bib, trimmed with a pocket and straps with metal fasteners.
Items that should not be used to sew clothes for little girls:
- Fitted straight silhouettes.
- Deep neckline.
- Long straight skirts with slits.
Sundress with contrasting trim
Patterns for a child:
SEQUENCE OF OPERATION
1. Sew the shoulder and side seams of the bodice.
2. Sew the side seams of the skirt.
3. Sew the skirt to the bodice, gathering it along the top edge.
4. Sew the back seam on the skirt to the mark where the zipper will be sewn. Sew in a hidden zipper.
5. Apply bias tape to the neckline and armholes of the sundress.
6. From the wrong side of the sundress, sew a drawstring for the elastic along the waist line. Leave a small hole and thread an elastic band into it. Tighten it as much as necessary. Sew the ends of the elastic by hand and straighten it inside the drawstring.
7. Process the frill strip on one side. On the other side, gather and stitch to the skirt.
8. Sew a small roll from a strip of fabric, tie it in a bow and sew it in the center of the front at the waist line.
Here the sundress for the girl is ready!
The sewing process is quite simple and now you know how to sew a sundress for a girl with your own hands. The choice of fabric depends on your preferences and needs. Under a sundress you can wear a golf shirt or a thin sweater. In this set, your child will not freeze and will feel quite comfortable.
The sundress pattern can be reduced or increased as needed. The length can also be changed.
I hope that this model will be useful to you and you will sew cute romantic sundresses for the fall for your girls.
In the “Simple Patterns” section you will find many interesting models for your kids, and if you want to look at the process of sewing such a sundress for a little girl, then take a look at the master class.
Best regards, Irina Shirokova.
SUBSCRIBE TO THE NEWSLETTER AND BE THE FIRST TO KNOW THE NEWS!
Your email:
Confidentiality guaranteed
Share on social media networks
I like
Children's sundress with buttons on the back
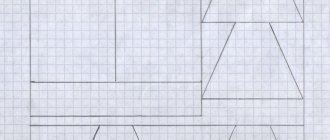
The main patterns for cutting can be drawn using the following drawings:
Simple option
The simplest dress is a one-piece dress, which is sewn from any materials. It is suitable for ages from 1 to 3 years. For 3 years, many sew more difficult dresses, but as a summer lightweight option, this style is suitable for 5 years. You can easily find patterns for children's dresses for girls in our material.
The basis for the dress can be downloaded for free on the Internet, after which it can be adjusted to the desired size and added with details - ties, pockets, an additional skirt, buttons. But it’s more interesting to do it yourself, especially since it won’t take much time. Find out how to make this outfit below.
- Prepare paper for the pattern. Find a T-shirt in your daughter’s wardrobe that is not too small for her;
- Next, put the T-shirt on the paper and smooth it out so that there are no unnecessary folds. Trace the outline of the T-shirt, or just the outline of the neckline and armhole. Next, the lines need to be widened towards the bottom and rounded at the bottom. It’s not scary if the pattern turns out to be asymmetrical, since only half of the product will be needed for sewing.
- Choose the length of the dress according to age. Choose the neckline of the dress. Next, measure the circumference of the child’s chest, divide it in half, obtaining a half-circumference. Determine the size of A and B. If there is no child nearby, or you are sewing as a gift for someone, you can refer to the tables that indicate sizes for small children.
- Measure the distances for allowances so that the dress fits freely on the child;
- Divide the pattern in half and cut it, since only one half is useful, you can choose the most successful half if they turn out different.
Sundresses with frilly straps
The frills on the straps look very delicate.
Patterns of sundresses are designed for sizes for girls:
Dresses and sundresses for a child can be sewn without having in-depth clothing design skills. In addition, you probably will not need to buy material or order it in Moscow or another large city. If you have sewn clothes before, you probably have leftover fabric. By combining them, you can sew a sundress for a girl with your own hands using patterns or without them.
Required tools and materials
A hand-sewn dress is the result of a labor-intensive process. In order to do everything correctly, you need to prepare the following:
- Needles of several types.
- Thick and thin threads.
- You will need an elastic band or thread that stretches.
- Chalk.
- Pins.
- Awl.
- Thimble.
- Tracing paper and pencil for patterns.
- Scissors.
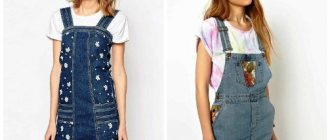
During the work, it is necessary to take into account that denim is a dense material. Therefore, when working with it you will need thick and sharp needles. It is also necessary to use threads of suitable thickness, otherwise the seams will be fragile.
Sundress with lace top
Important! When sewing jeans, you need to decide whether to do it on a machine or sew the fabric by hand. It is more convenient to do the first method, but you must have the appropriate work skills. When working by hand, the sewing process will be labor-intensive, but in this case the seams will be more neat.
This option is more suitable for beginners.
Double-sided sundress
For this model, two bright materials are combined or one of the sides is made of plain fabric. Using, for example, thin jeans looks very stylish.
To sew a sundress for a girl with our own hands we will need:
- fabric - two pieces of fabric, 0.8 m each;
- threads to match the color of the fabric;
- sewing tool.
How to sew
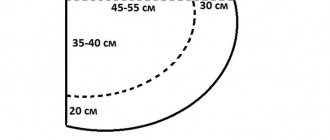
We start by making a life-size pattern.
One cell in the drawing corresponds to a square with a side of 1 cm.
The patterns are made for three sizes:
- from 1.5 years to 2 years (= height 86 – 92 cm);
- from 3 years to 4 years (= height 98 – 104 cm);
- from 5 years to 6 years (= height 110 – 116 cm).
The patterns are drawn taking into account allowances of 1 cm.
We cut out the parts from the first and second fabric - according to both patterns. There will be 4 blanks in total.
If we sew a sundress with pockets or appliqué, then we cut out blanks for them.
We process the edges of all workpieces around the perimeter using an overlock stitch or a zigzag stitch. Sew a pocket or applique (if provided) onto the front side of the front front.
We fold the blanks from the first fabric with the right sides and sew them together. Press the side seams.
We proceed similarly with blanks from the second fabric.
After you have sewn both parts of the sundress and pressed the seams, you can begin assembling.
Place one dress into the other with right sides facing each other and align along the cuts at the armholes and rollout.
Then we sew the seams along the armholes, straps and rollout. On the roll-out and armhole allowances, we make notches in several places so that the fabric does not pull when turning out. At the ends of the straps we cut off the allowances a little.
We turn the product right side out, sew the edge and iron it. We perform decorative stitching with a slight indentation from the edge along the line of the armholes, straps and roll-out. Hem the bottom edge.
That's it, the sundress is ready!
Basic sewing rules
By following the following tips for sewing a product, you can save time on correcting mistakes and get a positive result:
- when buying fabric, pay attention to the composition, giving preference to natural types of fabric or fabric with a small content of synthetic fibers (the child’s skin must breathe);
- before you start cutting, perform a WTO (the fabric may shrink);
- before sewing the product on a machine, baste it and check the fit of the dress;
- to carefully process the bottom of the product, first fold the edge and iron the folds a little;
- To make the inside look beautiful, iron the seams and finish the edges;
- there is no need to iron the elastic thread or elastic band, it can stretch;
- Give the finished item a finished look using WTO.
How to take children's measurements correctly
Correctly taken measurements are half of successful tailoring. This is not difficult to do if your child agrees to stand quietly for a few minutes. If you can’t persuade your child to do such a feat, take the finished product and take measurements from it. How to take basic measurements:
- Let the child stand up straight and natural. When starting to measure, make sure that the centimeter is close to the body, but not too tight.
- Girth. The exhaust gas is measured by the distance between the armpits (in front). OT can be identified by the narrowest point of the waist. In order to find out the OB, the most convex points of the buttocks on the sides are taken into account. OR is measured around the base of the neck.
- Length. DTS – measurements are taken from the 7th cervical vertebra to the waist. Road accident - from the base of the neck at the shoulder to the waist. DP is measured from the base of the neck to the extreme point of the shoulder. The total length of the product is determined from the 7th vertebra to the required point.
- Width. ШП - distance from shoulder to shoulder. ShS - between the armpits (back) through the shoulder blades.
Important! Most children do not have a pronounced waist. Therefore, when defining it, tie (loosely) a ribbon or string at the waist and allow the child to move a little. When the ribbon is in the most comfortable place for the child, you can take the measurement.
The basis of the outfit
To sew many dresses for your child, you can make a base pattern, which will easily be used to sew any dress in the future. To do this you need to take measurements:
- Lengths: back to waist, total length, shoulder, sleeves;
- Half-circumferences: neck and chest.
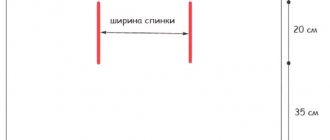
Build a rectangle on graph paper ABCD, AD is the length of the dress, AB and BC are the width = Length + 4 cm for allowance.
Please note that the seam allowance can be made smaller, then the dress will fit more tightly.
From A, retreat 1/3 * Pog + 6 cm and place G. From G, draw a line to BC, mark G1. From A, retreat Dc and mark the melancholy T, draw a line from it to BC and place point T1. Divide GG1 into two equal parts, mark G4 and draw a line from it to DC, mark H and H2. From G4 to the right and left, set aside ½*the width of the armhole (W=¼*Log+2 cm). Install G2 and G3. From G2 and G3, build straight lines upward to AB, place P1 and P. From B and P1, retreat 2 cm, place P2 and P3. Make a segment P2P3. PG2 is divided into two equal sections, and P1G3 is divided similarly into three sections.
From A, retreat to the right 1/3*Posh+0.5 cm, and another 1.5 cm to the right, connect the curve with A, you can use a pattern. From P, retreat 1.5 cm, draw a shoulder line using the resulting points, length = Dp. Divide angle G2 in half and retreat 2.5 cm on the resulting line, draw a line to G4.
From T2, retreat 2 cm, through G4 and the resulting point, draw a line to DC, not finishing 1 cm. Divide DH in half, connect the resulting point with 1 cm. From P3, retreat 1/3 * Posh + 1 cm down. From P3, retreat 1/3*Posh+0.5 cm to the left. Connect the resulting points with a curved concave line. From P2, retreat 3 cm and draw a shoulder line. Angle G3 is divided in half. Draw the armhole line through division P1G3 to point G4. From T2, retreat 2 cm to the left, draw a seam line from G4 to DC, not finishing 1 cm. From T1, retreat 2 cm down and connect to point 2 on the seam. From C, make segment BC 2 cm larger, connect the dots along the bottom.
The pattern is ready, it can be used as the basis for any dress for little princesses!