I didn’t find it. I decided to show you, someone might need it. But I couldn’t figure out how to get the old ones out. And then I read your story, and that’s it!
The problem has been solved, the hooks have been pulled out, all that remains is a small hole to mend. Very grateful! I had a situation where it was simply impossible to walk in a fur coat. The hooks were unfastening, and besides, they were broken. How to give a fur coat to a studio in such cold weather. and what to wear. Well, the studio will charge 150 rubles for replacing the hook. Now I’ll replace the hooks on my mother’s fur coat myself. Damn, you're a couple of weeks late, I had the same problem: at first the lower one came out of standing, and this year the upper one too, I twisted and twisted in my hands. And I took it to the studio, although I have some supplies at home.
What to do if the hooks on your fur coat are loose
And they took 300, not 150. And only for the hook, I didn’t change the ring. use it for your health. Thank you so much for sharing your experience. True, I solved the problem radically, sewed buttons instead of hooks. Wardrobe Sewing, replacing a hook on a fur coat Threads.
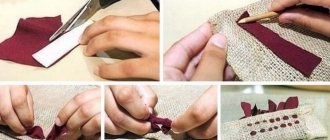
We replace this broken hook with a new one. I bought it for 40 rubles, the saleswoman said that they were excellent Polish ones. Only one part of the hook broke. I did not change the rings. You can get to the hook using 2 methods. 1 - rip in this place where the fur connects to the lining (but this creates additional difficulties, because first you need to rip it open and later sew it up, but you will get to the hook faster) 2 - crawl from the hem of the fur coat under the lining. here it is - this broken hook. We take out the broken hook. Do you see the holes? One is round, the second will be a flat slot. So I decided to take a risk. I bought a hook for 40 rubles.
Nothing complicated. I found it on the web yesterday. We insert our New hook into them. oh so it fit perfectly into the holes. And use a needle to sew 4-5 stitches into each hole. close everything back, turn the lining inside out. And voila, the fur coat is ready! Now I was going to work, satisfied that my fur coat wouldn’t come unbuttoned.
Many owners of fur coats believe that any work on their repair should be carried out only by professional craftsmen. In fact, this is not entirely true. And you don’t always have the financial opportunity or even just the time to go to a workshop. Plus, it's actually not such a difficult task that you can't handle it yourself.
Many people are interested in how to put a hook on a fur coat. In fact, there are clear instructions, but first you need to consider several equally important nuances before getting down to business.
What to prepare before replacing the hook
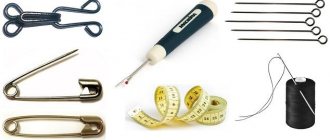
If the hook on your fur coat is broken and needs to be repaired, first of all you need to prepare everything you need. The necessary items should be at hand so that you don’t have to be distracted at a crucial moment. We will need:
- scissors;
- needle;
- hooks;
- threads
It is recommended to choose the most dense and high-quality threads. This will provide additional durability to the hook. If there are no too dense threads in the house, but you need to sew it urgently, then you can simply fold a regular thread several times.
Hooks and threads should be chosen in the most suitable color. Although they will be practically invisible, since they are on the inside, it is still not desirable for them to stand out particularly.
It is better to choose medium-sized hooks. Too massive ones will be inappropriate, but very small ones will not be suitable either - they can easily break or come undone.
For such purposes, it is better to choose scissors with pointed ends and small ones. The best ones for this are the usual ones from a manicure set.
Where and why are hooks sewn to a fur coat?
First of all, it’s worth figuring out where hooks are usually sewn on fur coats. Typically, these products are used instead of buttons, as well as to secure a collar or hood. Before sewing a hook onto the hood of a fur coat or collar, you need to clearly determine its location.
You must understand that at the same time the collar must be fastened tightly so that cold air does not blow in there (and the hood does not fly off on its own), but at the same time not too tight - you should take into account the fact that it is in this place that the scarf. Therefore, when designating the future location of the hook, it is better to take measurements after putting on the scarf.
Hooks have recently been used more often than other accessories. This is due to the fact that zippers on fur coats are almost never used, but buttons have already gone out of fashion. Ordinary buttons often do not look aesthetically pleasing and spoil the overall impression of outerwear, and if the buttons are made internal, this will significantly complicate the process of fastening them. This is a significant problem especially in winter. The hooks meet absolutely all the requirements :
- easy and simple to unfasten;
- hold tightly enough;
- almost invisible.
When can I return my fur coat?
You bought a fur coat - you spent a long time choosing, trying on, reading articles and tips on choosing a fur coat.
And finally, you’re home alone with your new clothes and then you realize that you didn’t buy what you wanted and you don’t like the fur coat.
You simply succumbed to the persuasion of the sellers. Another situation is that you are inspecting your purchase at home and see that when you examined it in the store you didn’t notice that the lint is creeping in, the fur stains your clothes and hands, the fur coat has holes in it, it smells suspicious, and in general you are not sure that it is mink, but not a rabbit, for example. What to do in the situations described above? Will you come to terms with the fact that you spent a lot of money, but bought something that wasn’t what you wanted and wasn’t of acceptable quality?
Should you repair your fur coat yourself or go to a studio? Our readers have encountered similar troubles, and in the “” section you can find answers to these questions.
And in this article we will try to analyze in order and in detail the situations that buyers of fur products regularly encounter.
Getting ready for renovation
If the hook on a fur product breaks, the part will need to be repaired or completely replaced. Replacing a hook does not require special knowledge and skills, however, you need to know at least a little sewing in order to complete the job accurately and accurately.
Tools
To work you will need the following tools:
- Furrier's or sharp stationery knife. You can also use small scissors with pointed ends (for example, manicure scissors), but working with them requires experience and dexterity.
- Needle and thread (as strong as possible). For manual work, it is best to use a special triangular needle designed for working with leather.
- Medium size hooks. A piece that is too massive will be out of place, and very small hooks can easily break or come undone.
- A piece of elastic fabric.
Adviсe:
- For sewing, choose a thin, strong and long needle to protect the flesh from damage during piercing.
- If you do not have too dense threads, then use regular thread, folding it several times.
- Choose threads and hooks that are the most suitable in color, even if they are almost invisible. The fastener should not stand out too much.
- When purchasing new hooks, pay attention to how they fasten. Please note that in frosty times your fingers sometimes do not obey, and it will be quite difficult to cope with a hook that is fastened too difficult and tight.
- Upon completion of the repair, it is necessary to restore the position of the pile. To do this, use a natural bristle brush (not very hard) or, as a last resort, a pet brush.
Important! Before restoring a matted area of fur, wet it with warm water and glycerin.
If you do not plan to replace your fur product with a new one in the near future, you need to make efforts to ensure that it remains beautiful and durable longer. And our detailed collections of tips from articles will help you with this:
Hooks and rivets
If you go to a fur and fur store, you will find that most products have hooks sewn on them. Their advantage is that the hooks are invisible from the outside, they are hidden inside. There are also disadvantages, the hooks are not always fastened conveniently, but it is also important to take into account the fact that you can get used to them. There are low-quality hooks, for example, a plastic clasp will break after several times of use.
Hooks for a fur coat should be clearly metal, inconspicuous, that is, blend in with the outerwear in color.
Sometimes hooks fall off if they are poorly sewn. It is worth paying attention to whether the hooks are located far from each other, otherwise the wind will blow. Even in the store, you need to try to unfasten and fasten them several times, check how securely they snap into place. If necessary, hooks can be purchased at any fabric store or online; they are not expensive, about 60–100 rubles apiece.
What fasteners are best for a fur coat?
To fasten fur products use:
- Hook with a special ring. The fastening system can be of two types: with a fastening element and a movable element. There is also the simplest type of hook - a fixed one. Products are made of metal and plastic.
Important! Plastic fasteners are inferior in strength to their metal counterparts, so, if possible, use metal fittings, especially if you are the owner of a heavy, floor-length fur coat. Plastic hooks may well be suitable for a fur vest or light short fur coat.
- Decorative fasteners in the form of clips and decorative hooks. Decorative elements are an additional decoration of the fur product. Most often, such accessories are used for short-pile fur coats so that decorative elements are visible.
Important! Buttons can also be used.
Adviсe:
- If you have to travel very often on public transport, then use fastening hooks so that the fur coat does not unfasten under the pressure of the crowd. Most often, such incidents happen with models that are flared to the bottom.
- The most common option is a simple metal hook with a movable tongue. Such hooks are suitable for both short and long fur coat models, regardless of the length of the pile. This type of fastener is considered reliable and looks original.
- If you want to use a decorative hook on your outerwear, don't overdo it. There should only be one such accessory. It is best to sew it on the collar so that the accessory acts as a brooch and at the same time secures the hood.
Important! Shiny accessories with stones look most impressive on plain clothes. A large size of decorative decoration is allowed, the main thing is that the accessory matches the model of the fur product.
It may not make sense to spend time repairing a fur coat if its style is already somewhat outdated. It’s better to immediately arm yourself with step-by-step instructions and update it completely. Find out how to alter a fur coat with your own hands.
Buttons for fur coats: varieties and features
Buttons on mink coats most often have a decorative function, since inconspicuous hooks sewn on the reverse side are used as fasteners. They can be located near the collar and hood, on the sleeves. There are different types of buttons for fur coats:
- in shape - elongated, round, oval, square and fancy;
- according to the material of manufacture - wooden, covered with leather or fabric, plastic, glass, metal, etc.;
- according to the method of sewing onto the product - with 2 or 4 holes, with a leg or a spike;
- Based on the presence or absence of design , models decorated with precious and semi-precious stones, Swarovski crystals, rhinestones, and sputtering are distinguished.
When choosing a button to decorate a mink coat, you need to focus not only on the appearance of the accessory, but also on whether it matches the fur. So, for example, blue or green items will look ridiculous on a shiny brown mink.
How to fix a hook on a fur coat without replacing it?
If the hooks do not hold on the fur product, this may be due to the following reasons:
- The fittings became loose during use. If the mechanism is broken, try to lightly pinch it using ordinary small pliers. Do this as carefully as possible so as not to break the part.
- The threads are partially torn. Re-sew the hook, replacing old threads with new ones or making additional stitches to strengthen the fastener.
- Incorrect fitting size. Hooks that are too small cannot hold the material of the product well. Incorrectly selected fittings should be replaced.
What mistakes should you avoid?
When starting to work on decorating a fur coat with a new fastener or altering an old one, it is important to choose the right needle. Too thick will damage the inside of the mink; too thin will not be able to penetrate it.
Also, don’t forget about the back button. Its presence will help avoid unnecessary stress on the fur. This is especially true for elements that are sewn on for permanent use. If the fastener is not strengthened from the inside out, it will eventually be torn out “with meat”.
If several buttons are altered at once during the work process, you need to do several fittings. Those who do not do this risk starting the work all over again, since without control, the fasteners can move and change their location under the weight of the fur.
If the inside is cracked on the reverse side, you can use a small piece of genuine leather as a sealant. Before starting work, it is laid between the core and the back button.
In order not to spoil the appearance of such an expensive and presentable fur product as a mink coat, buttons and fasteners for it must be selected with special care. It is better to avoid too bulky and elaborate designs, as they will not only worsen the appearance, but also spoil the fur around it.
The presence of a fur coat in the wardrobe determines the status of a woman, makes her elegant, stylish, and self-confident. However, you can improve the appearance of the product, giving it even more sophistication and individuality. To do this, it’s enough just to alter the buttons on a fur coat,” choosing a more worthy option, fortunately today there is a large choice.
How to sew a hook to a fur coat?
To sew on the fittings and solve the problem, the hooks on the fur coat are unfastened - what to do, you must first determine its location. If you want to secure a hood or collar with a hook, then you need to clearly understand that a scarf is usually put under the collar, and the hood needs to be fastened so that it does not fly off. Therefore, very carefully determine the location of the future hook - it is best to take measurements after putting on a scarf.
Important! One more point to remember before sewing on the fittings: all fasteners are made on the lining, without touching the main skin. For example, the inside of the hook should be hidden under the lining.
Preparation
When replacing an old broken part with a new one, you must first remove the old fastener by performing some operations:
- pick up the seam on the lining to get to the hook;
- If the lining is not sewn, then you should turn the fur coat inside out and find the desired element.
Important! Some craftsmen rip out the seam on the lining that runs from the sleeve to remove the old fastener hidden behind the flesh.
We repair hooks
In order to install the hook yourself, strictly follow the following recommendations and complete this process step by step:
- If there were no other fittings at the fastener site, then make a small cut in order to remove the necessary part of the hook. If you are replacing old fittings with new ones, then sew up the place of the old fastener (except for the slot for the new hook) and strengthen it with adhesive fabric or a piece of leather. First, make a slot on the leather material for a new fastener.
- Sew a hook on the inside of the lining. Typically, the base of the hook has several holes. To ensure that the fastener “sits” firmly on the flesh and does not tear it, sew all the holes to evenly distribute the load.
- Sew up all the undercut areas of the lining layer by layer. Make new seams as carefully as possible. Try to keep the bulk of the threads on the inside. Sew the last lining to the fur collar using a hidden seam.
Important! When sewing, do not pull the thread too hard, as the core may tear.
- If you need to sew on a hook ring, take careful measurements first so that the hardware is level. The ring can be sewn to the lining, securing it in two places with strong threads. A more reliable option is to undercut the lining in the right place, thread the ring through the two holes made and sew it on the inside of the lining, just as in the case of a hook.
Adviсe:
- To avoid stretching or tearing of the membrane, reinforce the fastener with a piece of thick fabric, leather material or adhesive fabric. Sew the patch by hand, leaving a hole for the hook first.
- If the fur of the fur coat is thin, then secure the ring with a strip of leather.
- Buy only high-quality hooks so as not to change them often, since a fur coat is a very expensive item and the lining should not be trimmed regularly.
Or maybe it makes sense to give yourself a great gift and simply update your wardrobe, buy more fashionable and beautiful clothes for the winter? Then it’s time to learn and remember all the details of how to choose a good quality fur coat.
How to replace a button
As already mentioned, buttons are the most common fastenings on fur clothing. If a button comes off or there is a need for additional fastening of the sides of a fur coat, you need to know how to sew it on correctly.
For work you will need the following items:
- gypsy needle;
- matches;
- scissors;
- thick thread;
- decorative button for attaching to the front of the product;
- small button for fastening on the inside.
Buttons for fur coats
Important! An additional button is needed to remove the load from mink or other skins. Its presence will prevent ruptures and damage to the fur at the attachment point.
Step by step process:
- the attachment point of the torn button is cleaned of thread residues;
- a thread folded in half is attached to the surface of the fur coat;
- a small button is applied to the wrong side and the thread is pulled through it to the front side;
- a decorative button is applied to the fur and a needle and thread are passed through it;
- a match is placed under the outer button and, making a loop over it, the thread is brought to the wrong side (this is necessary so that the sewn button does not wrinkle the fur in the future);
- this action is repeated at least 10 times;
- the match is pulled out;
- the thread is wrapped around the resulting stem at least 5 times;
- fasten the thread from the inside out and cut it.
Button sewn to a fur coat
Important! During the work process, it is necessary to straighten the fibers caught under the thread. It is necessary to take into account the direction of the pile, which should not break when attaching a new button.
A button on a leg is attached in the same way as a flat one. The only nuance that needs to be taken into account is the need to ensure free movement of the element along the fur. To do this, the threads located under the leg are wrapped several times before being secured.
A fur coat, by definition, cannot be cheap, but, unfortunately, it can look quite good.
Replacing hooks with buttons
Many owners of fur products believe that hooks often fail, and their replacement requires painstaking work, so it is better to replace them with buttons. We hasten to dissuade you, making such a replacement is not at all easy. The main difficulty lies in the design of the loop. In order to make a loop, you need to have the appropriate technique that will help you process the edges so that the pile does not fall off in the cut areas.
If you decide to change hooks to buttons, then listen to the following recommendations:
- Make the loops internal. They are easier to arrange. Proceed as follows: in the place where the hook ring was sewn, form a loop from dense threads. You can also use a thick elastic band, but it will have to be changed periodically, as it will stretch over time.
- To replace a hook with a button, first remove the old hardware and sew up the holes left by the removed hardware using light stitches. From the inside, lay adhesive tape over the place where the hook was and install the desired part.
Be sure to learn everything about how to store a fur coat so that it will last you more than one season.
Atelier at home
Tweet Hello dear visitors.
A new lesson awaits you on how to sew a fur coat hook.
Very often clients come to my studio with this problem. Hooks break or do not fasten well.
You can buy a hook at a sewing store and replace it yourself. After looking at the slides, you can confidently get down to business, and not give your fur coat to the studio for such a small thing. 1. In fur coats, different processing of the lining is used. Basically, the lining is attached with hand stitches and therefore, to replace the hook, we do not need a sewing machine. The main difference in the processing of the lining is the processing of the bottom of the fur coat.
The bottom can be loose, that is, along the bottom the lining is not attached to the fur coat and repairs can be made without tearing up the lining. In another case, the lining can be sewn along the bottom to the fur coat. In this case, it’s better not to touch the bottom, but to tuck the lining along the side near the hook.
2. In Fig. 1 there is an image of the side of the fur coat and the hook that we will change.