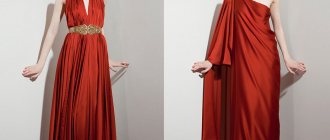
In order to give a dress, blouse or skirt a cheerful and flirty look, you need to remember such “helpers” as: flounces, ruffles and frills , get acquainted with the methods of processing flounces , their types and cutting.
A dress with ruffles and flounces - how can one be indifferent at the sight of such lightness, grace and beauty.....
Let's first understand the types of flounces and study today 2 methods of cutting flounces.
So, shuttlecocks differ in:
- location on clothing: vertical, horizontal, symmetrical, chaotic, over the shoulder, “diagonally”, flounces on the neck, on the shoulders, flounces on the skirt;
- shape: jabot, figured, tiered, flounces - frills, boas, flounces - sleeves, flounces - bows, flounces-drapes.
In order for the shuttlecock to have the property of “waving” along the edge, it must be cut in a special way.
There are two of them: a circular cut, also called “donut”, or a spiral cut, also with the double figurative name “snail”.
Let's explore these two methods.....
How to cut in a circle? For a general idea: draw a “donut” on the fabric and cut it out, then make a cut and push the fabric apart - we get a strip of wavy fabric.
In order to understand what size our “donut” should be, we measure the length of the place where the future shuttlecock will be located, for example, 50 cm - this means that the length of the inner circumference of the “donut” should be 50 cm.
To get the internal diameter of a “donut” to be 50 cm, you need to divide 50 by the magic number - 6.26. We get 7.98 - this means that at 7.98 cm, we need to move the compass apart and draw a circle, the diameter of which will be exactly 50 cm!
With the second, outer diameter of the “donut” circle, I think you have already guessed what to do? Yes, just add the desired width of the shuttlecock to the calculated figure 7.98, for example, we want a shuttlecock with a width of 3 cm, which means 7.98 + 3 = 10.98 - we expand the compass by 10.98 cm.
It's quite simple!
Sergey Karaulov did not ignore this topic either; watch an interesting and detailed video on how to cut shuttlecocks.
Let’s look at the second option, cut in a spiral or “snail”….
We decide on the width of the future shuttlecock, for example, we want 5 cm.
Take half of this value 2.5 and you can immediately add seam allowances, 1 cm each, for a total of 4.5 cm.
We start working with this number - this is the diameter of the circle that we are drawing (how to draw it - by analogy with a “donut”), then we draw a horizontal line through this circle, denoting the letters “a” and “b” - the points of intersection of the line with the circle.
Next, we measure the radius “a” “b”, from point “a” we draw a semicircle “b” “c” equal to this radius.
We measure the radius “b” “c”, from point “b” we again draw a semicircle “c” “d” equal to this radius.
Then, we measure the radius “a” “d”, from point “a” we draw a semicircle “d” “e” equal to this radius.
We measure the radius “b” “d”, from point “b” we draw a semicircle “d” “e” equal to this radius. In this spirit, we continue until the required length of the shuttlecock.
We cut our pattern in a spiral, stop at the segment “b” “d”, the rest of the tail is an unnecessary remnant of fabric!
How to determine the length of the shuttlecock in this version? Simply, take a measuring tape and measure the required length (for example, we need a shuttlecock 30 cm long), starting from point “b” to point “c”, etc.
Of these two flounce cut options, each has its own advantages and disadvantages:
The advantage of the circle cutting method is that the “waviness” will be the same from start to finish.
The disadvantage is that cutting in the circle leaves a “donut hole”! but in our business it’s not “nothing”, but rather a circle of fabric to be thrown away….
With the spiral method, everything is exactly the opposite!
The advantage lies in the tiny amount of fabric left over for discarding, but the disadvantage is the uneven “waviness” along the entire length of the shuttlecock.
But with the right approach to business, you can easily turn disadvantages into advantages! You just need to know that in models involving frills, vertical or chaotic types of flounces, you need to use the “snail” method.
And vice versa, if you need flounces of the same degree of “waviness”, horizontally located or tiered, it is best to cut using the “donut” method.
In order not to torment you any longer, in the next article we will continue the conversation about ruffles with frills, and we will talk about ways to process all these elements. See you!
How to make a frill?
Hello, dear readers of the milla-sidelnikova.com blog!
Do you want to add femininity, romance, playfulness, and seductiveness to your skirts, dresses or blouses? Make them flounces, frills or ruffles. Just not on all of them, only on some. Don't let it be too much!
Flounces, frills or ruffles are made on models made of thin and medium soft fabrics, so when moving and from the slightest breath of breeze they sway in playful waves as if alive.
Very often, simple sewing lovers confuse flounces, frills, and ruffles with each other.
Frills, ruffles, flounces, of course, are similar to each other in some ways of processing cuts and attaching to the product, and yet, these are completely different finishing elements.
Therefore, let's get to know them better, more closely. And the first ones to go today are the frills.
Frill (plural: frill) are elements that are made for decorative purposes. Frills can be found on women's clothing, children's clothing, as well as on items intended for home decoration - tablecloths, bedspreads, curtains, bed linen, various types of covers, etc.
A frill is a strip of fabric, one long longitudinal edge of which is gathered and sewn onto the main product. The second is processed in one of the ways and remains free, flying away.
Ruffles can be made from the main fabric or from additional fabric. And that one can be either sharply contrasting to the main color of the product, or in the color of the main or one of the color tones of the product.
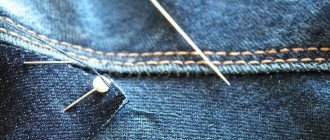
Processing the flying edge of the frills.
How to sew a frill?
Lush frill.
Types of frills.
The frills differ from each other:
1. Location on the product.
Frills can be located on products - horizontally, vertically, along yoke lines, along structural seams, etc.
2. The shape of the cut detail (see the cut section below in the article).
3. The method of processing cuts (see the article processing frills).
4. The method of “attaching” to the product.
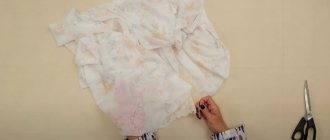
Cut the frills.
If necessary, you can cut out the frill yourself.
The cut out part of the frill can have the shape of a rectangle, triangle, trapezoid.
At the same time, short, transverse (1 or 2) and lower longitudinal sections of frills do not always have an even, straight cut line. It can also be curved, and in a wide variety of ways (depending on the desire of the “creator” of the frill and the characteristics of the model). For example, like this.
Most often, the frill pattern is laid out on the fabric along the bias thread, at an angle of 45⁰ to the warp thread, sometimes along the transverse thread.
Frill width.
The width of the frill depends on the style of the model and the properties of the fabric from which the frill is made and can be from 1.5 to 30 cm. To this you also need to add 1.5 - 2 cm for the seams along the upper and lower edges.
Frill length.
The length of the frill cut detail determines how the finished frill will look. The longer the cut detail of the frill, the more tightly gathered its upper cut will be, which means the frill will look more magnificent on the finished product.
For a not very fluffy frill, its upper cut should be 1.5 times longer than the stitching line.
For a normal, good fluffiness of the frill, the upper cut of the frill should be 2 times longer than the stitching line.
Well, for thin, easily draped fabrics, you can take three lengths of the stitching line.
Regardless of the length of the future detail of the frill cut, we add from 0.5 to 1.5 cm (depending on the properties of the fabric and the characteristics of the model) to the seam allowances on the side of each short transverse section.
Of course, it’s best when the frill is one-piece. It looks better and there is less fuss with its processing. Therefore, when laying out the cut details, do not forget about frills, especially long and wide ones.
Well, when there is not enough fabric for one single piece of frill, you will have to make it up from several, separately cut.
A finished frill, consisting of several separate parts, on some models simply must look like a single whole. And then, the separately cut details of the frill, on some models (optional, depending on the situation) should be ideally combined with each other with patterns of cells, lines, directions of floral patterns, etc.
On other models, different directions of the pattern on several parts of one frill can become an additional decorative effect. In this case, you need to carefully monitor the symmetry of the arrangement of the pattern of such parts. For example, like this.
Don't forget about seam allowances on these pieces! They must be present on the cutting details, but they are not involved in matching the pattern. Only the main part, without allowances, of the cut parts.
For frills that will be laid in pleats, pleats and corrugations, the pattern pieces are laid out along the grain or cross thread.
The length of the cutting details for frills that will be folded into pleats, pleats or corrugated folds depends on the type, and therefore the depth of the folds that will be made on the frill (needs to be calculated).
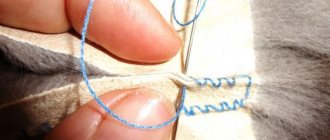
Sew the frill.
When a one-piece frill cut piece needs to be “turned” into a ring, short, cross-sections of one full-cut frill cut piece are joined with a ground stitch.
And when a whole, large frill needs to be made up of separately cut parts, the sections of these parts are also connected with a stitch seam.
Seam allowances for such joints are left from 0.5 to 0.7 cm, depending on the fraying of the sections.
And they are sewn together with a seam.
Of course, it will be best if the seam allowance cuts, no matter how many there are, are treated to prevent fraying. Frills are loose details, or almost free. Their movements are almost unrestricted, and it is not at all good if protruding threads are visible from under the flying frills and from the seams.
Now you need to process the frill cuts. You can read about methods for processing frill cuts by following the link to this article. After processing the lower, and if necessary, a short, transverse or two, sections, the upper cut of the frill also needs to be processed. It needs to be collected. You can see how to do this in this article.
A high-quality product is considered to have a frill that is evenly gathered along its entire length. There are two ways to achieve this result.
First. Having gathered the top edge of the frill to the length of the stitching line, use your hands to evenly distribute the resulting folds.
And after that, using pins and a hand basting stitch, we begin to attach the top edge of the frill to the main product.
Second way. We lay stitch lines on both sides, along the upper edge of the frill, using two hand stitches using straight stitches.
We pin the frill to the main part. First the edges, then the middle, then the middle of two sagging segments, again the middle, newly formed, but in four smaller segments, etc.
And when the frill is securely and evenly attached to the main part, all that remains is to pull the ends of the laid hand stitches and secure the assembly to the product with pins and a hand basting stitch.
This is the article I have today!
You can find out how this magnificent frill is “attached” to the product in the next publication.
Good luck to all! Sincerely, Milla Sidelnikova!