The design of a window opening is the most important detail in the design of a room. Beautiful curtains that match the style and color not only perform a protective role, but also create an atmosphere of coziness and comfort. You can sew the curtains yourself or buy a ready-made kit in the store. In any case, you need to be able to hem curtains correctly and beautifully. After all, curtain fabrics are usually sold with a length reserve, and finished products do not always have the appropriate dimensions, so they have to be shortened and hemmed. There are several ways to perform this simple job, which even a novice seamstress can handle.
Preparation of material
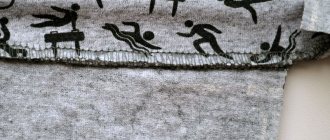
A variety of materials are used to make curtains. Thick curtains are made from crepe, jacquard, velvet, velor, thick cotton and linen; thin curtains - made of tulle, nylon, organza. Each fabric has its own characteristics and requires certain processing.
Before you start shortening and hemming, you need to do some preparatory work.
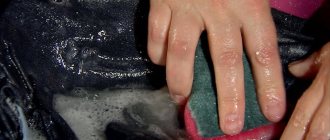
To ensure that the finished curtains do not end up short after the first wash, the fabric is decated. To do this, the fabric is immersed in water for several minutes, then wrung out and hung to dry.
- For processing synthetic materials, the water temperature should not exceed +30°C.
- Cotton and linen can be soaked in hotter water (from +40°C to +60°C).
- Wool, silk and fleecy materials are not decated.
Slightly damp curtains are ironed, setting the setting appropriate for the fabric.
Those materials that are not recommended to be decanted should be hung on a cornice or other crossbar, sprayed with water and allowed to hang for 2-3 days.
LiveInternetLiveInternet
—Categories
-Music
—Search by diary
—Subscription by e-mail
— Regular readers
—Communities
-Statistics
Let me make a reservation right away: this method is suitable if you first put hooks on the curtains, and only then hang them on the curtain rod. Ceiling cornices are ideal in this case.
We calculate the amount of material for this method of hanging curtains. We take the coefficient 1.5 plus 10 cm for the technical folds of the curtains (we want them to hang beautifully) plus 4 cm for hems of the side sections.
Let's say the width of the cornice is 3m. We need to sew 2 curtains. 3x1.5=4.5m. We turn each curtain on the sides (technical folds) by 10 cm, this is another 0.4 m. And four side seams - plus 16cm. In total we get 4.5 + 0.4 + 0.16 = 5.06 m. You can round it up to five meters exactly.
Why are technical tricks needed? You can, of course, do without them, but I personally prefer it when the side seams are not visible, especially since sometimes the side seam cannot be ironed properly (such fabrics do occur).
Let's move on to practice. We retreat 10cm from the side edge of the curtain and hang a hook - this will be the outermost hook.
We put the next hook on the loop (closer to the collar) and use it to thread the second loop through five centimeters. It turned out to be a small fold.
Next, we place hooks along the entire width of the curtain in the same way, the distance between the hooks is 10cm, and between the loops on one hook - 5cm.
Don't forget about the technical fold on the other side of the curtain.
The result was these uniform shallow folds across the entire width of the curtain. This is exactly how the curtain will hang when the window is curtained.
When the curtains are pulled apart, they will also hang in even folds, only the folds will be deeper.
If something is not clear, ask in the comments, I will answer all your questions.
Did you like the master class? I would be very grateful if you share this article with your friends on social networks by clicking on any button below.
If you would like to share your experience with the readers of the site or simply show your work, I invite you to cooperate .
Best regards, Oksana Fadeeva.
Source
How to hem curtains by hand and by machine?
When hemming curtains, it is better to use a sewing machine. The work will be done much faster and more accurately than by hand. However, you can do without this device and bend the fabric using a regular needle.
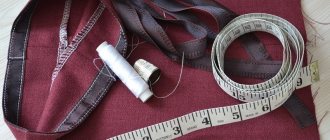
To work you need to prepare:
- sharp needle;
- sewing machine;
- scissors;
- measuring tape;
- ruler;
- chalk;
- pins;
- threads in the color of the material.
The first step is to determine how long the new curtains will be. To do this, use a measuring tape to measure the distance from the end of the hinges on the eaves to the floor or window sill and write down the resulting value.
Then you can follow the following instructions:
- The canvas is laid out on a flat hard surface with the wrong side up. It is better to place a cotton sheet under silk or satin fabric to prevent it from slipping.
- Measure the length of the curtain, making chalk marks in three places: on the sides and in the middle of the canvas. Connect the marks made with a straight line using a ruler. The drawn line is the bottom edge of the curtain.
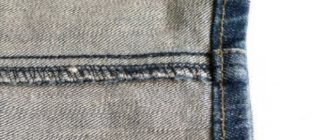
- Step back from the line by the width of the hem and cut off excess material. To hem curtains made of dense fabrics, you need to leave at least 15 cm. When hemming organza or nylon, it is enough to set aside 5–6 cm.
- The fabric is folded along the bottom edge and ironed to secure it. Then the hem is folded inward by 2-3 cm and stitched with a basting stitch or pinned and ironed again from the inside out.
We recommend: Rules that, if followed, will help you quickly get rid of cat hair
If you decide to sew by hand, you need to take a needle and threads that match the color, get comfortable, since this task will take more than one hour, and start working. You can use a blind stitch or machine stitch. In the first case, neither the seam nor the threads will be visible. But when doing machine stitching by hand, you need to make sure that the stitches are of equal length and the seam runs in a straight line. Careless work will ruin the appearance of the finished product.
Hemming curtains using a sewing machine is, of course, much faster. Moreover, you can use both a regular machine stitch and various decorative stitches. If the hem is high (more than 5 cm), first sew the side part from the bottom edge of the fabric to the end of the hem. Then turn the fabric 90° and sew the hem, departing 2-3 mm from the top edge. At the end, the material is unrolled again and the side part of the hem is sewn.
The threads remaining at the beginning and end of the line must be tied in pairs with a double knot and cut off, leaving tails of 2–3 mm.
Now all that remains is to steam the bottom of the finished product and hang the new curtain on the cornice.
Method number 1. Classic method
Before processing the bottom of the curtain, measure and set aside its finished height (from the top loop on the curtain tape down to the desired length), and put a control mark (a pin or a chalk mark). Then, from the mark downwards, double the width of the hem is laid in its finished form. In other words, if the finished hem width for the bottom of the curtain should be 6 cm, set aside 6*2=12 cm.
In general, the finished tulle hem width varies from 5 to 6 cm, unless there are any reservations (for example, a different hem width at the request of the customer or designer) and the length of the fabric is sufficient.
Then all excess is cut off, and the allowance for finishing the bottom is ironed to the full width towards the wrong side. After this, the flying edge of the allowance is folded inward by half the width and ironed again.
Next, hem the bottom of the tulle, machine stitching along the edge of the seam allowance pressed inward. This method is called the Closed Hem Seam.
To avoid distortions in the process of hemming the bottom of the curtain, the allowance can be pinned to the tulle at certain intervals (20-30 cm).
The hemmed bottom of the curtain is ironed and, if necessary, pulled back a little.
A wide hem looks expensive and also acts as a weighting agent. Moreover, it can be released if there is a need to lengthen the curtain.
Adhesive tape for hemming curtains
A simple and quick way to shorten curtains is to use adhesive tape. This translucent synthetic material, industrially treated with glue, is produced in the form of braid with a width of 5 mm to 5 cm. Gluing occurs by heating the adhesive with a hot iron.
It is clear that this type of fittings is not suitable for working with thin fabrics that cannot tolerate high temperatures. But thick curtains can be folded using adhesive tape. In this case, there will be no seams or needle holes, which usually spoil the appearance of the finished product.
Before starting work, it is better to experiment with an iron and tape on scraps of material and determine the optimal temperature for gluing. It is important not to burn the fabric and at the same time secure the hem firmly.
The shortening process looks like this:
- lay a double hem;
- adhesive tape is placed between two layers of material;
- iron several times with a well-heated iron.
This method has only one drawback: during washing, the glue is gradually washed off and the hem straightens. In this case, you will either have to glue a new tape, or use a special glue to restore the damaged sections of the tape.
Methods for processing the edge of the canvas
Proper processing of the edges of curtains is important: thanks to this, the threads will not fray, and the edge itself will look neat.
There are several processing options:
- Regular seam. The fabric from below is carefully folded, pinned or large stitches are made so that the fabric does not slip, and stitched. You need to sew confidently and evenly, do not pull the fabric so that it does not deform. If your machine has an overlocker, you can first process the edges with it, then fold and hem the bottom. This will allow the edge of the material to be secured more firmly;
An overlocker will help secure the edge of the fabric if it frays too much.
Important! You can hem the fabric by hand, but this activity will take much more time, and you will also need to sew very carefully, making seams in a straight line.
- Adhesive tape. The curtains must be folded twice, placing adhesive tape between the layers, then iron the area with a hot iron. The tape will melt and seal the edges. This is a simpler method, the seam is invisible, but the glue will not withstand heavy fabric;
Adhesive tape is a dry glue that melts when ironed
- Edging with braid, lace or ribbon. You need to take the braid (the length should be equal to the length of the edge being processed), fold it lengthwise, iron it and “insert” the edge inside. Then secure it and stitch it. The braid can be chosen to match the curtains or in a contrasting color.
Bias trim
You can hem the curtain using bias tape or tape cut from a material in a color contrasting with the main fabric. This finishing will emphasize the exclusivity of the product; the main thing is to choose the appropriate edging material.
To process the edge of the fabric with bias tape, you will need a sewing machine and a special foot, which can be bought in stores with sewing equipment. Having measured the required length of the curtain, cut off the excess material along the line, leaving only 5 mm. The edge of the fabric is inserted inside the bias tape and carefully stitched, trying to place the seam as close to the edge of the tape as possible.
Treat the edge of the curtain with edging material as follows:
- An edging strip is cut out from a contrasting color material. The width of the strip depends on the artistic imagination of the craftswoman, but you should not make the edging too wide, otherwise the product will look tasteless.
- The strip of material is folded in half and ironed to secure the fold.
- The upper and lower edges of the strip are folded inward by 1 cm and ironed again.
- The edge of the curtain is inserted between the two layers of edging so that at least 1 cm of the main fabric is inside. Baste and then sew with a machine seam or zigzag.
We recommend: Modern textiles for the home: which fabrics have no place in 2020?
To make the finished product look harmonious, the sides are also trimmed with finishing material.
What you will need
The set of tools for carrying out the manipulation depends on the method of hemming the curtains. So, if shortening is done manually, you will need:
- scissors;
- centimeter;
- chalk;
- pins;
- thread;
- needle.
When the material is processed on a sewing machine, the specified set is used, but instead of the last two tools, the corresponding device is taken.
To shorten the length using adhesive tape, you will need a strip with an adhesive base and an iron.
How to hem curtains made of light fabrics?
Thin fabrics – chiffon, organza, nylon, which are popularly called “tulle” – create the impression of weightlessness of the window composition. It seems that there is nothing easier than cutting and hemming such a light curtain. However, this work also poses many difficulties.
The nylon fabric slides, so cutting a straight edge is very difficult. It’s good if the tulle is decorated with a simple symmetrical pattern. In this case, you need to fold the curtain in half, matching the fragments of the pattern, and secure it with pins. If the curtain is wider than 3 m, you can fold the fabric into 4 layers and also secure with pins. After this, measure the required length and cut the fabric with sharp scissors, leaving only 1–1.5 cm for hemming.
A curtain without a specific pattern is more difficult to cut. The length is measured in several places, notches are made with chalk or pins, and only after that the excess material is carefully cut off. This is exactly the case when “measure twice, cut once.”
For hemming, two types of seams are used: “Moscow” and “zigzag”.
"Moscow"
The Moscow seam, or “American” in other words, is used for hemming thin fabrics cut along an oblique line. To get this finish, you need to do the following work:
- bend the edge of the fabric by 5 mm and iron it;
- sew the hem, retreating from the edge of the fabric no more than 3 mm;
- cut off excess fabric as close to the stitching as possible;
- bend the material inward one more time by 5 mm;
- lay a line so that it coincides with the already made seam.
If you carry out this processing of the material correctly and carefully, one machine seam will be visible on the front side, and two lines will be visible on the back side.
Zigzag
The zigzag stitch is found on all modern sewing machines; it is usually used to process internal seams. This stitch is also useful when shortening a light curtain.
- Before starting work, you need to determine the optimal width and length of the stitch so that the hem is smooth, beautiful, and the connection is strong.
- The edge of the fabric is folded 1 cm and the fold is fixed with an iron.
- The fold of the fabric is processed with a zigzag.
- Excess tulle is trimmed with small sharp scissors.
Some craftswomen do not hem nylon curtains, but singe them, trying to seal the edge of the product. This requires some skill, otherwise you can burn the product.
Every housewife with minimal experience in sewing can shorten and hem a thick curtain or thin tulle at home. To do this, you don’t need to have a sewing machine; you can do the job by hand. The main thing is desire and patience.
Tips for choosing and sewing curtain tape
Curtain tape is a special braid consisting of fabric strips of different widths, thin ropes and hook fastenings. The ribbon is sewn to the top of the curtains and, when tightened, creates beautiful ruffles.
Thanks to the curtain tape, curtains can be hung on curtains
Important! Curtain tape can be attached in other places: for example, in the middle.
All existing tapes are divided into several types:
- According to the materials used: tapes can be transparent (fishing line) for thin fabrics or durable (cotton, polyester) for dense ones;
- Width: narrow (1.5-4 cm) for lightweight materials or wide (5-17 cm) for denser ones;
Curtain tape is sewn from the inside out
- According to the method of fastening: with eyelets, with loops for hooks, for string cornices, for pipe cornices;
- According to the nature of the folds: horizontal (traditional) or vertical (the curtains “go” up);
- According to the type of folds: “accordion”, “pencil”, “butterfly”, etc.
Before starting work, you need to decide on the length of the fittings. To do this, add 10 cm to the width of the curtain for the hem.
Sewing the ribbon is easy:
- If the edge of the curtain is already hemmed, you need to straighten the braid across the width of the fabric, secure with pins, then sew on a machine. The edges of the tape should bend inward so as not to stick out; they are sewn up in this position;
- If the edge is not hemmed, you will first need to fold the fabric, then secure the fittings.
You can sew the ribbon by hand or by machine.
The need to shorten the curtains can be caused by various reasons. There are no less ways to do this: curtains can be hemmed, glued or folded; the work itself can be easily done at home yourself or taken to a studio. However, some prefer to leave the curtains long, flowing across the floor.
General rules for washing tulle
Tulle requires delicate care - even if we are talking about inexpensive nylon mesh curtains. This fabric cannot withstand high temperatures - too hot water or an iron can cause the fabric to turn yellow. Therefore, tulle is washed in lukewarm water and try not to iron.
At the same time, the curtains do not require intensive washing - dirt comes off the fabric quite well, especially if you do not “start” the process. Tulle curtains need to be washed once every 3-4 months - in this case, maintaining their whiteness will be quite easy. But, if we are talking about kitchen curtains, if the windows face a busy highway, or if family members are allergic to dust, it is better to increase the frequency of washing.
Since dust usually accumulates on curtains, it is advisable to shake out the tulle on the balcony or outside before washing. In this case, washing will be more effective.
Strengthening decorative cuts
A slit in a skirt, a neckline in the neckline or on the back can be beautifully processed using a web tape. Allowances on the armhole or cut can be strengthened using the adhesive method. To do this you need:
- Measure the length of the allowance and cut off the corresponding piece of tape.
- Place the strip into the armhole.
- Iron thoroughly.
Advice! Pre-test the quality of the tape on any unnecessary scrap. If the material does not adhere well even at high temperatures, it is better not to use it and purchase another one. This type of glue will not stick. This can happen if the adhesive material has been stored incorrectly for a long time or is made from low-quality raw materials.
Summarize! Glue web is a universal way to solve many everyday problems related to sewing and mending clothes. It can replace the hem of trousers, hide defects in outfits and seal cuts.
Instructions
To get an even cut, pull the thread along the entire length of the fabric and cut along the thread gap. There are some types of organza that are excellent at tearing, however, they may fray, so carefully iron this area, only lightly applying the sole of the iron to the fabric.
In order to evenly cut the edge of the organza, you need to pull the thread along the entire length of the fabric and make a cut along the gap from the thread. If your tulle has embroidery, it will not interfere; the elongated thread will still be visible one way or another. You can also pull the thread not along its entire length, but in small sections. For example, you can pull the thread up to a fragment of embroidery, and then the embroidery should be cut to fabric without ornament, then you can pick up the thread again and carefully pull it out. There is another option when organza tears beautifully. But when torn off, it begins to fray, so you need to carefully smooth it out, only lightly applying the hot sole of the iron to the fabric.
You may be interested in: How to sew a bow from fabric
If you were unable to hem the organza tulle in the way you originally intended, or some other sewing force majeure arose, then you can go for the emergency option and use a technical fold of the fabric of 10 cm. Sew along the fabric, and not along the tape, leaving a few lines - along the edges and in the center of the tape. Sew the ribbon to the organza tulle using two seams if the ribbon is not too wide, and three if the ribbon is quite wide. Fold the fabric at the top under the ribbon twice. Leave a small margin at the top if you want the gathered curtain to peek out above the ribbon.
Repairing torn clothes
To repair a cut fabric, you can use adhesive web and a piece of fabric of the same size. To do this you need:
- If necessary, process the edge of the cut, removing threads and irregularities.
- Align the edges and place the web and overlay on top. The overlay must be placed on the wrong side. If this does not hide the defect, it is better to use an applique or patch from the front.
- Iron carefully, being careful not to move the parts.
This simple method will help you perform minor clothing repairs and save you from trouble.
How to bleach tulle in a washing machine
Regular gentle washing in compliance with the basic rules, thorough rinsing and the absence of the harmful effects of high temperatures allows you to forget about the manipulation of bleaching yellowed or gray tulle - after all, washing in a washing machine is more effective than hand washing.
However, if you need to bleach the tulle, you can do this in a washing machine. The key to success here will be the correct choice of whitening products. When bleaching tulle, do not use products containing chlorine - this will destroy the fabric. Therefore, for curtains you need to choose:
Optical and oxygen brighteners are suitable for washing in washing machines. They can be added to washing powder if it is necessary to enhance the washing effect. If we are talking about very yellowed curtains, you can use the pre-wash or soak function.
If you are afraid to use bleach to wash tulle in the washing machine, you can use home remedies. Tulle is often bleached with salt - so you can put a couple of tablespoons of regular table salt in the detergent compartment and use it as a bleaching agent in the pre-wash mode. To enhance the effect, you can add a small amount of powder to it.
Instructions
You may be interested in: How to knit flowers
Make bastings along the entire length using large stitches. For an even hem, use pins. Attach them along the entire length, every 10 centimeters.
Iron the curtain. You need to iron on the floor, along the entire length, at the same time.
Hang the curtain. After it hangs for a couple of days, check its length and only then start hemming.
When sewing by hand, make hidden seams, sewing from the left side, from the front side, hooking one thread at a time. You can sew with small through stitches.
When hemming on a machine, loosen the presser foot and take small steps. You can sew a zigzag stitch along the edge. To do this, bend the curtain so that the hem is 3 mm, sew stitches by hand, then machine the seam.
You can make a seamless hem. To do this, buy a special tape (adhesive interlining). After cutting the desired length, iron it with an iron. Set the iron temperature according to the type of fabric.
Iron all stitched hems.