An unwanted dress length can ruin the mood of any girl. Be it festive or pleasure. When a problem needs to be solved quickly, and going to a tailor takes a lot of time and money, you can hem the dress yourself at home. However, this process causes fear and uncertainty.
In fact, if you study the recommendations and follow certain rules, this process will not take much time. If you are ready to take a risk and hem the dress yourself, then this article is for you.
Several ways to hem a product
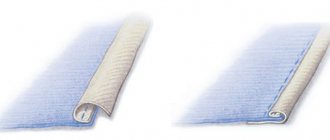
Double hem
The most common way is to fold the bottom edge, fold it again to the required width and sew with blind stitches.
Hemming with hem facing
Hemming is a fairly common way to hem a product. A separately cut strip of fabric makes it easier to hem products with a figured bottom edge (for example, scallops) or in case of insufficient length when cutting the product.
Hemming with cut edge
This method can be used for transparent fabrics or for double-sided products. It can be made using a ready-made edging or a strip of another material.
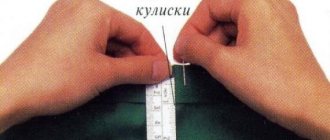
How to correctly mark the bottom line of a product
Before hemming the bottom, the product should “hang” for 24 hours, especially if the bottom cut is on the bias. After this, the product is tried on, making sure to wear shoes with heels, and the correct fit and fit are checked. To mark the line of the bottom of the skirt, you need the help of a third party who will measure the distance from the edge to the floor in a circle with a ruler. The bottom line is marked with chalk or pins along the entire circumference at the same distance from the edge to the floor. Then pin up the resulting seam allowance and check the hem while standing in a natural position in front of the mirror. The bottom of the product and the floor should be parallel.
Preparing the dress and necessary equipment
To hem the hem of the dress you will need:
- needle;
- threads;
- scissors;
- ruler;
- sewing pins;
- chalk pencil;
- iron.
Threads and needles must match the thickness of the fabric. Thick ones are used for dense fabrics, medium thickness ones are used for suiting, and thin ones are used for silk, chiffon, and chintz.
Before you start sewing, you need to prepare the dress:
- Smooth out the dress, try it on and decide on the desired length. If you plan to wear it with heels, then don't forget to wear them.
- Once you have decided on the length, take off your shoes and use a ruler to measure the length you need to cut. You may need an assistant in this matter.
- Remove the dress and turn it inside out. Place it on a flat surface and use a ruler and chalk pencil to measure the excess length at the hem.
- Next, draw a line along the hem along the marks.
- If you plan to sew with a hem, be sure to leave a few inches for it. To do this, draw another line below the first one. Otherwise the dress will be shorter.
- Carefully cut with scissors along the resulting second line.
Hemming and cutting the hem allowance
- Inside the hem, trim the vertical seam allowances to half the width to avoid excess density.
- Fold the hem along the marked bottom line and pin it across with pins at a distance of 5 cm from each other. Baste close to the fold.
- On the folded fabric, mark the width of the hem evenly. Trim away excess material. Along the edge of the hem, place a landing stitch 6 mm from the cut.
- Pull the ends of the threads, adjusting the hem until the edge lies flat. Finish the edge, press lightly and topstitch or hand baste.
Finishing the edge of a dress with a hem
When preparing the dress, do not forget to leave 3-4 cm for the hem. This is the standard length needed to finish the edge.
Double hem
A double hem is an easy way to finish the edge of a dress. Suitable for almost all types of fabric. It can be done either manually or on a sewing machine.
- Turn the dress inside out. Measure the height of the hem and add 1 cm.
- Fold 1 cm from the edge and iron.
- Fold the hem height and iron again. If you doubt that you will be able to sew evenly, then additionally sew the hems with thread.
- Sew from the inside with an even stitch on a sewing machine, retreating 1 mm from the edge of the hem.
If the hem height is large and the hem edge is wide, then make two lines. The distance between them must be at least 5 mm.
Video:
Using the “Moscow seam”
The Moscow seam is well suited for flared items, chiffon fabrics, and thin silk. It can only be done on a sewing machine. The technique is not easy, it requires skill and patience. The line must go straight.
- Use a machine to select a seam of 1.5-2 mm, no more.
- Fold the fabric from the wrong side by 3-4 mm, as little as possible.
- Sew with an even stitch 1 mm from the edge.
- Using small scissors, carefully trim off the excess hem.
When stitching, do not pull the fabric or pull it in front of the machine foot; it should flow freely. Otherwise, the product will go in waves.
Video:
Seam "Blind stitch"
A hidden stitch or a hidden hem helps to beautifully and accurately finish the bottom of the product so that the seam is not visible from the front side. The work is not easy, you will need a special foot for a sewing machine, but the effort is worth it.
- Prepare the dress, measure the required length, leaving 3-4 cm + 1 cm for the hem height.
- Overcast the raw edge or stitch with a zigzag stitch.
- Iron the hem and turn the edge on the wrong side so that the overturned part of the hem protrudes 4-5 mm.
- Machine stitch from the wrong side along the very edge of the fabric.
Video:
Hemming with open cut
One of the most common seams. Performed on a sewing machine.
- Measure the required length, leaving 2-3 cm in reserve.
- Sew the raw edge using an overlocker or zigzag machine.
- Make a fold and iron. If you are not sure that you can stitch evenly, secure with pins.
- Sew an even stitch over the finished edge.
- When finished, remove the pins and iron again.
Hem seal
To ensure that the hem line does not stand out from the front side of the product, the hem can be made denser. This technique maintains the shape of the hem and is often used on professionally tailored clothing. The seal is cut out on a bias 5 cm wider than the hem allowance and fixed before folding the hem.
- Mark the bottom line with a basting line. Trim the allowance and finish the cut. The sealant strips must be cut so that the ends overlap diagonally.
- Use pins to secure the seal and the wrong side of the product. The bottom edge of the seal should be 2.5 cm below the marked hem line.
- Fold the hem along the marked line. Pin it. Baste close to the cut. The seal should protrude 2.5 cm above the edge.
- Sew the hem with a goat seam, catching only the seal with stitches.
Using adhesive tape
Adhesive tape or web is a godsend for those who do not know any sewing techniques and who do not have a sewing machine. With its help you can hem trousers, curtains, dresses, skirts. Suitable for thicker fabrics and non-flared items. The method is quite easy.
- Prepare the dress by measuring the desired length. Leave 2-3 cm for hem. Cut off the excess edge.
- Pin the hem with sewing pins and iron.
- Take the adhesive tape and measure the required length. You can cut it into small pieces or take a long one at once.
- Place the web inside the hem, and fold the raw edge and secure with pins. Make sure that the adhesive tape does not show through.
- Iron well, pressing the iron against the fabric using steam. Hold the iron for a few seconds to release the glue.
- Remove the pins and go through the iron again.
In this technique, the main thing is not to overexpose the iron so that the adhesive tape does not overheat, otherwise it will deform the fabric.
Disadvantages of using adhesive tape:
- not suitable for thin fabric, because the web adds rigidity due to the hardened glue, and on thin clothes it will bulge;
- When ironing, a tape mark will appear on the front side;
- This method is short-lived; after washing, the tape will come off over time.
Finishing the bottom with bias tape
What you will need
- Needle and thread matching the fabric
- Straight stitch and other stitches
- Straight stitch foot, utility foot or bias tape foot
Bias tape is a convenient material for processing cuts, which also serves as a decorative element.
Bias tape
Bias binding is a finishing element, a ribbon of woven material, cut obliquely, that is, at an angle of 45° to the warp threads. This gives it some stretch (pull the ends of the bias tape and it will stretch).
Bias tape is sold in sewing stores, most often ironed on the edges. There is a wide selection of plain and patterned trims on sale. You can make bias tape yourself by cutting a ribbon of the desired width from the fabric you like.
If you want to iron the edges on it, get a bias tape maker (pictured right): using this and an iron, you can prepare the bias tape by ironing the edges in one motion.
Bias binding with visible seam
Without a special foot, you can sew bias tape in two stages:
- On the wrong side of the piece, pin the bias tape with pins, placing it right side on the wrong side of the fabric, stitch along the fold (photo 1). Fold the binding over the front side of the piece and press before pinning;
Photo 1
- From the front side, sew a stitch through all layers of material, moving along the hem line of the binding (photo 2).
Photo 2. On the front side, the bias tape is stitched at a distance of 1 mm from its hem
Sewn bias tape
Processing with right angle bias tape
Scheme for attaching bias tape
Use a clear multi-purpose foot that gives you a clear view of where the stitching is going. Determine at what distance from the edge the stitching will run (a in the diagram): maintaining this distance will ensure accurate processing of the corner.
Stitch the bias tape along the first side of the corner, placing it facing the face of the piece and aligning the edges of the tape and the piece. Stop the stitching at the specified distance from the edge (diagram 1).
Bend the bias tape outside the part at an angle of 45° (Diagram 2). After this, bend the binding back - facing the front side of the part, aligning the edges of the binding with the edges of the part (Diagram 3).
Sew along the second side of the corner, placing the needle at the set distance from the edge.
After making the stitches, bend the bias tape to the wrong side of the piece and straighten it so that you get a neat right angle on the wrong side as well.
Finish by sewing a stitch over the bias tape, through all layers of material underneath.
Sewing bias tape using a special foot
Regardless of whether you made the bias tape yourself or bought it ready-made at the store, a special foot for it will make your task easier. It will allow you to process even a very long edge with trim in one step.
Bias tape sewn on using a bias tape foot
A standard foot for bias tape is suitable for stitching it; the width of the tape when already sewn is 6-10 mm.
Bias foot
On sale you can find feet for bias tape with adjustment: using a wheel, you can adjust the width of the groove to the width of the tape being sewn.
Adjustable bias tape foot
The operating principle of all these feet is the same: they have a groove into which you need to insert the tape so that it is just under the needle.
How to insert bias tape into the groove of the foot?
Use tweezers or the tips of scissors. You can also make a few stitches on the edge of the binding, leaving thread ends of about 10 centimeters at the beginning and end of the stitching. Then pass these threads through the foot and insert the bias tape into the groove, pulling the ends of the threads so that the tape is under the needle. If you're using homemade bias tape, you can fold it in half and iron it to make it easier to insert into the groove of the foot.
Place the bias tape under the needle and adjust the needle position so that the stitching is a few millimeters from the left edge of the tape. Pass a few centimeters of the binding behind the foot to make it easier to move forward at the beginning of the stitch.
Insert the workpiece into the groove of the presser foot until it touches the sole of the presser foot: the fabric will be sandwiched inside the bias tape.
Bias tape inserted into the groove with thread at the end
Lower the presser foot and choose a stitch: straight, zigzag or even decorative. Sew the stitch, holding the fabric at the beginning and end. As you sew, make sure that the edge of the fabric lies inside the bias tape.
Processing several layers of fabric with bias tape
If you want to sew bias tape to several layers of fabric at the same time (for example, to the main fabric and the lining), first join the layers with a zigzag stitch, and then apply the tape to them using a special foot.
Using the Bias Foot on Curves
The movements of the hands must be coordinated: the right one holds the bias tape and guides it so that the stitching goes as needed; the left one places the fabric inside the bias tape and pushes the fabric through the sharpest curves. Sew slowly, reducing the stitch length of the straight stitch depending on the amount of bend.
Using the Bias Foot on Corners
To sew a corner with a bias tape foot, stitch to the top of the corner, secure it, lift the presser foot, and release the fabric in a forward motion, moving the bias tape inside the foot so that it doesn't slip out (Photo 1).
Photo 1
Trim the threads and use your fingers to fold the bias tape so that it fits neatly along the corner on both the front and back sides (Image 2).
Photo 2
Place the edge of the fabric into the foot again - inside the bias tape - so that the corner is under the foot. To do this, pull the bias tape towards you. Lower the presser foot and backtack before starting stitching (Image 3).
Photo 3
Corner finished with bias tape
Processing with bias tape using a seam “in the groove” on the front side
This method of attaching bias tape gives the piece a cleaner look with an invisible seam.
The first stitch is made on the binding and the piece, right sides together: make a straight stitch, following the fold line of the binding (photo 1).
Photo 1. Part after completing the first line
Then press the seam allowances and fold the bias tape over to the wrong side of the piece. Secure it with pins from the front side along the groove from the first line (photo 2). Make sure the pin catches the binding from the wrong side. If this is not the case, fold the hem slightly along the edge of the bias tape to increase its width by 1-2mm.
Photo 2. The right side of the piece, pinned together, before sewing the second stitch along the bias tape.
Set the hem foot or blind hem foot and stitch in the groove (see diagram) to secure the bias tape (Image 3).
Photo 3. Fixing the bias tape with a seam “in the groove”
Making ties
To transform bias tape into ties, use the bias tape foot: insert the tape into the foot without fabric. Join the edges of the bias tape with a straight stitch along its length until you get the desired length of ties.
Connecting two bias tapes
To maintain the elasticity of the two bias tapes after joining them, they need to be ground on the bias.
If the edges of the binding are pressed, open them with an iron. Place one piece of tape perpendicularly over the other piece of tape, face to face. Pin and draw a diagonal line, as in photo 1. Run a straight stitch along this line.
Photo 1
Trim off excess fabric (photo 2) and press seam (photo 3).
Photo 2
Photo 3. View from the inside: two bias bindings are connected with a seam along the bias
Do not glue the bottom of the skirt with cobwebs
You can buy a special adhesive web at a sewing accessories store. It has glue applied on both sides, and it is specially designed for fixing the hem of the bottom of a skirt, trousers and other technological sewing operations. Indeed, it is convenient and fast, and most importantly, you can easily fix any hem. You can use this web in some cases. But most often you don’t need to use it to hem a skirt. First, the web can imprint the hem onto the right side of the skirt fabric. Secondly, the bottom of the skirt will become “harder”, since after heat treatment the adhesive hardens. And thirdly, low-quality spider web very quickly loses its adhesive properties after several washes.
Therefore, if you want to hem a skirt with high quality, master the technique of making a blind seam. Also try making a Moscow seam on a piece of fabric; perhaps this is the type of treatment for the bottom of the skirt that you will like best.
In this video you will learn how easy it is to make a skirt pattern for a girl directly on the fabric. The technology of sewing a children's skirt with an elastic band instead of a belt is also shown.
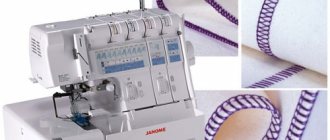
Processing the bottom with a shell seam
What you will need
- Needle and thread matching the fabric
- Invisible stitch or overlock stitch 4mm wide
- Satin stitch foot (for satin stitch) or universal
Janome Satin Stitch Foot
A shell seam is a slight hem of the edge, finished at intervals with overlock stitches that tuck it slightly toward the stitching. This treatment is great for knitwear, silk and other soft fabrics.
Prepare the fabric by basting the edge and making a hem no more than 1 cm wide. Do not stitch yet.
Select an invisible hem stitch (or any similar stitch) and, if the machine allows it, adjust the stitch width to 3mm with an overlock stitch repeated every 6-10mm. Install the presser foot. A mark on the foot will help guide the stitching along the edge so that the needle catches the fold. If the needle goes past the fold, the “shell” will not work.
Here one of the overcasting stitches did not hit the fold of the fabric: a “shell” did not form in this place
If the overcast stitch does not fold the edge under enough, try changing the upper thread tension so that the edge rises more toward the stitching.
When using a satin stitch foot, you need to align the edge of the fabric not with the red arrow in the middle of the foot, but with the branch of the foot
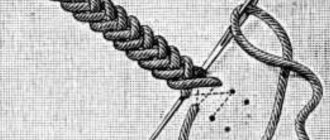
The Moscow seam is used for hemming
For example, I made a Moscow seam by hand and with different threads. You need to perform these operations on a sewing machine. All operations are performed on the wrong side. The first hem is placed at 0.2 and secured with a stitch. Then this hem is folded one more time (on the wrong side), approximately 0.3-0.4, and a finishing stitch is given at 0.2. This way, you won't need to overcast the hem of your skirt and prevent it from fraying during washing. See also Types of machine seams.
This is a rather complex type of processing of the bottom of the skirt, but it is indispensable when hemming circle skirts and other types of skirts cut on the bias. But, still, I would recommend simply overcasting the edge, turning it over and stitching, as shown in the top photo.
How not to hem a skirt
This is the method that beginners usually use. But besides the fact that this is too primitive a method, it is also too noticeable. After you iron the skirt, the hem will be “stamped” on the right side of the fabric.
This seam is called a “goat” stitch. It’s quite a decent way to hem a skirt, but very outdated. Used by our grandmothers at a time when overlock could only be seen in the studio.
And this is not even a way, they just hemmed the skirt as best they could. Such hemming will lead to the fact that the thread will soon break and you will have to hem the skirt again with a high-quality, invisible and neat hidden seam.
Necessary materials and tools for sewing
What you need for sewing:
- Ideally, you need an overlocker; it will carefully trim the fabric and overcast the edge of both thick and thin fabric. In the absence of one, we use a sewing machine with a narrow zigzag stitch.
- Threads in tone, as well as contrasting ones, for marking.
- A comfortable, thin, sharp needle for hand sewing, indispensable for all types of hand stitches.
- Sharp scissors.
- Chalk or soap.
- Pins for fixing the hem.
- Special machine double needle. Used for knitwear.
Sewing tools
How to hem a dress by hand
"Blind stitch" by hand
Above we described how you can make a “Blind Stitch” on a sewing machine, but there is an option to do it manually. Start at the seam of the dress to secure the thread and hide the knot.
- Prepare the dress, measure the required length, leaving 3-4 cm + 1 cm for the hem height.
- Make a hem, iron and baste with thread.
- Turn back the edge of the hem by 3-4 mm.
- Insert the needle under the hem, catching 1-2 threads.
- Make the next stitch on the hem.
- Take a step forward and stitch under the hem again, catching no more than 2 threads with the needle.
- Repeat steps along the entire hem.
- Do not tighten the thread too much, otherwise the fabric will wrinkle.
Video:
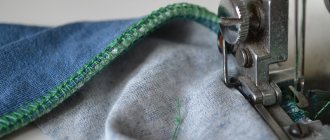
"Goat" for knitted fabrics
Not all sewing machines are capable of stitching knitwear evenly; the “Goat” technique is perfect for this fabric. The work is done from left to right, but the needle should be inserted from right to left.
- Fold the edge of the dress, secure with pins, and iron.
- Prepare a needle and thread. It is better to start from the seam of the dress to hide the knot of thread.
- Fix the needle from the edge of the hem by 3-4 mm.
- Taking a step to the left, insert the needle under the edge from right to left, hooking 2 threads.
- Then we take a step to the left again and, retreating 3-4 mm, insert the needle from right to left.
- In this way, go along the entire edge of the hem of the dress.
- The seam should look like a cross.
- Do not pull the thread or take a large step so that the seam is elastic.
Video:
Processing the bottom with piping
What you will need
- Needle and thread matching the fabric
- Straight stitch
- Straight stitch foot or groove stitch foot
The piping technique is often used for quilts, but it can also be useful for finishing other home decor and clothing items.
Straight edging
Cut the tape in the direction of the weft threads, not on the bias. To determine the height of the rectangle to be cut out, add a seam allowance (1 cm or 0.5 cm) and 0.5 cm for the fold to the desired width of the finished edging (as viewed from the front side), and multiply the resulting value by 2:
- h - height of the rectangle being cut out
- a is the width of the finished edge
- seam allowance - 1 cm
- fold allowance - 0.5 cm
h = (a + 1 + 0.5) x 2
The length of the tape must exceed the length of the edge of the product. Fold the ribbon in half lengthwise with the wrong side inward and iron the fold.
Place the tape on the workpiece face to face. Starting from the center of the piece (this will make it easier to connect the piping parts), align the edges and sew a straight stitch.
If you need to add another part of the edging, stop the stitching 5-10 cm from the end of the edging to make the further task easier. Connect the ends of the piping pieces in the same way as connecting two bias tapes.
Having made the first line, bend the edging outward using an iron and lay it on the wrong side of the part. Pin along the groove of the first seam (Photo 1).
Photo 1
Place the seam foot “in the groove” and stitch from the right side to secure the folded edge (Image 2).
Photo 2
Corner edging
Here's how to proceed if the product has right angles. Sew the first stitch: As you approach the corner, stop just short of the edge, at a distance equal to the width of the seam allowance. Release the product from under the foot and bend the edging in the same way as when processing a corner with bias tape.
Align the edge of the edging with the other side of the corner, continue stitching from the edge, holding the edging. When bending the piping to the wrong side of the product, straighten the corner with your hands and grab it with a clothespin until you fix it with a seam “in the groove”.
A clothespin holds the corners until they are secured with stitching.
Finished corner
If the piece being piping has multiple layers, use a walking foot or set the machine to double feed to make it easier to sew the edging and feed all layers of fabric.