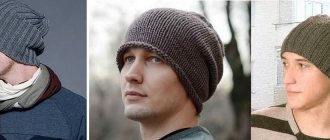
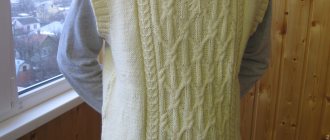
A wonderful knitted model for fashionistas is a knitted sweater with batwing sleeves. This year's fashionable knitted sweaters have a wide “flying” sleeve, a “kimono” sleeve, a flashlight sleeve, a cowl collar, a stand-up collar, and a golf neckline. That is, both wide and high knitted collars are in fashion. Oversized women's sweaters, ponchos, crop sweaters and pillowcase pullovers remain trendy.
In a word: among the leading models: hand knitting, volume, femininity, and most importantly - convenience and comfort. We offer 20 of the most interesting MKs with patterns for women, all models are laid out taking into account increasing complexity.
Yarn calculation
In order not to buy extra yarn, you need to make a calculation. To do this, you need to knit a “sample”, thanks to which we will calculate the sweater. We put 10 loops on the knitting needles and knit 10 cm with the main pattern with which the jacket will be knitted. The result is a square - a sample with which we will calculate the necessary loops and rows. We take some of our own sweaters similar in size to the one we will knit.
Applying the “sample” to the jacket, we measure how many cubes we get. Once we know the quantity, we need to calculate how many threads are spent on the “sample”. Usually the length of the thread is indicated on the skeins; you just need to calculate it. Thus, we found out approximately how much yarn we need to buy. At first glance, this procedure will seem boring and uninteresting, but at the end of the work you will be satisfied with the result. Your product will not be small or large, it will not have to be unraveled and bandaged.
Selection rules
The non-standard appearance of this product requires a competent approach to choosing a model and careful fitting before purchasing.
It is very important to make sure that the length of the sleeve and the item itself is ideal for a particular body type and fits harmoniously into the overall style. Often such things have asymmetry, which also requires mandatory fitting.
Choosing the right model depending on your body type:
- complete _ For those with a plump figure, products made from smooth, not too bulky or large yarn, in delicate tones of pink, beige or pearl, are suitable. The most optimal length in this case is a medium or slightly elongated version just below the hip;
- slender . Slender fashionistas can choose original products with high-fitting cuffs and large thick knit. Fashionable colors for slender ladies include pearlescent, pink, beige and milky tones;
- “rectangles” and “inverted triangles” . For girls with a fragile figure and sharp angular shapes, this style is simply perfect, correcting physique flaws and emphasizing their advantages. An option in a bright color with a round neckline will successfully decorate such a figure, adding femininity and volume to the silhouette;
- universal style . The style, which suits most women of any age and any shape, has a light color palette, medium knit and 3/4 sleeves. This item looks especially impressive in combination with an undershirt or blouse in a classic style.
Most products of this type have a long sleeve, however, some models may have a shortened 3/4 sleeve. This option will fit well into a romantic or everyday outfit, decorating the figure with its tenderness and unique appearance.
Often such sweaters have an original patterned knitting, which adds an exotic look and a touch of vintage ethnic style.
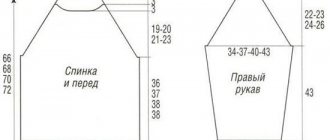
Patterns and descriptions of knitting sleeves of the “bat” pattern
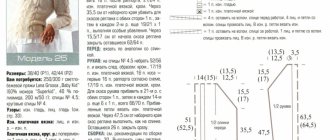
We begin work by knitting the back, as indicated in the diagram, the arrows indicate the direction of work. We cast on 95 loops on straight knitting needles, knit with an elastic band of 5 cm and another 7 cm, switching to the main knitting “tangle”, in total we get 12 cm.
After the work has reached 12 cm, we move on to knitting the batwing sleeve. To do this, on both sides we add 1 loop in every fourth row 10 times. Continuing to cast on loops, in every 2nd row, add 1 more loops 17 times. Now we cast on loops for the sleeves, make additions on both sides on the front rows, adding 2 times 2 loops, then 4 more times 3 loops and 1 time 4 loops. To make a new loop, you can use two methods. Wind the thread onto a knitting needle by taking it from a skein, or grab it and pull it from the previous row. All added loops amounted to 193.
When we have cast on a large number of stitches, the work no longer fits on the knitting needles, now we need to transfer it to larger knitting needles, for this we will take round knitting needles on a fishing line 100 cm long. We will start knitting a new row with circular knitting needles and gradually transfer all the work to them. Then, if necessary, we can again switch to straight knitting needles.
The history of the appearance of airy and flowing sleeves on world catwalks
The period of the Second World War, the 1940s were marked by the appearance of the “batwing” cut. It became popular for a number of reasons:
- ease of sewing;
- using a rough type of fabric.
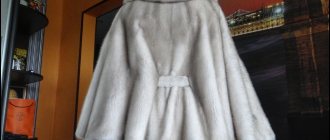
Bat dress
Additional information! Fashion historians pay attention to the appearance of the outfit. Naming the source of the change - the Japanese kimono dress.
Initially, the product was a tunic with wide sleeves and a belted belt.
In the 1980s, the dress gained particular popularity among the fairer sex. Wide, flowing sleeves are loved by girls of all ages and body types. During this period, designers developed a style that emphasized all the advantages of a woman and masked flaws.
In 2021, the style is used for sewing dresses, tunics, blouses, and sweatshirts. Media personalities often wear items of this cut.
Product from the 1980s
Knitting bat-shaped sleeves
We continue to knit without adding another 14 cm (44 rows), after which we proceed to bevel the sleeves, knitting the shoulder. To make the bevel of the shoulder of the sweater even, we close on both sides in each 2nd row 5 times with 7 loops, and in each 8th row with 6 loops. To cut the neckline, you need to close off the remaining 27 loops, knitting them two at a time, until there are none left.
We knit the front part of the sweater in the same way as the back, but we make the neckline deeper and rounder. To do this, when there is a 3rd decrease in the sleeve-shoulder, you need to close 17 central loops. We finish both sides of the work separately. To make the neck round and beautiful in shape, close each 2nd row 2 times with 2 loops and 1 time with 1 loop.
Pullover pattern with dolman sleeves
To sew a pullover you will need:
- Wool fabric 2.3 m * 1.4 m,
- Fabric on cuffs and neckline.
- Threads, scissors and pattern.
You can download the pullover patterns below. There are 5 sizes in the PDF file: XS = red, pink = S, Blue = M, L = Turquoise, Green = XL, XXL = ocher. Size chart below.
How to sew a pullover
Pullover Size Chart
Download the file, print it in full size (100%), glue the sheets together and cut out the pattern.
Assembling a sweater
Before sewing the parts, you need to steam them well. To do this, heat the iron well so that there is a lot of steam. The product is not ironed, but steamed. You need to make sure that all edges are carefully straightened. When the individual parts have been steamed, we begin sewing the seams of the sleeve and shoulder, using a darning needle. You can stitch the edges on a sewing machine, grabbing them along the very edge. To process the collar, along the edge of the neck we cast on 84 loops on circular knitting needles, knit with an elastic band of 7-10 cm, after which we close all the loops. The elastic band looks beautiful with alternating 2 loops of front and back.
OK it's all over Now. Your dolman sleeve sweater is ready! As you can see, even beginners can knit such a product. Below are ideas for knitting sweaters and half-overs with bat-shaped sleeves. You might like them better.
Video: sweater for beginners, bat
Models
Having understood the principle of making the classic model of the product under study, it will be possible to make a more effective or unique version.
However, at the planning stage, it is important to remember that the product itself has a highlight and attracts attention. The needlewoman’s task is not to overload it. Otherwise, the image you will get is not a bat, but a magpie.
THEREFORE, IT IS RECOMMENDED TO ADD ONLY ONE UNUSUAL DETAIL - LACERY SLEEVES, BEADS ON THE CELL LINE, INTERESTING YARN, PATTERN OR SOMETHING ELSE - AT THE CHOICE OF THE NEEDLEMAN.
With long sleeve
The “Bat” sweater is knitted using knitting needles (the pattern shown in the article) taking into account the season of wear. And we are talking not only about the yarn used, but also about the length of the sleeves. So, for autumn and winter you need a warm product. Therefore, it is better to complement it with wedge-shaped sleeves up to the wrist.
Principle of operation:
- A short sweater will look ridiculous - out of season. Therefore, the back and front are knitted according to the description for the standard version discussed above.
- To make sleeves, you need to measure the length and calculate the number of decreases.
- Then connect the parts taking into account the specified parameters.
- Finish knitting. If desired, you can decorate the product.
Short-sleeve
For spring and summer, it is wiser to make a cropped sweater. But so that the intended product does not lose its flavor, it is better not to make the sleeves shorter than the elbow. Ideally, the cuff should be positioned in front of this part of the arm.
The execution technology is simple:
- The back and front are knitted in such a way as to form a trapezoid. The instructions are presented in one of the previous paragraphs.
- Then, using a hook, the sleeves are picked up. You can start from the bottom edge, and decorate the finished product with an elastic band. Better than a single one - it will look more gentle.
- The features of tying decreases are already known; it is just important not to get confused in the calculations.
- The finished jacket is turned inside out and sewn on the sides.
- All that remains is to knit several rows with an elastic band along the lower edge of the sleeves and base.
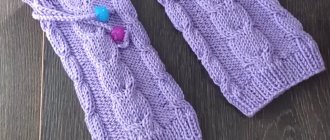
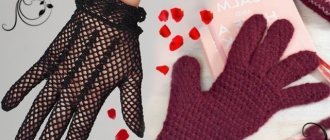
Openwork
If you want to look not only beautiful, but also feminine, you should knit such a model. It is better, of course, to use thin threads for the warm season. Although in winter you will be able to look impressive if you work with mohair, angora, merino wool, and wear a turtleneck underneath so as not to freeze.
If you want to make a unique product, you can think through the openwork yourself - the number of decreases and increases should be the same in each row, the front and back sides are also important to strictly observe.
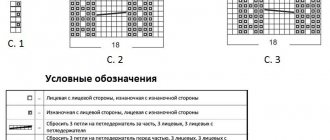
For example, for 8 loops the pattern could be like this:
| Number of loops | 8 | |
| 1 row | Edge, knit, 2 together, 2 knit, 1 yarn over, knit, edge | Total: in the row, 1 loop is first closed (2 together), and then restored (1 yarn over). |
| 2nd row | Purl only | All hinges are in place |
| Subsequent rows | Repeat pattern | |
By smell
The “Bat” model does not have to be an independent product. As an option - an unusual jacket or sweater with a scent.
To do this, you should:
- Knit the back, bind off all the loops, cut and hide the thread.
- Calculate the number of increases: (½ hip circumference - 40) / rows from shoulder to bottom edge. Round.
- Next you need to cast on 20 loops. Knit, adding loops, according to calculations.
- When there are 20 rows left to the end, finish decreasing and knit evenly. In this place (on the side) you need to pick up loops and make a tie.
- By analogy, but mirror the second shelf.
- Connect the front and back at the shoulder seams.
- Knit the sleeves.
- When connecting the product along the side seams, leave a slot on one side for pulling the tie through.
There is nothing difficult about knitting a “Bat” sweater. But first, you need to determine the season of wear, choose a convenient tool and suitable yarn, sketch the idea, take measurements and make simple calculations.
If you outline a clear action plan, you won’t have to redo the same thing several times. Then not only the result, but also the creative process will bring great pleasure.
How to sew a tunic with a batwing sleeve: master class
Take your favorite blouse as a sample, for example a logsleeve or a pullover that fits in size. Fold it in half and place it on the paper. Fold the sleeve a little, as shown in the photo.
How to sew a bat tunic
Then simply outline the top of the product, and draw the batwing sleeve at the bottom. Extend the products slightly downwards. Be sure to make indents for seam allowances.
Bat tunic pattern
Transfer the pattern to the fabric and cut out. Sew the seams on the sleeves, as well as the side and shoulder seams.
Transfer to fabric
Measure the width of the bottom and sleeves. Prepare strips of fabric of the appropriate width, as shown in the photo.
We measure the width of the tunic from below
Measure the width of the sleeve from the bottom
Cuffs and lower part of the tunic
Sew the cuffs and bottom of the tunic.