- 15593
- 13-10-2020
- Author: Mysekret Team
- 1
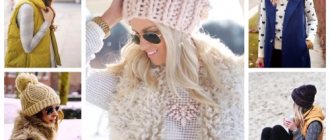
Gloves are a beautiful and useful thing. They can not only warm, but also decorate, make the image more sophisticated, calm, or vice versa - bright, catchy. Crocheted gloves offer a particularly wide variety of models for all seasons and occasions, which create worthy competition for models created with knitting needles.
It is due to this method of execution that gloves can turn out to be both dense and textured, and very thin, openwork. Of course, the deciding factor will be the yarn you choose - it is responsible for the warmth, thickness and degree of delicacy of the product. Such a variety of knitting possibilities allows you to get equally beautiful gloves for women and girls, comfortable and practical gloves for children, and warm gloves for men.
Crochet gloves: diagrams with description
Let's take a closer look at the most common options for crocheting gloves, including a method of crocheting products for beginner needlewomen. We will also learn how to crochet mitts - fingerless gloves, and we will analyze in detail the methods of knitting men's, women's and children's gloves.
See also...
✅ How to crochet mitts: instructions for beginners
✅ How to easily knit a backpack for September 1st
✅ How to knit mitts with knitting needles: step-by-step guide
✅ How to crochet a blanket: detailed instructions
Model for beginner needlewomen
Crocheting gloves provides the opportunity to create fairly thin, but dense and warm products. Let's try to create one of these, while performing a simple pattern of the same type.
Crocheting gloves for beginners starts with determining your hand measurements . You can do this as follows: trace your palm with a pencil or pen on a sheet of paper. Now, in accordance with the diagram, we measure the following indicators:
A
- the width of the palm at the base of the fingers (the approximate width of our glove);
B
- distance from the base of the palm to the bend of the thumb;
C
is the distance from the base of the palm to the tip of the middle finger (glove length without cuff);
D
is the distance from the base of the palm to the base of the little finger.
Materials for work:
- jersey;
- hook No. 2.5.
Progress
We collect a chain of chain loops equal in length to the circumference of the wrist + 1 cm to freely put on the glove. We connect the chain into a ring with a connecting post and to start knitting the first row we make 3 lifting air loops.
We knit the first row st. s/n and finish the row with a connecting loop in the last lifting loop. Next, to knit the second row, make 2 air lifting loops and knit an elastic pattern, alternating convex and concave relief columns. Finish the row with a connecting loop. Knit the next rows of elastic in the same way as the second. The cuff of the glove, knitted with an elastic pattern, can be of any width from 4 to 6 cm at your discretion.
Then we move on to knitting the main part of the glove. We knit the glove in half columns in circular rows in a spiral, that is, we do not make lifting loops, then the seam of the initial loops of the row will not be visible.
For yourself, mark the sides of the glove where the thumb will be located and where the little finger will be located.
Having connected 2-3 circular rows with half-columns along the side near the side of the thumb, we begin to make additions to expand the wedge of the thumb. To do this, in the next 5-7 rows, add one half-column at a time, knitting two from one loop.
When the height of the knitting reaches the base of the thumb in the last row, without tying 6-7 loops to the edge, we pick up a chain of 8-9 chain loops and fasten it into the arch through 12-14 loops of the previous row. This creates a hole for the thumb, which is knitted last.
Next, knit the main part of the glove in circular rows until the beginning of the little finger. Do not break the main working thread, but after knitting to the side of the thumb, pull out a large loop so that the knitting does not unravel.
Before you start knitting the fingers of the glove, calculate the loops for each finger. You can identify them by trying on the glove and noticing the loops on the inside and outside. To knit the little finger, attach the thread from the palm side, make 3-4 air loops and attach the arch to the back of the glove. Next, knit half columns in a circle to the height of your little finger.
Closer to the tip, make decreases on both sides of the finger to narrow it. When you have knitted your finger to its full height, close the loops by knitting single crochets in a circle - one of the two loops. When the hole narrows, cut the thread and secure it by pulling the tip through the loop. Insert a needle into the remaining tip of the thread and mend the remaining hole, thread the thread on the wrong side.
If you look at your hand, you will see that the fingers are located at different heights - the first little finger, the index finger a little higher, and the middle and ring fingers at the same level. Therefore, after knitting the little finger, return to knitting the main part of the glove. Taking the remaining thread to work, knit one circular row with half-columns along the inside, the arch at the base of the little finger and the outside of the glove. Now you can knit the ring finger. Attach a new thread to the inside, tie a chain of 4 chains. loops and secure the arch on the outside (photo 1).
Knit half stitches to the height of your finger, narrowing it at the top, making decreases along the sides. Finish the knitting in the same way as on the little finger - make decreases by knitting two single crochets together until the opening narrows to a small hole.
Take back the remaining main thread and knit one round row through the arch of the ring finger. Next, attach the thread for knitting the middle finger. If you get a large hole for your finger at the base, then make decreases in the corners, knitting two half-stitches together (photo 2).
Knit the index finger with the thread left from the main part of the glove. Attach the thumb yarn and knit in the round in half stitches, decreasing at the corners first, knitting two half stitches together until the hole is equal to the diameter of the finger. Next, knit it to a height and narrow it with single crochets.
The glove for the other hand is knitted in the same way, but in a mirror image. The back part can be decorated with a knitted flower or embroidery.
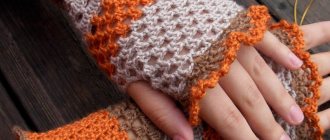
Fingerless gloves
Very popular nowadays, fingerless gloves, also called mitts , allow you to drive and use the phone quickly and without discomfort. In addition, the process of knitting this model is much simpler than knitting simple gloves - because here you do not need to work with each finger separately. There are many varieties of mitts , as they are knitted for both the summer and winter seasons. Let's take a closer look at how to crochet fingerless gloves, which look very impressive in the autumn and winter.
Materials for work:
- yarn “ADELIA Jessica” (67% wool, 33% polyester, 260 m/100 g);
- hook number 3.
Progress
First, you need to make a chain of air loops of such length that, folded in half, four fingers can easily fit into it. We will knit the mitt from top to bottom - from fingers to wrist. Let's close the chain into a ring using a connecting stitch, knit two chain stitches and then three rows of single crochets (photo 1).
Next we move on to knitting with lush columns. A lush stitch is three or more “under-knitted” double crochets, knitted in one loop at the end. In this case, the lush columns consist precisely of three “incomplete” double crochets. To make a fluffy stitch, we make a yarn over, insert the hook into the loop of the previous row and pull out the thread. We knit the thread into the resulting loop and yarn over (photo 2).
There are two loops on the hook. Let’s yarn over again and again “loosely knit” a simple double crochet (photo 1). There are three loops on the hook (photo 2). Let's repeat everything again - there are four loops on the hook (photo 3). Finally, we knit all four loops at the same time (photo 4). The lush column is ready!
We knit three rows of puffy stitches, then three rows of single crochets, then two more rows of puffy stitches. In principle, the alternation of different knittings can be anything - it all depends on the taste and desire of the knitter.
We have come to the base of the thumb. We knit a chain of fifteen air loops and attach it with a connecting post to the main knitting four loops from the beginning of the chain. Let's try on the mitt - the thumb should fit freely into the hole intended for it. If the hole is smaller or larger than you need, change the length of the chain (photo 1).
Let's continue knitting in the circle with single crochets - only the row has become longer by fifteen (in this case) loops. Here it is more convenient to knit in a spiral, without lifting loops (photo 2).
Having knitted two rows with single crochets, we begin to make decreases. It is best to do them this way: evenly decrease four loops in a row - knit the next row without decreasing - decrease four loops again - knit the row again without decreasing. There are four rows with decreases in total. Having finished decreasing, we will knit another four to five rows without decreasing. Let's complete the knitting with five rows of embossed stitches.
The details remain: the upper part, like the hole for the thumb, can be decorated next to a picot, having previously knitted two or three rows of single crochets. We knit the second mitt in the same way as the first. A pair of fingerless gloves is ready!
How to knit men's gloves
As a good gift for a loved one, you can crochet men's gloves. This will not take much time and effort, especially if you work according to the master class on crocheting gloves. In this case, we will talk about beautiful gloves that will look great in a monochromatic, moderate color scheme, preferably black, gray, dark blue.
To begin with, you should also trace the outline of a man’s hand on paper, or measure his old gloves.
Materials for work:
- thin acrylic or wool blend yarn;
- hook No. 2-2.5.
The gloves are knitted in the transverse direction from the little finger to the thumb. One glove consists of two parts: the back with four knitted fingers and the inner with a knitted fifth thumb. We sew the finished halves of the glove together; finally, tie the cuff along the bottom with an elastic band made from embossed columns.
Progress
Cast on the initial chain of chain stitches from the beginning of the cuff to the tip of the little finger according to the pattern. Next, knit rows in single crochet stitches the width of your little finger. Start each new row of columns with one lifting air loop.
When knitting single stitches towards the fingers, knit to the base of the ring finger and cast on a chain of chain stitches up to the tip of the ring finger.
Next, knit rows of st. b/n the width of the ring finger. Also knit the middle and index fingers. The back of the glove ends after the index finger is knitted.
The inner half of the glove is knitted exactly the same as the back half up to the middle finger. At the beginning of knitting the index finger, in a row of stitches in the direction from the cuff to the fingers, tying the stitches to the base of the thumb, cast on a chain of chain stitches equal to twice the length of the thumb. Close the chain into a long loop, continuing to knit stitches in a row to the base of the index finger, then cast on a chain of chain loops to the length of the index finger.
Work several rows of single crochets, first along the index finger chain, along the wrist row to the thumb loop, then along the thumb chain and then to the cuff. Having turned the work, knit the stitches in the opposite direction until you have knitted strips the width of your index finger and thumb.
Place the two halves of the glove, the back and the inside, together. You can connect them by crocheting a row of connecting posts along the contour or simply sewing them with a needle; also sew the sides of the thumb. Turn the sewn glove over to the other side so that the seam is on the inside.
Along the bottom of the glove, first knit a row of double crochets, then two rows of embossed stitches, alternating convex and concave. Knit the second glove in exactly the same way, only when sewing, place the pieces so that the thumb is on the other side.
How to knit openwork gloves for a woman
Adding gloves to your wardrobe is always a great idea, because they warm your hands and complete a woman’s look in the cold season. Even needlewomen without much experience can do this with their own hands; you just need to select a detailed knitting pattern with a description. Let's look at how to create openwork crocheted gloves with step-by-step photographs.
We take measurements
Using the hand measurement method indicated at the beginning of the article, we determine the size of future gloves. Now you need to calculate the required number of loops. Usually, in descriptions of knitting gloves they mention how many loops are contained in a 10*10 cm sample. However, you can do it simpler: knit a small sample (10-15 loops, 4-5 rows) and find out how many elements are in whole centimeters.
In this case, there are 3 double crochets per 1 cm, that is, initially 3 air loops. The width of the glove is 8 cm, which means 8*3 = 24 (add 1 more loop to make the pattern symmetrical = 25).
Glove knitting pattern
Rice. 1: Knitting pattern for the upper part of the right glove; Rice. 2: Knitting pattern for the bottom of the right glove.
Rice. 1: Knitting pattern for the thumb of the glove; Rice. 2: Knitting pattern for glove cuff.
Progress
We begin to knit the upper part of the glove of the right hand. We cast on a chain of 25 chain stitches + 3 chain stitches to move to the next row. We knit 2 rows with double crochets in each loop (photo 1).
In the third row we knit 6 double crochets, then we start knitting the pattern: we skip one loop, in the next we knit a “fan” of 6 double crochets, we skip one, two double crochets. We repeat the pattern element 2 more times and finish the row with double crochets (photo 2).
We knit another 8 rows with the pattern, or as many as needed for your hand size - try it on to know for sure. In the next row above the outer “fans” we knit only 3 double crochets, through one loop (photo 1).
We knit another row with a pattern element in the middle. Then 2 rows with single crochets. At this stage, the length of the part should be equal to the distance from the base of the palm to the base of the little finger ( d
).
Now you need to distribute the number of loops on each finger: 25 / 4 = 6 and one loop in reserve (6 - on the index finger; 7 - on the middle finger; 6 - on the ring finger; 6 - on the little finger).
We knit 19 double crochets, since the little finger is located slightly lower than the other fingers - we leave 6 loops for it.
Move to the next row and begin knitting the ring finger. In this case, there are only 10 rows of 6 double crochets. Finish with a “fan” of 6 double crochets in a loop in the middle of the row, fasten and cut the thread. At this stage, it is important to try the part on your hand to find out the desired finger length.
We knit the middle finger in the same way. In this case, there are only 12 rows of 7 double crochets. Finish with a “fan” of 6 double crochets in a loop in the middle of the row, fasten and cut the thread.
We knit the index finger in the same way as the ring finger.
We knit the little finger. In this case - 7 rows of 6 double crochets. Finish with a “fan” of 6 double crochets in a loop in the middle of the row, fasten and cut the thread. The upper part of the right glove is almost ready.
We tie the part in a circle with single crochets (2 single crochets for each outermost stitch, the tops of the fingers - 1 stitch in each loop and 1 stitch in the spaces between the fingers for a beautiful turn).
Now is the time to move on to knitting the lower part of the right glove, in accordance with the patterns indicated above.
We cast on a chain of 25 chain stitches + 3 chain stitches to move to the next row. We knit the lower part of the glove with double crochets. We knit so many rows so that the length of the part is equal to the distance from the base of the palm to the bend of the thumb ( in
). In this case - 10 rows (photo 1).
In the next row we leave room for the thumb. We knit 2 double crochets, skip 8 stitches (or as many as you need, try them on), above them we knit a chain of the same number of chain stitches and continue knitting with double crochets. In the next row, we knit 1 double crochet into each loop of the chain.
We knit to the base of the little finger. In this case - 3 more rows. We knit the little finger. Then we knit a row of 19 double crochets (photo 2). Then we knit the remaining fingers in the sequence: index, middle, ring.
We knit the thumb. To do this, we fasten the thread to the post adjacent to the place for the thumb, and knit 3 air loops. Then, 8 double crochets in each stitch and another double crochet for the adjacent stitch. In the next row we decrease one stitch, in the next row another one, up to 8 stitches (if the base of the thumb is wide, you can knit 2 rows without decreasing the stitches). In this case there are only 8 rows. Finish with a “fan” of 6 double crochets in a loop in the middle of the row, fasten and cut the thread.
Knit the other half of the thumb in the same way. And tie the parts with single crochets.
Now that the components of the gloves are ready, you need to connect them. To do this, you need to fold the upper and lower parts of the glove with the wrong sides inward and connect them with a hook or sew them together with a needle and thread.
Let's start knitting the cuff. To do this, we tie the glove in a circle with a pattern according to the last pattern.
Pattern report: 2 double crochets, skip 1 loop, in the next we knit a “fan” of 6 double crochets, skip one loop.
We knit the left glove symmetrically with the right one. As you work, be sure to try on the parts and make the necessary changes.
How to knit children's gloves
Another interesting model of knitted gloves is thin openwork. They are suitable for girls. same for girls. Beautiful, light, delicate - they are perfect for a beautiful outfit for a matinee, graduation or any other celebration. A detailed master class will help you learn how to crochet children's gloves.
Materials for work:
- cotton threads No. 30-40;
- hook number 1.
Progress
We start knitting gloves from the fingers. To do this, we knit 8 single stitches into the initial ring, tighten the ring, make a connecting loop in the first stitch and begin knitting with arches of 3 air stitches. loops in a circle around the cylinders, tying the index and middle fingers, try on the knitted cylinders and add arches to the base of the finger.
Connect the finished cylinders for the index and middle fingers and tie them around with 1-2 rows of the main pattern.
The next cylinder on the ring finger, also attach to the side of the middle finger and tie around now 3 cylinders.
Then it’s the turn of the little finger, attaching the cylinder of the little finger, tie the main pattern around the palm, do not forget to try on the glove while tying and, if necessary, make smaller arches between the fingers on the inside of the palm.
Having tied the glove to the thumb, attach the knitted cylinder and continue tying, making one arch decrease in each row on the inside of the palm from the point of attachment.
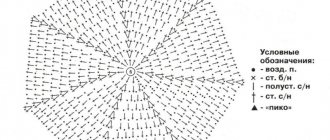
Having knitted to the end of the palm, stop decreasing and knit in the round until the required length of the glove, then tie the edge with a beautiful border according to this pattern:
How to crochet gloves for beginners: description, video
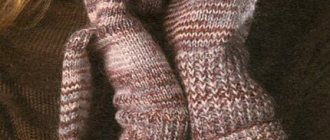
a ready-made crocheted glove of a novice needlewoman on her hand
Crochet creates original and beautiful things, which is why this tool attracts the attention of needlewomen.
Knit gloves for yourself with them to feel the difference with regular knitting needles.
The main thing for beginning needlewomen is to be able to perform the basic elements of knitting:
- air loops
- double crochet and single crochet
For a warm glove model, take 1 skein of thin wool yarn and a No. 2.5 hook.
Trace your palms with a pen on a white sheet of paper and take measurements:
hand measurements before crocheting gloves
Knit a control sample of 23 chain stitches, on which there are 4 rows of 20 double crochets. Determine the integer number of the latter in 1 cm.
Each glove consists of halves:
- rear, or external
- internal
They are knitted separately and then joined with a hook or needle. Add cuffs to them.
Back of the glove:
description of crocheting the back of a glove
Knit the other half of the glove in the same way, but leave a hole for the thumb.
- pick up air loops above it and in the next 2 rows reduce their number by a total of 4 above the hole,
- make the thumb on the glove also from 2 halves. Then fold and sew along the wrong side.
Sew the finished halves of the glove together with a hook or a needle along the front sides.
For the cuff in the round, make a row of double crochets and several rows of the pattern - 2 double crochets, skipping a loop, a fan of 6 double crochets, skipping a loop.
See pattern diagrams below:
pattern diagram for crocheting a glove cuff, option 1
pattern diagram for crocheting a glove cuff, option 2
For greater clarity, we are adding a video master class on crocheting gloves by beginning needlewomen.
Step-by-step knitting instructions
Usually mittens and gloves are knitted. Crocheted, they look more delicate and elegant. This knitting option is perfect for female models. If you choose the right color and thickness of yarn, then the men's version of this accessory will also look good.
Consider the idea of making the simplest crocheted gloves, which is suitable even for beginners.
To work you will need:
- wool yarn in various colors to suit your taste. It’s not scary if plain threads are used;
- hook No. 2.5.
The glove model has two sides - front and inner. First, the upper part is knitted.
We measure the length of the arm from the wrist to the end of the little finger and add a few more centimeters for the elastic band. We collect as many air loops as will fit in this segment. In the example given there are 38 loops.
We knit the finger. For the little finger, it was necessary to knit two rows: 1 - with a single crochet, 2 - with a single crochet.
Starting from the third row, change the color of the yarn if the threads are not monochromatic. We knit the product in a column to the place where the ring finger begins. Next, we cast on a number of air loops equal to the height of the limb.
Related article: Recipe for salted play dough for beginners with photos and videos
We continue knitting similarly to the little finger. We perform exactly the same manipulations with tying off the remaining limbs.
As a rule, to form fingers you need to knit from two to four rows.
Having knitted the index finger, we complete the work. We decorate it using a single crochet. The upper part of the glove is ready.
Making the inner side begins in exactly the same way as the first. The workpiece is knitted in the same way up to the index finger. When making it, we leave a hole for the thumb.
We tie the finished part.
We assemble the product. To do this, we tie the top and bottom together with a single crochet. We go through one row like this.
Let's start designing the thumb. On the left hole in the lower part we cast on the required number of loops. We knit them with single crochets, gradually decreasing the loops. Carefully close the top, mask the ends of the thread by pulling them inward.
The product is ready. The presented master class can be depicted in the form of diagrams that illustrate the work pattern.
This is the most basic way to create an accessory. Using imagination and ingenuity, you can knit products of different colors and lengths that will not be similar to each other.
How to crochet women's gloves: diagram with description
women's crocheted glove with ruffles on the cuffs on a girl's hand
There are so many models of crocheted women's gloves that you will definitely want to knit at least one pair for yourself.
Depending on the texture of the yarn they are:
- keep you warm in the cold
- will decorate any image
- highlight your femininity and uniqueness
Since it’s winter outside, knit yourself, for example, gloves to warm your hands.
Take:
- hook
- 100 g wool blend yarn
- sheet of paper and pencil
- ruler
Description of work:
description of work on crocheted women's gloves
An alternative job description is shown in the picture below:
description of crocheting women's gloves
The crochet pattern for women's gloves is as follows:
crochet pattern for the back of a glove
How to crochet men's gloves: diagram with description
ready-made three-color men's crochet gloves
Crochet gloves for men are larger in size and have less decoration. Needlewomen opt for yarn in calm tones for models of the stronger half of humanity.
Any of the methods discussed above will suit you. Or use alternatives:
- circular knitting
- creating a glove from 2 halves with knitting the thumb in the final
Let's take a closer look at the first one.
Prepare:
- 150 g yarn of the desired color
- hook to match the thickness of the thread
- scissors
- ruler or flexible meter
Description of work:
Description of crochet men's gloves
Make the second glove symmetrically.
How to take measurements
Whatever knitting method is chosen, an important point will be the correct measurement of the palm. When crocheting, the product turns out to be quite dense and does not stretch well, so measurements must be taken very carefully. You need to measure four parameters, after tracing your palm on a piece of paper:
- the width of the palm at the base of the fingers;
- the distance between the wrist and the base of the thumb;
- the distance between the wrist and the tip of the index finger;
- the distance between the wrist and the base of the little finger.
The choice of yarn depends on the planned model. For warm gloves, you should choose wool, acrylic or blended yarn, the main thing is that it is not too thick, otherwise the product will turn out rough. Openwork gloves are best knitted from linen, cotton or silk thread.
Crochet children's gloves: patterns
uncrocheted baby glove
Children love to play and frolic, so they definitely need freedom of their fingers. Mittens won't do it, but gloves won't.
If you are better at crocheting or want to learn how to knit warm gloves for your child, pay attention to the following pattern:
detailed description of crocheting children's gloves
And also take as a basis any scheme discussed in this article. The only point is to consider the size of the child’s hands before knitting.
Threads for knitting gloves
The middle strand of glove yarn is quite often used . This could be a baby blanket, which is very soft and pleasant to the body.
A thread of ordinary pekhorka is also often used. If the master wants to get something fluffy, then he takes into account mohair .
Summer models , or models for spring days, can be made using regular cotton threads. Something thicker than iris would look good on these gloves. You can make warmer products and even winter models, but for this it will be more profitable to use openwork inserts only on the elastic bands of such gloves, and make the base with denser patterns.
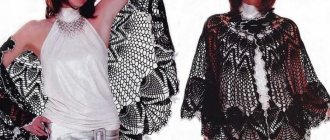
Openwork crochet gloves: diagram with description
feminine crochet gloves on a girl's hands
Crocheting gloves may conjure up more lace patterns than warm and thick ones.
There is logic in this, since only a hook will provide you with the opportunity to create the finest openwork patterns.
Whether they are laconic or with a fantasy pattern, decorations made of beads, rhinestones and pearls, such gloves will emphasize the femininity of your image.
Let us take, as an example, the work on openwork gloves with a pattern of air loop arches.
The direction of work is from the fingertips to the wrist.
You need:
- cotton in a skein 50-70 g
- thin hook
- scissors
- model to try on
Description:
description of work for lace crochet gloves
His diagram is below.
patterns and ready-made crocheted arches made from air loops
Repeat to create a second lace glove.
Be sure to try on your work at all stages of knitting.
Who needs mittens?
The smallest ones will be knitted by the mother or grandmother to the baby newborn. A preschool girl will love strawberry mittens. Boys choose mittens with several knitted fingers or no fingers at all. White, blue, pink, fluffy like a cloud - young beauties adore them. Young women will be happy to wear mittens - muffs and mittens with an openwork wrist. And business ladies will choose mittens with a top that can be unfastened like the lid of a basket: it’s convenient to take a key out of a purse, fasten a button for a child, and adjust a hat and scarf on your head.
Knitting mittens is easy. You need to get a hook, suitable threads, take measurements (length from the middle finger to the wrist, hand circumference, length of the thumb) and choose the model you like, adding your summer or other joyful memories when knitting. And warm, cozy mittens are ready!
How to crochet boxing gloves?
finished crocheted boxing gloves hanging on the wall
Original crocheted boxing gloves will be an interesting gift for men of any age. Especially for fans of this sport.
To link them, consider a few points:
- preparation of materials
- drawing a diagram indicating the parts of gloves
- the sequence of their knitting
- assembling and shaping boxing gloves
In addition to black or blue yarn and a hook, you need:
- padding polyester for filling
- needle with black/blue thread
- a piece of felt, acrylic paints and glue for making and attaching a label. But this is optional
See the picture below for a diagram of the gloves with details and the operating procedure.
knitting sequence diagram and crochet description for creating boxing gloves
Read the tables from left to right and knit the parts of the product in the same sequence.
- Fill the finished gloves with padding polyester and shape the fingers slightly bent inward. Heal the place with a needle and thread.
- Sew on a knitted strip that acts as Velcro.
- Cut out a couple of circles from felt and write the desired inscription-label on them with white paint. Either glue the felt to the finished gloves with glue, or sew it with a needle.
So, we looked at the features of crocheting gloves for adults and children, as well as creating creative models.
Treat your hands with a new item made by yourself. Perhaps you will fall in love with the hook and knit many interesting wardrobe and interior items.
Even loops for you!